Kincaid 8xp. Manual - part 11


  Index      Combines     Kincaid 8xp Combine Harvester - service manual 2012 year


Search            


Content   ..  9  10  11  12   ..


Kincaid 8xp. Manual - part 11


- 47 -

Check the Knife Fore/Aft

and Up/Down Positions.

Adjust the height by moving the drive lever

in its bearings. The fore/aft direction is

adjusted using screw joint A, fig. 55. The

up/down position is correct when the bottom

surface of the first knife section brushes the

cutting surface of the knife finger.

The fore/aft position is correct when the

knife tang and the joint fixing piece can

move freely for the whole length of the

stroke without brushing the edges of the

groove or the heads of the locking screws

on the knife finger.

Make sure the knife moves lightly when

turning the table auger drive pulley by hand

with the table disengaged.

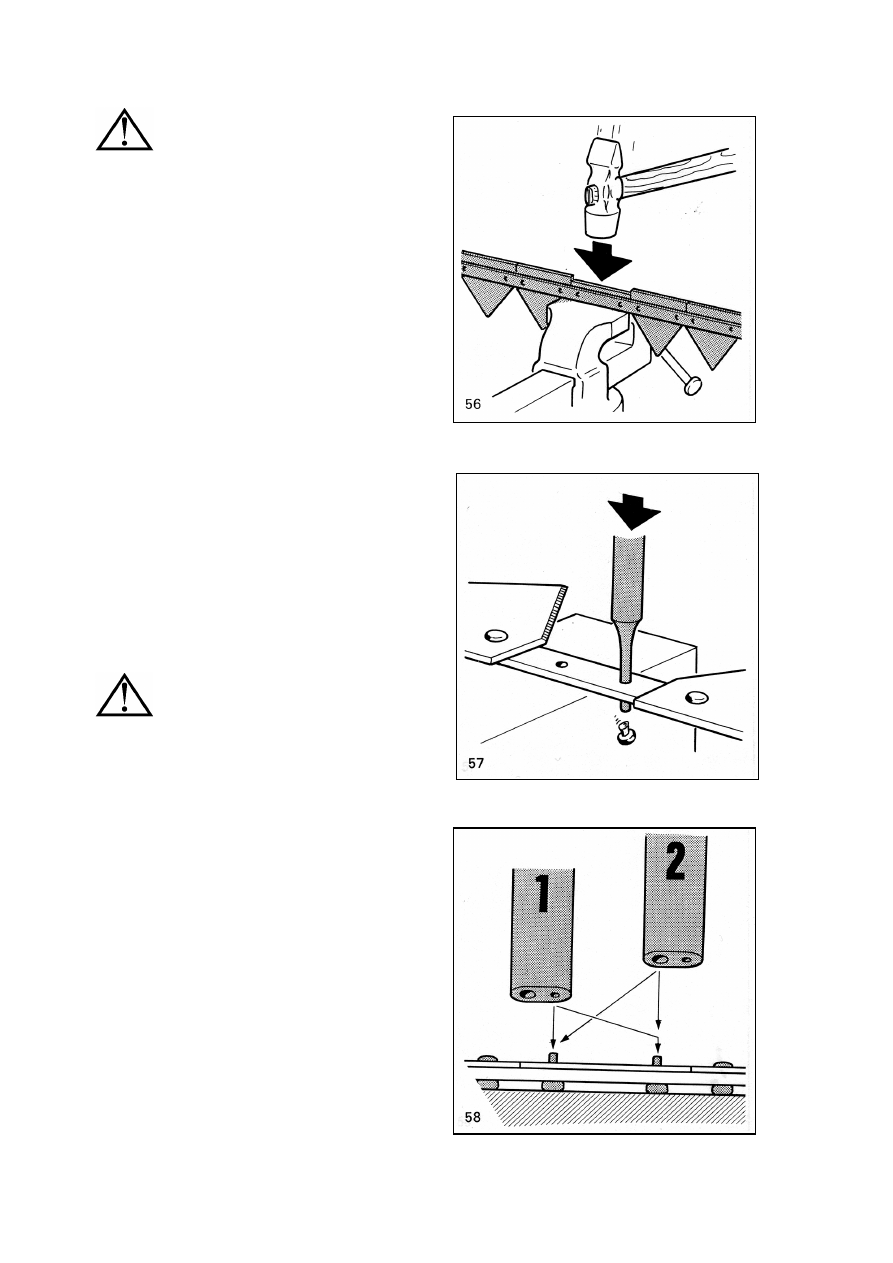
Replacing and Aligning of

a Knife Section

Remove the knife section by knocking out

the rivets according to Figs. 56 and 57. Rivet

up a new knife section. Use a riveting core

to tighten the section to knife tang 1 and

shape rivet head 2, fig. 58. Tool R 127831.

- 48 -

Align the knife sections according to Figs. 59

and 60 when replacing one.

Alignment of the Knife Fingers

Check the heightwise position of the knife

fingers. The heightwise difference between

the cutting surfaces of adjacent fingers

must not exceed 1 mm. Visual inspection

can be made by checking the alignment of

the fingers from the side of the table.

Straighten or replace bent knife fingers.

It is important to remember that the two

pairs of knife fingers on the left differ from

the other fingers.

- 49 -

Table Auger Fingers

Must Be Straight

Straighten or replace a bent 

finger. To remove the finger, which is 

necessary in both cases, open the door in 

the table auger housing and turn the auger 

until locking screw A can be unscrewed, fig. 

61.

Place reel supports before undertaking

any work!

A bent finger wears the guiding bearing

quickly, so check the condition

of the bearing when replacing a finger.

Check the Overload Clutches

of the Cutting Table Before

Starting Threshing

The function of the overload clutches 

protecting

the knife, table auger and reel must be

checked annually before starting threshing.

The best way to do this is to slacken nut A,

fig. 62, which tightens the cup spring pack,

so that spring pack B will slacken. After this,

turn belt pulley C (and the reel) to ensure

that friction plate D is not stuck. Open the

clutch, if necessary, and remove any rust 

from the friction surfaces. After checking, 

tighten the spring pack to its original 

measure E.

Table width    

Measure E

1.5 m    


12 mm

2.0 m   


12 mm

2.3 m    


11 mm

- 50 -

Removing of the TABLE in the Correct

Order

•  Lower the reel into its lowest position.

•  Stop the engine.

•  Disconnect the quick release coupling to 

the hydraulic piping of the reel and the 

electric connection on the right side of the 

crop elevator.

•  Unlock the locking between the lower 

corner of the crop elevator and the rear of 

the table, fig. P1.

•  Remove the belt guard on the left-hand 

side of the crop elevator and slacken the 

cutting table drive belt by moving jockey 

pulley A, fig P2. and remove the belt off the 

drive pulley of sliding coupling shaft.

•  Disconnect the feed cable for the table 

reverse from the quick release.

•  Disconnect the air hoses from the table on 

both side of the crop elevator.

•  Place the table support in between the 

knife fingers in the approximate centre of 

the knife as shown in fig P3.

•  Have a pallet or another appropriate 

platform ready onto which the table can be 

lowered.

•  Lower the table ensuring that the support 

remains in position and that the table 

comes away from the crop elevator.

•  Start the engine and let it run at idling.

•  Drive the table on top of the platform and 

lower it onto the support ensuring that the 

support remains in position andthat the 

crop elevator becomes disengaged from 

the table.

•  When the crop elevator is entirely off the 

table, reverse the combine checking that 

the table does not move.


Content   ..  9  10  11  12   ..