Volvo XC90 (2019 year). Instruction - part 11


  Index      Volvo     Volvo XC90 - instruction 2019 year in english


Search            


Content   ..  9  10  11  12   ..


Volvo XC90 (2019 year). Instruction - part 11


||

SEATS AND STEERING WHEEL

* Option/accessory.

196

2. Select 

Lumbar

 in the seat settings view.

Press the round button up 

/down 

to move the lumbar support upward/
downward.

Press the front part 

 of the button to

increase lumbar support.

Press the rear part 

 of the button to

decrease lumbar support.

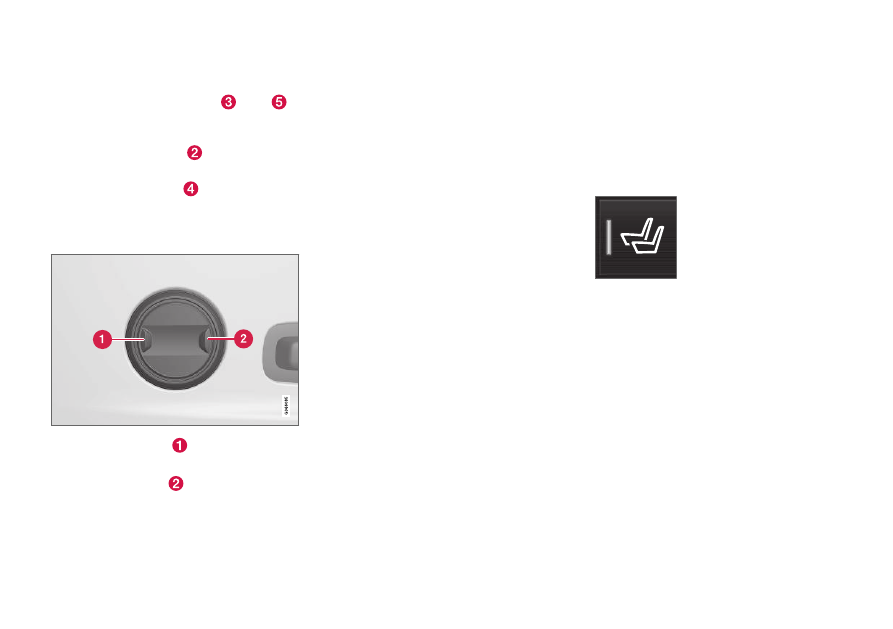
Adjusting lumbar support in vehicles
with two-way lumbar support

1. Press the front part 

 of the round button

to increase lumbar support.

2. Press the rear part 

 of the round button to

decrease lumbar support.

Related information

Manual front seats (p. 188)

Power* front seats (p. 189)

Adjusting the power* front seats (p. 189)

Storing positions for seats, mirrors and head-
up display* (p. 190)

Using stored positions for seats, mirrors and
head-up display* (p. 191)

Adjusting front seat massage settings*
(p. 193)

Adjusting* front seat cushion length (p. 193)

Front seat massage* settings (p. 192)

Adjusting front seat side bolster settings*
(p. 194)

Adjusting the passenger seat from the driv-
er's seat* (p. 196)

Adjusting the passenger seat from

the driver's seat*

The front passenger seat can be adjusted from
the driver's seat.

Activating the function

The function is activated via the function view in
the center display:

Tap the 

Adjust Passenger

Seat

 button to activate.

Adjust passenger seat

The driver must adjust the passenger seat within
10 seconds of activating the function. If no
adjustment is made within this time, the function
will be deactivated.

The driver adjusts the passenger seat using the
controls on the driver's seat:

SEATS AND STEERING WHEEL

}}

* Option/accessory.

197

Move the passenger seat forward/rearward
by moving the control forward/rearward.
Change the backrest tilt of the passenger
seat by moving the control forward/back-
ward.

Related information

Manual front seats (p. 188)

Power* front seats (p. 189)

Adjusting the power* front seats (p. 189)

Storing positions for seats, mirrors and head-
up display* (p. 190)

Using stored positions for seats, mirrors and
head-up display* (p. 191)

Adjusting front seat massage settings*
(p. 193)

Adjusting* front seat cushion length (p. 193)

Front seat massage* settings (p. 192)

Adjusting front seat side bolster settings*
(p. 194)

Adjusting front seat lumbar support* (p. 195)

Folding the second row backrests

The second row of seats has three individual
seating positions. The backrests can be folded
down separately.

WARNING

Adjust the seat and ensure it locks into
position before driving. Use caution when
adjusting the seat. Uncontrolled or care-
less adjustments could lead to injury.

Long objects must always be securely
tied down to help prevent injury or dam-
age in the event of sudden braking.

Always turn off the engine and apply the
parking brake when loading or unloading
the vehicle.

Put the gear selector in P to help prevent
the gear selector from being inadvertently
moved.

CAUTION

When the backrest is folded down, make sure
there are no objects in the rear seat, and the
seat belts are not buckled. Otherwise there is
a risk of damage to the upholstery.

||

SEATS AND STEERING WHEEL

* Option/accessory.

198

CAUTION

The seat cushion of the integrated child
restraint* must be in the stowed position
before the center seat backrest can be folded
down.

The armrest* in the center seat must be
raised before the seat backrest is folded
down.

NOTE

The front seats may need to be pushed for-
ward and/or the backrest adjusted so that the
rear seat backrests can be fully lowered.

The rear seats may also need to be moved
rearward.

The seats in the second row must be in the
upright position before they can be folded
down completely. They should not be folded
down when they are tilted forward to access
the third row of seats.

Center seat

To fold down the backrest:

1. Fold down the head restraint manually.

2. Pull the strap on the right side of the center

seat.

3. Fold the backrest down until it locks into

position. The seat cushion will move down-
ward/forward when the backrest is folded
down and create a flat surface.

To return the backrest to the upright position:

1. Pull the strap.

2. Fold up the backrest and release the strap.

Push the backrest until it locks into position.

3. Adjust the head restraint if necessary.

Outboard seats

To fold down the backrest:

NOTE

When folding down a second row seat back-
rest, always start from the seat's normal
upright position. Do not use the handle for
folding down the seat when the seat is in the
position for accessing the third row.

1. Pull up and hold the handle on the side of

the seat while the backrest is being folded
down.

SEATS AND STEERING WHEEL

}}

* Option/accessory.

199

2. Make sure that backrest and head restraint

do not come in contact with the seat in front
while the backrest is being folded down. Fold
the backrest down until it locks into position.
> The seat cushion will move downward/

forward when the backrest is folded down
and create a flat surface. The head
restraint folds down automatically when
the backrest is lowered.

WARNING

Make sure the backrest is securely locked

into position after it is folded down.

To return the backrest to the upright position:

1. Pull up and hold the handle on the side of

the seat while the backrest is being folded
up.

2. Make sure that backrest and head restraint

do not come in contact with the seat in front
while the backrest is being folded up. Fold up
the backrest and release the handle.

3. Press the backrest until it locks into position.

4. Fold up the head restraint manually.

WARNING

Make sure that the rear seat backrest and

head restraint are locked securely in place

after the seat is folded up.
The head restraints at the outer seats must

always be raised when there is a passenger in

one of these spots of the rear seat.

WARNING

The head restraints on the outboard second-

row seats must always be folded up when

there are passengers in the third row of

seats*.

Related information

Adjusting the second row head restraints
(p. 199)

Moving the second row seats forward/rear-
ward* (p. 201)

Adjusting the second row backrest tilt
(p. 201)

Getting into and out of the third row of
seats* (p. 202)

Folding the third row backrests* (p. 203)

Adjusting the second row head

restraints

Adjust the center head restraint in the rear seat
to the seat occupant's height. Fold down the
outboard head restraints* to improve rear visibil-
ity.

Adjusting the center head restraint

The center head restraint should be adjusted to
suit the passenger's height. The entire back of
the head should be covered if possible. Manually
move the restraint up or down as needed.

||

SEATS AND STEERING WHEEL

* Option/accessory.

200

To lower the restraint, press and hold the button
(located between the backrest and the head
restraint, see illustration) while carefully lowering
the head restraint.

WARNING

The center seat head restraint must be in its

lowest position when the seat is not occupied.

When the center seat is occupied, the head

restraint must be correctly adjusted to the

passenger's height, covering the entire back

of the head if possible.

Electrically folding down the rear seat's
outboard head restraints*

The outer head restraints can be folded via the
center display's function view. The head restraint
can be folded down when the vehicle is in igni-
tion mode 0.

Tap the 

Headrest Fold

 button

to activate/deactivate folding.

Manually push the head restraint until it clicks
into position.

WARNING

Do not lower the head restraint if there are

passengers in any of the rear seats.

WARNING

The head restraint must be locked in the

upright position after it has been folded up.

WARNING

The head restraints on the outboard second-

row seats must always be folded up when

there are passengers in the third row of

seats*.

Related information

Folding the second row backrests (p. 197)

Moving the second row seats forward/rear-
ward* (p. 201)

Adjusting the second row backrest tilt
(p. 201)

Getting into and out of the third row of
seats* (p. 202)

Folding the third row backrests* (p. 203)

SEATS AND STEERING WHEEL

}}

* Option/accessory.

201

Moving the second row seats

forward/rearward*

In vehicles with 7 seats*, the seats in the second
row can be moved forward or rearward individu-
ally to help optimize legroom for passengers in
the second and third rows. The second row
seats cannot be moved forward or backward in
5-seat models.

Lift the handle under the seat.

Move the seat forward or backward to the
desired position.

3. Release the handle and press the seat until

it locks into position.

Check to make sure the seat is securely locked
into place after its position has been changed.

WARNING

Adjust the seat and ensure it locks into
position before driving. Use caution when
adjusting the seat. Uncontrolled or care-
less adjustments could lead to injury.

Long objects must always be securely
tied down to help prevent injury or dam-
age in the event of sudden braking.

Always turn off the engine and apply the
parking brake when loading or unloading
the vehicle.

Put the gear selector in P to help prevent
the gear selector from being inadvertently
moved.

Related information

Folding the second row backrests (p. 197)

Adjusting the second row head restraints
(p. 199)

Adjusting the second row backrest tilt
(p. 201)

Getting into and out of the third row of
seats* (p. 202)

Folding the third row backrests* (p. 203)

Adjusting the second row backrest

tilt

Backrest tilt can be adjusted separately for each
seat in the second row.

Center seat

1. Pull the strap on the right side of the center

seat.

2. Adjust backrest tilt forward/backward by

decreasing/increasing pressure on the back-
rest.

3. Release the strap to lock the backrest in its

new position and press on the backrest until
the lock engages.

Check to make sure the seat is securely locked
into place after its position has been changed.

||

SEATS AND STEERING WHEEL

* Option/accessory.

202

Outboard seats

1. Pull the handle on the side of the seat

upward.

2. Adjust backrest tilt forward/backward by

decreasing/increasing pressure on the back-
rest.

3. Release the handle to lock the backrest in its

new position and press on the backrest until
the lock engages.

Check to make sure the seat is securely locked
into place after its position has been changed.

WARNING

Adjust the seat and ensure it locks into
position before driving. Use caution when
adjusting the seat. Uncontrolled or care-
less adjustments could lead to injury.

Long objects must always be securely
tied down to help prevent injury or dam-
age in the event of sudden braking.

Always turn off the engine and apply the
parking brake when loading or unloading
the vehicle.

Put the gear selector in P to help prevent
the gear selector from being inadvertently
moved.

Related information

Folding the second row backrests (p. 197)

Adjusting the second row head restraints
(p. 199)

Moving the second row seats forward/rear-
ward* (p. 201)

Getting into and out of the third row of
seats* (p. 202)

Folding the third row backrests* (p. 203)

Getting into and out of the third row

of seats*

The second row of seats can be adjusted for
easier access to the third row of seats*.

To fold down the backrest:

1. Pull the handle on the upper side of the right

or left outboard second row seat upward/
forward.

2. Fold the backrest down and move the entire

seat forward.

To return the seat to the upright position:

Push the seat rearward to its end position.
The backrest should then easily return to the
correct position.

SEATS AND STEERING WHEEL

}}

* Option/accessory.

203

NOTE

If a backrest in the second row of seats does
not lock back into the upright position after
being folded down (e.g. for getting in or out of
the third row of seats), it may need to be
pushed forward again and then pushed back
with more force.

WARNING

Make sure that the rear seat backrest and

head restraint are locked securely in place

after the seat is folded up.
The head restraints at the outer seats must

always be raised when there is a passenger in

one of these spots of the rear seat.

Related information

Folding the second row backrests (p. 197)

Adjusting the second row head restraints
(p. 199)

Moving the second row seats forward/rear-
ward* (p. 201)

Adjusting the second row backrest tilt
(p. 201)

Folding the third row backrests* (p. 203)

Folding the third row backrests* 

The third row has two individual seats. These
can be folded down separately.

CAUTION

To fold down the third-row seat backrests, it
may be necessary to change the position/tilt
the seats in the second row.

1. Pull the handle on the upper side of the

backrest upward/forward.

2. Make sure that backrest and head restraint

do not come in contact with the seat in front
while the backrest is being folded down. Fold
the backrest down.
> The seat cushion will move downward/

forward when the backrest is folded down
and create a flat surface. The head
restraint folds down automatically when
the backrest is lowered.

To return the seat to the upright position, fold the
backrest up manually until it locks into position.
Fold up the head restraint manually.

WARNING

Make sure that the rear seat backrest and

head restraint are locked securely in place

after the seat is folded up.
The head restraints at the outer seats must

always be raised when there is a passenger in

one of these spots of the rear seat.

Related information

Folding the second row backrests (p. 197)

Adjusting the second row head restraints
(p. 199)

Moving the second row seats forward/rear-
ward* (p. 201)

SEATS AND STEERING WHEEL

* Option/accessory.

204

Adjusting the second row backrest tilt
(p. 201)

Getting into and out of the third row of
seats* (p. 202)

Steering wheel controls and horn

The steering wheel has a horn and controls for
e.g. driver support systems and voice control.

Steering wheel keypads and paddles*.

Driver support system controls

5

.

Paddle* for manually shifting gears (auto-
matic transmission).
Controls for voice commands, adjusting the
head-up display, accessing menus and mes-
sages, and handling phone calls.

Horn

The horn is located in the center of the steering wheel.

Related information

Adjusting the steering wheel (p. 205)

5

Speed limiter, Cruise Control, Adaptive Cruise Control*, Distance Alert* and Pilot Assist.

SEATS AND STEERING WHEEL

* Option/accessory.

205

Adjusting the steering wheel

The steering wheel can be adjusted to various
positions.

The steering wheel's reach and height can be adjusted.

WARNING

Adjust the steering wheel and ensure it locks

into position before driving. Never adjust the

steering wheel while driving.

Steering wheel force can be adjusted with
speed-dependent power steering. Steering wheel
force is adjusted according to the vehicle's speed
to give the driver an enhanced sense of control
and stability.

Steering wheel adjuster lever.

1. Move the lever forward to release the steer-

ing wheel.

2. Adjust the steering wheel to the desired

position.

3. Pull the lever back to lock the steering wheel

into place. If the lever is difficult to move,
press the steering wheel lightly while pulling
the lever.

Related information

Steering wheel controls and horn (p. 204)

Adjusting the power* front seats (p. 189)

CLIMATE CONTROL

CLIMATE CONTROL

* Option/accessory.

208

Climate

The vehicle is equipped with electronic climate
control. The climate system cools, heats and
dehumidifies the air in the passenger compart-
ment.

All of the climate system functions are controlled
from the center display and the buttons on the
center console.

Certain rear seat functions can also be controlled
from the climate controls* on the rear of the tun-
nel console.

Related information

Climate zones (p. 208)

Climate control sensors (p. 209)

Perceived temperature (p. 209)

Climate control system voice commands
(p. 210)

Parking climate* (p. 236)

Air quality (p. 211)

Air distribution (p. 214)

Climate system controls (p. 219)

Climate zones

The vehicle is divided into climate zones to make
it possible to set different temperatures for dif-
ferent parts of the passenger compartment.

2-zone climate system

Climate zones with 2-zone climate system.

In 2-zone climate systems, the passenger com-
partment temperature can be set separately for
the left and right sides of the vehicle.

4-zone climate system*

Climate zones with 4-zone climate system.

In 4-zone climate systems, the passenger com-
partment temperature can be set separately for
the left and right sides of the vehicle, and for the
front and rear seats.

Related information

Climate (p. 208)

CLIMATE CONTROL

* Option/accessory.

209

Climate control sensors

The climate system has a number of sensors to
help regulate the climate settings in the vehicle.

Location of the sensors

Humidity sensor - in the rearview mirror con-
sole.
Ambient temperature sensor - in the right-
side door mirror.
Passenger compartment temperature sensor
- near the buttons in the center console.
Sunlight sensors - on the upper side of the
dashboard.

NOTE

Do not cover or block the sensors with cloth-
ing or other objects.

On vehicles equipped with the Interior Air Quality
System*, there is also an air quality sensor in the
climate system's air intake.

Related information

Climate (p. 208)

Interior Air Quality System* (p. 212)

Perceived temperature

The climate control system regulates the climate
in the passenger compartment based on per-
ceived temperature, not actual temperature.

The selected passenger compartment tempera-
ture is based on the physical perception of the
current ambient temperature, airflow speed,
humidity, sunlight in the passenger compartment,
etc.

The system has a sunlight sensor that detects
which side of the vehicle the sunlight is shining
on and adjusts the temperature accordingly. This
means that the temperature of the air coming out
of the vents may be different for the left and right
sides, even if the temperature setting is the same
for both sides.

Related information

Climate (p. 208)

CLIMATE CONTROL

* Option/accessory.

210

Climate control system voice
commands

1

Voice commands can be used for the climate
control system to e.g. change temperature, acti-
vate seat heating* or change blower speed.

Tap 

 and say one of the following commands:

"

Climate

" - starts a command dialog for cli-

mate controls and provides examples of
commands that can be used.

"

Set temperature to X degrees

" - sets

desired temperature.

"

Raise temperature

"/"

Lower

temperature

" - raises/lowers the set tem-

perature.

"

Sync temperature

" - synchronizes the

temperature for all climate zones in the vehi-
cle with the temperature set for the driver's
side.

"

Air on feet

"/"

Air on body

" - opens the

desired air vent.

"

Air on feet off

"/"

Air on body off

" - closes

the desired air vent.

"

Set fan to max

"/"

Turn off fan

" - changes

blower speed to 

Max

/

Off

.

"

Raise fan speed

"/"

Lower fan speed

" -

raises/lowers the set blower speed.

"

Turn on auto

" - activates automatic climate

control.

"

Air condition on

"/"

Air condition off

" -

activates/deactivates air conditioning.

"

Recirculation on

"/"

Recirculation off

" -

activates/deactivates air recirculation.

"

Turn on defroster 

"/"

Turn off defroster

"

- activates/deactivates window and door mir-
ror defrosting.

"

Turn on max defroster

"/"

Turn off max

defroster

" - activates/deactivates max

defroster.

"

Turn on electric defroster

"/"

Turn off

electric defroster

" - activates/deactivates

heated windshield*.

"

Turn on rear defroster

"/"

Turn off rear

defroster

" - Activates/deactivates heated

rear window and door mirrors.

"

Turn steering wheel heat on

"/"

Turn

steering wheel heat off

" - activates/deac-

tivates heated steering wheel*.

"

Raise steering wheel heat

"/"

Lower

steering wheel heat

" - raises/lowers the

level of steering wheel heating*.

"

Turn on seat heat

"/"

Turn off seat heat

"

- activates/deactivates seat heating*.

"

Raise seat heat

"/"

Lower seat heat

" -

raises/lowers the level of seat heating*.

"

Turn on seat ventilation

"/"

Turn off seat

ventilation

" - activates/deactivates seat

ventilation*.

"

Raise seat ventilation

"/"

Lower seat

ventilation

" - raises/lowers the level of seat

ventilation*.

Related information

Climate (p. 208)

Voice control (p. 147)

Using voice commands (p. 148)

Voice control settings (p. 150)

1

Certain markets only.

CLIMATE CONTROL

}}

* Option/accessory.

211

Air quality

The materials used in the passenger compart-
ment and air filtering system have been selected
to ensure a high level of air quality in the passen-
ger compartment.

Materials used in the passenger
compartment

The materials in the passenger compartment are
designed to be pleasant and comfortable, even
for people with asthma or allergies.

The materials have been developed and tested to
minimize dust in the passenger compartment and
make it easier to keep clean.

The mats in both the passenger compartment
and cargo compartment can be easily removed
for cleaning.

Use Volvo-recommended cleaning agents and
car care products to clean the interior.

Air filtering systems

In addition to the passenger compartment filter,
the Clean Zone Interior Package* and Interior Air
Quality System* also help maintain high air qual-
ity in the passenger compartment.

Related information

Climate (p. 208)

Clean Zone* (p. 211)

Clean Zone Interior Package* (p. 212)

Interior Air Quality System* (p. 212)

Passenger compartment air filter (p. 213)

Clean Zone*

The Clean Zone function monitors the condi-
tions affecting good air quality in the passenger
compartment and indicates whether they are ful-
filled or not.

The indicator is shown in the center display's
Climate view.
The indicator is shown in the climate bar
when Climate view is not open.

If the conditions are not met, the text 

Clean

Zone

 will be shown in white. When all the condi-

tions are met, the text will change to blue.

Clean Zone monitors whether:

All doors and tailgate are closed.

All side windows and panoramic roof* are
closed.

The Interior Air Quality System* is activated.


Content   ..  9  10  11  12   ..