Volvo XC90 Twin Engine (2019 year). Instruction - part 26


  Index      Volvo     Volvo XC90 Twin Engine - instruction 2019 year in english


Search            


Content   ..  24  25  26  27   ..


Volvo XC90 Twin Engine (2019 year). Instruction - part 26


STARTING AND DRIVING

* Option/accessory.

434

Starting the vehicle

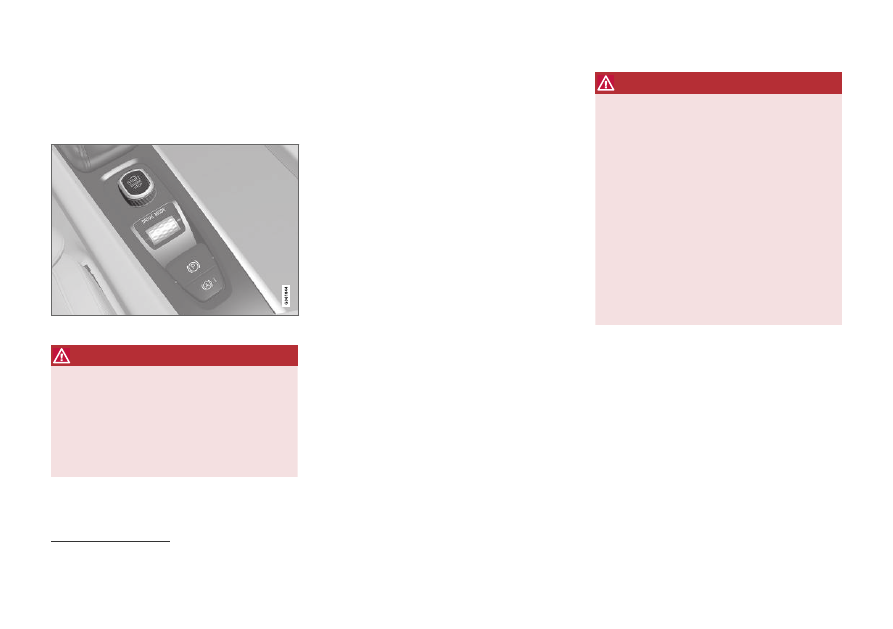
The vehicle can be started using the start knob
in the tunnel console when the remote key is in
the passenger compartment.

Start knob in the tunnel console.

WARNING

Before starting:

Buckle your seat belt.

Adjust the seat, steering wheel and mir-
rors.

Make sure you can fully depress the
brake pedal.

The remote key is not physically used to start the
ignition because the vehicle is equipped with the
keyless Passive Start system.

To start the vehicle:

1. The remote key must be inside the vehicle.

For vehicles with Passive Start, the key must
be in the front section of the passenger
compartment. With the optional keyless lock-
ing/unlocking function*, the key can be any-
where in the vehicle.

2. Press and hold down the brake pedal

1

 as far

as possible.

3. Turn the start knob clockwise and release.

The control will automatically return to the
original position.

WARNING

Never use more than one inlay mat at a
time on the driver's floor. If any other type
of floor mat is used, remove the original
mat from the driver's seat floor before
driving. All types of mats must be securely
anchored in the attachment points in the
floor. Make sure the floor mat does not
impede the movement of the brake pedal
or accelerator pedal in any way, as this
could be a serious safety hazard.

Volvo's floor mats are specially manufac-
tured for your vehicle. They must be prop-
erly secured in the attachment points in
the floor to help ensure they cannot slide
and become trapped under the pedals.

The starter motor will crank until the engine
starts or until overheating protection is triggered.

During normal start conditions, the vehicle's elec-
tric motor will be prioritized and the gasoline
engine will remain off. This means that once the
start knob is turned clockwise, the electric motor
has been "started" and the vehicle is ready to be
driven. The warning and information symbols in
the instrument panel will go out and the selected
theme will be displayed to indicate that the elec-
tric motor is activated.

1

If the vehicle is moving, it is only necessary to turn the start knob clockwise to start the engine.

STARTING AND DRIVING

}}

435

In some situations, such as in cold weather or if
the hybrid battery's charge level is too low, the
gasoline engine will start instead.

The vehicle should not be started with the charg-
ing cable connected. However, if the cable can-
not be pulled out or if the vehicle incorrectly
detects a cable that is not connected, the vehicle
can be started using an override procedure:

1. Press the brake pedal and turn the start

knob clockwise.

2.

Charge cable


Remove before start

 will

appear in the instrument panel.

3. Turn the start knob clockwise again.

4.

Removed? Turn and hold start knob 7s

will appear. Turn the knob clockwise and hold
it for 7 seconds to start the vehicle.

Location of the backup reader in the tunnel console.

If the 

Vehicle key not found

 message is shown

in the instrument panel at start, place the remote
key at the backup reader and then make a new
start attempt.

NOTE

When the remote key is placed in the backup
reader, make sure that no other vehicle keys,
metal objects or electronic devices (e.g. cellu-
lar phones, tablets, laptops or chargers) are in
the backup reader. Multiple vehicle keys close
to each other in the backup reader can dis-
rupt their functionality.

If 

Vehicle start


System check, wait

 is dis-

played in the instrument panel while attempting
to start the vehicle, wait until the message disap-
pears and try again to start the vehicle.

CAUTION

If the engine has not responded after 3
attempts – wait for 3 minutes before starting
a new attempt. Starting capability increases if
the starter battery is given time to recover.

NOTE

The vehicle cannot be started if the hybrid
battery is discharged.

WARNING

Never remove the remote control key from

the vehicle while driving.

WARNING

Always remove the remote key from the
passenger compartment when you leave
the vehicle and make sure the ignition is
in mode 0.

Always put the gear selector in P and
apply the parking brake before leaving
the vehicle. Never leave the vehicle unsu-
pervised while the engine is running.

Always open the garage door fully and
make sure that ventilation is very good
before starting the engine in a garage.
The exhaust fumes produced by the vehi-
cle contain carbon monoxide, which is
invisible and odorless but very toxic.

NOTE

With a cold start, idling speed may be consid-
erably higher than normal for certain engine
types. This is done to get the emissions sys-
tem up to normal operating temperature as
quickly as possible, which minimizes exhaust
emissions and protects the environment.

||

STARTING AND DRIVING

436

CAUTION

When starting in cold weather, the auto-
matic transmission may shift up at slightly
higher engine speeds than normal until
the automatic transmission fluid reaches
normal operating temperature.

Do not race a cold engine immediately
after starting. This could prevent fluids
from properly lubricating vital compo-
nents in the engine before it has reached
the proper operating temperature.

The engine should be idling when the
gear selector is moved. Never accelerate
until the gear is fully engaged. Accelerat-
ing rapidly before a gear is properly
engaged could lead to harder wear of
components.

To help prevent the transmission oil from
overheating, select P or N when idling at
a standstill for prolonged periods of time.

Related information

Switching off the vehicle (p. 436)

Ignition modes (p. 437)

Adjusting the steering wheel (p. 201)

Jump starting using another battery (p. 481)

Selecting ignition mode (p. 438)

Switching off the vehicle

The vehicle can be switched off using the start
knob in the tunnel console.

Start knob in the tunnel console.

To switch off the vehicle:

Turn the start knob clockwise and release to
switch off the vehicle. The control will auto-
matically return to the original position.

If the vehicle rolls:

Turn clockwise and hold the knob until the
vehicle switches off.

Related information

Starting the vehicle (p. 434)

Ignition modes (p. 437)

Adjusting the steering wheel (p. 201)

Jump starting using another battery (p. 481)

Selecting ignition mode (p. 438)

STARTING AND DRIVING

* Option/accessory.

437

Ignition modes

The vehicle's ignition can be put in various
modes (levels) to make different functions availa-
ble.

To enable the use of a limited number of func-
tions when the engine is not running, the ignition
can be put in one of three different levels: 0, I
and II. These levels are referred to as "ignition
modes" in the Owner's Manual.

The following table shows which functions are
available in each ignition mode:

Mode

Functions

0

The odometer, clock and tem-
perature gauge are illuminated

A

.

The power* seats can be
adjusted.

The power windows can be used.

The center display is activated
and can be used

A

.

The infotainment system can be
used

A

.

In this mode, the functions are availa-
ble for a limited time and then switch
off automatically.

I

The panoramic roof, power win-
dows, 12-volt electrical socket in
the passenger compartment,
Bluetooth, navigation, phone,
blower and windshield wipers can
be used.

The power seats can be adjusted.

The 12-volt electrical socket* in
the cargo compartment can be
used.

Electrical current will be taken
from the battery in this ignition
mode.

Mode

Functions

II

The headlights illuminate.

Warning/indicator lights illumi-
nate for 5 seconds.

A number of other systems are
activated. However, seat and rear
window heating can only be acti-
vated when the engine is running.

This ignition mode uses a lot of
current from the battery and
should be avoided whenever pos-
sible!

A

Also activated when the door is opened.

Related information

Starting the vehicle (p. 434)

Adjusting the steering wheel (p. 201)

Jump starting using another battery (p. 481)

Selecting ignition mode (p. 438)

STARTING AND DRIVING

438

Selecting ignition mode

The vehicle's ignition can be put in various
modes (levels) to make different functions availa-
ble.

Selecting an ignition mode

Start knob in the tunnel console.

Ignition mode 0 - Unlock the vehicle and
keep the remote key in the passenger com-
partment.

NOTE

To set level I or II without engine start – do
not depress the brake pedal (or clutch pedal
for vehicles with manual transmission) when
selecting this ignition mode.

Ignition mode I - Turn the start knob clock-
wise and release it. The control will automati-
cally return to the original position.

Ignition mode II - Turn the start knob clock-
wise and hold it there for approx. 5 seconds.
Release the knob, which will automatically
return to its original position.

Back to ignition mode 0 - To return to igni-
tion mode 0 from mode I and II, turn the start
knob clockwise and release it. The control
will automatically return to the original posi-
tion.

Related information

Starting the vehicle (p. 434)

Switching off the vehicle (p. 436)

Ignition modes (p. 437)

Adjusting the steering wheel (p. 201)

Jump starting using another battery (p. 481)

Brake functions

The vehicle's brakes are used to reduce speed
or prevent the vehicle from rolling.

In addition to the wheel brakes and parking
brakes, the vehicle is also equipped with a num-
ber of automatic brake assist functions. These
systems help the driver by e.g. keeping the vehi-
cle stationary when the brake pedal is not
depressed (e.g. at a traffic light or intersection),
when starting up a hill or when driving down a hill.

Depending on how the vehicle is equipped, the
following brake assist functions may be included:

Auto-hold brakes (Auto Hold)

Hill Start Assist (Hill Start Assist)

Braking assist after a collision

City Safety

Hill Descent Control (Hill Descent Control)

Related information

Brakes (p. 439)

Parking brake (p. 442)

Auto-hold brakes (p. 446)

Braking assist after a collision (p. 447)

Hill Start Assist (p. 447)

City Safety™ (p. 341)

Hill Descent Control (p. 466)

STARTING AND DRIVING

}}

439

Brakes

The brake pedal is used to apply the vehicle's
regular brakes, which are part of the brake sys-
tem.

The vehicle is equipped with two brake circuits. If
one brake circuit is damaged, the brake pedal will
go down further when depressed. More pressure
will then be required from the driver for normal
braking effect.

WARNING

The power brakes only work when the electric

motor or combustion engine is running.

If the brake pedal is used when the engine is
switched off, greater pressure must be applied to
brake the vehicle.

In very hilly areas or when driving with a heavy
load, gear position B can be used to augment the
brakes with engine braking.

Use the Off Road drive mode to increase the
engine braking effect when driving on steep
downgrades at low speeds.

Anti-lock brakes

The vehicle is equipped with an Anti-lock Braking
System (ABS), which helps prevent the wheels
from locking and helps maintain steering control
when braking. Vibrations may be felt from the

brake pedal when ABS is operating, which is nor-
mal.

After the vehicle is started, a brief test of the
ABS system is automatically performed when the
driver releases the brake pedal. An additional
automatic test of the system may be performed
when the vehicle is traveling at a low speed. Dur-
ing the test, the brake pedal may feel as though it
is pulsating.

Light braking charges the hybrid battery

When the brakes are applied lightly, the electric
motor braking function is used. This converts the
vehicle's kinetic energy into electrical energy,
which is used to charge the hybrid battery. When
the battery is being charged with the electric
motor braking function, this will be indicated in
the instrument panel.

When the battery is being charged with the electric
motor braking function, this will be indicated in the
instrument panel.

This function is active at speeds in the range of
150-5 km/h (93-3 mph). When braking at
speeds outside of this range, or during harder
braking, the hydraulic braking system is used to
augment braking. This is indicated in the instru-
ment panel with the pointer down in the red area.

||

STARTING AND DRIVING

440

Symbols in the instrument panel

Symbol

Meaning

A

B

Check the brake fluid level. If the
level is low, fill brake fluid and
check to determine the reason for
the loss of brake fluid.

A

B

Fault in pedal sensor.

Symbol

Meaning

A

B

Steady glow for 2 seconds after
the engine is started: Automatic
function check.

Steady glow for more than 2 sec-
onds: Fault in the ABS system. The
vehicle's regular brake system is
still working, but without the ABS
function.

If the message 

Brake pedal


Cha-

racteristics changed Service
required

 is displayed, the "Brake-

by-wire" system is not functioning
properly. Greater pressure will be
required to brake the vehicle.

A

In Canada.

B

In the US.

WARNING

If the warning symbols for both brake fault

and ABS fault are lit simultaneously, there

may be a fault in the brake system.

If the brake fluid reservoir level is normal
when this occurs, drive carefully to the
nearest workshop to have the brake sys-
tem checked - an authorized Volvo work-
shop is recommended.

If the brake fluid has fallen below the MIN
level in the brake fluid reservoir, the vehi-
cle should not be driven until the brake
fluid has been filled. The reason for the
brake fluid loss must be checked.

Related information

Brake Assist System (p. 441)

Auto-hold brakes (p. 446)

Hill Start Assist (p. 447)

Braking on wet roads (p. 441)

Braking on salted roads (p. 441)

Maintenance of the brake system (p. 442)

Brake lights (p. 160)

STARTING AND DRIVING

441

Brake Assist System

The brake enhancing system, Brake Assist
System (BAS), helps increase braking force and
thereby reduce braking distance.

The system monitors the driver's braking habits
and increases braking force when necessary.
Braking force can be increased up to the point at
which the ABS intervenes. The function is deacti-
vated when pressure on the brake pedal is
decreased.

Related information

Brakes (p. 439)

Braking on wet roads

Prolonged driving in heavy rain without braking
may cause braking effect to be slightly delayed
the first time the brakes are applied.

This may also occur after washing the vehicle. It
will then be necessary to apply greater pressure
to the brake pedal. You should therefore maintain
a greater distance to the vehicle ahead.

Firmly apply the brakes after washing the vehicle
or driving on wet roads. This helps warm up the
brake discs, enabling them to dry more quickly
and protecting them against corrosion. Consider
the current traffic situation when braking.

Related information

Brakes (p. 439)

Braking on salted roads (p. 441)

Braking on salted roads

When driving on salted roads, a layer of salt may
form on the brake discs and brake pads.

This could increase stopping distance. Maintain
an extra large safety distance to the vehicle
ahead. Make sure to also:

Apply the brakes from time to time to help
remove salt. Make sure braking does not
pose a risk to any other road users.

Gently apply the brakes when you have fin-
ished driving and before driving again.

Related information

Brakes (p. 439)

Braking on wet roads (p. 441)

STARTING AND DRIVING

442

Maintenance of the brake system

Regularly check the brake system components
for wear.

To keep the vehicle as safe and reliable as possi-
ble, follow the Volvo service schedule specified in
the Warranty and Maintenance Records Informa-
tion booklet. New and replaced brake pads and
brake discs do not provide optimal braking effect
until they are "broken in" by driving a few hun-
dred kilometers (miles). Compensate for the
reduced braking effect by applying greater pres-
sure to the brake pedal. Volvo recommends only
using brake pads approved for your Volvo.

CAUTION

The brake system's components should be
regularly checked for wear.

Contact a workshop for advice on how to do
this or let a workshop perform the inspection
- an authorized Volvo workshop is recom-
mended.

Related information

Brakes (p. 439)

Parking brake

The parking brake helps keep the vehicle sta-
tionary by mechanically locking two wheels.

The parking brake controls are located in the tunnel
console between the seats.

When the electric parking brake is being applied,
a faint sound can be heard from the brake's elec-
tric motor. This sound can also be heard during
the automatic function check of the parking
brake.

If the vehicle is stationary when the parking brake
is applied, it will only be applied to the rear
wheels. If it is applied while the vehicle is moving,
the normal brakes will be used on all four wheels.
Braking will be transferred to only the rear
wheels when the vehicle is almost stopped.

Related information

Activating and deactivating the parking brake
(p. 443)

Parking on a hill (p. 444)

Parking brake malfunction (p. 445)

Auto-hold brakes (p. 446)

STARTING AND DRIVING

}}

443

Activating and deactivating the

parking brake

Use the parking brake to help keep the vehicle
stationary when it is parked.

Activating the parking brake

1. Pull up the control.

> The symbol in the instrument panel will

illuminate when the parking brake is acti-
vated.

2. Make sure the vehicle is stationary.

Symbol in the instrument panel

Symbol

Meaning

A

B

The symbol will be illuminated
when the parking brake is acti-
vated.

A flashing symbol indicates that a
fault has been detected. Read the
message in the instrument panel.

A

In Canada.

B

In the US.

Automatic activation

The parking brake is applied automatically:

when the ignition is switched off and the set-
ting for automatically activating the parking
brake is activated in the center display.

if the Auto-hold function (automatic brake
application when the vehicle is stationary) is
activated and the vehicle has been stationary
for a prolonged period of time (5-10
minutes).

when the gear selector is moved to P on a
steep hill.

Emergency braking

In an emergency, the parking brake can be acti-
vated when the vehicle is moving by pulling and

holding up the control. The braking process is
canceled when the control is released or if the
accelerator pedal is depressed.

NOTE

In case of emergency braking at high speeds,
a signal sounds during the brake procedure.

Deactivating the parking brake

Deactivating manually

1. Depress the brake pedal firmly.

2. Press the control.

> The parking brake will release and the

symbol in the instrument panel will go out.

||

STARTING AND DRIVING

444

Deactivating automatically

1. Fasten your seat belt.

2. Depress the brake pedal firmly.

3. Start the vehicle.

4. Move the gear selector to D or R and press

the accelerator pedal.
> The parking brake will release and the

symbol in the instrument panel will go out.

NOTE

When the vehicle is initially started, the park-
ing brake could disengage automatically even
if the driver's seat belt is not buckled.

Related information

Settings for automatically activating the park-
ing brake (p. 444)

Parking brake malfunction (p. 445)

Parking brake (p. 442)

Parking on a hill (p. 444)

Settings for automatically activating

the parking brake

Choose whether the parking brake should be
activated automatically when the vehicle is
switched off.

This selection is made in the Settings menu in
the center display.

1. Tap 

Settings

 in the Top view.

2. Tap 

My Car

Parking Brake and

Suspension

 and select or deselect the

Auto Activate Parking Brake

 function.

Related information

Activating and deactivating the parking brake
(p. 443)

Parking brake (p. 442)

Parking on a hill

Always use the parking brake when parking on a
hill.

WARNING

Always apply the parking brake when parking

on an incline. Selecting a gear or putting the

automatic transmission in P may not be suffi-

cient to keep the vehicle stationary in all sit-

uations.

If the vehicle is pointing uphill:

Turn the front wheels so they are pointing
away from the curb.

If the vehicle is pointing downhill:

Turn the front wheels so they are pointing
toward the curb.

Heavy load uphill

Heavy loads, such as a trailer, could cause the
vehicle to roll backward when the parking brake
is released automatically on steep uphill gradi-
ents. To help avoid this, pull the control upward
while you are driving away. Release the control
when the vehicle gains traction.

Related information

Activating and deactivating the parking brake
(p. 443)

STARTING AND DRIVING

445

Parking brake malfunction

If you are unable to deactivate or activate the
parking brake after several attempts, contact an
authorized Volvo workshop.

A audible warning signal will sound if the parking
brake is applied while the vehicle is being driven.

If the vehicle must be parked before the problem
is rectified, turn the wheels as when parking on
an incline and put the gear selector in P.

Low battery charge level

If the battery charge level is too low, it will not be
possible to apply or release the parking brake.
Connect an auxiliary battery to the vehicle if the
battery is discharged.

Replacing brake pads

Due to the design of the electric parking brake,
the rear brake pads must be replaced by a work-
shop. An authorized Volvo workshop is recom-
mended.

Symbols in the instrument panel

Symbol

Meaning

A

B

A flashing symbol indicates that a
fault has been detected. See the
message in the instrument panel.

A

B

Fault in the brake system. See the
message in the instrument panel.

Information message in the instru-
ment panel.

A

In Canada.

B

In the US.

Related information

Activating and deactivating the parking brake
(p. 443)

Start battery (p. 627)

Volvo's service program (p. 610)

STARTING AND DRIVING

446

Auto-hold brakes

With the Auto-hold brake function, the driver can
release the brake pedal and the brakes will
remain applied, for example, when the vehicle
has stopped at a traffic light or intersection.

When the vehicle stops, the brakes are activated
automatically. The function can use either the
normal brakes or the parking brakes to keep the
vehicle stationary and works on flat surfaces or
hills. When driving off, the brakes will be automat-
ically released if the driver's seat belt is buckled.

NOTE

When braking to a stop on an uphill or down-
hill gradient, depress the brake pedal with
slightly more force than usual before releas-
ing to ensure that the vehicle cannot move at
all.

The parking brake is activated if:

the vehicle is switched off

the driver's door is opened

the driver's seat belt is removed

the vehicle has been stationary for a pro-
longed period of time (5-10 minutes)

Symbols in the instrument panel

Symbol

Meaning

This symbol illuminates when the
function is using the normal brakes
to keep the vehicle stationary.

A

B

This symbol illuminates when the
function is using the parking brake
to keep the vehicle stationary.

A

Canadian models.

B

US models.

Related information

Activating and deactivating Auto-hold at a
standstill (p. 446)

Brakes (p. 439)

Parking brake (p. 442)

Hill Start Assist (p. 447)

Activating and deactivating Auto-

hold at a standstill

The Auto-hold brake function at a standstill is
activated with the button in the tunnel console.

Press the button in the tunnel console to
activate or deactivate the function.
> The indicator light in the button will illumi-

nate when the function is activated. The
function will remain active the next time
the vehicle is started.

STARTING AND DRIVING

}}

447

When shutting off

If the function is active and holding the
vehicle stationary using the normal
brakes (A symbol lit), the brake pedal
must be depressed while pressing the

button in order to deactivate Auto-hold.

The function will remain off until it is reactiva-
ted.

When Auto-hold is switched off, Hill Start
Assist (HSA) will remain active to help pre-
vent the vehicle from rolling backward when
starting up a hill.

Related information

Auto-hold brakes (p. 446)

Hill Start Assist

The function for assisting when starting the vehi-
cle on inclines, Hill Start Assist (HSA), helps
prevent the vehicle from rolling backward when
starting on an uphill gradient. When backing up
a hill, HSA helps prevent the vehicle from rolling
forward.

The function retains pressure from the brake
pedal in the brake system for several seconds
after the brake pedal has been released.

This temporary braking effect is released after a
few seconds or when the driver begins driving.

Hill Start Assist is available even if the Auto-hold
brake function is switched off.

Related information

Auto-hold brakes (p. 446)

Brakes (p. 439)

Braking assist after a collision

In a collision in which the activation level is
reached for the pyrotechnic seat belt tensioners
or airbags, or if a collision with a large animal is
detected, the vehicle's brakes will be automati-
cally activated. This function is intended to help
prevent or reduce the effects of any subsequent
collision.

After a serious collision, it may no longer be pos-
sible to control and steer the vehicle. In order to
avoid or mitigate a possible further collision with
a vehicle or an object in the vehicle's path, the
brake assist system is activated automatically to
help stop the vehicle safely.

The brake lights and hazard warning flashers are
activated during braking. When the vehicle has
stopped, the hazard warning flashers will con-
tinue to flash and the parking brake will be
applied.

If braking is not appropriate, e.g. if there is a risk
of being hit by passing traffic, the driver can over-
ride the system by depressing the accelerator
pedal.

This function assumes that the brake system is
intact after a collision.

Brake assist is part of the Rear Collision Warning
and Blind Spot Information safety systems.

||

STARTING AND DRIVING

* Option/accessory.

448

Related information

Rear Collision Warning (p. 354)

BLIS* (p. 355)

Brake functions (p. 438)

Transmission

The transmission is part of the vehicle's driveline
(power transmission) between the engine and
the drive wheels. The function of the transmis-
sion is to change gears depending on speed
and power needs.

The vehicle has an 8-speed automatic transmis-
sion and an electric motor for rear-wheel drive.
The number of gears allows the engine's torque
and power band to be effectively utilized. Two of
the gears are overdrive gears that save fuel when
driving at a constant engine speed. The steering
wheel paddles* can be used to shift up or down
manually. The instrument panel shows the gear
currently in use.

CAUTION

Check the operating temperature of the
transmission to help avoid damage to any of
the drive system components. If there is a risk
of overheating, a warning symbol will appear
in the instrument panel and a text message
will be displayed. Follow the recommenda-
tions given.

Symbols in the instrument panel

If a problem should occur with the transmission, a
symbol and a message will appear in the instru-
ment panel.

Symbol

Meaning

Information and messages related
to the transmission. Follow the rec-
ommendations provided.

Hot or overheated transmission.
Follow the recommendations provi-
ded.

Reduced performance

/

Acceler-

ation performance reduced

In the event of a temporary fault in
the driveline, the vehicle may go
into a "limp home" mode with
reduced power output to help avoid
damage to the driveline.

Related information

Gear selector positions for automatic trans-
missions (p. 449)

STARTING AND DRIVING

}}

449

Gear selector positions for

automatic transmissions

In vehicles with an automatic transmission, the
system selects the optimal gear for the current
driving conditions. The transmission also has a
manual mode.

The instrument panel shows which gear is cur-
rently in use:

P

R

N

D

 or 

B

.

For manual shifting, the gear indicator in the
instrument panel displays the gear currently
being used (1-8).

Selecting gears

The gear selector is a shift-by-wire selector,
where shifting is done electronically instead of
mechanically. This makes shifting easier and the
gear positions more distinct.

Select gears by moving the spring-loaded, non-
locking gear selector forward or backward.

Gear selector positions

Park - P

Park is activated using the P button located next
to the gear selector.

Select P when the vehicle is parked or when star-
ting the engine. The vehicle must be stationary
when Park is selected.

To move to another gear from Park, the brake
pedal must be depressed and the ignition in
mode II.

When parking – apply the parking brake before
shifting to Park.

WARNING

Always apply the parking brake when parking

on an incline. Selecting a gear or putting the

automatic transmission in P may not be suffi-

cient to keep the vehicle stationary in all sit-

uations.

NOTE

The gear selector must be in the P position
before the vehicle can be locked and the
alarm set.


Content   ..  24  25  26  27   ..