Volvo XC90 Twin Engine (2019 year). Instruction - part 16


  Index      Volvo     Volvo XC90 Twin Engine - instruction 2019 year in english


Search            


Content   ..  14  15  16  17   ..


Volvo XC90 Twin Engine (2019 year). Instruction - part 16


||

KEY, LOCKS AND ALARM

* Option/accessory.

274

In the event of alarm system failure

If a problem is detected in the alarm
system, a symbol and the message

Alarm system failure


Service

required

 will appear in the instrument

panel. Contact a workshop - an authorized Volvo
workshop is recommended.

NOTE

Do not attempt to repair or alter any of the
components in the alarm system yourself. Any
such attempt could affect the terms and con-
ditions of your insurance policy.

Related information

Arming and disarming the alarm (p. 274)

Arming and disarming the alarm

The alarm is armed when the vehicle is locked.

Arming the alarm

Lock and arm the vehicle by:

pressing the lock button on the remote key

.

touch the marked surface on the outside of
the door handle or the rubberized pressure
plate on the tailgate

21

.

If the vehicle is equipped with both keyless lock-
ing/unlocking* and power tailgate*, the button

 on the lower edge of the tailgate can also

be used to lock and arm the vehicle.

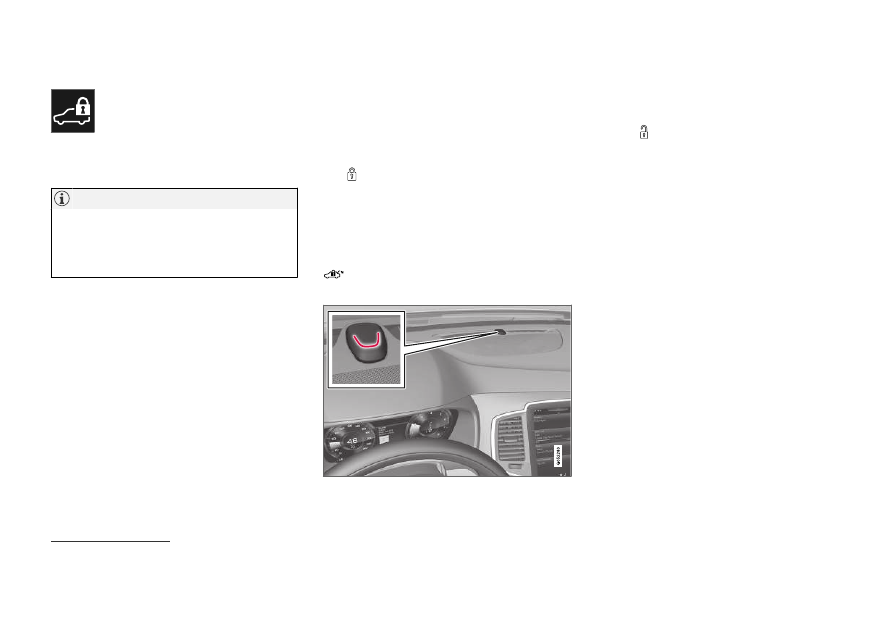
A red LED light on the dashboard will flash every other
second when the vehicle is locked and the alarm is
armed.

Disarming the alarm

Unlock and disarm the vehicle alarm by:

pressing the unlock button on the remote
key 

.

grip a door handle or press the tailgate's rub-
berized pressure plate

21

.

21

Only vehicles with keyless locking and unlocking* (Passive Entry).

KEY, LOCKS AND ALARM

275

Disarming the alarm without a functioning
remote key

The vehicle can be unlocked and disarmed even
if the remote key is not functioning, e.g. if the
battery is discharged.

1. Open the driver's door using the detachable

key blade.
> This will trigger the alarm.

Location of the backup key reader in the cup holder.

2. Place the remote key on the key symbol in

the backup reader in the tunnel console's
cup holder.

3. Turn the start knob clockwise and release.

> The alarm will be disarmed.

Turning off a triggered alarm

Press the unlock button on the remote key
or put the ignition into mode I by turning the
start knob clockwise and then releasing it.

NOTE

Remember that the alarm is armed when
the vehicle is locked.

The alarm will be triggered if any of the
doors is opened from the inside.

Automatically arming and disarming the
alarm

Automatically arming the alarm helps prevent
inadvertently leaving the vehicle without alarm
protection.

If the vehicle is unlocked using the remote key
(and the alarm is disarmed) but none of the
doors or tailgate are opened within two minutes,
the alarm will be automatically rearmed. The vehi-
cle will also re-lock.

On some markets, the alarm will be automatically
armed following a slight delay after the driver's
door has been opened and closed without being
locked.

To change this setting:

1. Tap 

Settings

 in the center display's Top

view.

2. Tap 

My Car

Locking

.

3. Select 

Passive Arming Deactivation

 to

temporarily deactivate the function.

Related information

Alarm (p. 273)

DRIVER SUPPORT

DRIVER SUPPORT

* Option/accessory.

278

Driver support systems

The vehicle is equipped with a number of driver
support systems that can provide the driver with
active or passive assistance in various situations.

The systems can, for example, help the driver:

maintain a set speed

maintain a set time interval to the vehicle
ahead

help prevent a collision by warning the driver
and applying the brakes

park the vehicle.

Some of the systems are standard and others are
options. This also varies from market to market.

Related information

Speed-dependent steering wheel resistance
(p. 278)

Electronic Stability Control (p. 279)

Stability system Roll Stability Control
(p. 279)

Speed limiter (p. 283)

Automatic Speed Limiter (p. 287)

Cruise control (p. 291)

Distance Alert* (p. 296)

Adaptive Cruise Control* (p. 300)

Pilot Assist (p. 316)

Radar sensor (p. 332)

Camera (p. 337)

City Safety™ (p. 341)

Rear Collision Warning (p. 354)

BLIS* (p. 355)

Cross Traffic Alert* (p. 360)

Road Sign Information* (p. 364)

Driver Alert Control (p. 370)

Lane Keeping Aid (p. 372)

Steering assistance at risk of collision
(p. 380)

Park Assist* (p. 390)

Park Assist Camera* (p. 396)

Park Assist Pilot* (p. 406)

Speed-dependent steering wheel

resistance

Speed-dependent power steering increases the
steering wheel resistance in pace with the vehi-
cle's speed to give the driver an enhanced feel-
ing of control and stability.

Steering may feel stiffer on highways. When
parking and at low speeds, it will be easier to
move the steering wheel.

NOTE

In some situations, the power steering may
become too hot and require temporary cool-
ing – during such time the power steering will
work at reduced output and the steering
wheel may feel more difficult to move.

In parallel with the temporarily reduced steer-
ing assistance, the driver display shows a
message as well as a STEERING WHEEL
symbol.

WARNING

While the power steering is working at

reduced power, the driver support functions

and systems with steering assistance are not

available.
In such a situation, the driver display shows

the 

Power steering failure

 message, com-

bined with a STEERING WHEEL symbol.

DRIVER SUPPORT

}}

* Option/accessory.

279

Changing the level of steering wheel
resistance*

To change the level of steering wheel resistance,
see the description of the INDIVIDUAL option
under "Available drive modes" in the "Drive
modes" section.

On models not equipped with drive mode con-
trols and the INDIVIDUAL option, steering wheel
resistance can instead be set in the center dis-
play's Top view under:

Settings

My Car

Drive Modes

Steering Force

Steering wheel resistance settings cannot be
accessed when turning at speeds above
10 km/h (6 mph).

Related information

Drive modes (p. 454)

Pilot Assist (p. 316)

Lane Keeping Aid (p. 372)

Steering assistance at risk of collision
(p. 380)

Park Assist Pilot* (p. 406)

Stability system Roll Stability

Control

The Roll Stability Control (RSC

1

) system helps

minimize the risk of a rollover in the event of e.g.
a sudden evasive maneuver or if the vehicle
begins to skid.

The RSC system monitors the lateral angle at
which the vehicle is leaning and registers any
changes. Using this information, the system cal-
culates the likelihood of a rollover. If there is an
imminent risk of a rollover, Electronic Stability
Control is activated, engine torque is reduced and
brakes are applied to one or more of the wheels
until the vehicle has regained stability.

WARNING

The vehicle’s stability systems, including RSC

do not replace the driver’s responsibility for

operating the vehicle in a safe manner. Speed

and driving style should always be adapted to

the current road, traffic and weather condi-

tions. Posted speed limits should always be

respected.

Related information

Driver support systems (p. 278)

Electronic Stability Control

The Electronic Stability Control (ESC

2

) function

helps the driver avoid skidding and improves the
vehicle's directional stability.

This symbol will be displayed in
the instrument panel when the
ESC system is intervening.

When the ESC has intervened
to apply the brakes, a pulsing
sound may be heard and the

vehicle may accelerate more slowly than expec-
ted when the accelerator pedal is depressed.

The ESC system consists of the following sub-
functions:

Stability control

3

Spin control and active yaw control

Engine drag control

Trailer Stability Assist

1

Roll Stability Control

2

Electronic Stability Control

3

Also called traction control.

||

DRIVER SUPPORT

* Option/accessory.

280

WARNING

The Electronic Stability Control system
ESC is supplementary driver support
intended to facilitate driving and make it
safer – it cannot handle all situations in
all traffic, weather and road conditions.

ESC is not a substitute for the driver's
attention and judgment. The driver is
always responsible for ensuring the vehi-
cle is driven in a safe manner, at the
appropriate speed, with an appropriate
distance to other vehicles, and in accord-
ance with current traffic rules and regula-
tions.

Stability control

3

This function helps control the driving and brak-
ing force of each individual wheel in an attempt
to stabilize the vehicle.

Spin control and active yaw control

This function is active at low speeds and brakes
the wheels that are spinning to transfer additional
power from wheels that are not spinning.

This function also helps prevent the wheels from
spinning while the vehicle is accelerating.

Engine drag control

Engine drag control (EDC

4

) helps prevent inad-

vertent wheel lock, e.g. after downshifting or
using engine braking when driving at low speeds
on a slippery surface.

Inadvertent wheel lock while driving could impair
the driver's ability to steer the vehicle.

Trailer Stability Assist*

5

Trailer Stability Assist (TSA

6

) is designed to help

stabilize a vehicle that is towing a trailer if the
vehicle and trailer have begun to sway. For more
information, see "Trailer Stability Assist".

NOTE

The TSA function is deactivated if 

ESC Sport

Mode

 is activated.

Related information

Electronic Stability Control Sport mode
(p. 281)

Activating/deactivating Sport mode in Elec-
tronic Stability Control (p. 281)

Electronic Stability Control Sport mode limi-
tations (p. 281)

Electronic Stability Control symbols and mes-
sages (p. 282)

Trailer Stability Assist* (p. 485)

3

Also called traction control.

4

Engine Drag Control

5

Trailer Stability Assist is included if the vehicle is equipped with a Volvo original towbar.

6

Trailer Stability Assist

DRIVER SUPPORT

281

Electronic Stability Control Sport

mode

The ESC

7

 system is always activated and can-

not be switched off. However, the driver can
select 

ESC Sport Mode

, which offers more

active driving characteristics.

With the 

ESC Sport Mode

 sub-function

selected, intervention from ESC is reduced and
more lateral movement is permitted, giving the
driver more control of the vehicle than usual.

When 

ESC Sport Mode

 is selected, ESC may

seem to be disabled even though the function
continues to assist the driver.

NOTE

When the 

ESC Sport Mode

 function is

selected, the trailer stabilizer (TSA

8

) is

switched off.

ESC Sport Mode

 also helps provide maximum

traction if the vehicle gets stuck or is driving on a
loose surface such as deep snow or loose sand.

Related information

Electronic Stability Control (p. 279)

Activating/deactivating Sport mode

in Electronic Stability Control

The ESC

9

 system is always activated and can-

not be switched off. However, the driver can
select Sport mode, which offers more active
driving characteristics.

Sport mode can be activated/
deactivated in the center dis-
play's Function view.

Tap the 

ESC Sport Mode

 button in Func-

tion view.
> Sport mode is activated when the indica-

tor light is green, and deactivated when
the indicator light is gray.

When 

ESC Sport Mode

 is activated,

this symbol will illuminate with a steady
glow in the instrument panel. It will
remain on until the driver deactivates

the function or until the engine is turned off. The
ESC system will return to normal mode the next
time the engine is started.

Related information

Electronic Stability Control (p. 279)

Electronic Stability Control Sport

mode limitations

There are certain limitations associated with the
ESC

10

 system's subfunction 

ESC Sport Mode

being activated.

The 

ESC Sport Mode

 function cannot be

selected when any of the following functions are
activated:

Speed limiter

Cruise control

Adaptive Cruise Control

Pilot Assist.

Related information

Electronic Stability Control (p. 279)

7

Electronic Stability Control

8

Trailer Stability Assist

9

Electronic Stability Control

10

Electronic Stability Control

DRIVER SUPPORT

282

Electronic Stability Control symbols

and messages

A number of symbols and messages related to
Electronic Stability Control (ESC) may be dis-
played in the instrument panel.

Some examples of symbols and messages are
shown in the table below.

Symbol

Message

Meaning

Steady glow for
approx. 2 seconds.

System check when the engine is started.

Flashing light.

The ESC is actively operating.

Steady glow.

Sport mode is activated.

Note: The ESC system is not deactivated in this mode, but has partially reduced functionality.

ESC

Temporarily off

The ESC system's functionality has been temporarily reduced due to high brake system temperatures. The
function will be automatically reactivated when the brakes have cooled.

See the message in the instrument panel.

ESC

Service required

The ESC system is not functioning properly.

Stop the vehicle in a safe place, turn off the engine and then restart it.

Consult a workshop if the message persists 

‒ an authorized Volvo workshop is recommended.

A text message can be erased by briefly pressing
the 

 button in the center of the right-side

steering wheel keypad.

If the message persists: Contact a workshop 

‒ an

authorized Volvo workshop is recommended.

Related information

Electronic Stability Control (p. 279)

DRIVER SUPPORT

283

Speed limiter

A Speed Limiter (SL

11

) could be described as a

reverse cruise control. The driver regulates the
vehicle's speed using the accelerator pedal, but
is prevented by the Speed Limiter from inadver-
tently exceeding a preset maximum speed.

Function buttons and symbols

12

.

: Activates the Speed Limiter from

standby mode and resumes the set maxi-
mum speed.

: Increases the set maximum speed

: From standby mode - activates the

Speed Limiter and sets the current speed

: From active mode - deactivates/puts

the Speed Limiter in standby mode

: Reduces the set maximum speed

Marker for set maximum speed

The vehicle's current speed

The set maximum speed

WARNING

The Speed Limiter function is supple-
mentary driver support intended to facili-
tate driving and help make it safer – it
cannot handle all situations in all traffic,
weather and road conditions.

The driver must always pay attention to
traffic conditions and take action if the
Speed Limiter is not maintaining a suita-
ble speed.

The Speed Limiter is not a substitute for
the driver's attention and judgment. The
driver is always responsible for ensuring
the vehicle is driven in a safe manner, at
the appropriate speed, with an appropri-
ate distance to other vehicles, and in
accordance with current traffic rules and
regulations.

Related information

Cruise Control limitations (p. 287)

Activating and starting Speed Limiter
(p. 284)

Managing Speed Limiter speed (p. 284)

Deactivating and putting Speed Limiter in
standby mode (p. 285)

Reactivating Speed Limiter from standby
mode (p. 286)

Turning off Cruise Control (p. 286)

Automatic Speed Limiter (p. 287)

Automatic Speed Limiter limitations (p. 291)

Activating/deactivating Automatic Speed
Limiter (p. 289)

Changing Automatic Speed Limiter tolerance
(p. 290)

11

Speed Limiter

12

Note: This illustration is general and details may vary depending on model.

DRIVER SUPPORT

284

Activating and starting Speed

Limiter

The Speed Limiter (SL

13

) function must be

selected and activated in order to regulate
speed.

Putting Speed Limiter in standby mode

Note: This illustration is general and details may vary
depending on model.

Press 

◀ (1) or ▶ (3) and scroll to the Speed

Limiter function 

 (4).

> The symbol (4) will appear, indicating that

the Speed Limiter is in standby mode.

Starting the Speed Limiter

The Speed Limiter can only be activated while
the engine is running. The lowest maximum
speed that can be set is 30 km/h (20 mph).

With the Speed Limiter in standby mode and

the 

 symbol displayed, press the

 button (2) on the steering wheel key-

pad.
> The Speed Limiter will be started and the

vehicle's current speed will be set as the
maximum speed.

Related information

Speed limiter (p. 283)

Managing Speed Limiter speed

The Speed Limiter (SL

14

) can be set to various

speeds.

Setting/changing set speed

Note: This illustration is general and details may vary
depending on model.

Change a set speed by pressing the 

 (1)

or 

 (3) buttons briefly or by pressing and

holding them:

Press briefly: Press briefly: each press
changes the speed in +/- 5 mph
(+/- 5 km/h) increments.

Press and hold: Release the button when
the set speed indicator (4) has moved to
the desired speed.

The most recently set speed will be stored.

13

Speed Limiter

DRIVER SUPPORT

285

Related information

Speed limiter (p. 283)

Deactivating and putting Speed

Limiter in standby mode

The Speed Limiter (SL

15

) can be temporarily

deactivated and put in standby mode.

Note: This illustration is general and details may vary
depending on model.

To deactivate the Speed Limiter and put it in
standby mode:

Press the 

 button on the steering wheel

(2).
> The speed limit markings and symbols in

the instrument panel will change from
WHITE to GRAY. This indicates that the
Speed Limiter is temporarily deactivated
and the driver can exceed the set maxi-
mum speed.

Temporarily deactivating using the
accelerator pedal

The set maximum speed can be temporarily
deactivated and exceeded using the accelerator
pedal without first putting the Speed Limiter in
standby mode, e.g. when quick acceleration is
required.

To do so:

1. Depress the accelerator as far as possible

and then release it when the desired speed
has been reached.
> The Speed Limiter will remain activated

and the symbol in the instrument panel
will be WHITE.

2. Release the accelerator pedal fully when the

temporary acceleration is completed.
> The vehicle will use engine braking to

automatically slow down to a speed below
the most recently set maximum speed.

Related information

Speed limiter (p. 283)

14

Speed Limiter

15

Speed Limiter

DRIVER SUPPORT

286

Reactivating Speed Limiter from

standby mode

Speed Limiter (SL

16

) can be reactivated after

having been temporarily deactivated and put in
standby mode.

Note: This illustration is general and details may vary
depending on model.

To reactivate the Speed Limiter from standby
mode:

Press the 

 button on the steering wheel

(1).
> The speed limit markings in the instru-

ment panel will change from GRAY to
WHITE. The vehicle's speed will once
again be limited to the most recently set
speed.

or

Press the 

 button on the steering wheel

(2).
> The speed limit markings and symbols in

the instrument panel will change from
GRAY to WHITE and the vehicle's current
speed will be set as the maximum speed.

Related information

Speed limiter (p. 283)

Turning off Cruise Control

The Speed Limiter (SL

17

) can be turned off.

Note: This illustration is general and details may vary
depending on model.

To turn off Cruise Control:

1. Press the 

 button on the steering wheel

(2).
> The Speed Limiter will go into standby

mode.

2. Press the 

◀ (1) or ▶ (3) buttons on the

steering wheel to select another function.
> The Speed Limiter symbol and marking

(4) in the instrument panel will go out and
the set maximum speed will be erased.

16

Speed Limiter

17

Speed Limiter

DRIVER SUPPORT

}}

287

3. Press the 

 (2) button on the steering

wheel keypad again.
> Another function will be activated.

Related information

Speed limiter (p. 283)

Cruise Control limitations

On steep downgrades, the Speed limiter's brak-
ing capacity may not be sufficient and the set
maximum speed may be exceeded. If this hap-
pens, 

Speed limit exceeded

 will be displayed in

the instrument panel to alert the driver.

NOTE

A text message on exceeded max. speed is
activated if the speed is exceeded by at least
3 km/h (ca 2 mph).

Related information

Speed limiter (p. 283)

Automatic Speed Limiter

The Automatic Speed Limiter (ASL) function
helps the driver adapt the vehicle's maximum
speed to the posted speed limits.

The Speed Limiter (SL

18

) function can be

switched to Automatic Speed Limiter (ASL).

The Automatic Speed Limiter function uses
speed information from the Road Sign Informa-
tion function (RSI) to automatically adapt the
vehicle's maximum speed.

18

Speed Limiter

||

DRIVER SUPPORT

288

WARNING

The ASL function is supplementary driver
support intended to facilitate driving and
help make it safer – it cannot handle all
situations in all traffic, weather and road
conditions.

Even if the driver can clearly see the
speed limit sign, the speed information
from the Road Sign Information (RSI)
function to ASL may be incorrect. In such
cases, the driver must intervene and
accelerate or brake to an appropriate
speed.

ASL is not a substitute for the driver's
attention and judgment. The driver is
always responsible for ensuring the vehi-
cle is driven in a safe manner, at the
appropriate speed, with an appropriate
distance to other vehicles, and in accord-
ance with current traffic rules and regula-
tions.

See also the heading "Road Sign Infor-
mation limitations".

Is SL or ASL active?

The symbols in the instrument panel indicate
which Speed Limiter function is active:

Symbol

SL

ASL

A

Road sign symbol

B

 after "70" = ASL is

activated.

A

WHITE symbol: The function is active. GRAY symbol: Standby

mode.

B

See "ASL symbol" below for an explanation of the symbol's dif-

ferent colors.

ASL symbol

The road sign symbol (next to the
stored speed ("70" here) in the center
of the speedometer) can be displayed
in three different colors, which are

explained in the following table:

Road sign

symbol's color

Explanation

Greenish-yel-

low

ASL is active

Gray

ASL is in standby mode

Amber/orange

ASL is temporarily in
standby mode, e.g. because
a speed limit sign could not
be read.

Related information

Speed limiter (p. 283)

Activating/deactivating Automatic Speed
Limiter (p. 289)

Changing Automatic Speed Limiter tolerance
(p. 290)

Automatic Speed Limiter limitations (p. 291)

DRIVER SUPPORT

289

Activating/deactivating Automatic

Speed Limiter

The Automatic Speed Limiter (ASL) is a supple-
ment to the Speed Limiter (SL) and can be acti-
vated/deactivated.

Activating ASL

The 

Speed Sign Assist

 but-

ton is located in the center dis-
play's Function view.

To activate the Automatic Speed Limiter:

1. Tap the 

Speed Sign Assist

 button.

> ASL will go into standby mode and a

green indicator light will illuminate. A road
sign symbol will be displayed in the center
of the speedometer in the instrument
panel.

2. Pressing the 

 button on the steering

wheel keypad.
> ASL will be activated and set to the vehi-

cle's current speed.

NOTE

If the Automatic Speed Limiter function is
activated, road sign information is shown
in the driver display even if RSI

19

 is not

activated.

To remove road sign information from the
driver display, you must deactivate both
Automatic Speed Limiter and RSI.

When the Automatic Speed Limiter func-
tion is activated but RSI is deactivated, no
warnings are given from RSI. RSI must
also be activated for warnings to be pos-
sible.

Deactivating ASL

To deactivate the Automatic Speed Limiter:

Tap the 

Speed Sign Assist

 button in Func-

tion view.
> ASL will be deactivated, the indicator light

in the button will be GRAY and SL will be
activated instead.

WARNING

The vehicle will no longer follow the posted

maximum speed after switching from ASL to

SL – it then only follows the maximum speed

stored in the memory.

Related information

Speed limiter (p. 283)

Automatic Speed Limiter (p. 287)

Activating/deactivating Road Sign Informa-
tion (p. 365)

19

Road Sign Information (RSI)


Content   ..  14  15  16  17   ..