Volvo S90 (2019 year). Instruction - part 33


  Index      Volvo     Volvo S90 - instruction 2019 year in english


Search            


Content   ..  31  32  33  34   ..


Volvo S90 (2019 year). Instruction - part 33


LOADING, STORAGE AND PASSENGER COMPARTMENT

}}

* Option/accessory.

557

Related information

Electrical outlets (p. 555)

Passenger compartment interior (p. 554)

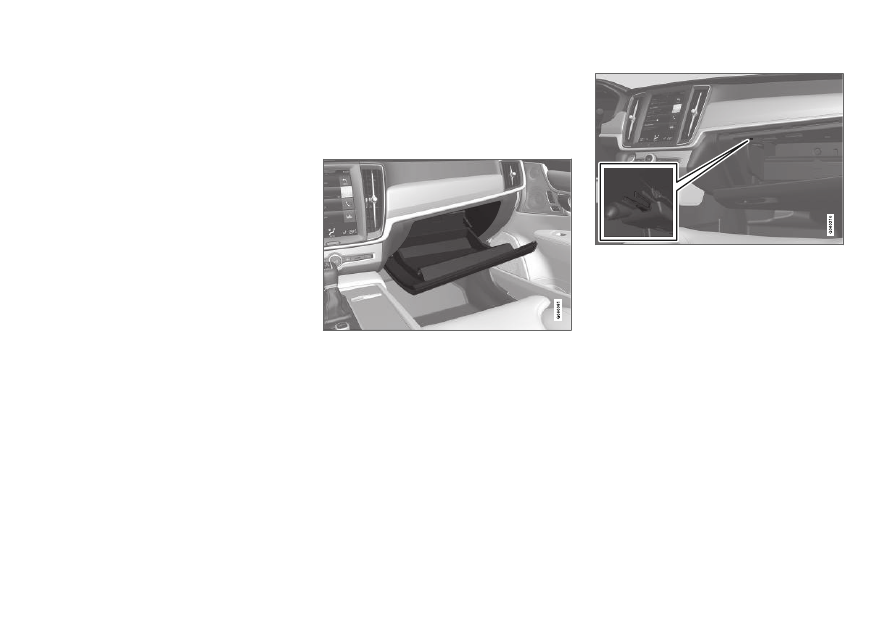
Using the glove compartment

The glove compartment is located on the pas-
senger side. The glove compartment can be
used to store the Owner's Manual, maps, etc.
There is also room for a pen and a card holder.

Locking and unlocking the glove box*

The glove compartment can be locked when the
vehicle is left at a workshop, hotel, etc. The glove
compartment can then only be locked/unlocked
with the glove compartment key.

Storage compartment for the key. The illustration is
generic – the design may vary.

||

LOADING, STORAGE AND PASSENGER COMPARTMENT

* Option/accessory.

558

The illustration is generic – the design may vary.

To lock the glove compartment:
Insert the key into the lock on the glove com-
partment.
Turn the key 90 degrees clockwise.

Remove the key from the lock.

To unlock, perform the above steps in
reverse.

Using the glove box as a cooled area*

The glove compartment can be used to cool e.g.
drinks or food. Cooling is possible when the cli-
mate system is active (i.e. when the ignition is in
mode II or when the engine is running).

The illustration is generic – the design may vary.

Activate cooling

Deactivate cooling

Activate or deactivate cooling by moving the
control as far as possible toward the passen-
ger compartment/glove compartment.

Related information

Passenger compartment interior (p. 554)

Private Locking (p. 264)

Sun visors

In the ceiling in front of the driver and front pas-
senger, there are sun visors that can be lowered
and angled to the side as necessary.

The illustration is generic – the design may vary.

The mirror lighting* comes on automatically when
the cover is lifted up.

The mirror frame has a holder for e.g. cards or
tickets.

Related information

Passenger compartment interior (p. 554)

LOADING, STORAGE AND PASSENGER COMPARTMENT

* Option/accessory.

559

Folding down the armrest in the

rear seat*

The rear seat armrest* can be folded down for
increased comfort.

The armrest is locked in the raised position and
needs to be unlocked before it is folded down.
The handle for unlocking the armrest is located
directly underneath the head restraint.

1. Grasp the handle and rotate it toward you to

unlock the armrest.

2. When the handle is rotated to its maximum

position, the armrest is unlocked and can be
folded down.

CAUTION

Before moving down the armrest, make
sure to unlock it by rotating the handle. Do
not pull the handle if the armrest is locked.

Make sure the armrest is securely locked
into position after it is folded up.

Cargo compartment

Loads can be secured in the trunk to keep them
in place while driving.

The folding* rear seat backrests can help
increase the cargo capacity of the trunk. Load
anchoring eyelets and grocery bag holders are
provided to help secure objects in place.

The towing eyelet and tire sealing system, or the
temporary spare tire*, are located under the
cargo compartment floor.

Related information

Loading recommendations (p. 560)

Grocery bag holders (p. 561)

Load anchoring eyelets (p. 562)

LOADING, STORAGE AND PASSENGER COMPARTMENT

* Option/accessory.

560

Loading recommendations

There are a number of things to consider when
carrying loads in or on the vehicle.

Load-carrying capacity is determined by the vehi-
cle's curb weight. The total weight of all passen-
gers and any installed accessories reduces the
vehicle's load-carrying capacity by the corres-
ponding amount.

WARNING

The vehicle's driving characteristics change

depending on the weight and position of the

load.

Loading the cargo compartment/trunk

Position objects so they are pressing against
the rear seat backrests.

Distribute the load evenly.

Heavy objects should be positioned as low
as possible. Avoid placing heavy objects on
folded-down seat backrests.

Cover sharp corners with a soft cloth or simi-
lar to help prevent damage to the upholstery.

Use the load anchoring eyelets and tension-
ing straps or similar to secure all objects.

WARNING

In a head-on collision at a speed of 50 km/h

(30 mph), an unsecured object weighing 20

kg (44 pounds) can reach a projectile weight

equivalent to 1000 kg (2200 pounds).

WARNING

If objects are loaded higher than the upper

edge of the side windows, leave a 10 cm (4

in.) space between the objects and the win-

dow. Objects placed closer to this could

impede the function of the inflatable curtain

concealed inside the headlining.

WARNING

Always secure the load. Otherwise, it may shift

during heavy braking and injure people in the

vehicle.
Cover sharp edges and sharp corners with

something soft.
Turn off the engine and apply the parking

brake when loading/unloading long objects.

Otherwise, it is possible for the load to reach

the gear lever or gear selector and move it to

a drive position – which could cause the vehi-

cle to begin rolling.

Extra cargo space

The ski hatch* in the rear seat can be folded
down to carry skis or other long, thin objects.

Related information

Load anchoring eyelets (p. 562)

Folding down the rear seat backrests*
(p. 191)

Rear seat ski hatch* (p. 562)

Roof loads and load carriers (p. 561)

Leveling control* and suspension (p. 435)

Weights (p. 631)

LOADING, STORAGE AND PASSENGER COMPARTMENT

561

Roof loads and load carriers

Volvo-developed load carriers are recommended
for carrying loads on the roof of the vehicle.

Volvo load carriers are specially designed to help
prevent damage to your vehicle and help ensure
maximum safety while driving. Volvo load carriers
are available from authorized Volvo retailers.

Carefully follow the installation instructions provi-
ded with the load carriers.

Distribute the load evenly throughout the
load carriers. Place heavier cargo at the bot-
tom of the load.

Check periodically to ensure that the load
carriers and load are properly secured.
Secure the load firmly using tie straps or
similar.

If the load is longer than the vehicle, such as
a canoe or kayak, attach the towing eyelet in
its front outlet and secure the tie straps in it.

The vehicle's wind resistance and fuel con-
sumption increase with the size of the load.

Drive smoothly. Avoid rapid acceleration, hard
braking and fast cornering.

WARNING

The vehicle's center of gravity and driving

characteristics are altered by roof loads.
Follow the vehicle's specifications regarding

weights and maximum permitted load.

Related information

Loading recommendations (p. 560)

Weights (p. 631)

Grocery bag holders

Grocery bag holders (hooks) help keep shop-
ping bags in place and prevent them from falling
over and spilling their contents in the cargo
compartment.

On the sides of the cargo compartment

The illustration is generic - details may vary according to
vehicle model.

There is a grocery bag holder in the side panel
on each side of the cargo compartment.

CAUTION

The grocery bag holders are only intended to
hold weights up to 5 kg (11 lbs).

Related information

Loading recommendations (p. 560)

LOADING, STORAGE AND PASSENGER COMPARTMENT

* Option/accessory.

562

Load anchoring eyelets

The load anchoring eyelets in the cargo com-
partment can be used to secure objects with
straps, a net, etc.

WARNING

Hard, sharp and/or heavy objects in or pro-

truding from the vehicle can cause injury in

the event of hard braking.
Always secure large and heavy objects with a

seat belt or cargo retaining straps.

Related information

Loading recommendations (p. 560)

Weights (p. 631)

Rear seat ski hatch*

The hatch in the rear seat backrest can be
opened to transport long, narrow objects such
as skis.

The illustration is generic - details may vary according to
vehicle model.

1. In the cargo compartment, grasp the ski

hatch handle and pull it down.

2. Fold down the armrest in the rear seat.

If the private locking function is used, the ski
hatch must be closed.

Related information

Loading recommendations (p. 560)

Private Locking (p. 264)

Load anchoring eyelets (p. 562)

MAINTENANCE AND SERVICE

564

Volvo's service program

To keep the vehicle as safe and reliable as pos-
sible, follow the Volvo service schedule speci-
fied in the Warranty and Maintenance Records
Information booklet.

WARNING

California Proposition 65

Operating, servicing and maintaining a pas-

senger vehicle can expose you to chemicals

including engine exhaust, carbon monoxide,

phthalates, and lead, which are known to the

State of California to cause cancer and birth

defects or other reproductive harm. To mini-

mize exposure, avoid breathing exhaust, do

not idle the engine except as necessary, serv-

ice your vehicle in a well ventilated area and

wear gloves or wash your hands frequently

when servicing your vehicle. For more infor-

mation go to www.P65Warnings.ca.gov/

passenger-vehicle.

Volvo recommends having an authorized Volvo
workshop perform service and maintenance.
Volvo workshops have the staff, service literature
and special tools to guarantee the highest quality
of service.

CAUTION

To ensure the Volvo warranty is not invalida-
ted, check and follow the Service and War-
ranty Booklet.

Introduction

The maintenance services contain several checks
that require special instruments and tools and
therefore must be performed by a qualified tech-
nician. To keep your Volvo in top condition, spec-
ify time-tested and proven Genuine Volvo Parts
and Accessories.

The Federal Clean Air Act - U.S.

The Federal Clean Air Act requires vehicle manu-
facturers to furnish written instructions to the ulti-
mate purchaser to assure the proper servicing
and function of the components that control
emissions. These services, which are listed in the
"Warranty and Service Records Information"
booklet, are not covered by the warranty. You will
be required to pay for labor and material used.

Maintenance

Your Volvo passed several major inspections
before it was delivered to you, in accordance with
Volvo specifications. The maintenance proce-
dures outlined in the Warranty and Service
Records Information booklet, many of which will
positively affect your vehicle's emissions, should
be performed as indicated. It is recommended
that receipts for vehicle emission maintenance be
retained in case questions arise concerning
maintenance. Inspection and maintenance should
also be performed anytime a malfunction is
observed or suspected.

Applicable warranties - U.S./Canada

In accordance with applicable U.S. and Canadian
regulations, the following list of warranties is pro-
vided.

New Vehicle Limited Warranty

Parts and Accessories Limited Warranty

Corrosion Protection Limited Warranty

Seat Belt and Supplemental Restraint Sys-
tems Limited Warranty

Emission Design and Defect Warranty

Emission Performance Warranty

These are federal warranties; other warranties are
provided as required by state/provincial law.
Refer to your separate Warranty and Service
Records Information booklet for detailed informa-
tion concerning each of the warranties.

MAINTENANCE AND SERVICE

}}

565

Periodic maintenance helps minimize
emissions

NOTE

Refer to your Service and Warranty Book-
let for a comprehensive service and main-
tenance schedule up to 240,000 km
(150,000 miles). This program contains
inspections and services necessary for
the proper function of your vehicle and
includes components that affect vehicle
emissions.

The Warranty and Service Records Infor-
mation booklet also contains detailed
information concerning the warranties
that apply to your vehicle.

On-board Diagnostic System

OBD II is part of your vehicle's computerized
engine management system. It stores diagnostic
information about your vehicle's emission con-
trols. It can light the Check Engine light (MIL) if it
detects an emission control "fault." A "fault" is a
component or system that is not performing
within an expected range. A fault may be perma-
nent or temporary. OBD II will store a message
about any fault.

Emission inspection readiness

How do states use OBD II for emission
inspections?

Many states connect a computer directly to a
vehicle's OBD II system. The inspector can then
read "faults." In some states, this type of inspec-
tion has replaced the tailpipe emission test.

How can my vehicle fail OBD II emission
inspection?

Your vehicle can fail OBD II emission inspection
for any of the following reasons:

If your Check Engine (MIL) light is lit, your
vehicle may fail inspection.

If your vehicle's Check Engine light was lit,
but went out without any action on your part,
OBD II will still have a recorded fault. Your
vehicle may pass or fail, depending on the
inspection practices in your area.

If you had recent service that required dis-
connecting the battery, OBD II diagnostic
information may be incomplete and "not
ready" for inspection. A vehicle that is not
ready may fail inspection.

How can I prepare for my next OBD II
emission inspection?

If your Check Engine (MIL) light is lit or was
lit but went out without service, have your

vehicle diagnosed and, if necessary, serviced
by a qualified Volvo technician.

If you recently had service for a lit Check
Engine light, or if you had service that
required disconnecting the battery, a period
of driving is necessary to bring the OBD II
system to "ready" for inspection. Two half-
hour trips of mixed stop-and-go/highway
driving are typically needed to allow OBD II to
reach readiness. Your Volvo retailer can pro-
vide you with more information on planning a
trip.

Maintain your vehicle in accordance with your
vehicle's maintenance schedule.

Owner maintenance

Periodic maintenance requirements and intervals
are described in your vehicle's Warranty and
Service Records Information booklet.

The following points can be carried out between
the normally scheduled maintenance services.

Each time the car is refueled:

Check the engine oil level.

Clean the windshield, windshield wipers,
headlights, and taillights.

||

MAINTENANCE AND SERVICE

566

Monthly:

Check cold tire pressure in all tires. Inspect
the tires for wear.

Check that engine coolant and other fluid
levels are between the indicated "min" and
"max" markings.

Clean interior glass surfaces with a glass
cleaner and soft paper towels.

Wipe driver information displays with a soft
cloth.

Visually inspect battery terminals for corro-
sion. Corrosion may indicate a loose terminal
connector, or a battery near the end of its
useful service life. Consult your Volvo retailer
for additional information.

As needed:

Wash the car, including the undercarriage, to
reduce wear that can be caused by a buildup of
dirt, and corrosion that can be caused by salt res-
idues.

Clean leaves and twigs from air intake vents at
the base of the windshield, and from other places
where they may collect.

NOTE

Complete service information for qualified
technicians is available online for purchase or
subscription at www.volvotechinfo.com.

Related information

Vehicle status (p. 568)

Scheduling service and repairs (p. 569)

Connecting equipment to the vehicle's data
link connector (p. 37)

Technician certification (p. 38)

Climate control system service (p. 575)

Maintenance of the brake system (p. 415)

Engine compartment overview (p. 576)

Data transfer between vehicle and

workshop over Wi-Fi

Volvo workshops have a designated Wi-Fi net-
work for secure data transfer between your vehi-
cle and the workshop. Your visit to the workshop
will be easier and more effective when diagnos-
tics information and software can be transferred
over the workshop's network.

When you arrive at the workshop, your service
technician can connect your vehicle to the work-
shop's Wi-Fi network to perform troubleshooting
and download software. For this type of commu-
nication, the vehicle only connects to a work-
shop's network. It is not possible to connect the
vehicle to another Wi-Fi network (e.g. your home
network) in the same way as to a workshop's net-
work.

Connecting with remote key

Connection is usually managed by the service
technician, who will use the remote key buttons. It
is therefore important to bring a key with buttons
with you when you visit the workshop. Pressing
the lock button on the remote key three times will
connect the vehicle to the workshop's Wi-Fi net-
work.

When the car is connected to a Wi-Fi network,
the 

 symbol appears in the center display.

MAINTENANCE AND SERVICE

}}

* Option/accessory.

567

WARNING

The vehicle may not be driven when it is con-

nected to the workshop's networks and sys-

tems.

Related information

Handling system updates via Download Cen-
ter (p. 567)

Scheduling service and repairs (p. 569)

Download Center

With the vehicle connected to the Internet

1

,

updates for a number of the vehicle's systems
can be downloaded from the center display.

The 

Download Center

 app is

started from the center display
and makes it possible to:

search for and update system software

update Sensus Navigation* map data

download, update and delete apps.

Related information

Handling system updates via Download Cen-
ter (p. 567)

Download apps (p. 461)

Updating apps (p. 462)

Deleting apps (p. 462)

Internet-connected vehicle* (p. 503)

Navigating in the center display's views
(p. 113)

Handling system updates via

Download Center

System updates for Internet-connected vehicles
and infotainment can be updated via Download
Center. Updates can be done one at a time or
all at the same time.

Searching for update

If an update is available, the
message 

New software

updates available

 will be dis-

played in the center display's
status field.

In order for system updates to be possible, the
vehicle must have an Internet connection

2

.

Go to 

Download Center

 in the center dis-

play's App view.
> If no search has been performed since

the last time the infotainment system was
started, a search will be initiated. No
search will begin if a software download is
in progress.

A number in 

System updates

 shows

how many updates are available. Tap to
display a list of updates that can be instal-
led in the vehicle.

1

There may be a charge for transmitting data over the Internet, depending on your service plan.

2

There may be a charge for transmitting data over the Internet, depending on your service plan.

||

MAINTENANCE AND SERVICE

* Option/accessory.

568

NOTE

Data downloading can affect other services
such as transfer data, e.g. web radio. If the
affect on other services is experienced as
problematic, the download can be interrupted.
Alternatively, it may be appropriate to switch
off or cancel other services.

NOTE

An update can be interrupted when the igni-
tion is switched off and the vehicle is left.

However, the update does not have to be
completed before the vehicle is left as the
update is resumed the next time the vehicle is
used.

Updating all system software

Select 

Install all

 at the bottom of the list.

To avoid displaying a list, select 

Install all

 via

System updates

.

Updating individual system software

Select 

Install

 to choose the software you

would like to download.

Canceling software download

Tap the checkbox in the activity indicator that
replaced 

Install

 when the download began.

Note that only a download can be cancelled. An
installation cannot be cancelled once it has
begun.

Deactivating the background search for
software update

Automatic background searching for software
updates is activated as the default factory setting,
but the function can be deactivated.

1. Tap 

Settings

 in the center display's Top

view.

2. Tap 

System

Download Center

.

3. Tap to deselect 

Auto Software Update

.

Related information

Download Center (p. 567)

Internet-connected vehicle* (p. 503)

Navigating in the center display's views
(p. 113)

Vehicle status

The vehicle's general status can be displayed in
the center display along with the option to
schedule service

3

.

The 

Car Status

 app is started

from the center display's App
view and has four tabs:

3

Certain markets only.

MAINTENANCE AND SERVICE

}}

* Option/accessory.

569

Messages

 - status messages

Status

 – checking engine oil level and

AdBlue level

4

TPMS

 - tire inflation pressure check

Appointments

 - appointment information

and vehicle information

3

.

Related information

Handling messages saved from the instru-
ment panel (p. 105)

Checking and filling engine oil (p. 577)

Tire pressure monitoring system* (p. 531)

Scheduling service and repairs (p. 569)

Sending vehicle information to the workshop
(p. 570)

Navigating in the center display's views
(p. 113)

Scheduling service and repairs

5

This service offers a convenient way to schedule
service and workshop appoints directly from the
vehicle.

When it is time for service, and in certain cases if
the vehicle requires repairs, a message will be
displayed in the instrument panel and at the top
of the center display. The time for service is
determined by how much time has elapsed, the
number of hours the engine has run, or the dis-
tance driven since the last service.

To use the service

Create a Volvo ID and register it to the vehi-
cle.

To select a Volvo retailer you would like to
contact, go to www.volvocars.com and log in.

To send and receive appointment informa-
tion, the vehicle must be connected to the
Internet

6

.

Book service

Book a service request when desired or when a
message is displayed indicating that service or
repairs are needed.

1. Open the 

Car Status

 app from App view in

the center display.

2. Tap 

Appointments

.

3. Tap 

Request appointment

.

4. Check that your 

Volvo ID

 is correct.

5. Make sure your preferred 

Workshop

 is cor-

rect.

6. In the 

Tap to write information to the

workshop

 field, you can provide details on

what you would like performed during the
visit or other important information to your
workshop.

4

AdBlue Diesel models only.

3

Certain markets only.

5

Certain markets only.

6

There may be a charge for transmitting data over the Internet, depending on your service plan.

||

MAINTENANCE AND SERVICE

* Option/accessory.

570

7. Tap 

Send appointment request

.

> You will receive an appointment sugges-

tion by email within a couple of days

7

.

You will also receive the same message
via email and when you log in to
www.volvocars.com.

On some markets, the message in the
instrument panel indicating that the vehi-
cle requires service will go out once the
appointment request has been sent.

8. Tap 

Cancel request

 if you would like to

cancel your request.

The appointment request contains information
about your vehicle that helps the workshop plan
for your visit.

The retailer will send you a digital appointment
suggestion. Information about your retailer is also
available in the vehicle so that you can contact
your workshop at any time.

Accepting an appointment suggestion

When the vehicle has received an appointment
suggestion, a message will be displayed at the
top of the center display.

1. Tap the message.

2. To accept the suggested appointment, tap

Accept

. Otherwise, tap 

Send new

proposal

 or 

Decline

.

For some markets, the system reminds you when
an appointment time is approaching and the navi-
gation system

8

 can also guide you to the work-

shop at the appointed time.

Related information

Vehicle status (p. 568)

Sending vehicle information to the workshop
(p. 570)

Navigating in the center display's views
(p. 113)

Volvo ID (p. 26)

Internet-connected vehicle* (p. 503)

Sending vehicle information to the
workshop

9

Vehicle-related information can be sent at any
time from the vehicle, e.g. if you schedule a visit
to a workshop and would like to assist your
workshop by providing additional basic informa-
tion. Sending vehicle information is not the same
as scheduling service.

1. Open the 

Car Status

 app from App view in

the center display.

2. Tap 

Appointments

.

3. Tap 

Send vehicle data

.

> A message confirming that vehicle-related

information has been sent will appear at
the top of the center display. You can
cancel data transmission by tapping the
checkbox in the activity indicator.

Information is sent via the vehicle's Inter-
net connection

10

.

7

Timespan may vary depending on market.

8

For vehicles with Sensus Navigation*.

9

Certain markets only.

10

There may be a charge for transmitting data over the Internet, depending on your service plan.

MAINTENANCE AND SERVICE

* Option/accessory.

571

Vehicle information can be accessed by any
retailer if they are provided with your vehicle iden-
tification number (VIN

11

).

Vehicle information contents

The most recently saved vehicle-related informa-
tion will be sent (the last time the vehicle was
turned on). This includes information regarding:

service requirements

time since last service was performed

function status

fluid levels

mileage (odometer reading)

Vehicle Identification Number (VIN

11

)

software version

diagnostic information.

Related information

Scheduling service and repairs (p. 569)

Vehicle status (p. 568)

Navigating in the center display's views
(p. 113)

Internet-connected vehicle* (p. 503)

11

Vehicle Identification Number.

MAINTENANCE AND SERVICE

* Option/accessory.

572

Hoisting the vehicle

When hoisting the vehicle, it is important to
ensure the jack/vehicle hoist is correctly
engaged in the designated attachment points
under the vehicle.

For vehicles with self-leveling*, pneumatic sus-
pension (if installed) must be turned off before
the vehicle is lifted. Turning off the function in the
center display.

WARNING

If the vehicle is lifted on a garage jack, the

jack must be placed under one of the four lift-

ing points. Make sure that the vehicle is cor-

rectly positioned on the jack and that it can-

not slide off. Make sure the jack plate has a

rubber pad to help keep the vehicle stable

and prevent damage. Always use axle stands

or similar.

NOTE

Volvo recommends only using the jack
intended for your specific vehicle model. If a
jack other than that recommended by Volvo is
used, follow the instructions included with the
equipment.

The vehicle's ordinary jack is only intended to
be used in temporary situations for short peri-
ods of time, such as when changing wheels in
the event of a flat tire. If the vehicle needs to
be lifted more frequently, or for a longer
period of time than for a wheel change, a
garage jack or hoist is recommended. Always
follow the instructions for use provided with
the equipment.

MAINTENANCE AND SERVICE

* Option/accessory.

573

The triangles in the plastic covering indicate where the jack attachment points/lifting points (red areas) are located.

Related information

Removing a wheel (p. 538)

Jack* (p. 537)

Leveling control settings* (p. 437)


Content   ..  31  32  33  34   ..