Volkswagen Touareg (2015 year). Instruction - part 22


  Index      Volkswagen     Volkswagen Touareg - instruction 2015 year in english


Search            copyright infringement  


Content   ..  20  21  22  23   ..


Volkswagen Touareg (2015 year). Instruction - part 22


Managing stored waypoint tours 


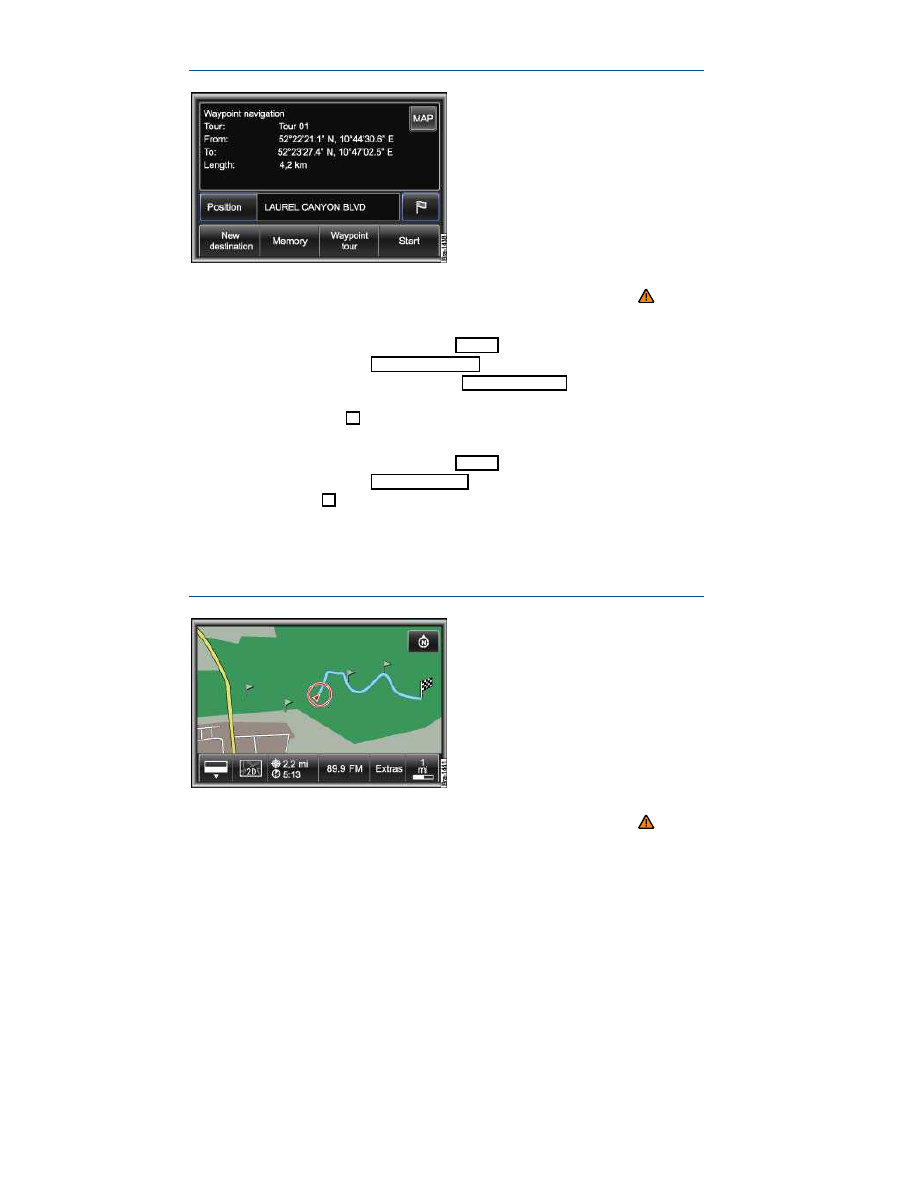
Fig. 210 Waypoint navigation menu with stored waypoint tour. 

 Please first read and note the introductory information and heed the WARNINGS 


Editing a waypoint tour 

  In the Waypoint navigation menu, press the  Memory  function key 

⇒ 

fig. 210

  In the pop-up window, press the  Manage tour memory  function key. 

  In the Waypoint tour memory menu, press the  Edit waypoint tour(s)  function key. 

  Press the waypoint tour to display additional information. 
  OR: Press the function key 

 to rename or delete the tour. 

Load waypoint tour 

  In the Waypoint navigation menu, press the  Memory  function key. 

  In the pop-up window, press the  Load waypoint tour  function key. 

  Press the function key 

 in the list in order to see the waypoint tour in the detailed view. 

  OR: Press the required waypoint tour directly in order to see it in the Waypoint navigation 

menu 

⇒ 

fig. 210

Driving a stored waypoint tour 


Fig. 211 Driving a waypoint tour in the map display. 

 Please first read and note the introductory information and heed the WARNINGS 


Starting route guidance 

Before you start a waypoint tour, drive to the immediate vicinity of the required starting point. 

  Load stored waypoint tour  

  In the Waypoint navigation menu, press the  Start  function key 

⇒ 

fig. 210

  In the following menu, select how the waypoint tour should be driven. 

“Starting” off in a stored route is not detected by the system automatically. 
 

Function key: Effect  

Reverse waypoint tour: Reverses the direction of the displayed waypoint 

tour to be driven.  

From nearest: Will start the waypoint tour from the nearest waypoint.  

Start whole tour: Will start the entire waypoint tour. In the menu that fol-

lows you will have to select how the start point of the waypoint tour should 
be reached.  


On road: The start point for the route guidance will be reached using 

public roads as far as possible.  


Off-road: The start point for route guidance will be reached in off-road 

mode and any available roads will not be used.  


When route guidance starts, the system will switch to the map view. 

An audible signal is given when the starting point of the waypoint tour has been reached. 

During route guidance 

Characteristics of the terrain are ignored during route guidance. A driving recommendation will be 
given about 55 yards (50 meters) before reaching a turning point. You should therefore drive slowly 
and follow recommendations for turning as far as possible! 

Changes in the direction of travel will be given in relation to the current direction of travel, such as  
“Please travel in direction 9 o'clock!”. 

The tendency of the direction of travel will be shown in the instrument cluster display using arrows. 

Stopping route guidance 

  Press the Infotainment button  

NAV

 in the map display to open the Waypoint navigation 

menu. 

  Press the  Stop  function key. 


Stopping waypoint navigation 


Fig. 212 Waypoint navigation menu. 

 Please first read and note the introductory information and heed the WARNINGS 


  In the Waypoint navigation menu, press the  Waypoint tour  function key followed by the 

Exit waypoint mode  function key.  

  OR: Press the function key  New destination  and the function key  On road destination  in the menu 

that follows in order to open the Destination entry menu 

⇒ page 299. 

Any waypoint tour that is being recorded will be stored automatically if the waypoint navigation mode is 
closed. 


Route guidance 

 Introduction 

In this section you’ll find information about: 

Route options


Starting and stopping route guidance


Provision of navigation recommendations


Route guidance in tour mode


Showing routes or a maneuver list


Manually excluding the route section immediately ahead


SIRIUS traffic reports (TRAFFIC)


Display of traffic congestion and dynamic route guidance


Displaying Sirius traffic reports in a list


Navigation settings


After starting route guidance, the route is calculated according to the parameters in the routing op-
tions. 

The unit switches to the map view. You are guided to your chosen destination by announcements and 
visual recommendations. Navigation messages are played back at the preset volume. 

During route guidance all audio sources of the device are available. 

More information: 

  Safety information 

 for Infotainment System  

  Basic information on use  
  Introduction to navigation 
  Destination input  
  Tour mode  

  WARNING 

Driving recommendations can be different depending on the current situation, for instance if 
there are construction zones or out-of-date navigation data. 

  Traffic signs and traffic regulations have priority over the recommendations from the nav-

igation system. 

  Always adjust your speed and driving style to road, traffic, weather, and visibility condi-

tions. 


Route options 


Fig. 213 Navigation main menu. 


Fig. 214 Routing options setup menu. 

 Please first read and heed the WARNINGS 

 note the introductory information and heed 

the WARNINGS 


It is possible to exclude certain types of route and define route criteria for the calculation of the route. 
Routing options can be changed during route guidance. The route is then accordingly recalculated. 

The route options that are currently active are indicated by the icons in the Navigation main menu. 
Inactive symbols do not indicate types of route that are not allowed. 

  In the Navigation main menu, press the  Options  function key 

⇒ 

fig. 213

 Route: Defining route options 

  In the Route options menu, press the  Route  function key. 

  Press the desired settings to select them in the pop-up window. 

Fast : fastest route to the destination, even if this requires detours. 

Short : shortest route to the destination, even if it results in a longer travelling time. The navigation 

route may include unusual route sections, such as dirt roads. 

Most economic : calculates a mix between shortest route and shortest time. 

Depending on the settings, 3 alternative routes corresponding with the selectable route criteria are 
displayed for selection after route guidance is started  


Dynamic route: Switching dynamic route guidance on or off 

With this option, traffic reports can be taken into account in the route calculation  

  In the Route options menu, press the  Dynamic route  function key. 

  In the pop-up window, press the  On  or  Off  function key to enable or disable dynamic route guid-

ance. 

Excluding or including types of route in the calculation 

Press the     Highways ,     Ferries ,     Toll roads  and     Tunnels  function keys to activate or deac-
tivate them. This makes it possible to define whether these types of route should be allowed for the 
route calculation or not. 

If no reasonable route exists without the road type to be avoided, this road type will be nevertheless 
considered in the route calculation. For instance, if an island cannot be reached without using a ferry. 
For the calculation of very long routes, it is not possible to avoid highways  . 

Starting and stopping route guidance 


Fig. 215 3D map display during route guidance. 


Fig. 216 Navigation main menu during route guidance. 

 Please first read and heed the WARNINGS 

 note the introductory information and heed 

the WARNINGS 


After route guidance has started, the route to the first destination that meets the parameters in the 

Route options menu is calculated. 

The unit switches to the map display 

⇒ 

fig. 215


  Press the 

NAV

 Infotainment button or the 

...  ...  function key to switch to the Navigation main 

menu. 

  In the Navigation main menu, press the 

NAV

 Infotainment button or  MAP  function key to switch 

back to the map view. 

The map is displayed in the most recently selected type (2D or 3D). 3D and “Autozoom” are activated 
by default  

Alternative routes: Selecting a calculated route 

In the Navigation settings menu, you can specify that 3 alternative routes are suggested on the 
map after the start of route guidance. These 3 routes correspond to the available route criteria Fast
Short and Economical route.  Route 1  corresponds to the current setting in this case. 

  Select the required route by pressing on the right of the map. 

The setting for the route criteria in the Route options menu is changed accordingly. 

If no route is selected then route guidance starts automatically after about one minute, using the 
setting selected in the Route options. 

Interrupting route guidance 

Active route guidance can be stopped and later resumed from the new vehicle position at any time in 
the Navigation main menu. 

  In the Navigation main menu, press the  Stop  function key 

⇒ 

fig. 216

  Press the  Start  function key to continue route guidance 

⇒ 

fig. 213

Provision of navigation recommendations 


Fig. 217 3D map display during route guidance. 


Fig. 218 Visual navigation recommendations in the instrument cluster. 

 Please first read and heed the WARNINGS 

 note the introductory information and heed 

the WARNINGS 


Navigation recommendations are provided in the form of navigation announcements and visual direc-
tions in the Infotainment System map view and on the instrument cluster display. 

Displays in the Infotainment System map view 

The red vehicle position indicator   shows vehicle position and direction of travel 

⇒ 

fig. 217

During active route guidance, the route to be driven is indicated as a blue line. 

Information on the journey time is displayed in the 

...  ...  function key. 

 : Distance to the destination. 

 : Estimated time of arrival or driving time (Navigation settings ). 

Manually entered exclusions on the calculated route and are displayed. 

Further information can be displayed in the route and maneuver list  

Displays in the instrument cluster 

After starting the route guidance, a street view is displayed in the instrument cluster by default for 

route guidance 

⇒ 

fig. 218

. At junctions in towns, travel direction arrows and a vehicle position indicator 

following the road are shown on a simplified section of the map  . 

In the Navigation settings menu, you can select the classic view for route guidance in the in-
strument cluster. Then only travel direction arrows are displayed starting from the current direction of 
travel. 

The distance to the next turning point is displayed in both views. In addition, a filling bar on the right of 
the screen graphically indicates the approach to the turn-off point. The road that you should turn into 
next is displayed at the top. 

Navigation messages (acoustic driving recommendations) 

After the route is calculated, an initial announcement is issued. Depending on the settings made, up to 
3 navigation announcements are given before a turn, such as “Prepare to turn left”, “Turn left in 325 
yards (300 meters)” and “Now turn left”. 

  In the map view, briefly press the setting knob 

⇒ 

fig. 131


(3)

 to repeat the last navigation an-

nouncement. 

The distances that are announced depend on the type of road and your speed. On highways, the first 
announcement can be given about 1 1/4 miles (2,000 m) before an exit. 

Appropriate announcements are also given on multi-lane roads, branching roads and at roundabouts, 
such as  “Take the second exit from the roundabout”. 

When you reach your destination, you will hear a corresponding announcement, such as: “You have 
reached the destination”. 


Acoustic driving recommendation settings 

The volume of an acoustic driving recommendation can be adjusted to a predefined minimum and 
maximum volume using the volume control  . All additional acoustic driving recommendations are 
issued at this volume. 

The volume of audible navigation recommendations can be preset in the volume settings. 

In the Navigation settings menu, you can switch off spoken navigation recommendations or 
define their level of detail. 

Even when navigation information is switched off, you can show them briefly in the map view by press-

ing the setting knob 

⇒ 

fig. 131


(3)

  If a turn was missed during route guidance and there is no possibility to turn, continue driving 

until the navigation system offers an alternative route. 

  The quality of the announcements given by the unit depends on the navigation data provided. 

Route guidance in tour mode 


Fig. 219 Tour plan in Tour mode. 

 Please first read and heed the WARNINGS 

 note the introductory information and heed 

the WARNINGS 


Information about tour mode. 

During route guidance, the information on driving time and arrival time refer to the next stopover. 

When departing from a tour plan, the route guidance starts automatically for the next destination after 
reaching a stopover (announcement “You have reached the stopover”). 

If a stopover cannot be reached accurately because, for example, it is located in a non-digitalized 
area, this destination must in some cases be deleted manually from the Tour plan. 

  Press the display box of the tour in the Navigation main menu. 

  In the tour plan, press the 

 function key following the stopover 

⇒ 

fig. 219

  In the pop-up window, press the  Delete  function key. 

If a stopover is added or deleted during route guidance, the route guidance will then need to be started 
again in some cases. 

If route guidance to only one destination showed in the tour plan is started, only this destination is 
used and all other destinations of the tour plan will be ignored. 


Showing routes or a maneuver list 


Fig. 220 Maneuver list in the split screen. 

 Please first read and heed the WARNINGS 

 note the introductory information and heed 

the WARNINGS 

. 

The route and maneuver lists can be displayed only during route guidance. 

Route list 

  In the Navigation main menu, press the  Route  function key 

⇒ 

fig. 216

  In the pop-up window, press the  Route list  function key. 

In the route list the street names or street designations of the route sections to be driven are 
displayed in a list. 

Function keys with an arrow   indicate that you can display further subsections for this route section. 

  Press the   ...  function key to display subsections. 

  Press the   ...  function key to close the subsections view again. 

Maneuver list 

The Maneuver list can be displayed in a separate window from the map view 

⇒ 

fig. 220

  Press the  Extras  function key in the map display. 

  In the pop-up window, activate the check box in the 

 Split screen  function key. 

  In the split screen, press the   ...  function key at the top left. 

  In the pop-up window, press the  Maneuver list  function key. 

In the Maneuver list the next turning points are displayed in a list with travel direction arrows. In 
addition, points of interest and traffic congestion can be indicated by icons. 

Street names or street designations refer to streets where turns are made. 

  It takes a few seconds after route guidance has started for the route and maneuver list to be 

calculated so that it can be displayed. 

Manually excluding the route section immediately ahead 

 Please first read and heed the WARNINGS 

 note the introductory information and heed 

the WARNINGS 


During route guidance, you can manually exclude the route section immediately ahead of your current 
location. The route exclusion is revoked when route guidance is stopped. 

  In the Navigation main menu, press the  Route  function key 

⇒ 

fig. 216

  In the pop-up window, press the  Avoid area  function key. 

The Avoid area menu opens. The length of the stretch to be excluded from the current vehicle 
position. 

  Press the 

 function key to specify up to which route section the route ahead should be blocked. 

  Press the 

 function key to shorten the route exclusion. 

  Press the  OK  function key to confirm the exclusion entry. 

In the Navigation main menu 

⇒ 

fig. 216

, the icon for an active route exclusion   is displayed. 

The route is recalculated if a sensible alternative route can be calculated given the entered exclusion. 
In the map, the manually excluded stretch of road is shown by a red dotted line. 

Manually revoking a route exclusion 

  In the Navigation main menu, press the  Route  function key. 

  In the pop-up window, press the  Remove  function key. 

The route is recalculated if a route that saves time can be calculated after removal of the exclusion. 

  Only one route exclusion can be entered manually. 

SIRIUS traffic reports (TRAFFIC) 

 Please first read and heed the WARNINGS 

 note the introductory information and heed 

the WARNINGS 


The current traffic conditions can be displayed on the map by symbols and the Sirius traffic flow dis-
plays  

If dynamic route guidance is activated, reported traffic problems are taken into account in the route 
calculation  

Sirius traffic reports are subject to subscription charges and may not be available in all locations. The 
subscription must be activated for use either by telephone or Internet using the unit-specific Sirius ID. 

Displaying the SIRIUS-ID 

  Press the 

SETUP

 Infotainment button 

⇒ 

fig. 131

  Press the  Navigation  function key. 

  Press the function key  SIRIUS traffic ID . 

The Sirius traffic ID and the Internet address and the telephone number of the Sirius activation hotline 
are displayed in the pop-up window. 

  Press function key  OK  to close the pop-up window. 


Display of traffic congestion and dynamic route guidance 


Fig. 221 SIRIUS traffic flow display and traffic congestion on the map. 

 Please first read and heed the WARNINGS 

 note the introductory information and heed 

the WARNINGS 


Reported traffic problems are indicated by colored symbols on the map: Familiar symbols are used to 
indicate traffic events, such as   for a traffic jam. 

The positioning of a symbol indicates the start of the traffic congestion if this is clearly defined in the 
traffic message. 

During route guidance, traffic congestion which is not on the calculated route, is shown in gray. 

The length of a traffic hold-up on the calculated route is shown by a red and white dotted line. 

  Press a traffic congestion symbol to display additional information. 

Due to the map scale, one symbol on the map may indicate more than one traffic problem. If this is the 
case, a list of traffic problems at that location appears when you press the symbol. 

Dynamic route guidance 

If a traffic problem affecting the route is reported during route guidance, an alternative route is calcu-
lated if the navigation system determines that it would save time. A navigation announcement also 
informs you if this is the case. 

Sirius traffic flow display 

Traffic flow is monitored by cameras and sensors on some highways and main roads. The analyzed 

traffic flow data can be shown on the map as a traffic flow display 

⇒ 

fig. 221

Green line: Traffic flowing freely. 

Orange line: Slow-moving traffic. 

Red line: Queuing or stop-and-go traffic. 

No display: Traffic flow display not available for this area. 

  Avoiding a traffic jam as a result of reported traffic congestion may not necessarily save time if, 

for instance, there is also heavy traffic on the alternative route. 

  The quality of dynamic route guidance depends on the stored navigation data and the traffic 

information provided by Sirius. 

  The route ahead can also be excluded manually, to start a new calculation of the route  


Displaying Sirius traffic reports in a list 

 Please first read and heed the WARNINGS 

 note the introductory information and heed 

the WARNINGS 


  Press the 

TRAFFIC

 Infotainment button to display a list of the current traffic reports. 

Traffic reports in the vicinity of the current vehicle position are displayed. 

During route guidance, traffic congestion along the calculated route is shown at the top of the list and 
is indicated by a colored symbol. Other traffic jams are then indicated by a gray symbol. 

  Press a traffic report entry to show the details. 
  Press the arrow buttons in the detailed view in order to scroll through the traffic reports. 

Traffic reports displayed in the detailed or list view can be read out by the Infotainment System. 

  In the list view, press the function key at the top right to have all displayed traffic reports read out 

one after the other. 

  While they are read out, you can press the   function key to stop the feature. 

If another menu is opened using an Infotainment button, the list of traffic reports will be closed. 

Navigation settings 


Fig. 222 Menu: Navigation settings. 

 Please first read and heed the WARNINGS 

 note the introductory information and heed 

the WARNINGS 


  Press the 

SETUP

 Infotainment button 

⇒ 

fig. 131

  Press the  Navigation  function key. 

If the check box in a function key is checked  , the feature is switched on  
 

Function key: Effect  

 Suggest 3 alternative routes: 3 alternative routes are displayed on the 

map following the start of route guidance  

Voice guidance: Setting for the spoken navigation recommendations  


Function key: Effect  


Complete: Detailed driving recommendations with lane recommen-

dation and additional information.  


Compact: Some additional navigation recommendations and infor-

mation are left out.  

Off: No spoken navigation recommendations.  

Time display: Display   during route guidance.  


Arrival time: The estimated time of arrival at the destination is dis-

played.  


Driving time: The estimated driving time until reaching the destina-

tion is displayed.  

Map icons: Select icons for display on the map  

 Speed limit display: The speed stored in the navigation data for the 

road you are currently travelling on is displayed on the map. The actual 
speed limit may differ from this display.  

Advanced navigation settings: Allows settings for demo mode.  

SIRIUS traffic ID: The Sirius traffic ID and the Internet address and the 

telephone number of the Sirius activation hotline are displayed in the pop-
up window  

Instrument cluster guidance: Visual navigation recommendations for guid-

ance in the instrument cluster  


Arrow view: Travel direction arrows show the direction of travel and 

the distance to the next turn-off point.  

Street view: Road and route view corresponding with the map dis-

play in the Infotainment System.  


Function key: Effect  

 Voice guidance during phone call: Spoken navigation recommendations 

are also given during a telephone call.  


Advanced navigation settings: Demo mode and manual location 

  In the Advanced navigation settings menu, check the check box in the  Demo mode  

function key by pressing it   to start virtual route guidance to the entered destination. 

  Press the  Enter current position manually  function key to select a manual location in the same way 

you entered a destination  

If demo mode is enabled an additional pop-up window opens when you start route guidance. 

  Pressing the  Demo mode  function key starts a “virtual route guidance” to the destination you have 

entered. 

  If you press the  Normal mode  function key, a “real route guidance” starts. 

The sequence of events and the operations in virtual route guidance are similar to those in real route 
guidance. Once a manual location has been entered, the virtual route guidance starts from that 
position. 

Virtual route guidance is repeated when you reach the fictitious destination and always starts again 
from the starting point if it is interrupted. 

When real route guidance is started following route guidance in demo mode, the unit first has to reori-
ent itself. Depending on the number of currently received satellites, this orientation may take some 
time. Vehicle movement can reduce the re-orientation time. 

  If the vehicle is moved and the unit can determine its current location by GPS, any manually 

entered location will be overwritten with the current vehicle location. 

  Disable demo mode after use, otherwise you will be prompted to choose between virtual and 

normal route guidance each time you start route guidance. 


MAP (map display) 

 Introduction 

In this section you’ll find information about: 

Overview of the map display


Browsing and centering map


Changing the scale and view


Changing display type and displaying destination area


Split screen in the map view


Symbols and additional displays on the map


Map settings: selecting map symbols


More information: 

  Safety information 

 for Infotainment System  

  Basic information on use  
  Introduction to navigation  
  Destination guidance  

Overview of the map display 


Fig. 223 3D map display during route guidance. 


Content   ..  20  21  22  23   ..