Volkswagen Beetle Convertible (2015 year). Instruction - part 22


  Index      Volkswagen     Volkswagen Beetle Convertible - instruction 2015 year in english


Search            copyright infringement  


Content   ..  20  21  22  23   ..


Volkswagen Beetle Convertible (2015 year). Instruction - part 22


Lift points for the vehicle 


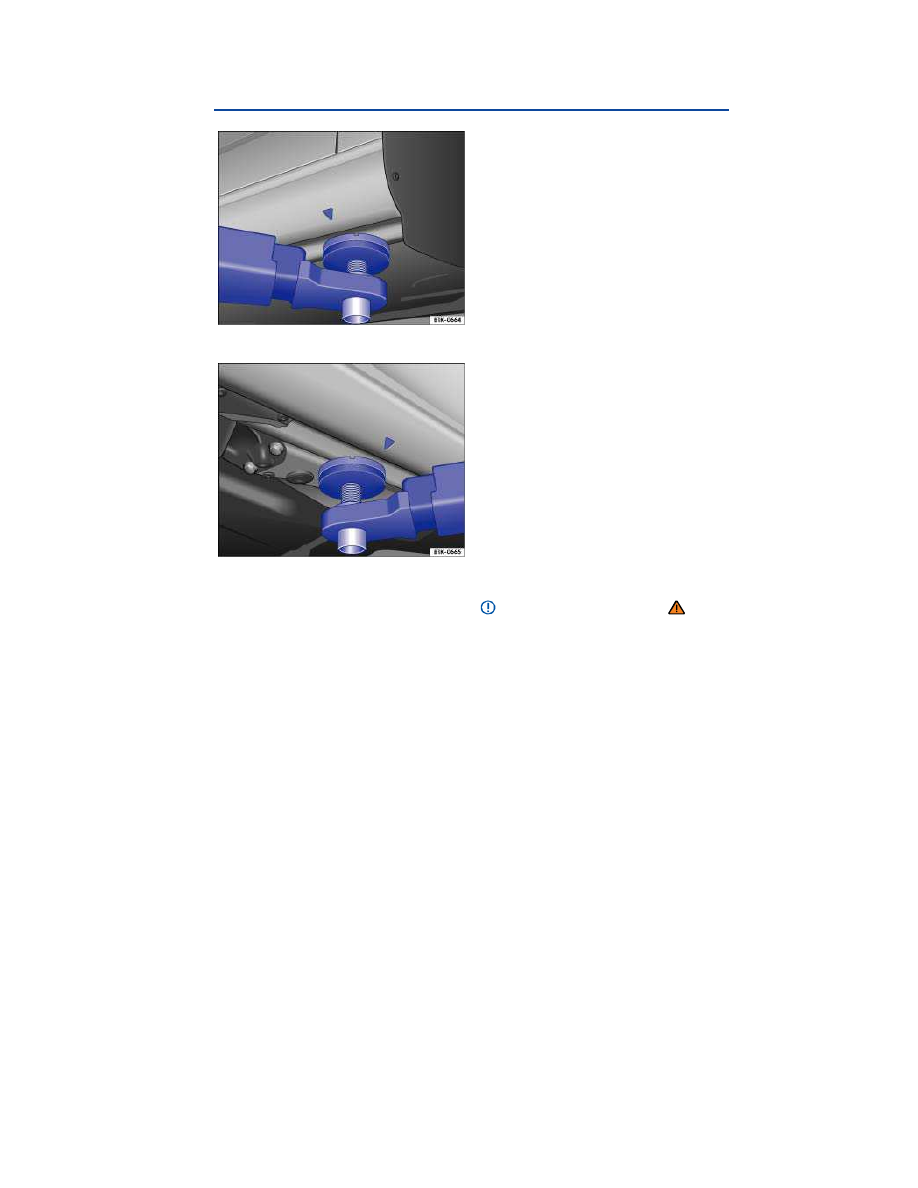
Fig. 152 Front lift point for workshop hoist or floor jack. 


Fig. 153 Rear lift point for workshop hoist or floor jack. 

The vehicle may only be raised at the lift points shown in illustrations 

⇒ 

fig. 152

 and 

⇒ 

fig. 153

. If the 

vehicle is lifted at different points, vehicle damage 

⇒ 

 and serious injuries may occur 

⇒ 

Workshop hoists that use fluid cushions (receiving platforms) must not be used for lifting the vehicle. 

There are many precautions that have to be followed when lifting a vehicle on a workshop hoist or 
floor jack. Do not try to lift a vehicle on a workshop hoist or floor jack unless you have the training, 
knowledge, and experience to be able to do so safely. 

Information about lifting the vehicle with the vehicle jack 

⇒  Lifting the vehicle with the vehicle jack


  WARNING 

Improperly lifting your vehicle with a workshop hoist or a floor jack can cause the vehicle to 
fall off and cause serious personal injury. 

  Always read and heed the operating instructions from the floor jack manufacturer and 

legal regulations if necessary before using the floor jack to lift the vehicle. 

  Never let anyone stay in the vehicle when it is being lifted or when it is off the ground. 
  Always lift your vehicle only at the designated lift points shown in the illustrations 

⇒ 

fig. 152

 and 

⇒ 

fig. 153

. Not using the designated lift points can cause the vehicle to fall off 

the floor jack when heavy parts such as the engine or transmission are removed. 

  Always make sure that the vehicle's lift points lie as flat as possible and centered on the 

carrier plates of the floor jack. 

  Never start the engine when you have raised the vehicle on the floor jack. The engine 

vibrations and vehicle movements could knock the vehicle off the floor jack. 

  If you must work under a vehicle raised on a floor jack, always make sure that the vehicle 

is safely supported on safety stands intended for that purpose that are strong enough to 
support the weight of the vehicle. 

  Never use the floor jack as a ladder or step ladder. 
  Always make sure that the weight of the vehicle is not heavier than the lifting capacity of 

the floor jack and safety stands being used. 


  NOTICE 

  To help prevent serious vehicle damage, never lift the vehicle by the engine oil pan, 

transmission housing, or by the front or rear axles or suspension. 

  To help prevent damage to the underbody or chassis, always insert a rubber pad between 

the hoist and the lifting points. In addition make sure the lifting arms have enough clearance. 

  The lifting arms should not touch side sills or other parts of the vehicle. 


In an emergency 

 Introduction 

In this section you’ll find information about: 

Protecting yourself and the vehicle


More information: 

  Braking and parking 
  Emergency closing and opening 
  Vehicle tool kit  
  Changing a wheel  

  WARNING 

A vehicle breakdown in traffic is dangerous and creates a great risk for you, your 
passengers, and others. 

  Always stop the vehicle as soon as it is safe to do so. Move the vehicle a safe distance off 

the road where it is safe to park and, if necessary, lock all doors in an emergency. Turn on 
the emergency flashers and set up another warning device about 25 yards (25 meters) behind 
the vehicle to warn approaching traffic. 

  Never leave children, disabled persons, or anyone who cannot help themselves alone in 

the vehicle when locking the doors. This could result in people being trapped in the vehicle in 
an emergency. Depending on the time of year, people trapped in the vehicle can be exposed 
to very high or very low temperatures. 


Protecting yourself and the vehicle 


Fig. 154 In the center of the instrument panel: Button for the emergency flashers. 

 Please first read and note the introductory information and heed the WARNINGS 


Obey all legal requirements regarding protecting a broken-down vehicle. For example, turning on the 
emergency flashers and wearing a safety vest are mandatory in many countries. 

Checklist 

For your own safety and that of your passengers, carry out the following steps in the order listed 

⇒ 

1.  Park the vehicle at a safe distance from traffic and on a suitable surface 

⇒ 

2.  Switch on emergency flashers by pressing the 

 button 

⇒ 

fig. 154

3.  Apply the parking brake to help prevent the vehicle from moving 

⇒  Braking and parking

4.  Shift the transmission into Park (P) (automatic) or Neutral (manual only) 

⇒  Shifting

5.  Stop the engine and remove the key from the ignition switch 

⇒  Starting and stopping the engine

6.  Have all passengers exit and go to a safe location away from moving traffic, such as behind a 

guard rail. 

7.  Take all vehicle keys with you when leaving your vehicle. 

8.  Set up a warning triangle or other warning device in order to alert other motorists and cyclists. 

9.  Let the engine cool down and get expert assistance if necessary. 


If the emergency flashers are on, use the turn signal lever to indicate a direction or lane change, for 
example when the vehicle is being towed. This temporarily interrupts the emergency flashers. 


Switch on the emergency flashers when: 

  Traffic suddenly slows down or stops in front of you to warn those approaching from behind. 
  In any emergency situation. 
  If the vehicle breaks down. 
  When being towed. 

Always obey traffic laws that govern the use of emergency flashers where you are driving. 

If the emergency flashers are not working, a different method – as permitted by law – must be used to 
alert other motorists and cyclists to the breakdown. 

  WARNING 

Disregarding the safety-related checklist may lead to accidents and serious personal injuries. 

  Always review and follow the checklist. Follow accepted safety practices and use common 

sense. 


  WARNING 

The vehicle exhaust system and the catalytic converter or diesel particulate filter get very hot. 
They can cause fires and serious personal injury. 

  Never park where parts of the hot exhaust system or catalytic converter could ignite 

flammable materials, such as dry grass, brush, leaves, spilled fuel, etc. 


  NOTICE 

To help prevent damage to the vehicle if you should have to push it a short distance by hand, 
never push against spoilers, lights, body panels, windows, or similar parts. Concentrating 
force on these parts of the vehicle can cause expensive damage that may not always be 
obvious right away.
 

  The vehicle battery will be drained if the emergency flashers are on for a long time – even if the 

ignition is switched off. 


Emergency closing and opening 

 Introduction 

In this section you’ll find information about: 

Manually unlocking and locking the driver door


Manually locking the passenger door


Opening the luggage compartment lid from the passenger compartment


Opening the luggage compartment lid from inside the luggage compartment


Emergency closing of the convertible top


Emergency release for the fuel filler flap


Emergency release for the selector lever lock


The doors, luggage compartment lid, and convertible top can be manually locked and, in some cases, 
unlocked if necessary, for instance because the power locking system or the remote control vehicle 
key malfunctions. 

More information: 

  Vehicle key set  
  Power locking system  
  Doors  
  Luggage compartment lid  
  In an emergency  

  WARNING 

Serious injuries can result if the emergency closing and opening procedures are used 
carelessly. 

  Never leave children, disabled persons, or anyone who cannot help themselves in the 

vehicle. The doors can be locked with the remote control vehicle key. This could result in 
people being trapped in the vehicle in an emergency. 

  A closed vehicle can become very hot or very cold, depending on the season. Particularly 

in the summer, heat buildup in the passenger and luggage compartment of a parked vehicle 
can result in temperatures in the vehicle that are much higher than the outside temperatures. 
Temperatures can quickly reach levels that can cause unconsciousness and death, 
particularly to small children. 


  WARNING 

Careless opening and closing of the doors, the luggage compartment lid, and the convertible 
top is dangerous and can cause serious personal injury. 

  Open or close the doors, the luggage compartment lid, and the convertible top only when 

no one is in the way. 


  WARNING 

Before using the emergency procedure to close the convertible top, park the vehicle as far 
away from moving traffic as possible. If necessary, switch on the emergency flashers and set 
up a warning triangle. Obey all applicable legal requirements. 


  NOTICE 

If the vehicle's battery fails or the power windows won't work, the door windows are not 
lowered when the door is opened or closed. Always close and open the door carefully to help 
prevent damage to the window, the paint, or the rubber seal.


  NOTICE 

To help prevent vehicle damage, carefully remove and properly reinstall parts after emergency 
locking or unlocking.
 

Manually unlocking and locking the driver door 


Fig. 155 Door handle on driver door: Concealed lock cylinder. 

 Please first read and note the introductory information and heed the WARNINGS 


When locking the vehicle manually, all doors are locked. When the vehicle is unlocked manually, only 

the driver door is unlocked. Note the instructions for the anti-theft alarm system 

⇒  Power locking 

system

  Unfold the key bit from the remote control vehicle key 

⇒  Vehicle key set

  If the vehicle has a concealed lock cylinder, insert the key bit from below into the opening of the 

cover cap on the driver door 

⇒ 

fig. 155

 (arrow) and lift the cover cap off. Grasping the door handle and 

pulling slightly makes it easier to remove the cap. 

  Insert the key bit into the lock cylinder of the driver door and unlock or lock the door. 
  Reinsert the cover cap from top to bottom and press until it clicks into place. Grasping the door 

handle and pulling slightly makes it easier to reinstall the cap. 


Special considerations when unlocking: 

  If the vehicle is equipped with an anti-theft alarm system, the system remains activated for the 

unlocked vehicle. But the alarm is not triggered at first 

⇒  Power locking system

  Open the driver door. The alarm will sound. 
  Switch on the ignition. For vehicles with Keyless Access, deactivate the alarm by holding the 

remote control vehicle key to the right of the steering column trim and pressing the starter button 

⇒  

Starting and stopping the engine, if necessary. The electronic immobilizer recognizes a valid remote 
control vehicle key when the ignition is switched on and deactivates the anti-theft alarm system. 

  The driver door can be unlocked separately from the inside the vehicle by pulling the door 

handle to open the door 

⇒  Unlocking or locking the vehicle from the inside

  The anti-theft alarm system, when installed, is not activated when the vehicle is locked manually 

with the key bit 

⇒  Anti-theft alarm system

Manually locking the passenger door 


Fig. 156 On the edge of the passenger door: Manually locking the door with the vehicle key. 

 Please first read and note the introductory information and heed the WARNINGS 


The passenger door can be locked manually. This will not activate the anti-theft alarm system, when 
installed. 

Manually locking the passenger door 

  Open the door. 

  Unfold the key bit from the remote control vehicle key 

⇒  Vehicle key set

  Insert the key bit into the slot and turn clockwise 

⇒ 

fig. 156

 (arrow) to the locked position. 

  Close the door. 
  Make sure that the door is locked. 
  Have the vehicle checked immediately by an authorized Volkswagen dealer or an authorized 

Volkswagen Service Facility. 


  The passenger door can be unlocked and opened separately from inside the vehicle by pulling 

the door handle to open the door 

⇒  Unlocking or locking the vehicle from the inside

Opening the luggage compartment lid from the passenger 
compartment 


Fig. 157 In the bottom of the driver door pillar: Emergency release cover. 


Fig. 158 In the bottom of the driver door pillar: Luggage compartment lid emergency release. 

 Please first read and note the introductory information and heed the WARNINGS 


  Open the driver door. 
  Insert the vehicle key from below (in the direction of the arrow) into the opening in the cover 

⇒ 

fig. 157

 A. Carefully remove the cover from the trim with the vehicle key. 

  Grasp the cover and pull on the release loop attached to it 

⇒ 

fig. 157

 B 

(1)

 in the direction of the 

arrow until the cord is completely extended. 

  Pull slowly and firmly on the release loop in the direction of the arrow until the luggage 

compartment lid releases 

⇒ 

fig. 158

 A

  Keep the release loop pulled and carefully move toward the rear of the vehicle until you can reach 

the luggage compartment lid 

⇒ 

fig. 158

 B 

⇒ 

  Open the luggage compartment lid 

⇒ 

fig. 158

 B

  Gently release the tension on the loop and guide it back. 


  NOTICE 

Use caution when guiding the luggage compartment lid release loop forward and back to help 
prevent damage to the vehicle paint.
 

Opening the luggage compartment lid from inside the luggage 
compartment 


Fig. 159 Inside the luggage compartment: Opening the luggage compartment lid. 

 Please first read and note the introductory information and heed the WARNINGS 


  Remove luggage in order to reach the luggage compartment lid from the inside. 

  Push the lever in the direction of the arrow 

⇒ 

fig. 159

 (magnified view). The luggage compartment 

lid unlatches. Push the luggage compartment lid to open. 

The release lever glows in the dark to help it be seen in low-light conditions. 

Emergency closing of the convertible top 


Fig. 160 Convertible top emergency closing (1). 


Fig. 161 Convertible top emergency closing (2). 

 Please first read and note the introductory information and heed the WARNINGS 


The convertible top can be closed by hand if there is a malfunction 

⇒ 

Before using the 

emergency closing function, make sure the preliminary requirements for the normal convertible top 

closing process are met 

⇒  Convertible top

Only use the convertible top emergency closing procedure if the top will not close even though all 
of the technical requirements are met, or if all of the requirements cannot be met. 

The 

 indicator light in the instrument cluster will flash if there is a convertible top malfunction. A 

message providing information or instructions may also appear in the instrument cluster display. Only 
perform these steps in the specified order. 

1. Release the convertible top 

Release the open convertible top as follows: 

  Remove the cover (boot) from the convertible top if it is installed 

⇒  Convertible top

  Remove the hexagonal socket wrench for releasing the convertible top, the emergency handle for 

latching the convertible top, and the screwdriver from the vehicle tool kit 

⇒  Vehicle tool kit

  Unscrew the bolts 

⇒ 

fig. 160

 A 

(1)

 (arrow) on both sides of the convertible top counterclockwise 

using the rounded end of the hexagonal socket wrench. Remove the bolts completely. 

2. Close the convertible top 

Lift the convertible top out of the tray and close it by hand as follows: 

  Close the convertible top until it meets the windshield 

⇒ 

fig. 160

 B 

(2)

 (arrow). Have a second 

person help (one person on either side), if necessary 

⇒ 

3. Latch the convertible top 

Latch the convertible top using the emergency handle as follows: 

  Carefully remove the front cover under the convertible top using the flat blade of the screwdriver 

⇒ 

fig. 161

 C 

(3)

. The emergency locking mechanism is located behind it. 

  Push the end of the screw in the top of the emergency handle down so the end of the screw is 

flush with the top of the handle. 

  Insert the emergency handle in the emergency release opening and turn until it locks into place 

⇒ 

fig. 161

 D 

(4)

 (small arrow). 

  Keep the handle pressed in place and turn the screw in the center of the emergency clockwise to 

tighten using the Phillips head end of the screwdriver 

⇒ 

fig. 161

 D 

(4)


  Turn the handle counterclockwise to open the convertible top hooks. You may have to push up on 

the front of the convertible top slightly so the hooks can open all the way. 

  Pull the convertible top down using the emergency handle and turn the handle clockwise until the 

convertible top latches completely and securely. The 

 indicator light goes out. 

  Turn the screw in the center of the emergency handle counterclockwise to loosen using the Phillips 

head end of the screwdriver and remove the handle. 

  Reinstall the front cover over the emergency lock opening. 
  Put the hexagonal socket wrench, emergency handle, and screwdriver back into the vehicle tool kit 

⇒  Vehicle tool kit

  Drive to an authorized Volkswagen dealer or an authorized Volkswagen Service Facility to have 

the convertible top serviced. The bolts that were removed cannot be reused and must be replaced with 

new bolts before the top can be opened again 

⇒ 

  WARNING 

The wind generated by driving can open the convertible top if it is not latched. This can cause 
accidents and serious injuries. 

  Never drive if the convertible top is not latched. 


  CAUTION 

To help reduce the risk of personal injury, never touch moving parts when the convertible top 
is closing. 

  Always be careful not to pinch your hands when closing the convertible top manually. 
  Always be careful not to pinch yourself or others when pressing the convertible top onto 

the windshield frame. 


  NOTICE 

To help prevent significant vehicle damage, do not operate the convertible top after performing 
the emergency closing procedure until the bolts are replaced with correct, new bolts by an 
authorized Volkswagen dealer or an authorized Volkswagen Service Facility.
 

Emergency release for the fuel filler flap 

 Please first read and note the introductory information and heed the WARNINGS 


There is no emergency release for the fuel filler flap. Contact an authorized Volkswagen dealer or an 
authorized Volkswagen Service Facility for assistance. 


Emergency release for the selector lever lock 


Fig. 162 Removing the selector gate cover. 


Fig. 163 Releasing the selector lever lock. 

 Please first read and note the introductory information and heed the WARNINGS 


If the power supply fails (due to a dead vehicle battery, for example) and the vehicle has to be pushed 
or towed, the emergency release must be used to move the selector lever to Neutral (N)

The emergency release is located under the selector gate cover on the right side when viewed in the 
driving direction. 

Preparations 

  Set the parking brake. If the parking brake cannot be set firmly, you must find another way to help 

prevent the vehicle from moving. 

  Switch off the ignition. 

Removing the selector gate cover 

  Pull upward on the cover around the selector lever sleeve 

⇒ 

fig. 162

  Slip the cover up and over the selector lever 

⇒ 

Emergency release for the selector lever 

  Push the colored release lever 

⇒ 

fig. 163

 in the direction of the arrow and hold it in this position. 

  Press the release button in the selector lever handle and shift the selector lever to Neutral (N)


  Carefully press the selector gate cover back in place, making sure that the electrical wiring stays in 

the correct position and is not pinched or damaged. 

  WARNING 

Never shift the transmission out of Park (P) without first firmly applying the parking brake. 
Otherwise, the vehicle can start to roll unexpectedly, especially on hills or inclines, and cause 
an accident and serious injuries. 


  NOTICE 

Even with the selector lever is in Neutral (N), the automatic transmission will be damaged if the 
vehicle is towed (or you let it coast) for an extended period or at high speed with the engine 
shut off.


Vehicle tool kit 

 Introduction 

In this section you’ll find information about: 

Storage


Contents


When securing the vehicle after a breakdown, always obey all applicable legal requirements. 

More information: 

  Convertible top  
  Working in the engine compartment  
  In an emergency  
  Changing a wheel  

  WARNING 

Loose tools and other items in the vehicle tool kit and a loose compact spare wheel may be 
thrown through the passenger compartment if you brake suddenly or steer sharply or are 
involved in an accident. This can cause severe injuries. 

  Always make sure the vehicle tool kit and compact spare wheel are securely stowed in the 

luggage compartment. 


  WARNING 

Improper or damaged vehicle tools can lead to accidents and injury. 

  Never work with tools that are damaged or not right for the job. 


Storage 


Fig. 164 In the luggage compartment: Floor covering 1 folded back. 

 Please first read and note the introductory information and heed the WARNINGS 


The vehicle tool kit is in the luggage compartment in one of several places, such as under the luggage 
compartment floor panel. 

  Open the luggage compartment lid 

⇒  Luggage compartment

  Lift the floor panel 

⇒ 

fig. 164


(1)

 and remove it from the luggage compartment. 

  Completely retract the jack after use. Otherwise it will not fit in its compartment and cannot be 

stowed safely. 

Contents 


Fig. 165 Contents of the vehicle tool kit. 

 Please first read and note the introductory information and heed the WARNINGS 


The contents of the vehicle tool kit depend on the vehicle's equipment. The following describes the 
maximum contents. 


Content   ..  20  21  22  23   ..