Volkswagen Golf / Golf GTI / Golf Variant. Manual - part 426


  Index      Volkswagen     Volkswagen Golf / Golf GTI / Golf Variant - service repair manual 2013 year


Search            copyright infringement  


Content   ..  424  425  426  427   ..


Volkswagen Golf / Golf GTI / Golf Variant. Manual - part 426


Caution

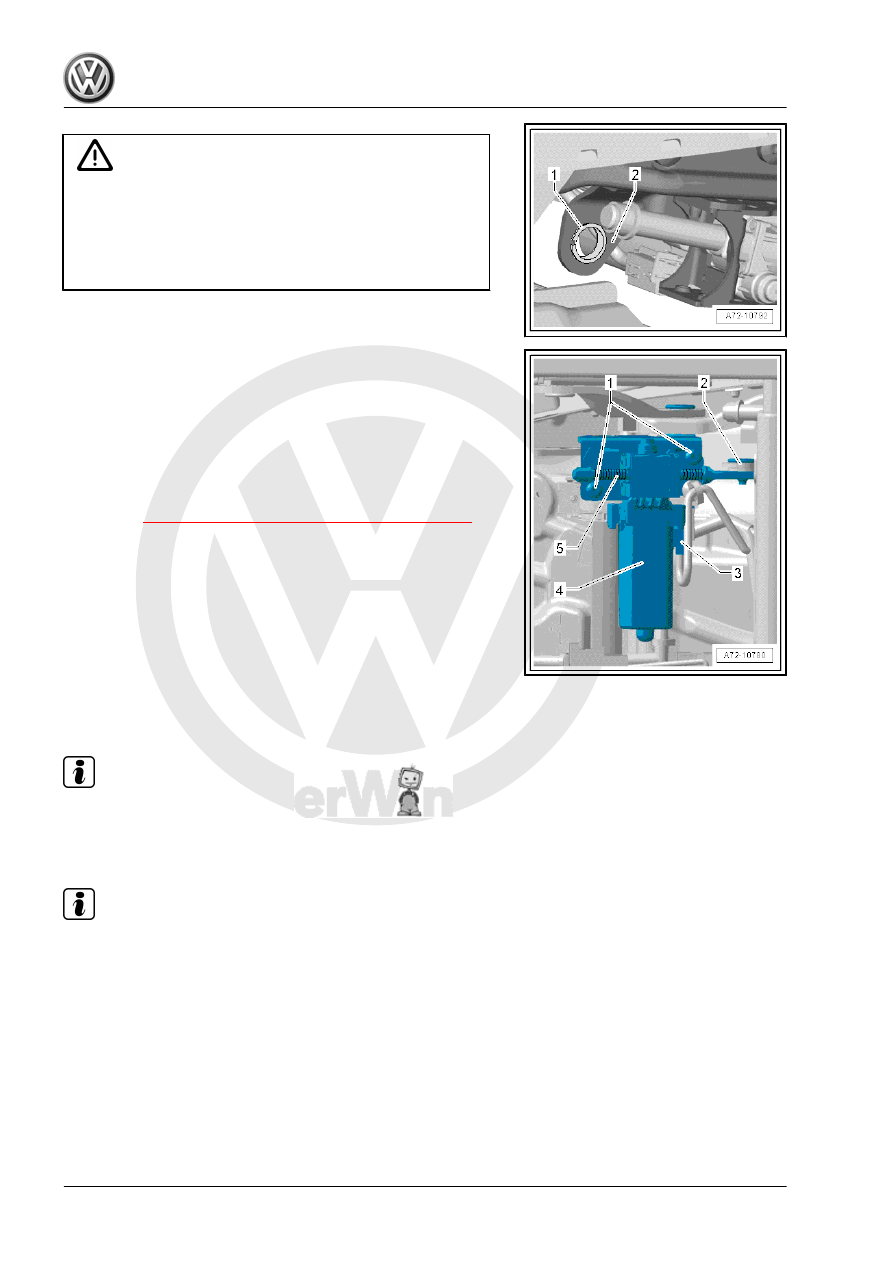
Risk of damage to the bushing -1- in the bearing point -2- (ad‐

justing spindle/seat pan bolting).

♦ The bushing cannot be replaced with workshop materials.
♦ If the bushing is damaged, the corresponding assembly

parts must be replaced.

– Disconnect the connector -3- at the seat angle adjustment

motor.

– Remove the bolts -1- and the seat angle adjustment motor

-4-.

Installing
Install in reverse order of removal.
Tightening Specifications
♦ Refer to 

⇒ “2.7 Overview - Seat Angle Adjuster”, page 333

2.18

Seat Height Adjustment Handle, Re‐

moving and Installing

Note

The seat height adjustment handle can only be replaced with the

front seat installed.

Removing

Note

Remove the seat height adjustment handle as described. Nev‐

er drive the seat height adjustment handle off the lever.

If the tab gets damaged while removing the handle, then it is

not possible to install it again. The handle must be replaced.

– Pull the seat height adjustment handle in direction of -1- as far

upward as possible and hold it in that position.

– Guide a small screwdriver up to the retainer -3- between the

seat height adjuster handle -1- and the trim -2-.

– Press the retaining tab -3- inward using the screwdriver.

– At the same time, remove the seat height adjuster handle -1-

from the lever -4- in the direction of the -arrow-.

Installing
Install in reverse order of removal while paying attention to the

following:
– Check for damage and proper seating of the retainer -3- on

the lever -4-.

– Slide the seat height adjustment handle -1- onto the lever -4-

until it engages.

– After installing, make sure the retainer -4- is properly engaged.
– Check for secure fit by pulling on it.

2.19

Seat Height Adjuster, Removing and In‐

stalling

⇒ “2.19.1 Seat Height Adjuster, Removing and Installing, Except

Power Seat”, page 353
⇒ “2.19.2 Seat Height Adjuster, Removing and Installing, Power

Seat”, page 355

2.19.1

Seat Height Adjuster, Removing and In‐

stalling, Except Power Seat

Note

The following describes the removing and installing on the left

side of the vehicle. Removing and installing on the right side is

identical.

Special tools and workshop equipment required
♦ Torque Wrench 1783 - 2-10Nm - VAG1783-
Removing
– Position the seat into its highest position.
– Remove the backrest adjuster. Refer to

⇒ “2.21.1 Backrest Adjuster, Removing and Installing, Except

Power Seat”, page 358

 .

– Remove the seat height adjustment handle. Refer to

⇒ “2.18 Seat Height Adjustment Handle, Removing and In‐

stalling”, page 352

 .

– Remove the sill-side seat trim. Refer to

⇒ “2.14.1 Door Sill Side Seat Trim, Removing and Installing,

Except Power Seat”, page 345

 .

– Remove the bolts -2-.
– Remove the lever -1-.

– Remove the lock washer -1-.
– Remove the bolts -1 and 3-.

– Remove the seat height adjuster -2-.
Installing
Install in reverse order of removal while paying attention to the

following:

Note

The bolts -1- and the bolt -3- are different lengths.

The bolt -3- is shorter.

The bolt -3- has a larger bolt head.

Ensure the correct allocation.

– Push the seat downward via the backrest.
– Attach the seat height adjuster -2-.

– Tighten the bolts -1 and 3-.
Tightening Specifications
♦ Refer to

⇒ “2.6.1 Overview - Seat Height Adjuster, Except Power Seat”,

page 331

2.19.2

Seat Height Adjuster, Removing and In‐

stalling, Power Seat

Note

The following describes the removing and installing on the left

side of the vehicle. Removing and installing on the right side is

identical.

Special tools and workshop equipment required
♦ Torque Wrench 1783 - 2-10Nm - VAG1783-
Removing
– Remove the front seat. Refer to

⇒ “2.10 Front Seat, Removing and Installing”, page 335

 .

– Attach the front seat to the Fixture For Seat Repair . Refer to

⇒ “1.2 Front Seat, Mounting on Fixture for Seat Repair”, page

311

 .

– Remove the sill-side seat trim. Refer to

⇒ “2.14.2 Door Sill Side Seat Trim, Removing and Installing,

Power Seat”, page 347

 .

– Disconnect the connector -1- at seat height adjustment motor

-2-.


Content   ..  424  425  426  427   ..