Volkswagen Golf / Golf GTI / Golf Variant. Manual - part 421


  Index      Volkswagen     Volkswagen Golf / Golf GTI / Golf Variant - service repair manual 2013 year


Search            copyright infringement  


Content   ..  419  420  421  422   ..


Volkswagen Golf / Golf GTI / Golf Variant. Manual - part 421


2.6.2

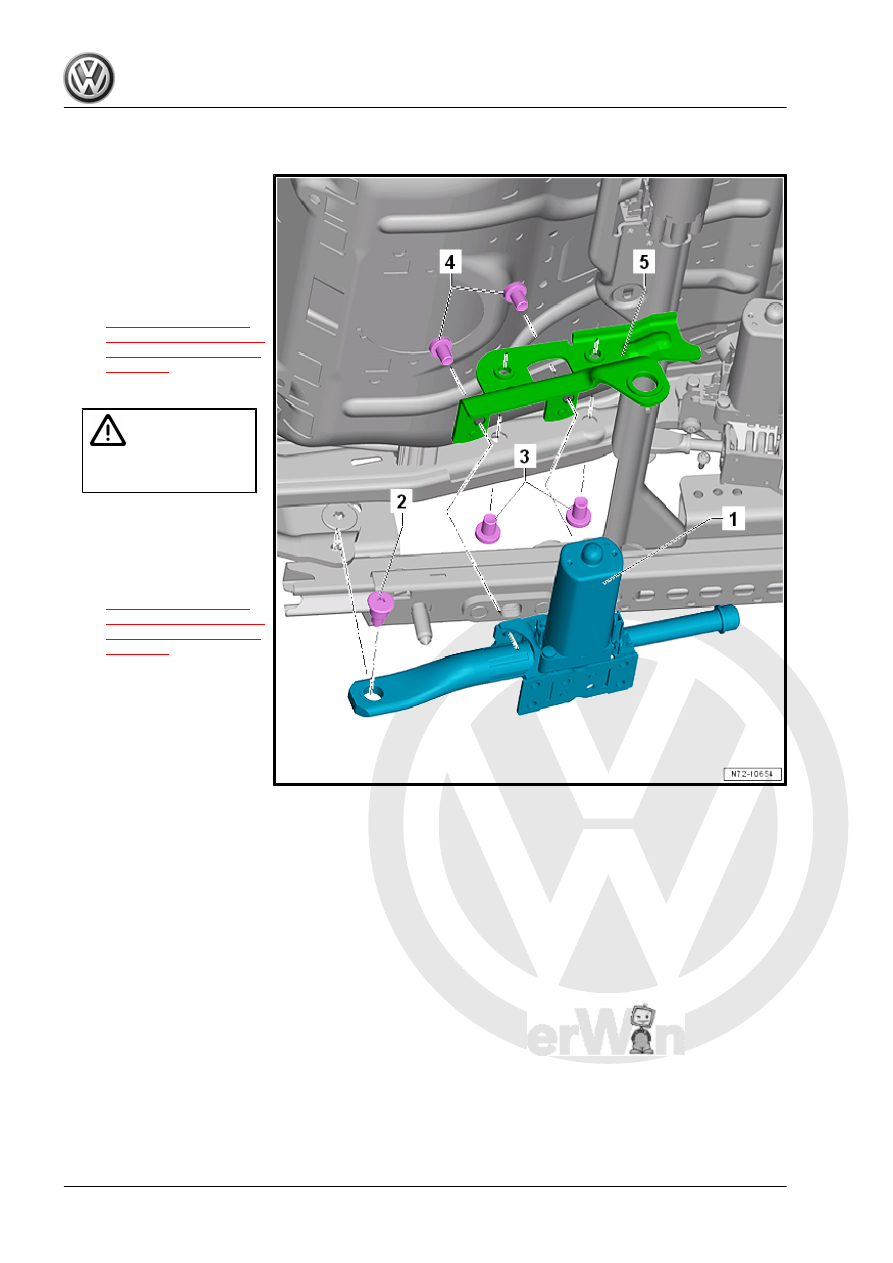
Overview - Seat Height Adjuster, Power Seat

1 - Height Adjustment Motor

❑ Driver Seat Height Ad‐

justment Motor - V138-

❑ Front Passenger Seat

Height Adjustment Mo‐

tor - V246-

❑ Removing and instal‐

ling. Refer to

⇒ “2.19.2 Seat Height

Adjuster, Removing and

Installing, Power Seat”,

page 355

 .

2 - Screw

Caution

The bolt has a left-hand

thread.

❑ 22 Nm
❑ Self-locking
❑ Replace after removing
❑ Removing and instal‐

ling. Refer to

⇒ “2.19.2 Seat Height

Adjuster, Removing and

Installing, Power Seat”,

page 355

 .

❑ Clean the threaded hole

with a thread tap.

3 - Screws

❑ 20 Nm
❑ Quantity: 2
❑ Self-locking
❑ Replace after removing
❑ Threaded holes for the bolts must be cleaned, for example, with a thread tap

4 - Screws

❑ 10 Nm
❑ Quantity: 2
❑ Self-locking
❑ Replace after removing
❑ Threaded holes for the bolts must be cleaned, for example, with a thread tap

5 - Bracket

❑ Bolted with the seat pan

2.7

Overview - Seat Angle Adjuster

1 - Angle Adjustment Motor

❑ Driver Seat Angle Ad‐

justment Motor - V243-

❑ Front Passenger Seat

Angle Adjustment Motor

- V244-

❑ Removing and instal‐

ling. Refer to

⇒ “2.17 Seat Angle Ad‐

juster, Removing and

Installing”, page 351

 .

2 - Bracket

❑ Bolted with the seat pan

3 - Screw

❑ 20 Nm
❑ Self-locking
❑ Replace after removing
❑ Clean the threaded hole

with a thread tap.

4 - Screws

❑ 10 Nm
❑ Quantity: 2
❑ Self-locking
❑ Replace after removing
❑ Threaded holes for the

bolts must be cleaned,

for example, with a

thread tap

2.8

Overview - Storage Compartment

1 - Screw

❑ 1.5 Nm
❑ Quantity: 2

2 - Storage Compartment

❑ Depending on the vehi‐

cle equipment level

❑ Removing and instal‐

ling. Refer to

⇒ “2.35 Storage Com‐

partment, Removing

and Installing”,

page 371

 .

❑ Cannot be disassem‐

bled

❑ Allocation. Refer to the

Parts Catalog.

3 - Spring Nut

❑ Quantity: 2
❑ Inserted in the seat pan
❑ Replace any damaged

or deformed threaded

clips

4 - Seat Pan

2.9

Overview - Fire Extinguisher

1 - Bracket

❑ Removing
– Remove the bracket

-4-.

– Remove the seat pan

cover and cushion. Re‐

fer to

⇒ “1.4 Seat Pan Cover

and Cushion, Removing

and Installing”,

page 405

 .

WARNING

Danger of eye injury.

Wear protective eye‐

wear.

– Drill out the rivets -2- us‐

ing a drill and remove

the bracket.

2 - Rivet

❑ Quantity: 3

3 - Screw

❑ 8 Nm
❑ Quantity: 2

4 - Bracket

❑ Removing
– Remove the fire extin‐

guisher -6-.

– Remove the bolts -3-

and the bracket.

5 - Mounting Strap
6 - Fire Extinguisher

❑ Removing
– Open the mounting strap -5- and remove the fire extinguisher.

2.10

Front Seat, Removing and Installing

Note

The following describes removing and installing the left seat.

Removing and installing the right seat is identical.

The following describes removing and installing a manual

seat. Removing and installing a power seat is identical.


Content   ..  419  420  421  422   ..