Volkswagen Golf / Golf GTI / Golf Variant. Manual - part 323


  Index      Volkswagen     Volkswagen Golf / Golf GTI / Golf Variant - service repair manual 2013 year


Search            copyright infringement  


Content   ..  321  322  323  324   ..


Volkswagen Golf / Golf GTI / Golf Variant. Manual - part 323


4.1.3

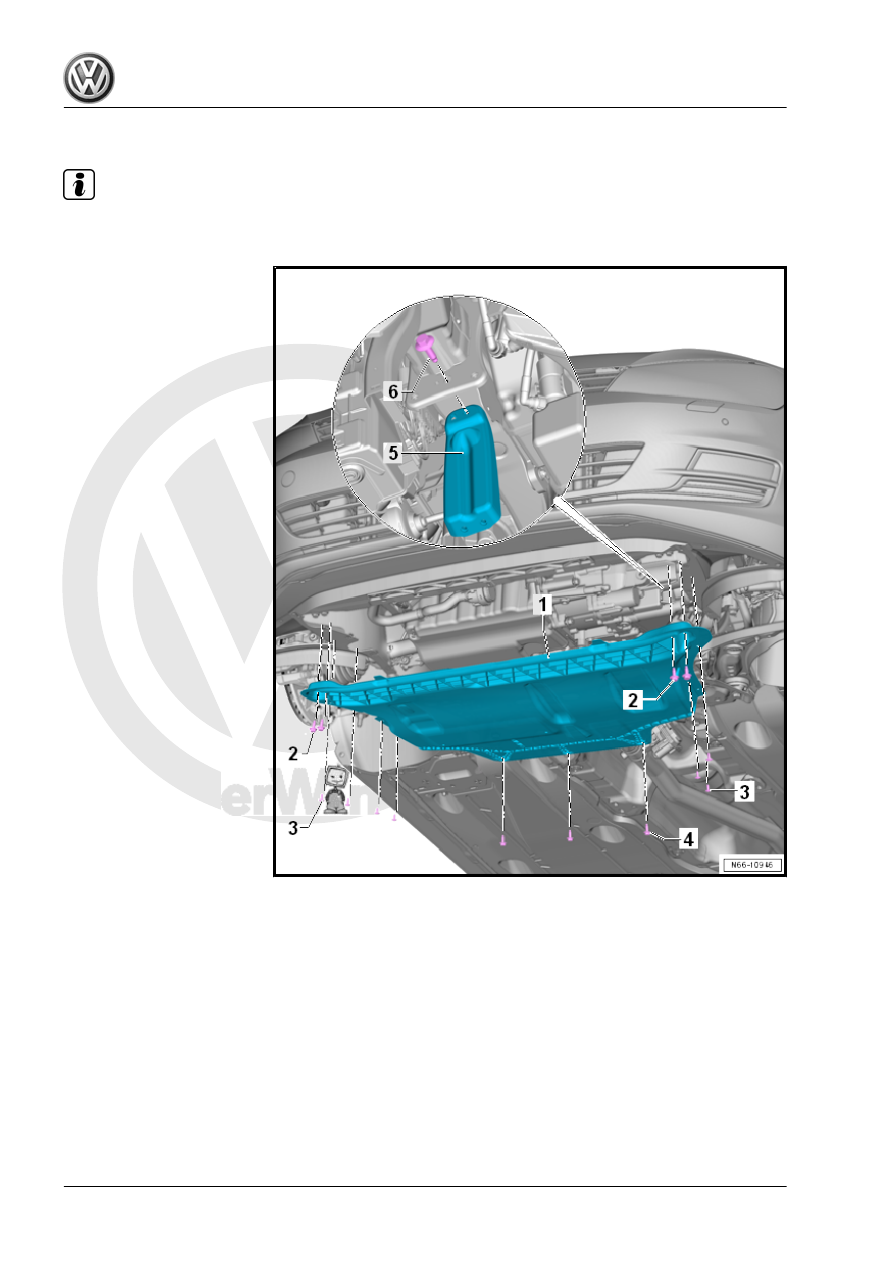
Overview - Impact Guard

Note

Depending on the engine version, slight deviations must be considered when removing and installing.

1 - Impact Guard

❑ Removing
– Remove the bolts

-2, 3, and 4-.

– Remove the noise insu‐

lation toward the rear

from the lock carrier.

2 - Bolt

❑ 20 Nm
❑ Quantity: 2 on each side

3 - Bolt

❑ 2 Nm
❑ Quantity: 3 on the left

side

❑ Quantity: 4 on the right

side

4 - Bolt

❑ 20 Nm
❑ Replace after removing
❑ Microencapsulated
❑ Quantity: 3

5 - Impact Guard Bracket

❑ Left and right

6 - Bolt

❑ 20 Nm
❑ Quantity: 1 on each side

5

Underbody Panel

⇒ “5.1 Overview - Underbody Panels”, page 425
⇒ “5.2 Underbody Panels, Removing and Installing”, page 426
⇒ “5.3 Center Underbody Panels, Removing and Installing”, page

427
⇒ “5.4 Rear Underbody Panel, Removing and Installing”,

page 429
⇒ “5.5 Front Tunnel Brace, Removing and Installing”, page 430
⇒ “5.6 Rear Tunnel Brace, Removing and Installing”, page 431

5.1

Overview - Underbody Panels

1 - Front Cover

❑ Left and right
❑ Removing and instal‐

ling. Refer to

⇒ “5.2 Underbody Pan‐

els, Removing and In‐

stalling”, page 426

 .

2 - Underbody Trim Panels

❑ Left and right
❑ Removing and instal‐

ling. Refer to

⇒ “5.2 Underbody Pan‐

els, Removing and In‐

stalling”, page 426

 .

3 - Nut

❑ 2 Nm
❑ With retainer
❑ Quantity: 7 on each side

4 - Rear Underbody Trim Panel

❑ Removing and instal‐

ling. Refer to

⇒ “5.4 Rear Underbody

Panel, Removing and

Installing”, page 429

 .

5 - Spring Nut
6 - Bolt

❑ 2 Nm

7 - Expanding Rivet
8 - Lock Washer
9 - Rear Tunnel Brace

❑ Removing and instal‐

ling. Refer to

⇒ “5.6 Rear Tunnel Brace, Removing and Installing”, page 431

 .

10 - Nut

❑ 20 Nm
❑ Quantity: 2 on each side

11 - Center Underbody Trim Panel

❑ Removing and installing. Refer to

⇒ “5.3 Center Underbody Panels, Removing and Installing”, page 427

 .

12 - Expanding Rivet

❑ Quantity: 4

13 - Front Tunnel Brace

❑ Removing and installing. Refer to 

⇒ “5.5 Front Tunnel Brace, Removing and Installing”, page 430

 .

14 - Bolt

❑ 20 Nm
❑ Quantity: 2 on each side

5.2

Underbody Panels, Removing and In‐

stalling

Special tools and workshop equipment required
♦ Torque Wrench 1783 - 2-10Nm - VAG1783-

Note

Depending on the engine version, slight deviations must be considered when removing and installing.

Removing

– Remove the center underbody panels. Refer to

⇒ “5.3 Center Underbody Panels, Removing and Installing”,

page 427

 .

– Release the mounting tab and remove the front cover

-2 or 5- from the retainer in the direction of travel toward the

rear.

– Remove the nuts -3-.
– Remove the underbody panel -1 or 4-.
Installing
Install in reverse order of removal.
Tightening Specifications

5.3

Center Underbody Panels, Removing

and Installing

⇒ “5.3.1 Center Underbody Trim Panels, Removing and Installing,

Underbody Trim Panels”, page 427
⇒ “5.3.2 Center Underbody Trim Panels, Removing and Installing,

Short Trim Panels”, page 428

5.3.1

Center Underbody Trim Panels, Removing and Installing, Underbody Trim

Panels

Note

Depending on the engine version, slight deviations must be considered when removing and installing.

Removing


Content   ..  321  322  323  324   ..