Volkswagen Golf / Golf GTI / Golf Variant. Manual - part 224


  Index      Volkswagen     Volkswagen Golf / Golf GTI / Golf Variant - service repair manual 2013 year


Search            copyright infringement  


Content   ..  222  223  224  225   ..


Volkswagen Golf / Golf GTI / Golf Variant. Manual - part 224


Installing
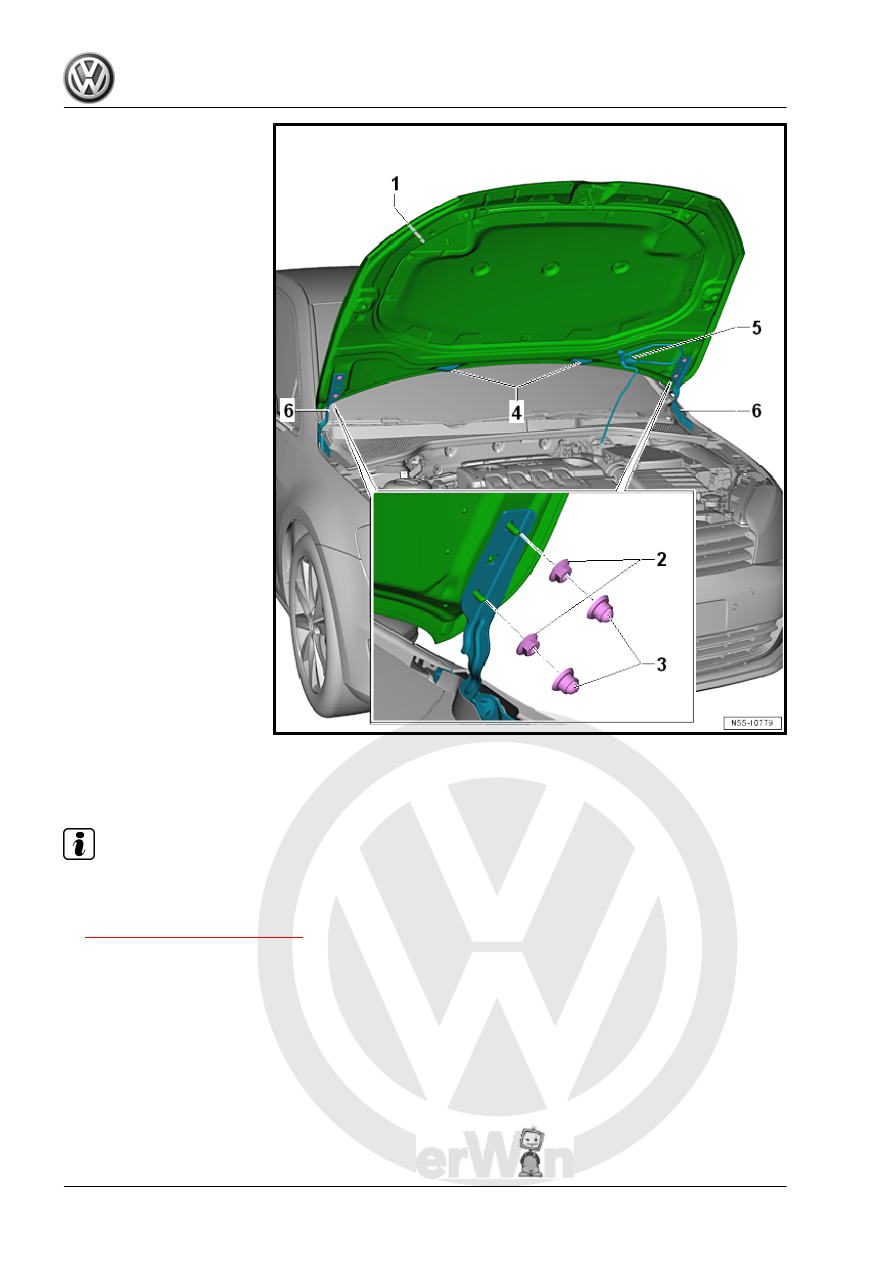
Install the hood -1- in reverse order of removal.

Note

Route the line -5- in a curve. If the line is installed twisted, it will kink.

– Adjust the hood -1-. Refer to

⇒ “1.4 Hood, Adjusting”, page 28

 .

Tightening Specifications

1.4

Hood, Adjusting

Special tools and workshop equipment required
♦ Torque Wrench 1331 5-50Nm - VAG1331-

Note

The vehicle must be on all four wheels when adjusting the hood.

The left and right adjusting buffers -2- are not meant for adjusting. They stabilize and cushion the hood.

The hood is properly adjusted when there is an overall even gap dimension when it is closed. The hood may

not be positioned too far inward or outward. The contours must also align.

The hood must engage into the latch without using much force.

– Remove the catch -1-. Refer to

⇒ “1.8 Catch, Removing and Installing”, page 36

 .

– The height of the front of the hood can be adjusted in relation

to the fenders using the lid lock -4-. Refer to

⇒ “1.6 Latch, Adjusting”, page 33

 .

– After adjusting the hood the catch -1- can be reinstalled and

adjusted. Refer to 

⇒ page 38

 .

Tightening Specifications
Hinges, Adjusting

Note

The nuts -2- and bolts -5- are not removed, just loosened.

– If equipped, remove the caps -3 or 4-.
– By loosening the hex nuts -5- on the left and right lid hinges

-1-, the hood can be adjusted from side to side in direction of

-b arrow- and lengthwise in direction of -a arrows- between the

fenders.

– By loosening the bolts -2- on the left and right lid hinges -1-,

the hood can be adjusted in height in direction of -c arrow- and

lengthwise in direction of -a arrows- between the fenders.

– Make sure the gap dimensions are even. Refer to ⇒ Body Re‐

pair; Rep. Gr.  00 ; Body Gap Dimensions; Front Body

– After adjusting, perform corrosion protection measures on the

lid hinges -1-, the hex nuts -5- and the bolts -2-.

– If necessary, adjust the adjusting buffers.
Tightening Specifications
Adjusting Buffer, Adjusting

– Turn the adjusting buffer -1- in direction of -arrows- to adjust.
– Install and adjust the catch after adjusting the hood -2-. Refer

to 

⇒ page 38

 .

1.5

Latch, Removing and Installing

Special tools and workshop equipment required
♦ Torque Wrench 1331 5-50Nm - VAG1331-


Content   ..  222  223  224  225   ..