Volkswagen Golf / Golf GTI / Golf Variant. Manual - part 220


  Index      Volkswagen     Volkswagen Golf / Golf GTI / Golf Variant - service repair manual 2013 year


Search            copyright infringement  


Content   ..  218  219  220  221   ..


Volkswagen Golf / Golf GTI / Golf Variant. Manual - part 220


Note

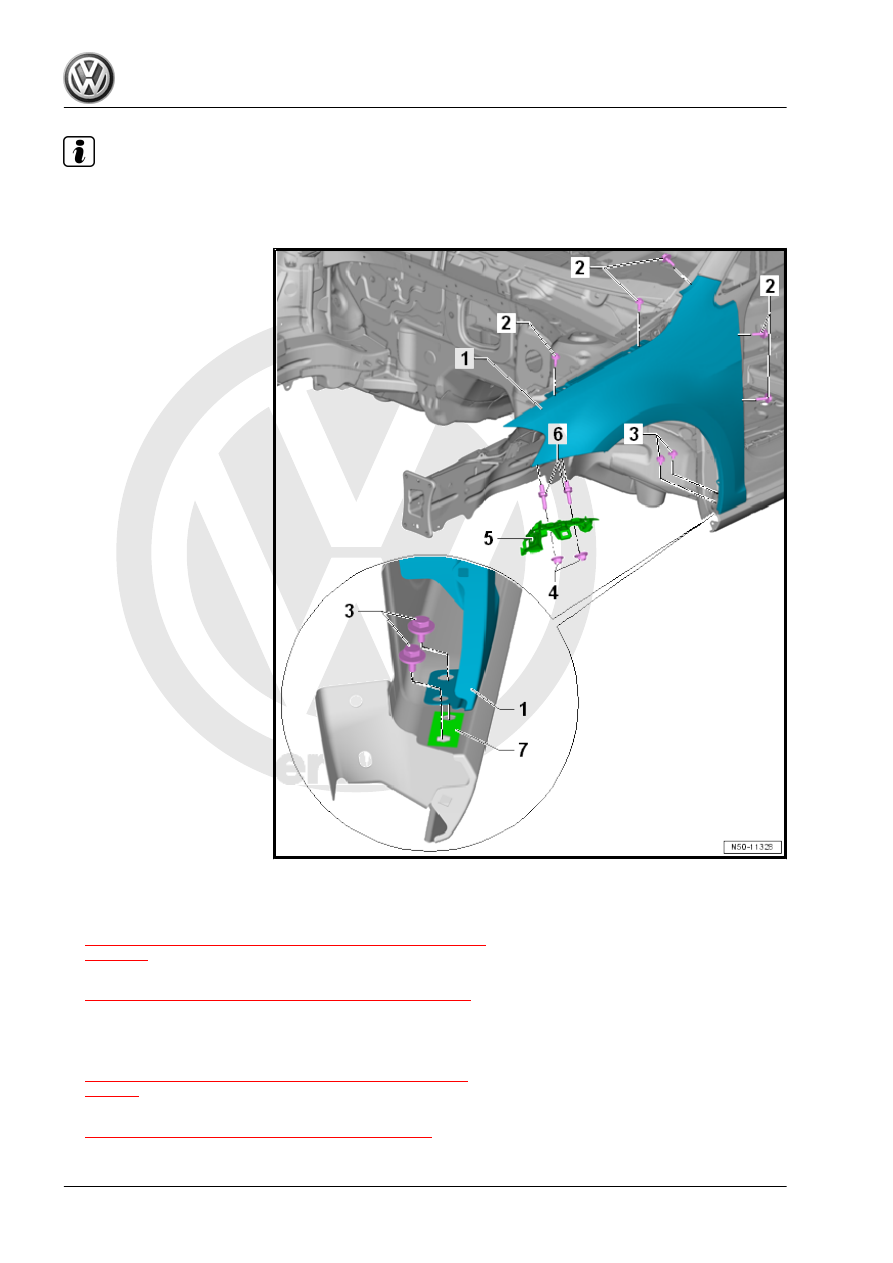
The following describes the removal and installation of the left fender. Removing and installing the right fender

is identical.

Removing
– Remove the front wheel housing liner. Refer to

⇒ “8.4 Front Wheel Housing Liner, Removing and Installing”,

page 447

 .

– Remove the front bumper cover. Refer to

⇒ “1.5 Bumper Cover, Removing and Installing”, page 317

 .

– Remove the headlamps. Refer to ⇒  Electrical Equipment;

Rep. Gr.  94 ; Headlamp; Headlamp, Removing and Installing .

– Remove the left plenum chamber cover. Refer to

⇒ “3.4 Plenum Chamber Cover, Removing and Installing”,

page 19

 .

– Remove the drip rail. Refer to

⇒ “3.4 Drip Rail, Removing and Installing”, page 409

 .

– Remove the hex nut -4- and then remove the guide -5-.

– Remove the fender noise insulation -item 5-

⇒ Item 5 (page 10)

 .

– Remove the brace insulation -item 4- 

⇒ Item 4 (page 10)

 .

– Remove the double bolts -6-.
– Remove the bolts -2 and 3-.
– Carefully remove the fender -1-.

Note

The Zinc Spacer - AKL 381 035 50- -7- (if present) will be damaged during the removal.

Note

Install the fender -1- so that it is free of tension.

Installing
Install in reverse order of removal. Note the following:

– With the fender brace loosened, align the fender free of ten‐

sion. Refer to

⇒ “2.4 Fender Brace, Removing and Installing”, page 14

 .

– Always insert the Zinc Spacer - AKL 381 035 50- -7- between

the fender and side sills.

– Note the parallel alignment and gap dimensions. Refer to

⇒ Body Repair; Rep. Gr.  00 ; Body Gap Dimensions; Front

Body .

Tightening Specifications

2.4

Fender Brace, Removing and Installing

Special tools and workshop equipment required
♦ Torque Wrench 1783 - 2-10Nm - VAG1783-

Note

The following describes the removal and installation of the left fender brace. Removing and installing the right

fender brace is identical.

Removing
– Remove the front bumper cover. Refer to

⇒ “1.5 Bumper Cover, Removing and Installing”, page 317

 .

– Remove the headlamps. Refer to ⇒  Electrical Equipment;

Rep. Gr.  94 ; Headlamp; Headlamp, Removing and Installing .

– Remove the guide for the front bumper cover -item 7-

⇒ Item 7 (page 10)

 .

– Remove the double bolts -item 8- 

⇒ Item 8 (page 10)

 .

– Remove the bolts -2- and remove the fender brace -1-.
Installing
Install in reverse order of removal. Note the following:
– Adapt the fender brace and the fender to the hood and bump‐

er. Refer to ⇒ Body Repair; Rep. Gr.  00 ; Body Gap Dimen‐

sions; Front Body .

Tightening Specifications

Component

Tightening Specifica‐

tions

Fender brace to the body

6 Nm


Content   ..  218  219  220  221   ..