Volkswagen Golf / Golf GTI / Golf Variant. Manual - part 1008


  Index      Volkswagen     Volkswagen Golf / Golf GTI / Golf Variant - service repair manual 2013 year


Search            copyright infringement  


Content   ..  1006  1007  1008  1009   ..


Volkswagen Golf / Golf GTI / Golf Variant. Manual - part 1008


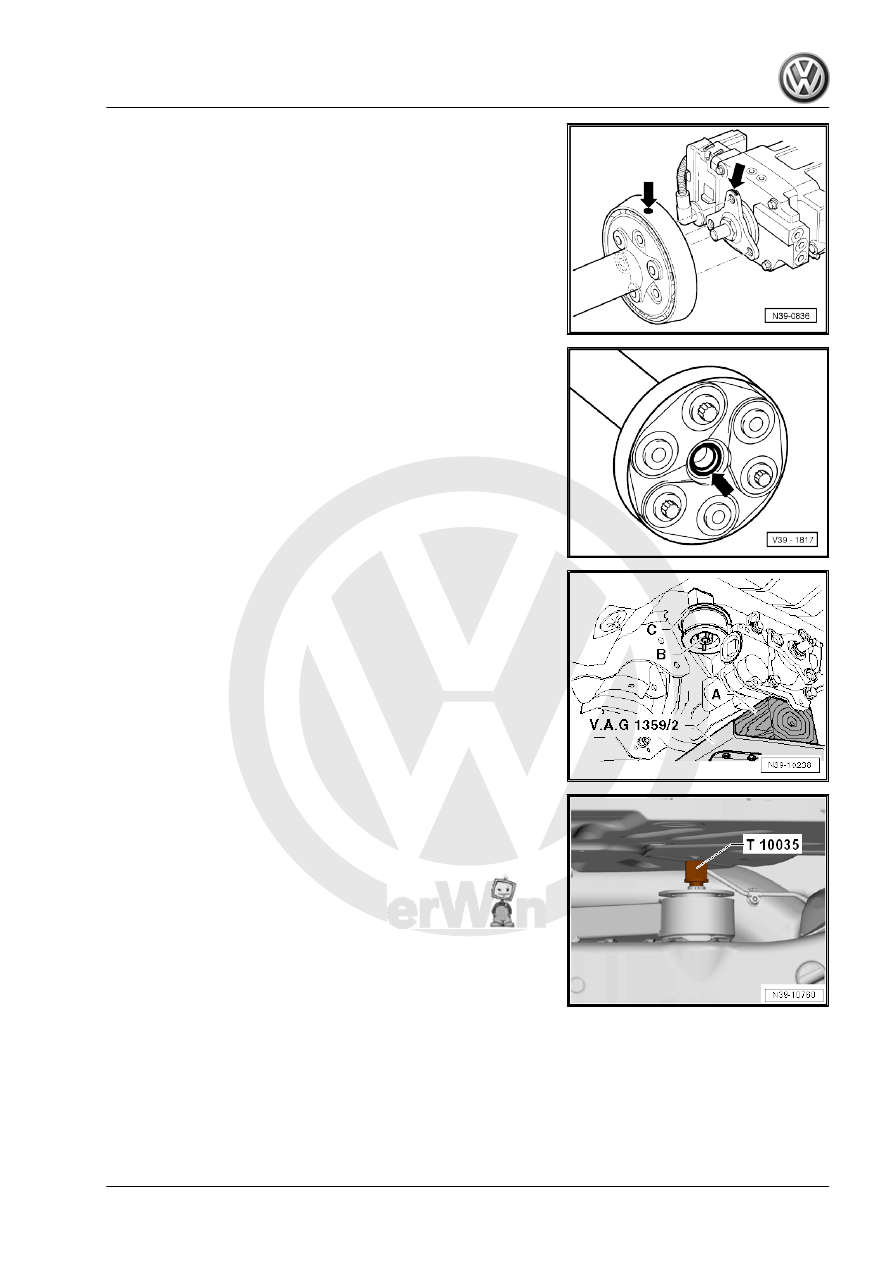
– Attach the driveshaft to the flange/driveshaft on the rear final

drive so that the markings -arrows- line up. Install the bolts

hand-tight at first.

– When removing and installing the driveshaft, be careful not to

damage the bushing -arrow-.

– Place washer -C- on the front driveshaft and faster hand tight

with a new bolt -B-. Do not tighten the bolt yet.

– Bolt the rear bolt for the final drive on the rear axle using the

Multipoint Socket - T10035- . Tightening specification, refer to

⇒  Suspension, Wheels, Steering; Rep. Gr.  40 ; Subframe;

Overview - Subframe .

– Bolt the rear axle on the body, refer to ⇒  Suspension, Wheels,

Steering; Rep. Gr.  42 ; Rear Axle; Rear Axle, Removing and

Installing .

Golf 2015 ➤

Rear Final Drive - Edition 09.2013

3. Final Drive    

25

– Tighten the final drive from “underneath” -arrow-. Tightening

specification, refer to ⇒  Suspension, Wheels, Steering; Rep.

Gr.  40 ; Subframe; Overview - Subframe .

– Tighten the driveshaft. Tightening specification.

– Connect the connector -B- from the All Wheel Drive Control

Module - J492- - A-. Ignore item -C-.

Note

For the next steps it is important that the multi-link axle springs

are removed. This applies to the right and left side.

– Position the Engine and Gearbox Jack - VAS6931- -1- under

the tie rod, and push upward until the driveshaft can be inser‐

ted in the final drive flange.

Note

Ignore items -2 and 3-.

– Tighten drive axles. Tightening specification, refer to ⇒  Sus‐

pension, Wheels, Steering; Rep. Gr.  42 ; Drive Axle; Drive

Axle, Removing and Installing .

– Install the rear stabilizer bar, refer to ⇒  Suspension, Wheels,

Steering; Rep. Gr.  42 ; Stabilizer Bar; Stabilizer Bar, Remov‐

ing and Installing .

– Install the rear section of the exhaust system, refer to ⇒  En‐

gine Mechanical, Fuel Injection and Ignition; Rep. Gr.  26 ;

Exhaust Pipes/Mufflers; Overview - Muffler .

If final drive is replaced:
– Check fluid level in Haldex clutch, refer to

⇒ “7.1 Haldex Clutch Oil, Checking Level”, page 41

 .

– Final Drive Fluid Level, Checking, refer to

⇒ “6.1 Gear Oil, Checking Level”, page 40

 .

Golf 2015 ➤

Rear Final Drive - Edition 09.2013

26

     Rep. Gr.39 - Final Drive, Differential

4

Assembly Mounts

⇒ “4.1 Overview - Assembly Mounts”, page 27
⇒ “4.2 Subframe Mount, Removing and Installing”, page 28

4.1

Overview - Assembly Mounts

Note

Replace the bonded rubber bushings in “pairs” (upper and lower

bushings).

1 - “Upper Rear” Bonded Rub‐

ber Bushing

❑ With buffer
❑ Allocation, refer to the

Parts Catalog

❑ Remove the buffer for

removal and installation

❑ Removing and instal‐

ling, refer to

⇒ “4.2 Subframe Mount,

Removing and Instal‐

ling”, page 28

2 - “Lower Rear” Bonded Rub‐

ber Bushing

❑ Without buffer
❑ Allocation, refer to the

Parts Catalog

❑ Removing and instal‐

ling, refer to

⇒ “4.2 Subframe Mount,

Removing and Instal‐

ling”, page 28

3 - “Lower Rear” Bonded Rub‐

ber Bushing

❑ Without buffer
❑ Allocation, refer to the

Parts Catalog

❑ Removing and instal‐

ling, refer to

⇒ “4.2 Subframe Mount,

Removing and Instal‐

ling”, page 28

4 - “Lower Front” Bonded Rub‐

ber Bushing

❑ With buffer
❑ Allocation, refer to the Parts Catalog
❑ Remove the buffer for removal and installation
❑ Removing and installing, refer to 

⇒ “4.2 Subframe Mount, Removing and Installing”, page 28

5 - Rear Final Drive

❑ Remove to replace the bonded rubber bushing, refer to

⇒ “4.2 Subframe Mount, Removing and Installing”, page 28

6 - “Upper Front” Bonded Rubber Bushing

❑ Without buffer

Golf 2015 ➤

Rear Final Drive - Edition 09.2013

4. Assembly Mounts    

27

❑ Allocation, refer to the Parts Catalog
❑ Removing and installing, refer to 

⇒ “4.2 Subframe Mount, Removing and Installing”, page 28

7 - “Upper Rear” Bonded Rubber Bushing

❑ With buffer
❑ Allocation, refer to the Parts Catalog
❑ remove the buffer for removal and installation
❑ Removing and installing, refer to 

⇒ “4.2 Subframe Mount, Removing and Installing”, page 28

4.2

Subframe Mount, Removing and Instal‐

ling

Special tools and workshop equipment required
♦ Thrust Piece3291/1 from the Bushing Tool Kit - 3291-
♦ Spindle from the Bushing Tool Set - 3292-
♦ Thrust pieces 3348 and 3348/1 from the Bearing Installer -

Multiple Use - 3348-

♦ Puller - Kukko Internal - 46-56mm - 21/7- -1-
♦ Puller - Kukko Counterstay - 22/2- -4-
Removing
– Rear final drive, removing, refer to

⇒ “3.1 Final Drive, Removing and Installing”, page 20

Removing “Upper” Bearing

WARNING

Wear safety gloves.

To position the support :
– Break two pieces -arrows- out of the bearing collar.

Golf 2015 ➤

Rear Final Drive - Edition 09.2013

28

     Rep. Gr.39 - Final Drive, Differential


Content   ..  1006  1007  1008  1009   ..