Volkswagen Golf / Golf GTI / Jetta. Manual - part 707


  Index      Volkswagen     Volkswagen Golf / Golf GTI / Jetta - service repair manual 1999-2005 year


Search            copyright infringement  


Content   ..  705  706  707  708   ..


Volkswagen Golf / Golf GTI / Jetta. Manual - part 707


Exception: If bonding is not performed immediately after 
cutting back, remaining material must be activated using 
Activator D 181 801 A1 . 

Preparing new window for glazing


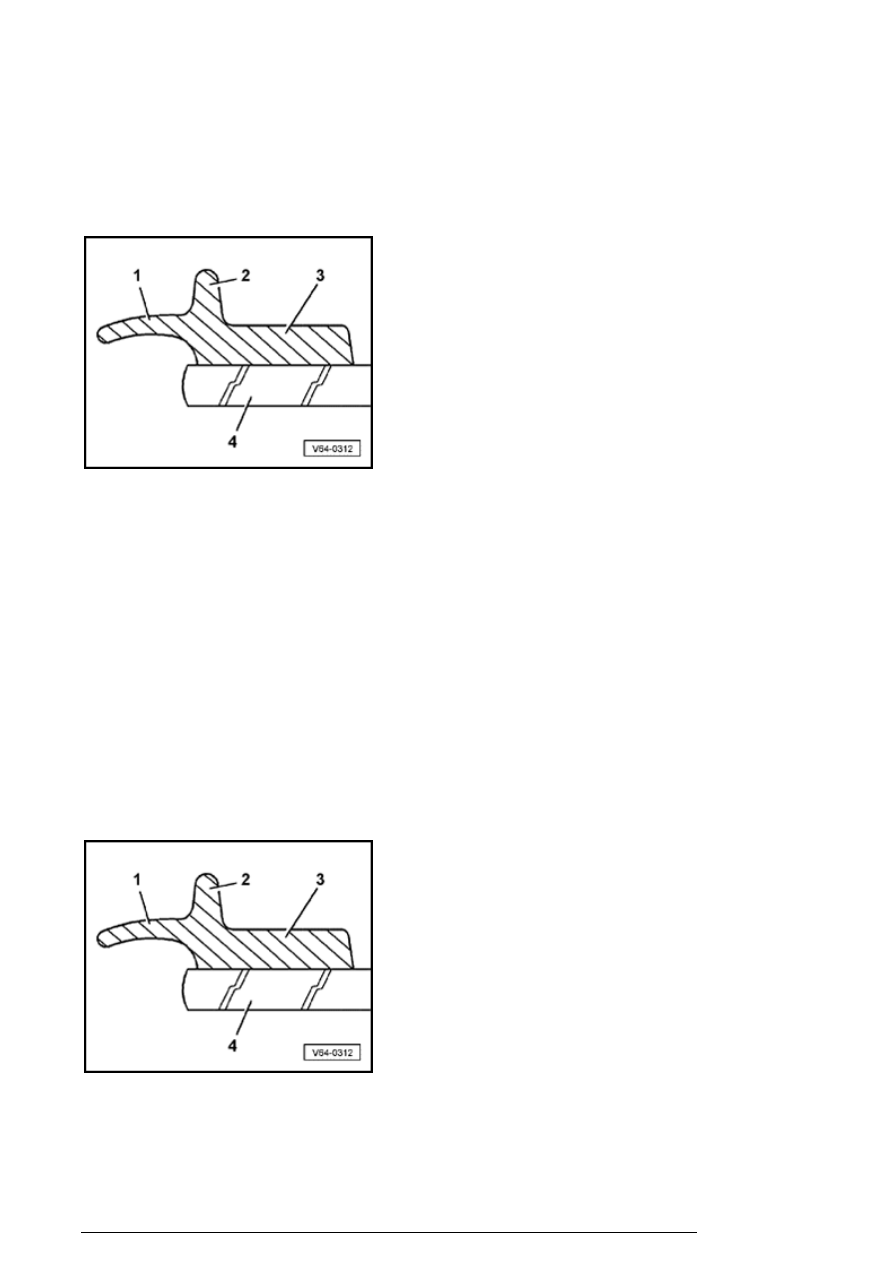
New windows are shipped pre-coated with -PUR-. Pre-
coating consists of positions - 1 - - 2 - and - 3 - 

1. Sealing lip  
2. Spacer  
3. Application are for adhesive bead  
4. Washer  

Side window


Note: 

Due to production change of pre-coating material for side 
windows, handle pre-coating as follows:  
 

- Saturate cloth with silicone remover. 

- Always wipe application area for adhesive bead  - 3 - twice 
using saturated cloth. 

- Normally, after an air drying time of at least five minutes, 

Flush-bonded windows

13/2/2005


Activator D 181 801 A1 must be used for pre-coated 
windows. 

Gap dimensions for side windows


When inserting side window, a gap dimension of 56 mm 
must be maintained between upper edge of window and 
window flange at side panel.


Reason: Distance is necessary for securing roof base 
carrier.


Rest of bonding procedure remains unchanged.

Preparing new window without pre-coating 
for glazing


For 2-door Golf and Golf/Jetta Wagon, a new, non-pre-
coated side window has been introduced. On new side 
windows, only PUR-sealing lip - 1 - and spacer - 2 - has still 
been sprayed. 

1. Sealing lip  
2. Spacer  
3. Washer  

Note: 

Application area for adhesive bead - 3 - is not pre-coated 
and not primed.  
 

- Clean window circumference to width of 20 mm all around 
using Cleaning solution D 009 401 04 . 

- Then rub window circumference dry using a lint-free rag. 

Warning!  

Ceramic application on window is not primer! It must 
be primed before application of adhesive sealing 

Flush-bonded windows

13/2/2005


material! Only use primer D 009 200 02 ! 

- Now apply primer - 2 - uniformly in one stroke using 
Applicator D 009 500 25 - 1 - 

Dry time approx. 10 minutes  
 

Note: 

For adhesive bead application, a nozzle must be cut 
exactly so that adhesive bead can be applied to a width of 
8 mm and a height of 12 mm.   
 

All other windows


- Rub pre-coating with a dry, lint-free rag. 

Warning!  

Do not prime or use a cleaning solution on pre-coating.

Flush-bonded windows

13/2/2005


- Using Applicator D 009 500 25 - 1 - (felt ball with wire), 
apply Activator D 181 801 A1 thinly onto pre-coating  - 2 - 
only. 

- Allow activator to air dry for at least 10 minutes.  

Note: 

Activator must not come into contact with paint - otherwise 
paint will be damaged.  
 
Activator must not be applied onto distributing wire for 
window heater.  
 

Preparing window flange for glazing


- Cut back remaining material using Scraper V.A.G1561/8 , 
do not remove all residue under any circumstance. 

Note: 

Residual material acts as a base for new adhesive sealing 
material. Keep adhesive surface free of dirt and grease.   
 

Warning!  


Activator must not come into contact with paint  - 
otherwise paint will be damaged.

Exception: If bonding is not performed immediately after 
cutting back, remaining material must be activated using 
Activator D 181 801 A1 . 

Note: 

If body flange is being worked on or is partially replaced, it 
must be cleaned and primed again after painting 
corresponding area.  
 

Flush-bonded windows

13/2/2005


Content   ..  705  706  707  708   ..