Volkswagen Golf / Golf GTI / Jetta. Manual - part 704


  Index      Volkswagen     Volkswagen Golf / Golf GTI / Jetta - service repair manual 1999-2005 year


Search            copyright infringement  


Content   ..  702  703  704  705   ..


Volkswagen Golf / Golf GTI / Jetta. Manual - part 704


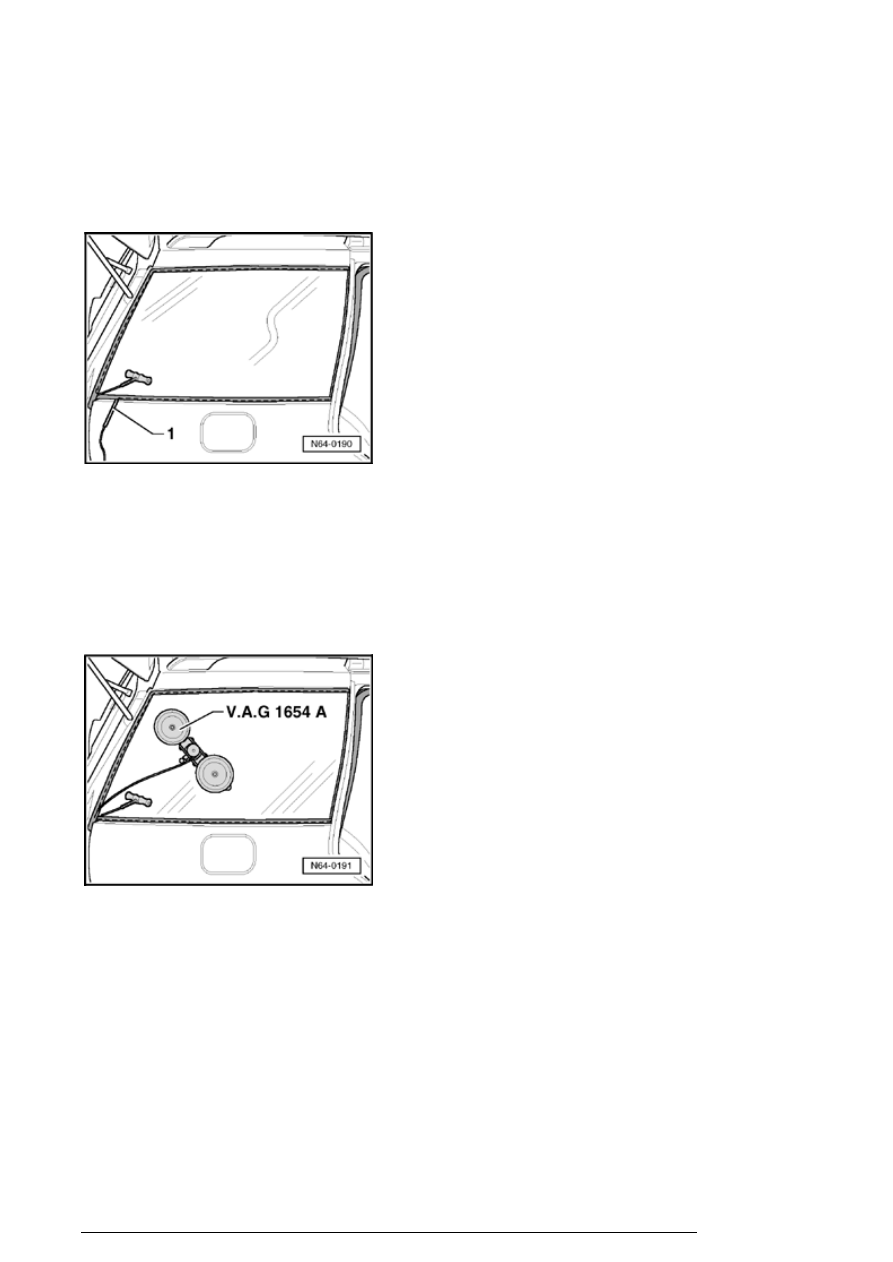
- Push cutting cord through adhesive sealant into vehicle 
interior using awl (from V.A.G1474 ). 

- Using small tube - 1 - , guide in cutting cord between seal 
and window flange. 

- Pull through outer cord end inward and counterhold using 
Pulling grip V.A.G 1351/1 . 

- Secure one cord end to Spooling tool V.A.G1654A and 
cut window free by positioning spooling tool. 

- While cutting free, press cutting cord against window 
using plastic wedge in order to have clearance from 
window flange. 

- In area of C-pillar, two securing pins are installed on 
window. Securing pins are cut through when cutting 
through adhesive bead. 


Window is re-installed without securing pins since they are 
not available as replacement parts.

Flush-bonded windows

13/2/2005


- As shown in illustration, one suction cup can be removed 
from spooling tool. By doing this, roller of spooling tool can 
be placed closer to window flange. 

Damaged side window, removing


Removing a damaged side window is performed same as 
for removing a damaged rear window 


64-1, Damaged 

rear window, removing

 . 

Side window, installing


Preparing undamaged window for glazing 


64-1, 

Preparing undamaged window for glazing

 . 

Preparing new window without pre-coating for glazing 


64-1, Preparing new window without pre-coating for 
glazing

 . 

Preparing window flange for glazing 


64-1, Preparing 

window flange for glazing

 . 

Installation notes 


64-1, Installation notes

 . 

Minimum curing time 


64-1, Minimum curing time

 . 

Rear window (Golf), assembly overview


Flush-bonded windows

13/2/2005


1. Rear window 

¡

Removing rear window 


64-1, 

Undamaged rear window, removing


¡

Installing rear window 


64-1, Rear 

window, installing


2. Gasket 

¡

for rear window wiper  


3. Sealing lip (component part of 

pre-coating)  

4. PUR adhesive sealant 

¡

Bead cross section:  

Width = 7 mm  
 

Flush-bonded windows

13/2/2005

¡

Minimum curing time 


64-1, 

Minimum curing time


5. Trim  

6. Contact for window heater  

7. Gap dimension - a - = 4.5 mm  

Height = 11 mm (including pre-coating, 
residual material on window glass and 
window flange)  
 

Undamaged rear window, removing


- Remove rear lid trim 


Repair Manual, Body Interior, Repair Group 70, Rear lid 

trim


- Disconnect connectors for heated rear window and press 
connector tabs onto window. 

- Removing rear window wiper motor 


Repair Manual, Electrical Equipment, Repair Group 92, 

Rear window wiper and washer system, servicing


- Removing auxiliary brake light 


Repair Manual, Electrical Equipment, Repair Group 94, 

- Loosen sealing lip from window flange using plastic 
wedge and spray in Cleaning solution D 009 401 04 (as a 
substitute for lubricant). 

Flush-bonded windows

13/2/2005


Content   ..  702  703  704  705   ..