Volkswagen Golf / Golf GTI / Jetta. Manual - part 1237


  Index      Volkswagen     Volkswagen Golf / Golf GTI / Jetta - service repair manual 1999-2005 year


Search            copyright infringement  


Content   ..  1235  1236  1237  1238   ..


Volkswagen Golf / Golf GTI / Jetta. Manual - part 1237


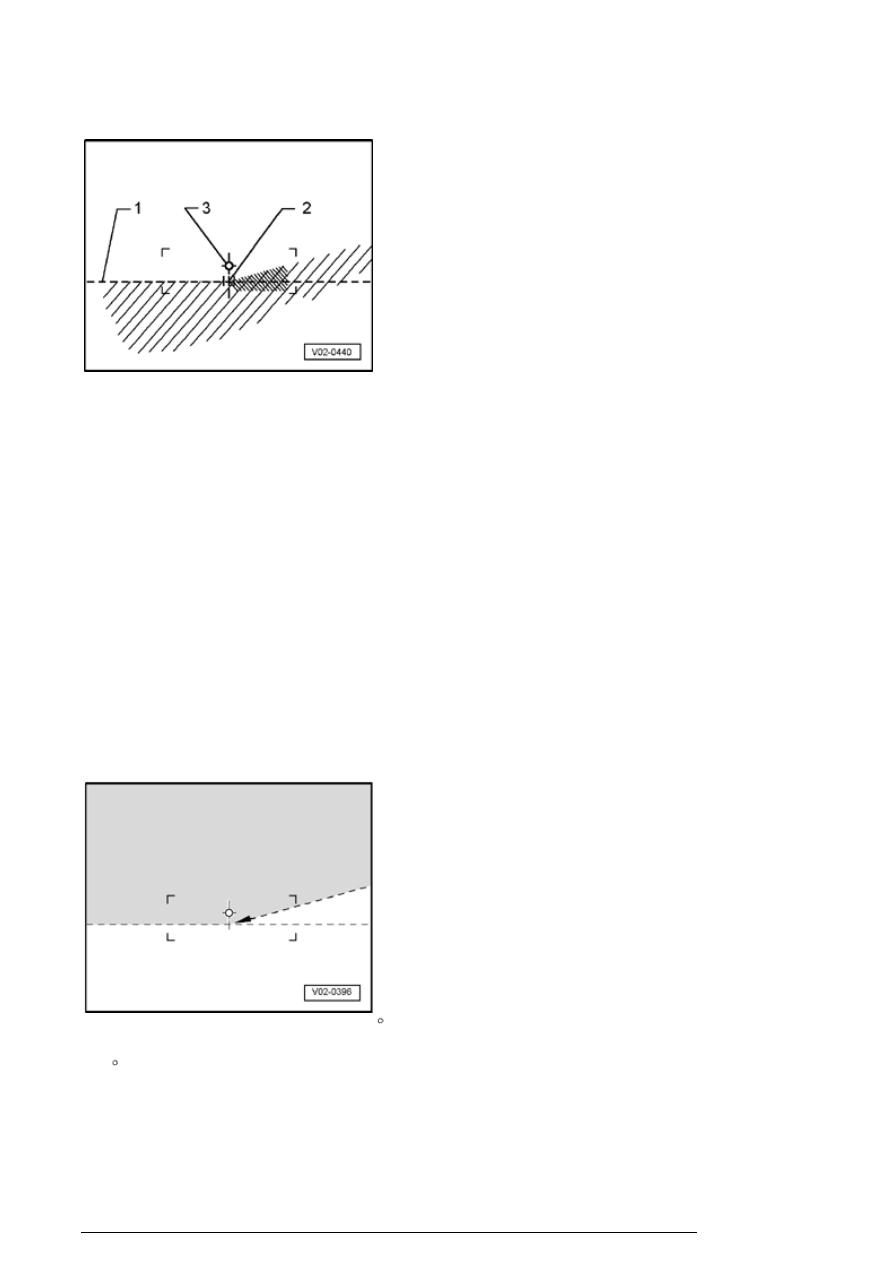
Check the following:

- With the low beam switched on check whether the 
horizontal light-dark border of the setting line  - 1 - contacts 
the test surface. 

- Check whether the break-away point - 2 - between the left 
horizontal part and the rising part on the right of the light-
dark border runs vertically through the center point  - 3 - 
The bright core of the light beam must be on the right of the 
vertical line. 

Note: 

To make it easier to find break-away point - 2 - cover and 
uncover left half of headlight (as viewed when looking 
forward) a few times. Then check low beam again.   
 
After correct adjustment of low beams the center point of 
the main beam must lie on the center mark  - 3 - .  
 

For the previous test screen with 15   -setting line, adjust 
as for new test screen. To avoid incorrect settings, ignore 
15   setting line.  


Other additional headlights:


Accessory auxiliary headlight systems must be checked 

Description of work (part 2 of 2)

13/2/2005


and adjusted according to the guidelines valid for them.

Adjusting headlights for the Golf


Adjusting headlights for the Jetta. 


01-8, Adjusting 

headlights for the Jetta


Note: 

At the same time the low-beam headlights are adjusted, the 
fog lamps and high-beam headlights are adjusted as well.   


Headlight (left):


Both adjustment screws on right-hand headlight are a 
mirror image.

A - Lateral adjustment 

B - Height adjustment 

- Adjust headlights with a suitable phillips head screwdriver 
through the bores - A - and - B - 

Note: 

Also, check if the reflectors in both headlights adjust 
equally by manipulating the beam width regulation.   
 

Adjusting headlights for the Jetta


Adjusting headlights for the Golf 


01-8, Adjusting 

headlights for the Golf


Note: 

At the same time the low-beam headlights are adjusted, the 
fog lamps and high-beam headlights are adjusted as well.   
 

Description of work (part 2 of 2)

13/2/2005


Headlight (left):


Both adjustment screws on right-hand headlight are a 
mirror image.

1 - Lateral adjustment 

2 - Height adjustment 


Adjust the adjustment wheel with a phillips head 
screwdriver to adjust the lateral and height settings.

Note: 

Also, check if the reflectors in both headlights adjust 
equally by manipulating the beam width regulation.   
 

Headlight adjustment, checking headlight with 
gas discharge lamps


Special tools, testers and auxiliary items required 

Vehicle Diagnosis, Testing and Information System VAS 
5051A  
 
Diagnostic cable VAS 5051/6A  
 
Headlight setting unit VAS 5046/  
 

Description of work (part 2 of 2)

13/2/2005


or

Headlight setting unit VAS 5047/  


The following test- and adjustment instructions are 
applicable to all countries. But national legislation and 
regulations of the respective country is to be adhered to.

The following are prerequisites when adjusting 
headlights with gas discharge system: 

Tire pressure OK.  
 
Lenses must not be damaged or dirty.   
 
Reflectors and bulbs OK.  
 
The parking brake must not be engaged and no gear 
should be selected.  
 
The steering wheel must be in straight-ahead position.   
 
The vehicle may not be moved during the basic setting 
(including door "open and close" , leaning against, getting 
in and out).  
 
Nobody may be in the vehicle and the vehicle must not be 
loaded.  
 
Move vehicle back and forth for 1 meter (3 to 4 feet) or 
bounce front and rear of vehicle several times up and down 
to settle suspension.  
 
Vehicle and headlight adjuster must be on a level surface.   
 
Vehicle and headlight adjuster must be aligned.  
 
Inclination must be set.  
 

In the trim above the headlight, inclination measurements 
are stamped in "%" . The headlights must be adjusted 
according to these measurements. Percentage information 
is based on a projection distance of 10 meters. For 
example: inclination of 1.2 % converts to approx. 12 cm. 


Headlight (left):

Perform basic setting with the Vehicle Diagnosis, Testing 
and Information System VAS 5051B : 

Description of work (part 2 of 2)

13/2/2005


Content   ..  1235  1236  1237  1238   ..