Volkswagen Jetta / Jetta Hybrid. Manual - part 2
 

  Index      Volkswagen     Volkswagen Jetta / Jetta Hybrid service manual 2011-2013 year


Search            copyright infringement  


Content   ..  1  2  3   ..


Volkswagen Jetta / Jetta Hybrid. Manual - part 2


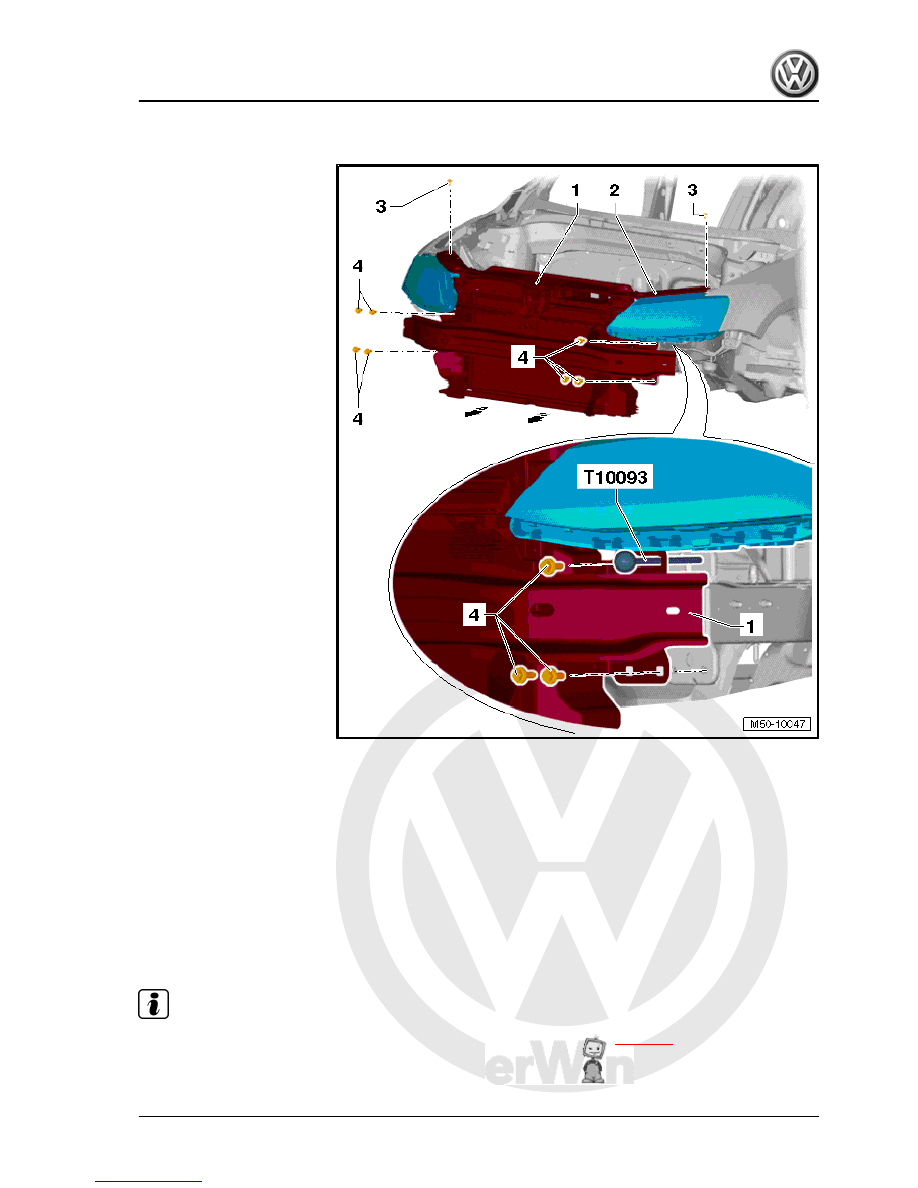
Carry out following work:
– Push lock carrier together with add-on parts -1- on the guide

pins -T10093- and onto the longitudinal member.

– Fit bolts -3- and -4- in place.
– Align lock carrier together with add-on parts -1- to longitudinal

members and between wings ⇒ Body Repairs; Rep. gr.  00 ;

Body gaps/shut lines; Body - front .

Specified torque for bolts -3-: 8 Nm.
Specified torque for bolts -4-: 60 Nm.
Further installation is performed in the reverse order of removal.

Note

♦

Make sure that the charge air cooler pressure hoses are properly refitted 

⇒ page 8

 .

♦

Hoses and lines must not be pinched.

Jetta 2011 ➤ , Jetta Hybrid 2013 ➤

1. Lock carrier    

5


add-on parts

1.4.1

Removing

Note

♦

The lock carrier is a safety-relevant component. It must not be repaired for this reason.

♦

In the event of damage, renew lock carrier.

Carry out following work:
– Move to service position 

⇒ page 3

 .

19 ; Parts of the cooling system; Draining and filling coolant .

– Disconnect coolant lines for condenser ⇒  Heating, air condi‐

tioning; Rep. gr.  87 ; Repairs to the refrigerant circuit which

Jetta 2011 ➤ , Jetta Hybrid 2013 ➤

6


– Support bonnet and remove support rod from bonnet.
– Together with a second mechanic, unscrew guide pins -

T10093- from left and right longitudinal member -2- and lift out

lock carrier with add-on parts -1-.

WARNING

Do not start the engine if the air conditioning system and/or the

coolant system lines are disconnected.

Note

♦

Do not hang condenser and hydraulic oil cooler from lines.

♦

Do not kink condenser and hydraulic lines.

1.4.2

Installing

Jetta 2011 ➤ , Jetta Hybrid 2013 ➤

1. Lock carrier    

7


Further installation is performed in the reverse order of removal.
• During assembly, ensure that all connectors and hose con‐

nections are properly installed.

– Align lock carrier together with add-on parts -1- to longitudinal

members and between wings ⇒ Body Repairs; Rep. gr.  00 ;

Body gaps/shut lines; Body - front .

1.5

Removing and installing pressure hoses

1.5.1

Pressure hose with push-on coupling

Releasing pressure hose
Carry out following work:
– Disengage retaining clip -1- in direction of -arrow a-.
– Pull pressure hose -2- in direction of -arrow b- out of coupling

-3-.

Fitting pressure hose so that it latches into place
Carry out following work:

• Ensure that the retaining clip -2- is in the upper position.
– Insert pressure hose -3- in direction of -arrow- into coupling

-1-.

– Press retaining clip -2- all the way downwards.

Note

♦

If the retaining clip cannot be pushed down fully, the pressure

hose is not inserted sufficiently in the coupling.

♦

Press pressure hose again and lock retaining clip.

• Check push-on coupling by pulling on it.

Jetta 2011 ➤ , Jetta Hybrid 2013 ➤

8


Content   ..  1  2  3   ..