Volkswagen Jetta Hybrid (2013 year). Manual - part 8


  Index      Volkswagen     Volkswagen Jetta Hybrid 2013 year


Search            copyright infringement  


Content   ..  6  7  8  9   ..


Volkswagen Jetta Hybrid (2013 year). Manual - part 8


Risk of damaging the clutch.

♦ Only drive in oil seal until it is flush, in order to avoid closing

off oil drilling located behind it. Otherwise, bearing can no

longer be supplied with enough oil.

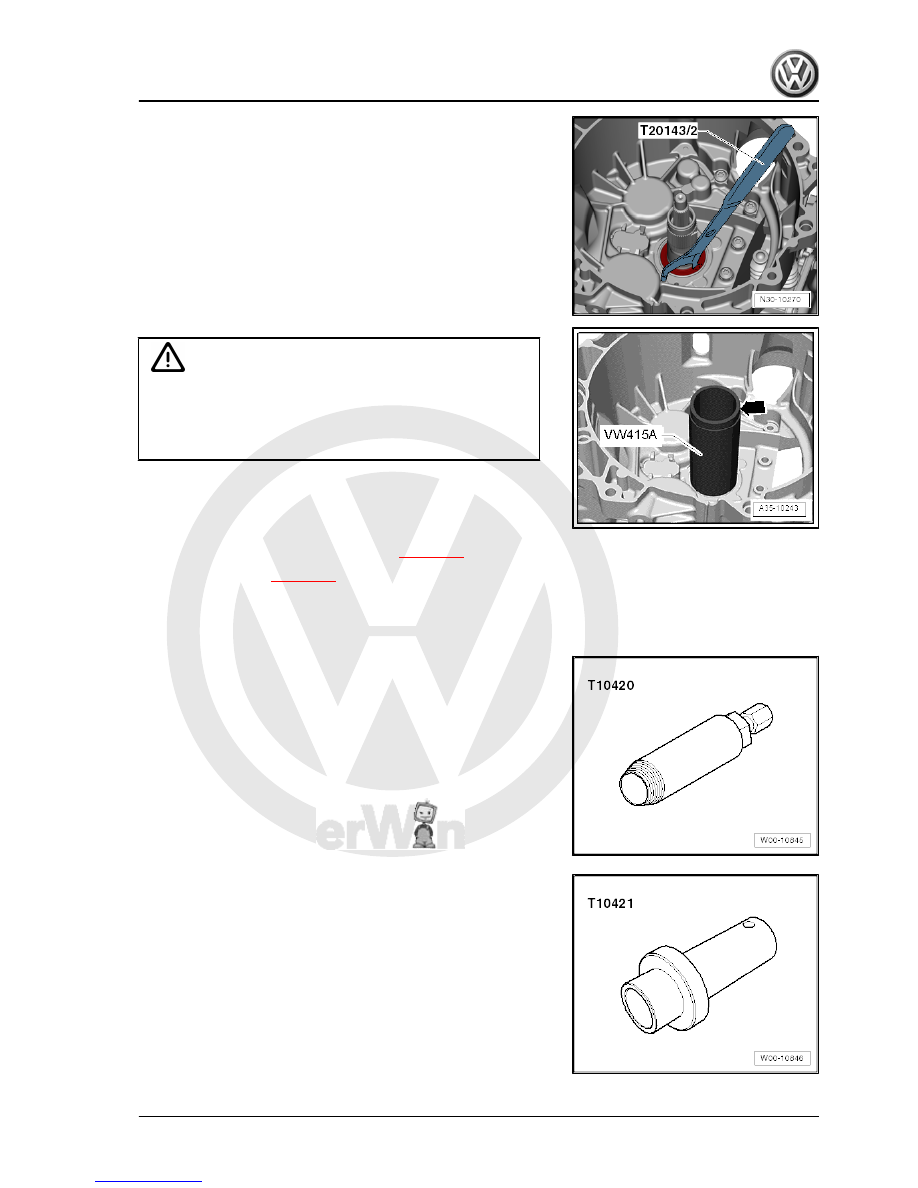
– Drive in new oil seal using nylon-faced hammer until it is flush

with clutch housing, as shown in illustration.

• Shoulder of pipe section -VW 415 A- points upwards -arrow-.
– Install clutch engagement mechanism 

⇒ page 29

 .

– Install dual clutch 

⇒ page 20

 .

1.4

Renewing seal for inner input shaft

Special tools and workshop equipment required
♦ Oil seal extractor -T10420-

♦ Thrust piece -T10421-

Jetta Hybrid 2013 ➤

1. Clutch    

25


 .

• Clutch engagement mechanism is removed 

⇒ page 29

 .

Caution

Risk of damage to clutch and other components!

• Renew dual clutch if it is oily.

Note

There are 2 oil seals in gearbox at clutch end. Both oil seals can

be renewed without gearbox being dismantled. If only oil seals

are renewed, there is no need to adjust the clutch engagement

mechanism.

– Unscrew spindle of oil seal extractor -T10420- .
– Screw oil seal extractor -T10420- into »small«, inner oil seal.

Push on puller when screwing in.

Note

Puller will become very tightly clamped when turning oil seal.

– Screw puller in until the seal begins to turn in its seat.

– Now screw in spindle.
– Pull out oil seal using spindle.

Jetta Hybrid 2013 ➤

26


– Install clutch engagement mechanism 

⇒ page 29

 .

– Install dual clutch 

⇒ page 20

 .

Jetta Hybrid 2013 ➤

1. Clutch    

27


⇒ “2.1 Assembly overview - clutch engagement mechanism”,

page 28
⇒ “2.2 Removing and installing clutch engagement mechanism”,

page 29
⇒ “2.3 Adjusting clutch engagement mechanism”, page 32

2.1

Assembly overview - clutch engagement mechanism

1 - Shim for “K 1”

❑ Determining thickness

⇒ “2.3 Adjusting clutch

engagement mecha‐

nism”, page 32

 .

2 - Large engaging lever for “K

1”

❑ With engagement bear‐

ing

❑ Removing and installing

⇒ “2.2 Removing and in‐

stalling clutch engage‐

ment mechanism”, page

29

 .

3 - Hinge mounting

❑ For large engaging lever

“K 1”

❑ Is not renewed

4 - Small engagement bear‐

ings for “K 2”
5 - Shim for “K 2”

❑ Determining thickness

⇒ “2.3 Adjusting clutch

engagement mecha‐

nism”, page 32

 .

6 - Upper section of guide

sleeve

❑ Small small engaging

lever “K 2”

❑ Is removed and installed

together with small en‐

gaging lever and lower

section of guide sleeve

7 - Small engaging lever for “K

2”

❑ Is removed and installed together with upper and lower section of guide sleeve
❑ Removing and installing 

⇒ “2.2 Removing and installing clutch engagement mechanism”, page 29

 .

8 - Ball pin

❑ Small small engaging lever “K 2”
❑ Removing and installing 

⇒ page 34

 .

9 - Bolt

❑ Renew after each removal.
❑ 8 Nm +90°

Jetta Hybrid 2013 ➤

28


Content   ..  6  7  8  9   ..