Toyota Corolla Hatchback (2021 year). Manual in english - part 5


  Index      Toyota     Toyota Corolla Hatchback (2021 year). Manual in english


Search            copyright infringement  


Content      ..     3      4      5      6     ..


Toyota Corolla Hatchback (2021 year). Manual in english - part 5


268

5-2. Basic information before operation

COROLLA H/B_U

Select to change character 
types. (

P.268)

Select to make a space on 
cursor.

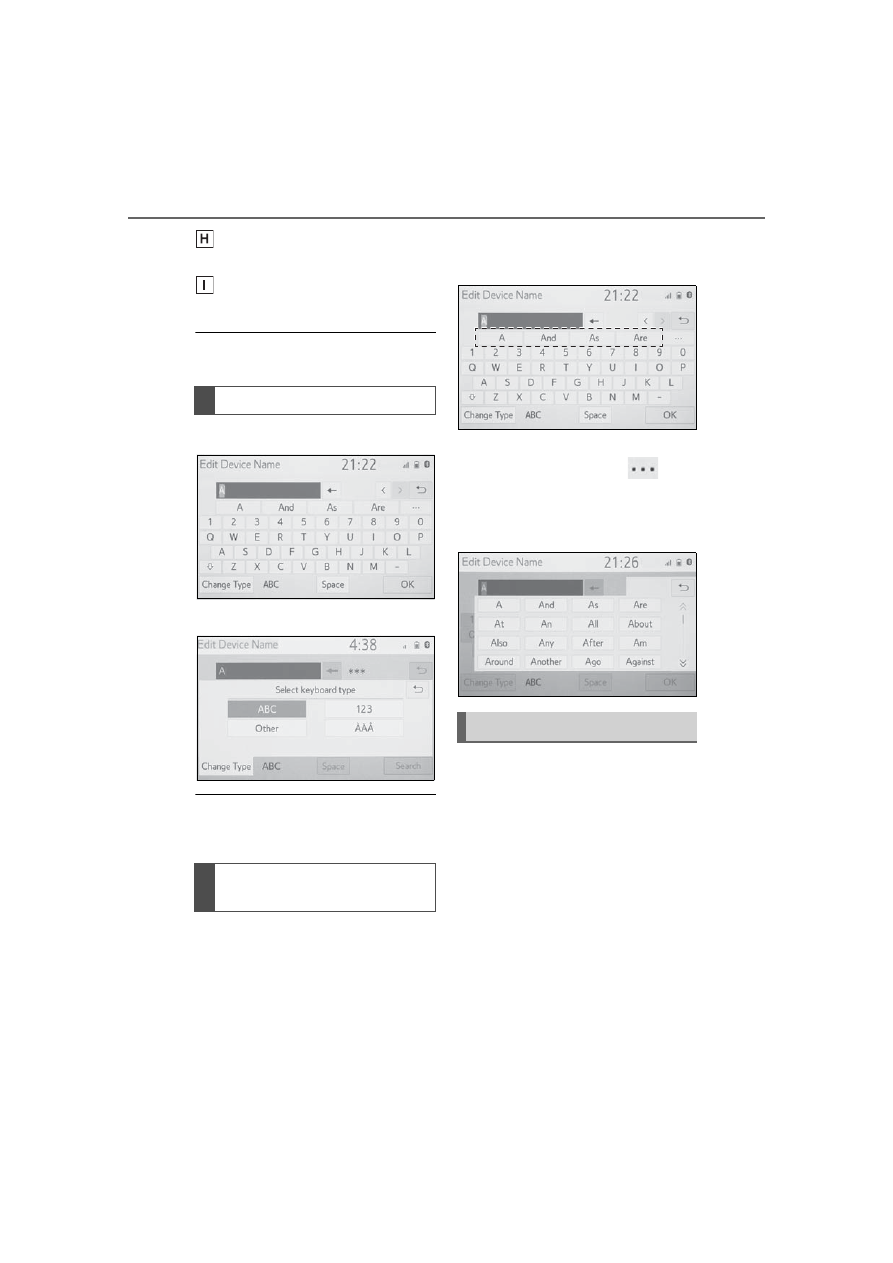
Keyboard layout can be changed. 
(

P.296)

1

Select “Change Type”.

2

Select the desired character.

Depending on the screen being 
displayed, it may not possible to 
change keyboard characters.

When text is input, the system 
predicts the text that may com-
plete the currently unconfirmed 
text and displays predictive 
replacement candidates that 
match the beginning of the text.

1

Input text.

2

Select the desired candidate.

To select a candidate that is 

not displayed, select 

and then select the desired 
predictive replacement candi-
date.

The list screen may be dis-
played after entering characters. 
When a list is displayed, use the 
appropriate screen button to 
scroll through the list.

Changing character type

Displaying predictive text 
candidates

List screen

-------------------------------------------------------------------------------------------------------------------------------------------------------------

269

5-2. Basic information before operation

COROLLA H/B_U

5

Audio

To scroll up/down the list, 
flick the list up/down.

Select to skip to the next or 
previous page. Select and 

hold 

 or 

 to scroll 

through the displayed list.

Indicates the position of the 
displayed entries in the entire 
list.
To scroll up/down pages, 
drag the bar.

If 

 appears to the right of an 

item name, the complete name is 
too long to display.

• Select to 

 scroll to the end of 

the name.

• Select 

 to move to the begin-

ning of the name.

Items are displayed in the list 
with the most similar results of 
the search at the top.

1

Select .

2

Input text.

3

Select “Search”.

4

The list is displayed.

Scrolling list screen

Searching a list

-------------------------------------------------------------------------------------------------------------------------------------------------------------

270

5-2. Basic information before operation

COROLLA H/B_U

1

Press the “MENU” button.

2

Select “Display”.

3

Select the desired items to 
be set.

Select to turn the screen off. 
To turn it on, press any but-

ton.

Select to turn day mode 
on/off. (

P.270)

Select to adjust the screen 
display. (

P.270)

Select to adjust the camera 
display.

When the screen is viewed 
through polarized sunglasses, a 
rainbow pattern may appear on 
the screen due to optical charac-
teristics of the screen. If this is dis-
turbing, please operate the screen 
without polarized sunglasses.

Depending on the position of the 
headlight switch, the screen 
changes to day or night mode. 
This feature is available when 
the headlight is switched on.

1

Select “Day Mode”.

If the screen is set to day mode 
with the headlight switch turned 
on, this condition is memorized 
even with the engine turned off.

The contrast and brightness of 
the screen can be adjusted 
according to the brightness of 
your surroundings.

1

Select “General” or “Cam-
era”.

2

Select the desired item.

“Display (General)” screen 

Screen adjustment

The contrast and brightness 
of the screen display and 
the image of the camera dis-
play can be adjusted. The 
screen can also be turned 
off, and/or changed to either 
day or night mode.

(For information regarding 
audio/visual screen adjust-
ment: 

P.306)

Displaying the screen 
adjustment screen

Changing between day 
and night mode

Adjusting the con-
trast/brightness

-------------------------------------------------------------------------------------------------------------------------------------------------------------

271

5-2. Basic information before operation

COROLLA H/B_U

5

Audio

only: Select “<” or “>” to select 
the desired display.

• “Contrast”

“+”: Select to strengthen the con-
trast of the screen.

“-”: Select to weaken the contrast of 
the screen.

• “Brightness”

“+”: Select to brighten the screen.

“-”: Select to darken the screen.

Linking multi-informa-

tion display and the 

system

The following functions of 
the system are linked with 
the multi-information dis-
play in the instrument clus-
ter:

Audio

Phone

*

etc.

These functions can be 
operated using multi-infor-
mation display control 
switches on the steering 
wheel. (

P.83)

*

: When an Apple CarPlay con-

nection is established, this 
function will be unavailable.

-------------------------------------------------------------------------------------------------------------------------------------------------------------

272

5-3. Connectivity settings

COROLLA H/B_U

5-3.Connectivity settings

Registering from the sys-
tem

1

Turn the Bluetooth

®

 connec-

tion setting of your cellular 
phone on.

This function is not available 

when Bluetooth

®

 connection 

setting of your cellular phone 
is set to off.

2

Press the “MENU” button.

3

Select “Phone”.

Operations up to this point 
can also be performed by 

pressing the 

 switch on the 

steering wheel or the 
“PHONE” button on the instru-
ment panel.

Registering/Connect-

ing a Bluetooth

®


device

To use the hands-free sys-
tem, it is necessary to regis-

ter a Bluetooth

®

 phone with 

the system.

Once the phone has been 
registered, it is possible to 
use the hands-free system.

This operation cannot be 
performed while driving.

When an Apple CarPlay 
connection is established, 

Bluetooth

®

 functions of the 

system will become unavail-
able and any connected 

Bluetooth

®

 devices will be 

disconnected.

*

When connecting to 

Android Auto, a Bluetooth

®


connection will be made 

automatically.

*

When an Android Auto con-
nection is established, 

some Bluetooth

®

 functions 

other than hands-free sys-

tem cannot be used.

*

*

: This function is not made avail-

able in some countries or 
areas.

Registering a Bluetooth

®


phone for the first time

-------------------------------------------------------------------------------------------------------------------------------------------------------------

273

5-3. Connectivity settings

COROLLA H/B_U

5

Audio

4

Select “Yes” to register a 
phone.

5

Select the desired Bluetooth

®


device.

If the desired Bluetooth

®


phone is not on the list, select 
“If you cannot find...” and fol-
low the guidance on the 
screen. (

P.274)

6

Register the Bluetooth

®


device using your Blue-

tooth

®

 device.

For details about operating 

the Bluetooth

®

 device, see 

the manual that comes with it.

A PIN code is not required for 
SSP (Secure Simple Pairing) 

compatible Bluetooth

®


devices. Depending on the 

type of Bluetooth

®

 device 

being connected, a message 
confirming registration may 
be displayed on the Blue-

tooth

®

 device’s screen. 

Respond and operate the 

Bluetooth

®

 device according 

to the confirmation message.

7

Check that the following 
screen is displayed, indicat-
ing pairing was successful (a 

Bluetooth

®

 link has been 

established but registration is 
not yet complete).

The system is connecting to 
the registered device.

At this stage, the Bluetooth

®


functions are not yet avail-
able.

-------------------------------------------------------------------------------------------------------------------------------------------------------------

274

5-3. Connectivity settings

COROLLA H/B_U

8

Check that “Connected” is 
displayed and registration is 
complete.

If an error message is dis-
played, follow the guidance 
on the screen to try again.

If a cellular phone does not oper-
ate properly after being con-
nected, turn the cellular phone off 
and on and then connect it again.

Registering from phone

1

Select “If you cannot find…”.

2

Select “Register from 
Phone”.

3

Check that the following 
screen is displayed, and reg-

ister the Bluetooth

®

 device 

using your Bluetooth

®


device.

For details about operating 

the Bluetooth

®

 device, see 

the manual that comes with it.

A PIN code is not required for 
SSP (Secure Simple Pairing) 

compatible Bluetooth

®


devices. Depending on the 

type of Bluetooth

®

 device 

being connected, a message 
confirming registration may 
be displayed on the Blue-

tooth

®

 device’s screen. 

Respond and operate the 

Bluetooth

®

 device according 

to the confirmation message.

4

Follow the steps in “Register-

ing a Bluetooth

®

 phone for 

the first time” from step 

7

(

P.272)

-------------------------------------------------------------------------------------------------------------------------------------------------------------

275

5-3. Connectivity settings

COROLLA H/B_U

5

Audio

To use the Bluetooth

®

 audio, it is 

necessary to register an audio 
player with the system.

Once the player has been regis-
tered, it is possible to use the 

Bluetooth

®

 audio.

This operation cannot be per-
formed while driving.

For details about registering a 

Bluetooth

®

 device: 

P.272

1

Turn the Bluetooth

®

 connec-

tion setting of your audio 
player on.

This function is not available 

when the Bluetooth

®

 connec-

tion setting of your audio 
player is set to off.

2

Press the “AUDIO” button.

3

Select “Source” on the audio 
screen or press “AUDIO” but-
ton again.

4

Select “Bluetooth”.

5

Select “Yes” to register an 
audio player.

6

Follow the steps in “Register-

ing a Bluetooth

®

 phone for 

the first time” from step 

5

(

P.272)

This system supports the follow-
ing services.

Bluetooth

®

 Core Specifica-

tion

Ver. 2.0 (Recommended: Ver. 
4.1 +EDR)

Profiles

HFP (Hands Free Profile) Ver. 
1.0 (Recommended: Ver. 1.7)

• This is a profile to allow 

hands-free phone calls using a 
cellular phone or head set. It has 
outgoing and incoming call func-
tions.

OPP (Object Push Profile) 
Ver. 1.1 (Recommended: Ver. 
1.2)

• This is a profile to transfer con-

tacts data.

PBAP (Phone Book Access 
Profile) Ver. 1.0 (Recom-
mended: Ver. 1.2)

• This is a profile to transfer phone-

book data.

MAP (Message Access Pro-
file) Ver. 1.0 (Recommended: 
Ver. 1.2)

• This is a profile to use phone 

message functions.

SPP (Serial Port Profile) Rec-

Registering a Bluetooth

®


audio player for the first 
time

Profiles

-------------------------------------------------------------------------------------------------------------------------------------------------------------

276

5-3. Connectivity settings

COROLLA H/B_U

ommended: Ver. 1.2

• This is a profile to use the Toyota 

audio multimedia function.

A2DP (Advanced Audio Dis-
tribution Profile) Ver. 1.0 (Rec-
ommended: Ver. 1.3)

• This is a profile to transmit stereo 

audio or high quality sound to the 
audio system.

AVRCP (Audio/Video Remote 
Control Profile) Ver. 1.0 (Rec-
ommended: Ver. 1.6)

• This is a profile to allow remote 

control the A/V equipment.

This system is not guaranteed to 
operate with all Bluetooth

®


devices.

If your cellular phone does not 
support HFP, registering the Blue-
tooth

®

 phone or using OPP, 

PBAP, MAP or SPP profiles indi-
vidually will not be possible.

If the connected Bluetooth

®


device version is older than rec-
ommended or incompatible, the 
Bluetooth

®

 device function may 

not work properly.

Refer to https://www.toyota.com/
audio multimedia in the United 
States, 
https://www.toyota.ca/connected 
in Canada, and 
http://www.toyotapr.com/
audio-multimedia in Puerto Rico, 
to find approved Bluetooth

®


phones for this system.

Certification

Bluetooth is a registered trademark 
of Bluetooth SIG, Inc.

-------------------------------------------------------------------------------------------------------------------------------------------------------------

277

5-3. Connectivity settings

COROLLA H/B_U

5

Audio

1

Press the “MENU” button.

2

Select “Setup”.

3

Select “Bluetooth”.

4

Select the desired item to be 
set.

Connecting a Bluetooth

®


device and editing the Blue-

tooth

®

device information 

(

P.277, 280)

Registering a Bluetooth

®


device (

P.279)

Deleting a Bluetooth

®

 device 

(

P.280)

Setting the Bluetooth

®

 sys-

tem (

P.282)

Up to 5 Bluetooth

®

 devices 

(Phones (HFP) and audio play-
ers (AVP)) can be registered.

If more than 1 Bluetooth

®

 device 

Setting Bluetooth

®


details

When an Apple CarPlay 
connection is established, 
this function will be unavail-

able.

*

When an Android Auto con-
nection is established, 
some functions will be 

unavailable.

*

*

: This function is not made avail-

able in some countries or 
areas.

Displaying the Blue-
tooth

®

 setup screen

Bluetooth

®

 setup screen

Connecting a Bluetooth

®


device

-------------------------------------------------------------------------------------------------------------------------------------------------------------

278

5-3. Connectivity settings

COROLLA H/B_U

has been registered, select 
which device to connect to.

1

Display the Bluetooth

®

 set-

tings screen. (

P.277)

2

Select “Registered Device”.

3

Select the device to be con-
nected.

: Phone

: Audio player

: Phone/Toyota apps services

The profile icon for a currently 
connected device will be dis-
played in color.

Selecting a profile icon which 
is not currently connected will 
switch the connection to the 
function.

If the desired Bluetooth

®


device is not on the list, select 
“Add New Device” to register 
the device. (

P.279)

4

Select the desired connec-
tion.

“Device Info”: Select to con-
firm and change the Blue-

tooth

®

 device information. 

(

P.280)

When another Bluetooth

®


device is connected

To disconnect the Bluetooth

®


device, select “Yes”.

5

Check that a confirmation 
screen is displayed when the 
connection is complete.

If an error message is dis-
played, follow the guidance 
on the screen to try again.

It may take time if the device con-
nection is carried out during Blue-
tooth

®

 audio playback.

Depending on the type of Blue-
tooth

®

 device being connected, it 

may be necessary to perform 
additional steps on the device.

When disconnecting a Bluetooth

®


device, it is recommended to dis-
connect using the system.

Connecting a Bluetooth

®


device in a different way 
(from phone top screen)

P.350

-------------------------------------------------------------------------------------------------------------------------------------------------------------

279

5-3. Connectivity settings

COROLLA H/B_U

5

Audio

Connecting a Bluetooth

®


device in a different way 
(from phone setup screen)

P.364

Connecting a Bluetooth

®


device in a different way 

(from Bluetooth

®

 audio 

screen)

P.322

Auto connection mode

To turn auto connection mode 
on, set “Bluetooth Power” to on. 

(

P.282) Leave the Bluetooth

®


device in a location where the 
connection can be established.

When the engine switch is in 
ACC or ON, the system 
searches for a nearby regis-
tered device.

The system will connect with 
the registered device that was 
last connected, if it is nearby. 
When automatic connection 
priority is set to on and there 
is more than one registered 

Bluetooth

®

 phone available, 

the system will automatically 

connect to the Bluetooth

®


phone with the highest prior-
ity. (

P.282)

Connecting manually

When the auto connection has 
failed or “Bluetooth Power” is 
turned off, it is necessary to con-

nect the Bluetooth

®

 device man-

ually.

1

Display the Bluetooth

®

 set-

tings screen. (

P.277)

2

Follow the steps in “Connect-

ing a Bluetooth

®

 device” from 

step 

2

. (

P.277)

Reconnecting the Blue-

tooth

®

 phone

If a Bluetooth

®

 phone is discon-

nected due to poor reception 

from the Bluetooth

®

 network 

when the engine switch is in 
ACC or ON, the system auto-
matically reconnects the Blue-

tooth

®

 phone.

Up to 5 Bluetooth

®

 devices can 

be registered.

Bluetooth

®

 compatible phones 

(HFP) and audio players (AVP) 
can be registered simultane-
ously.

This operation cannot be per-
formed while driving.

1

Display the Bluetooth

®

 set-

tings screen. (

P.277)

2

Select “Add New Device”.

When another Bluetooth

®


device is connected

To disconnect the Bluetooth

®


device, select “Yes”.

Registering a Bluetooth

®


device

-------------------------------------------------------------------------------------------------------------------------------------------------------------

280

5-3. Connectivity settings

COROLLA H/B_U

When 5 Bluetooth

®

 devices 

have already been registered

A registered device needs to 
be replaced. Select “Yes”, and 
select the device to be 
replaced.

3

Follow the steps in “Register-

ing a Bluetooth

®

 phone for 

the first time” from step 

5

(

P.272)

This operation cannot be per-
formed while driving.

1

Display the Bluetooth

®

 set-

tings screen. (

P.277)

2

Select “Remove Device”.

3

Select the desired device.

4

Select “Yes” when the confir-
mation screen appears.

5

Check that a confirmation 
screen is displayed when the 
operation is complete.

When deleting a Bluetooth

®


phone, the contact data will be 
deleted at the same time.

The Bluetooth

®

 device’s infor-

mation can be displayed on the 
screen. The displayed informa-
tion can be edited.

This operation cannot be per-
formed while driving.

1

Display the Bluetooth

®

 set-

tings screen. (

P.277)

2

Select “Registered Device”.

3

Select the desired device to 
be edited.

4

Select “Device Info”.

Deleting a Bluetooth

®


device

Editing the Bluetooth

®


device information

-------------------------------------------------------------------------------------------------------------------------------------------------------------

281

5-3. Connectivity settings

COROLLA H/B_U

5

Audio

5

Confirm and change the 

Bluetooth

®

 device informa-

tion.

The name of the Bluetooth

®


device is displayed. It can be 
changed to a desired name. 
(

P.281)

Select to set the Bluetooth

®


audio player connection 
method. (

P.281)

Device address is unique to 
the device and cannot be 
changed.

Phone number is unique to 

the Bluetooth

®

 phone and 

cannot be changed.

Compatibility profile is unique 

to the Bluetooth

®

 device and 

cannot be changed.

Select to reset all setup 
items.

If 2 Bluetooth

®

 devices have been 

registered with the same device 
name, the devices can be distin-
guished referring to the device’s 
address.

Depending on the type of Blue-
tooth

®

 phone, some information 

may not be displayed.

1

Select “Device Name”.

2

Enter the name and select 
“OK”.

Even if the device name is 
changed, the name registered in 
your Bluetooth

®

 device does not 

change.

1

Select “Connect Audio Player 
From”.

2

Select the desired connec-
tion method.

“Vehicle”: Select to connect the 
audio player from the vehicle’s 
audio/visual system.

“Device”: Select to connect the 
vehicle’s audio/visual system from 
the audio player.

Depending on the audio 

Changing a device name

Setting audio player con-
nection method

-------------------------------------------------------------------------------------------------------------------------------------------------------------

282

5-3. Connectivity settings

COROLLA H/B_U

player, the “Vehicle” or 
“Device” connection method 
may be best. As such, refer to 
the manual that comes with 
the audio player.

The Bluetooth

®

 settings can be 

confirmed and changed.

1

Display the Bluetooth

®

 set-

tings screen. (

P.277)

2

Select “Detailed Settings”.

3

Select the desired item to be 
set.

Select to set Bluetooth

®

 con-

nection on/off. (

P.282)

Select to change the auto-
matic connection priority of 

the registered Bluetooth

®


devices. (

P.282)

Select to edit the system 
information. (

P.283)

Select to reset all setup 
items.

1

Select “Bluetooth Power”.

When “Bluetooth Power” is on: 

The Bluetooth

®

 device is auto-

matically connected when the 
engine switch is in ACC or ON.

When “Bluetooth Power” is off: 

The Bluetooth

®

 device is dis-

connected, and the system will 
not connect to it next time.

While driving, the auto connection 
state can be changed from off to 
on, but cannot be changed from 
on to off.

The automatic connection prior-

ity of the registered Bluetooth

®


devices can be changed.

1

Select “Preferred Device Set-
tings”.

2

Select the desired item to be 
set.

Select to set automatic con-
nection priority on/off.

Select to change the auto-

“Detailed Settings” 
screen

Changing “Bluetooth 
Power”

Setting automatic connec-
tion priority

-------------------------------------------------------------------------------------------------------------------------------------------------------------

283

5-3. Connectivity settings

COROLLA H/B_U

5

Audio

matic connection priority of 

the registered Bluetooth

®


phones. (

P.283)

Select to change the auto-
matic connection priority of 

the registered Bluetooth

®


audio players. (

P.283)

Select to reset all setup 
items.

Changing Bluetooth

®


device automatic connec-
tion priority

1

Select “Preferred Phones” or 
“Preferred Audio Players”.

2

Select the desired Bluetooth

®


device and select “Move Up” 
or “Move Down” to change 
the preferred order.

A newly registered Bluetooth

®


device will automatically be given 
the highest automatic connection 
priority.

1

Select “System Information”.

2

Select the desired item to be 
set.

Displays system name. Can 
be changed to a desired 
name. (

P.284)

PIN code used when the 

Bluetooth

®

 device was regis-

tered. Can be changed to a 
desired code. (

P.284)

Device address is unique to 
the device and cannot be 
changed.

Select to set the connection 
status display of the phone 
on/off.

Select to set the connection 
status display of the audio 
player on/off.

Compatibility profile of the 
system

Select to reset all setup 
items.

Editing the system infor-
mation

-------------------------------------------------------------------------------------------------------------------------------------------------------------

284

5-3. Connectivity settings

COROLLA H/B_U

Editing the system name

1

Select “System Name”.

2

Enter a name and select 
“OK”.

Editing the PIN code

1

Select “System PIN Code”.

2

Enter a PIN code and select 
“OK”.

*

: If equipped

1

Enable the Wi-Fi

®

 Hotspot 

function. (

P.285)

2

Disable the “Hide Access 
Point” function. (

P.285)

3

Search for the vehicle access 
point using the device you 
wish to connect.

For details about operating 
the device, refer to the docu-
mentation which came with it.

Wi-Fi

®

 Hotspot

*

By connecting a device to 

the vehicle via Wi-Fi

®

, it can 

access the internet through 
the DCM.

To use this function, a 

Wi-Fi

®

 Hotspot service sub-

scription from Verizon Wire-
less is required. Contact 
your Toyota dealer for 
details.

This function is not made 
available in some countries 
or areas.

Connecting a device to 
the in-vehicle access 
point

Searching for and con-
necting a device to the 
vehicle access point

-------------------------------------------------------------------------------------------------------------------------------------------------------------

285

5-3. Connectivity settings

COROLLA H/B_U

5

Audio

4

Operate the device to con-
nect it to the vehicle access 
point.

To check the vehicle access 
point password, check “Pass-
word”. (

P.285)

Hints for connecting to the vehicle 
via Wi-Fi

®

 can be displayed. 

(

P.285)

1

Enable the Wi-Fi

®

 Hotspot 

function. (

P.285)

2

Enable the “Hide Access 
Point” function. (

P.284)

3

Enter the access point name 
(SSID) into the device you 
wish to connect and connect 
it.

To check the vehicle access 
point password, check “Pass-
word”. (

P.285)

The security settings on the 
device must be the same as 
that displayed for “Security”. 
(

P.285)

For details about operating 
the device, refer to the docu-
mentation which came with it.

1

Press the “MENU” button.

2

Select “Setup”.

3

Select “Wi-Fi

*

”.

*

: Wi-Fi

®

 is a registered trademark 

of Wi-Fi Alliance

®

.

4

Select the desired item to be 
set.

Select to enable/disable the 

Wi-Fi

®

 Hotspot function. 

(

P.286)

Connecting a device to the 
in-vehicle access point 
using the access point 
name (SSID)

Changing the Wi-Fi

®

 set-

tings

-------------------------------------------------------------------------------------------------------------------------------------------------------------

286

5-3. Connectivity settings

COROLLA H/B_U

Select to check/change the 
access point password. 
(

P.286)

Select to display hints for 
connecting to the vehicle via 

Wi-Fi

®

.

Select to make the access 
point searchable/unsearch-
able.

Select to check/change the 
security protocol of the 
access point (for authentica-
tion and encryption). 
(

P.287)

Select to change the access 
point name (SSID). (

P.287)

Select to change the Wi-Fi

®


connection channel (within 
the 2.4GHz frequency band). 
(

P.287)

If any settings have been 
changed, it will be necessary to 
reset the Wi-Fi

®

 system to com-

plete the changes. To reset the 
Wi-Fi

®

 system, select “Yes” on the 

pop-up displayed after changing 
the settings.

When the Wi-Fi

®

 Hotspot func-

tion is enabled, the system 
checks for a valid Hotspot ser-
vice subscription.

If a hotspot service subscription 
has not been started, connect 
your device to the in-vehicle 

access point to start your sub-
scription. A trial subscription 
may be available.

1

Select “Password”.

2

Check that the following 
screen is displayed.

Displays the password

Select to display/hide the 
entered password.

Select to change the pass-
word.

1

Select “Change Password”.

2

Enter the desired password 
and select “OK”.

When setting/changing a 
password, observe the follow-
ing guidelines to help prevent 
the password from being 
cracked by a third party:

• Use an 8-character or longer 

password consisting of letters 
and numbers. (Non-ASCII char-
acters will not be recognized by 
the system.)

Enabling/disabling the 

Wi-Fi

®

 Hotspot function

Checking/changing the 
password

Changing the password

-------------------------------------------------------------------------------------------------------------------------------------------------------------

287

5-3. Connectivity settings

COROLLA H/B_U

5

Audio

• Change the password regularly.

• If you write the password down, 

do not leave it somewhere where 
it would be visible.

• Do not use the same or a similar 

password to that for other 
accounts.

• Avoid using easy to identify 

words, such as your vehicle’s 
model name or license plate 
number, simple dictionary words, 
or words with simple obfuscation, 
such as c@t (for cat), as your 
password.

1

Select “Security”.

2

Select the desired security 
protocol.

1

Select “Access Point Name”.

2

Enter the desired access 
point name (SSID) and select 
“OK”.

1

Select “Channel”.

2

Check that the following 
screen is displayed.

Select to change the chan-
nel selection to auto-
matic/manual.

When “Manual” is selected, 
select to change the channel.

1

Set “Select Channel” to 
“Manual”.

2

Select “Channel Number”.

3

Enter the desired channel 
number and select “OK”.

Channels 1 through 11 can be 
selected.

If a connected device is taken out 
of the Wi-Fi

®

 connection area, the 

connection will be severed.

If the vehicle is driven out of the 
cellular communication coverage 
area, connecting to the internet 
via the Wi-Fi

®

 Hotspot will not be 

possible.

If a Bluetooth

®

 device is used 

while a device is connected using 
the Wi-Fi

®

 Hotspot function, the 

Changing the security pro-
tocol

Changing the access point 
name (SSID)

Selecting a Wi-Fi

®

 connec-

tion channel

Changing the channel

Wi-Fi

®

 function operating 

hints

-------------------------------------------------------------------------------------------------------------------------------------------------------------

288

5-3. Connectivity settings

COROLLA H/B_U

communication speed may 

decrease.

If the vehicle is near a radio 

antenna, radio station or other 

source of strong radio waves and 

electrical noise, communication 

may be slow or impossible.

The condition of Wi-Fi

®

 connec-

tion appears on the right upper 

side of the screen. (

P.260)

Communication standards

IEEE 802.11b

IEEE 802.11g

IEEE 802.11n (2.4GHz)

Security
WPA™
WPA2™

• WPA™ and WPA2™ are trade-

marks of Wi-Fi Alliance

®

.

WARNING

Use Wi-Fi

®

 devices only when 

safe and legal to do so.

Your audio unit is fitted with 

Wi-Fi

®

 antennas. People with 

implantable cardiac pacemak-

ers, cardiac resynchronization 

therapy-pacemakers or implant-

able cardioverter defibrillators 

should maintain a reasonable 

distance between themselves 

and the Wi-Fi

®

 antennas.

The radio waves may affect the 

operation of such devices.

Before using Wi-Fi

®

 devices, 

users of any electrical medical 

device other than implantable 

cardiac pacemakers, cardiac 

resynchronization ther-

apy-pacemakers or implantable 

cardioverter defibrillators should 

consult the manufacturer of the 

device for information about its 

operation under the influence of 

radio waves. 

Radio waves could have unex-

pected effects on the operation 

of such medical devices.

Conditions displayed with 
Wi-Fi

®

 icon

Specifications

-------------------------------------------------------------------------------------------------------------------------------------------------------------

289

5-3. Connectivity settings

COROLLA H/B_U

5

Audio

*

: This function is not made avail-

able in some countries or areas.

1

Enable Siri on the device to 
be connected.

2

Connect the device to the 
USB port. (

P.305)

3

Select “Always Enable” or 
“Enable Once”.

If “Do Not Enable” is selected, 
an Apple CarPlay connection 
will not be established. In this 
case, the device can be oper-
ated as a normal Apple 
device, such as an iPod.

Depending on the device con-
nected, it may take approxi-
mately 3 to 6 seconds before 
an Apple CarPlay connection 
is established.

4

Press the “MENU” button.

Apple CarPlay/

Android Auto

*

Apple CarPlay allows some 
applications, such as Map, 
Phone, and Music, to be 
used on the system.

When an Apple CarPlay 
connection is established, 
Apple CarPlay compatible 
applications will be dis-
played on the system dis-
play.

Compatible device

Apple iPhone (iOS Ver. 9.3 or 
later) that supports Apple Car-
Play. For details, refer to

https://www.apple.com/ios/car
play/

.

Android devices with Android OS 
ver 5.0 or higher which support 
Android Auto and have the 
Android Auto application 
installed.

For details, refer to

https://www.android.com/auto/

.

*

*

: Some devices may not operate 

with this system.

Establishing an Apple 
CarPlay connection

-------------------------------------------------------------------------------------------------------------------------------------------------------------

290

5-3. Connectivity settings

COROLLA H/B_U

5

Select the “Apple CarPlay”.

6

Check that home screen of 
Apple CarPlay is displayed.

Select to display the home 
screen of Apple CarPlay.
Touch and hold to activate 
Siri.

Select to start the application.
User can use any iPhone 
application supported by 
Apple CarPlay.

Select to display the system 
screen.

1

Check that the Android Auto 
application is installed to the 
device to be connected.

2

Connect the device to the 
USB port. (

P.305)

3

Select “On” to enable the 
function.

“Off”: Select to not enable 
Android Auto. Android Auto 
will remain off until “Android 
Auto” of “Projection Settings” 
on the general settings screen 
is turned on.

Depending on the device con-
nected, it may take approxi-
mately 3 to 6 seconds before 
the system returns to previous 
screen.

The screen may change to 
“step 

6

” depending on the 

system.

4

Press the “MENU” button.

5

Select “Android Auto”.

6

Check that home screen of 
Android Auto is displayed.

When an Apple CarPlay/Android 
Auto connection is established, 
the function of some system but-
tons will change.

When an Apple CarPlay/Android 
Auto connection is established, 
some system functions, such as 
the following, will be replaced by 
similar Apple CarPlay/Android 
Auto functions or will become 
unavailable:

Establishing an Android 
Auto connection

-------------------------------------------------------------------------------------------------------------------------------------------------------------

291

5-3. Connectivity settings

COROLLA H/B_U

5

Au

dio

• iPod (Audio Playback)

• USB audio/USB video

• Bluetooth

®

 audio

• Bluetooth

®

 phone (Apple CarPlay 

only)

• Toyota apps

When an Apple CarPlay/Android 

Auto connection is established, 

voice command system (Siri/Goo-

gle Assistant) and map application 

voice guidance volume can be 

changed by selecting “Voice Vol-

ume” on the voice settings screen. 

It cannot be changed by “POWER 

VOLUME” knob on Audio control 

panel.(

P.300)

Apple CarPlay/Android Auto is an 

application developed by Apple 

Inc/Google LLC. Its functions and 

services may be terminated or 

changed without notice depending 

on the connected device’s opera-

tion system, hardware and soft-

ware, or due to changes in Apple 

CarPlay/Android Auto specifica-

tions.

For a list of the apps supported by 

Apple CarPlay or Android Auto, 

refer to their respective website.

While using these functions, vehi-

cle and user information, such as 

location and vehicle speed, will be 

shared with the respective appli-

cation publisher and the cellular 

service provider.

By downloading and using each 

application, you agree to their 

terms of use.

Data for these functions is trans-

mitted using the internet and may 

incur charges.

For information about data trans-

mission fees, contact your cellular 

service provider.

Depending on the application, cer-

tain functions, such as music play-

back, may be restricted.

As the applications for each func-

tion are provided by a third-party, 

they may be subject to change or 

discontinuation without notice.

For details, refer to the website of 

the function.

If the USB cable is disconnected, 

operation of Apple Car-

Play/Android Auto will end.

At this time, sound output will stop 

and change to the system screen.

Use of the Apple CarPlay logo 

means that a vehicle user inter-

face meets Apple performance 

standards. Apple is not responsi-

ble for the operation of this vehicle 

or its compliance with safety and 

regulatory standards. Please note 

that the use of this product with 

iPhone or iPod may affect wire-

less performance.

Apple CarPlay is a trademark of 

Apple Inc.

Android and Android Auto are 

trademarks of Google LLC.

WARNING

Do not connect iPhone or operate 

the controls while driving.

-------------------------------------------------------------------------------------------------------------------------------------------------------------

292

5-3. Connectivity settings

COROLLA H/B_U

If you are experiencing difficulties with Apple CarPlay/Android Auto, 

check the following table.

NOTICE

Do not leave your iPhone in the 

vehicle. In particular, high tem-

peratures inside the vehicle 

may damage the iPhone.

Do not push down on or apply 

unnecessary pressure to the 

iPhone while it is connected as 

this may damage the iPhone or 

its terminal.

Do not insert foreign objects into 

the port as this may damage the 

iPhone or its terminal.

Troubleshooting

Symptom

Solution

An Apple Car-

Play/Android Auto con-

nection cannot be 

established.

Check if the device supports Apple Car-

Play/Android Auto.

Check if Apple CarPlay/Android Auto is 

enabled on the connected device.

Check if that the Android Auto application is 

installed to the device to be connected.

For details, refer to 

Apple CarPlay: https://www.apple.com/ios/

carplay/.

Android Auto: https://www.android.com/auto/.
Check if “Apple CarPlay”/“Android Auto” of 

“Projection Settings” on the general settings 

screen is set to on. (

P.296)

Check if the USB cable being used is securely 

connected to the device and USB port.

Check that the device is connected directly to 

the USB port of the system and not connected 

to a USB hub.

For Apple CarPlay: Check if the Lightning cable 

being used is certified by Apple. Check if Siri is 

enabled.
After checking all of the above, try to establish 

an Apple CarPlay/Android Auto connection. 

(

P.289, 290)

-------------------------------------------------------------------------------------------------------------------------------------------------------------

293

5-3. Connectivity settings

COROLLA H/B_U

5

Audio

When an Apple Car-
Play/Android Auto con-
nection is established and 
a video is being played, 
the video is not displayed, 
but audio is output 
through the system.

As the system is not designed to play video 
through Apple CarPlay/Android Auto, this is not 
a malfunction.

Although an Apple Car-
Play/Android Auto con-
nection is established, 
audio is not output 
through the system.

The system may muted or the volume may be 
low. Increase the system volume.

The Apple Car-
Play/Android Auto screen 
has artifacts and/or audio 
from Apple Car-
Play/Android Auto has 
noise.

Check if the USB cable being used to connect 
the device to the system is damaged.
To check if the USB cable is damaged inter-
nally, connect the device to another system, 
such as a PC, and check if the device is recog-
nized by the connected system. (The device 
should begin charging when connected.)

After checking all of the above, try to establish 
an Apple CarPlay/Android Auto connection. 
(

P.289, 290)

The map display of the 
Apple CarPlay Maps app 
cannot be enlarged or 
contracted with pinch 
multi-touch gestures.

As the Apple CarPlay Maps app is not compati-
ble with pinch multi-touch gestures, this is not a 
malfunction.

Symptom

Solution

-------------------------------------------------------------------------------------------------------------------------------------------------------------

294

5-3. Connectivity settings

COROLLA H/B_U

During Apple CarPlay 
music application (Apple 
Music, Spotify, etc.) play-
back, if the iPhone is 
operated to start and play 
audio from an application 
that is not compatible with 
Apple CarPlay* and the 
onboard device volume is 
changed, the audio of the 
incompatible application 
stops and the system 
resumes playback of the 
original music application.

This operation is performed according to the 
specification of the onboard device, this is not a 
malfunction.

After interrupt audio (such 
as navigation route guid-
ance) is played from an 
application that is not 
compatible with Apple 
CarPlay while the onboard 
device is playing audio, 
the system does not 
resume playback of the 
original audio.

This operation is performed according to the 
specification of the onboard device, this is not a 
malfunction.
Manually change the audio source by yourself. 
Or, do not use applications that are not compat-

ible with Apple CarPlay.

*

 Due to some naviga-

tion applications are compatible from iOS 12, 
update to the latest iOS and application ver-
sions.

When using Apple Car-
Play, route guidance 
arrows and turn by turn 
navigation are not dis-
played on the multi-infor-
mation display and 
system display.
When using Android Auto, 
turn by turn navigation is 
not displayed on the 
multi-information display 
and system display.

This is not a malfunction as display of these 
items is not possible with this function.

Symptom

Solution

-------------------------------------------------------------------------------------------------------------------------------------------------------------

295

5-3. Connectivity settings

COROLLA H/B_U

5

Audio

*

: Applications not compatible with Apple CarPlay are applications installed 

on the iPhone that are not displayed on the Apple CarPlay screen appli-
cation list. (such as visual voicemail)

When using Android Auto, 
hands-free call audio can-
not be heard from the 
vehicle’s speakers.

Disconnect the phone from the USB cable and 
check if hands-free call audio can be heard 
using the hands-free system.

Connect the phone to the system using Android 
Auto, turn up the volume on the system and 
check if hands-free call audio can be heard.
Check if other sounds can be heard from the 
vehicle’s speakers.

Symptom

Solution

-------------------------------------------------------------------------------------------------------------------------------------------------------------

296

5-4. Other settings

COROLLA H/B_U

5-4.Other settings

1

Press the “MENU” button.

2

Select “Setup”.

If the general settings screen 
is not displayed, select “Gen-
eral”.

3

Select the desired items to 
be set.

“Clock”

Select to change the time zone and 
select “On” or “Off” for daylight sav-
ing time, automatic adjustment of 

the clock, etc. (

P.297)

“Language”

Select to change the language. The 
language setting of Apple Car-
Play/Android Auto can only be 
changed on the connected device.

“Customize Home Screen”

Select to change the display infor-
mation/area on the home screen 
and the home screen layout.  
(

P.266)

“Theme Setting”

Select to change the screen theme 
setting.

“Beep”

Select to turn the beep sound 
on/off.

“Units of Measurement”

Select to change the unit of mea-
sure for distance/fuel consumption.

“Keyboard Layout”

Select to change the keyboard lay-
out.

“Delete Keyboard History”

Select to delete the keyboard his-
tory.

“Memorize Keyboard History”

Select to set the memorize key-
board history on/off.

“Animation”

Select to turn the animations on/off.

“Projection Settings”

*1

Select to set automatic Apple Car-
Play/Android Auto connection 
establishment on/off. (

P.298)

“Driver Setting”

General settings

Settings are available for 
clock, operation sounds, 
etc.

Displaying the general 
settings screen

General settings screen

-------------------------------------------------------------------------------------------------------------------------------------------------------------

297

5-4. Other settings

COROLLA H/B_U

5

Audio

Select to change the driver set-
tings. (

P.298)

“Delete Personal Data”

Select to delete personal data. 
(

P.299)

“Software Update”

Select to update software versions. 
For details, contact your Toyota 
dealer.

“Software Update Setting”

*2

Select to set software update set-
ting. (

P.299)

“Gracenote Database 
Update”

Select to update Gracenote

®

 data-

base versions. For details, contact 
your Toyota dealer.

“Software Information”

Select to display the software infor-
mation. Notices related to third 
party software used in this product 
are enlisted. (This includes instruc-
tions for obtaining such software, 
where applicable.)

“SW Sensitivity Level”

Select to change the capacitive 
touch screen button sensitivity to 1 
(low), 2 (medium), or 3 (high).

*1

: This function is not made avail-

able in some countries or areas.

*2

: If equipped

1

Display the general settings 
screen. (

P.296)

2

Select “Clock”.

3

Select the desired items to 
be set.

Select to change the time 
zone. (

P.297)

Select to set daylight saving 
time on/off.

Select to set automatic 
adjustment of the clock by 
GPS on/off.
When set to off, the clock can 
be manually adjusted. 
(

P.297)

Select to set the 24 hour time 
format on/off.
When set to off, the clock is 
displayed in 12 hour time for-
mat.

1

Select “Time Zone”.

2

Select the desired time zone.

When “Auto Adjust by GPS” is 
turned off, the clock can be 
manually adjusted.

1

Select “Auto Adjust by GPS” 
to set to off.

Clock settings

Setting the time zone

Manual clock setting

-------------------------------------------------------------------------------------------------------------------------------------------------------------

298

5-4. Other settings

COROLLA H/B_U

2

Adjust the clock manually.

Select “+” to set the time for-
ward one hour and “-” to set 
the time back one hour.

Select “+” to set the time for-
ward one minute and “-” to 
set the time back one minute.

Select to round to the nearest 
hour.
e.g.
1:00 to 1:29 

 1:00

1:30 to 1:59 

 2:00

*

: This function is not made avail-

able in some countries or areas.

1

Display the general settings 
screen. (

P.296)

2

Select “Projection Settings”.

3

Select the desired items to 
be set.

Select to turn Apple CarPlay 

connection establishment 
on/off when a compatible 
iPhone is connected to the 
system via USB. (

P.289)

Depending on the system, 
this setting cannot be 
changed when a device is 
connected to the system via 
USB. Disconnect the device 
before attempting to change 
the setting.

Select to turn Android Auto 
connection establishment 
on/off when a compatible 
device is connected to the 
system via USB. (

P.290)

Depending on the system, 
this setting cannot be 
changed when a device is 
connected to the system via 
USB. Disconnect the device 
before attempting to change 
the setting.

The driver settings feature will 
allow the system to link some 
preferences (such as audio pre-
sets, screen theme, language, 

etc.) to a paired Bluetooth

®


phone.

1

Display the general settings 
screen. (

P.296)

2

Select “Driver Setting”.

Projection settings

*

Driver settings

-------------------------------------------------------------------------------------------------------------------------------------------------------------

299

5-4. Other settings

COROLLA H/B_U

5

Audio

3

Select “Enable This Feature”.

1

Select “Manually Select 
Linked Settings”.

2

Select the desired phone.

After a few seconds, loaded 
screen automatically switches 
to the home screen.

Registered or changed per-
sonal settings will be deleted or 
returned to their default condi-
tions.

1

Display the general settings 
screen. (

P.296)

2

Select “Delete Personal 
Data”.

3

Select “Delete”.

4

Select “Yes” when the confir-
mation screen appears.

Examples of settings that can be 
returned to their default conditions:

Audio settings

Phone settings

etc.

*

: This function is not made avail-

able in some countries or areas.

When the automatic update 
check function is enabled, if a 
software update is available 
from the Toyota response cen-
ter, a message will be displayed.

1

Display the general settings 
screen. (

P.296)

2

Select “Software Update Set-
ting”.

3

Select “Automatic Update 
Check” to enable/disable the 
automatic update check func-
tion.

When software update information 
is displayed, contact your Toyota 
dealer.

Manually select linked set-
tings

Deleting personal data

Software update settings

*

-------------------------------------------------------------------------------------------------------------------------------------------------------------

300

5-4. Other settings

COROLLA H/B_U

1

Press the “MENU” button.

2

Select “Setup”.

3

Select “Voice”.

4

Select the desired items to 
be set.

Select to adjust the volume of 
voice guidance.

Select to set the voice recog-
nition prompts.

Select to train voice recogni-
tion.

The voice command system 
adapts the user accent.

Select to start the voice rec-
ognition tutorial.

Select to set the voice 
prompt interrupt on/off.

Select to reset all setup 
items.

Voice settings

Voice volume, etc. can be 
set.

Displaying the voice set-
tings screen

Voice settings screen

-------------------------------------------------------------------------------------------------------------------------------------------------------------

301

5-4. Other settings

COROLLA H/B_U

5

Audio

1

Press the “MENU” button.

2

Select “Setup”.

3

Select “Vehicle”.

4

Select the desired items to 
be set.

Select to set vehicle customi-
zation. (

P.535)

Select to set valet mode. 
(

P.301)

The security system can be set 
to on by entering a security code 
(4-digit number).

When set to on, the system will 
become inoperative once the 
electrical power source is dis-
connected until the security 
code is entered.

1

Display the vehicle settings 
screen. (

P.301)

2

Select “Valet Mode”.

3

Enter the 4-digit personal 
code and select “OK”.

4

Enter the same 4-digit per-
sonal code again and select 
“OK”.

The system will request that 
you input the security code 
again to confirm that you 
remember it correctly.

When valet mode activates, 
the system stops and a secu-
rity code (4-digit number) 
standby screen is displayed.

If the 4-digit personal code is for-
gotten, please contact your Toyota 
dealer.

1

Enter the 4-digit personal 
code and select “OK”.

If an incorrect security code 
(4-digit number) is entered 6 
times, the system will not accept 

Vehicle settings

Settings are available for 
vehicle customization, etc.

Displaying the vehicle 
settings screen

Vehicle settings screen

Setting the valet mode

If the valet mode has been 
activated

-------------------------------------------------------------------------------------------------------------------------------------------------------------

302

5-4. Other settings

COROLLA H/B_U

another security code (4-digit 
number) for 10 minutes.

-------------------------------------------------------------------------------------------------------------------------------------------------------------

303

5-5. Using the audio/visual system

COROLLA H/B_U

5

Audio

5-5.Using the audio/visual system

The audio control screen can be reached by the following methods:

From the “AUDIO” button

1

Press the “AUDIO” button.

From the “MENU” button

1

Press the “MENU” button, then select “Audio”.

• Using the radio (

P.308)

• Playing a USB memory (

P.314)

• Playing an iPod/iPhone (Apple CarPlay

*

) (

P.316)

• Using the Android Auto

*

 (

P.319)

• Playing a Bluetooth

®

 device (

P.320)

• Using the steering wheel audio switches (

P.324)

• Audio system settings (

P.326)

*

: This function is not made available in some countries or areas.

Quick reference

Functional overview

-------------------------------------------------------------------------------------------------------------------------------------------------------------

304

5-5. Using the audio/visual system

COROLLA H/B_U

“POWER VOLUME” knob: 

Press to turn the audio/visual 

system on and off. The system 

turns on in the last mode used. 

Turn this knob to adjust the vol-

ume.

1

Press the “AUDIO” button.

2

Select “Source” or press 

“AUDIO” button again.

3

Select the desired source.

Dimmed screen buttons cannot be 

operated.

When there are two pages, select 

 or 

 to change the page.

When an Apple CarPlay/Android 

Auto connection is established, 

some system functions, such as 

the following, will be replaced by 

similar Apple CarPlay/Android 

Auto function or will become 

unavailable

*

:

• iPod (Audio Playback)

• USB audio/USB video

• Bluetooth

®

 audio

• Toyota apps

*

: This function is not made avail-

able in some countries or areas.

1

Display the audio source 

selection screen. (

P.304)

2

Select “Reorder”.

Some basics

This section describes 

some of the basic features 

of the audio/visual system. 

Some information may not 

pertain to your system.
Your audio/visual system 

works when the engine 

switch is in ACC or ON.

NOTICE

To prevent the battery from being 

discharged, do not leave the 

audio/visual system on longer 

than necessary when the engine 

is not running.

Turning the system on 

and off

Selecting an audio source

Reordering the audio 

source

-------------------------------------------------------------------------------------------------------------------------------------------------------------

305

5-5. Using the audio/visual system

COROLLA H/B_U

5

Audio

3

Select the desired audio 

source then 

 or 

 to reor-

der.

4

Select “OK”.

1

Connect a device.

Turn on the power of the 
device if it is not turned on.

If a USB hub is plugged-in, two 
devices can be connected at a 
time.

Even if a USB hub is used to con-
nect more than two USB devices, 
only the first two connected 
devices will be recognized.

If a USB hub that has more than 
two ports is connected to the USB 
port, devices connected to the 
USB hub may not charge or be 
operable, as the supply of current 
may be insufficient.

1

Display the audio control 
screen. (

P.304)

2

Select “Sound”.

3

Select the desired item to be 
set.

Select to set the tre-
ble/mid/bass. (

P.305)

Select to set the fader/bal-
ance. (

P.306)

Select to set the Automatic 
Sound Levelizer. (

P.306)

Treble/Mid/Bass

How good an audio program 
sounds is largely determined by 
the mix of the treble, mid and 
bass levels. In fact, different 
kinds of music and vocal pro-
grams usually sound better with 
different mixes of treble, mid 
and bass.

1

Select “Treble/Mid/Bass”.

2

Select the desired screen 
button.

Select “+” or “-” to adjust 
high-pitched tones.

USB port

Sound settings

-------------------------------------------------------------------------------------------------------------------------------------------------------------

306

5-5. Using the audio/visual system

COROLLA H/B_U

Select “+” or “-” to adjust 
mid-pitched tones.

Select “+” or “-” to adjust 
low-pitched tones.

Fader/Balance

A good balance of the left and 
right stereo channels and of the 
front and rear sound levels is 
also important.

Keep in mind that when listening 
to a stereo recording or broad-
cast, changing the right/left bal-
ance will increase the volume of 
1 group of sounds while 
decreasing the volume of 
another.

1

Select “Fader/Balance”.

2

Select the desired screen 
button.

Select to adjust the sound 
balance between the front 
and rear speakers.

Select to adjust the sound 
balance between the left and 
right speakers.

Automatic sound levelizer 
(ASL)

The system adjusts to the opti-
mum volume and tone quality 

according to vehicle speed to 
compensate for increased road 
noise, wind noise, or other 
noises while driving.

1

Select “Automatic Sound 
Levelizer”.

2

Select “High”, “Mid”, “Low” or 
“Off”.

Screen format settings

The screen format can be 
selected for USB video.

1

Press the “MENU” button.

2

Select “Setup”.

3

Select “Audio”.

4

Select “Common”.

5

Select “Screen Format”.

6

Select the desired item to be 
adjusted.

Select to display a 4 : 3 
screen, with either side in 
black.

Select to enlarge the image 
horizontally and vertically to 
full screen.

Select to enlarge the image 
by the same ratio horizontally 

Audio screen adjustment

-------------------------------------------------------------------------------------------------------------------------------------------------------------

307

5-5. Using the audio/visual system

COROLLA H/B_U

5

Audio

and vertically.

Contrast and brightness 
adjustment

The contrast and brightness of 
the screen can be adjusted.

1

Press the “MENU” button.

2

Select “Setup”.

3

Select “Audio”.

4

Select “Common”.

5

Select “Display”.

6

Select the desired item to be 
adjusted.

“Contrast”

“+”: Select to strengthen the con-
trast of the screen.

“-”: Select to weaken the contrast of 
the screen.

“Brightness”

“+”: Select to brighten the screen.

“-”: Select to darken the screen.

Depending on the audio source, 
some functions may not be avail-
able.

1

Press this switch to operate 
the voice command system.

The voice command system 
and its list of commands can 
be operated. (

P.339)

Voice command system

-------------------------------------------------------------------------------------------------------------------------------------------------------------

308

5-6. Radio operation

COROLLA H/B_U

5-6.Radio operation

*

: If equipped

The radio operation screen can 
be reached by the following 
methods:

P.304

Select to display the audio 
source selection screen.

Select to display the preset 
stations screen. (

P.308)

Select to display a list of 
receivable stations. (

P.309)

Select to display the radio 
options screen. (

P.309)

Select to display the sound 
setting screen. (

P.305)

Select to tune to preset sta-
tions/channels. (

P.308)

Press to seek for stations in 
the relevant program type.
Press and hold for continu-
ous seek.

Turn to step up/down fre-
quencies.
Turn to move up/down the 
station. Also, the knob can be 
used to enter selections on 
the list screens by pressing it.

The radio automatically changes 
to stereo reception when a stereo 
broadcast is received.

Radio mode has a mix preset 
function, which can store up to 
36 stations (6 stations per page 
x 6 pages) from any of the AM, 
FM or SXM bands.

1

Tune in the desired station.

AM/FM/SiriusXM

®

 Sat-

ellite Radio

*

Overview

Control screen

Control panel

Presetting a station

-------------------------------------------------------------------------------------------------------------------------------------------------------------

309

5-6. Radio operation

COROLLA H/B_U

5

Audio

2

Select and hold “(Hold Edit)”.

To change the preset station 
to a different one, select and 
hold the preset station.

The number of preset radio sta-
tions displayed on the screen can 
be changed. (

P.326)

1

Select “Station List”.

2

Select “AM”, “FM” or “SXM”.

Select the desired program 
genre when the genre selec-
tion screen is displayed.

3

Select the desired station.

Refreshing the station list

1

Select “Refresh”.

“Cancel Refresh”: Select to can-
cel the refresh.

“Source”: Select to change to 
another audio source while 
refreshing.

The audio/visual system sound is 
muted during refresh operation.

In some situations, it may take 
some time to update the station 
list.

1

Select “Options”.

2

Select the desired item to be 
set.

When “SXM Tune Start” is 
turned on, the current song is 
played from the beginning 
when you select the channel.

Analog FM only: Select to 
display RBDS text mes-
sages.

Select to scan for receivable 
stations.

This audio/visual system is 
equipped with Radio Broadcast 
Data Systems (RBDS). RBDS 
mode allows text messages to 
be received from radio stations 
that utilize RBDS transmitters.

When RBDS is on, the radio can 
do the following functions.
• Only selecting stations of a 

particular program type

• Displaying messages from 

radio stations

Selecting a station from 
the list

Radio options

Radio broadcast data sys-
tem

-------------------------------------------------------------------------------------------------------------------------------------------------------------

310

5-6. Radio operation

COROLLA H/B_U

• Searching for a stronger sig-

nal station

RBDS features are available 

only when listening to an FM 

station that broadcasts RBDS 

information and the “FM Info” 

function is on. (

P.309)

All SiriusXM services, including 

satellite radio and data services, 

plus streaming services, require 

a subscription, sold separately 

or as a package by Sirius XM 

Radio Inc. (U.S.A.) or Sirius XM 

Canada Inc. (Canada), after any 

trial subscription which may be 

included with your vehicle pur-

chase or lease. To subscribe 

after your trial subscription, call 

1-877-447-0011 (U.S.A.) or 

1-877-438-9677 (Canada).

Important information 

about your subscription

Your SiriusXM services will 

automatically stop at the end of 

your trial unless you decide to 

subscribe. If you decide to con-

tinue service, the paid subscrip-

tion plan you choose will 

automatically renew and you will 

be charged the rate in effect at 

that time and according to your 

chosen payment method. Fees 

and taxes apply. You may can-

cel at any time by calling 

1-866-635-2349. See SiriusXM 

Customer Agreement for com-

plete terms at www.siri-

usxm.com (U.S.A.) or 

www.siriusxm.ca (Canada). All 

fees and programming subject 

to change. Traffic information 

not available in all markets.

About SiriusXM Services

• Most in-car trials today include 

SiriusXM’s best package — All 

Access. It includes every channel 

available on your radio, plus 

streaming.

SiriusXM All Access Subscription

• Listen everywhere with All 

Access. You get every channel 

available in your ride, plus you can 

listen on the app and online — so 

you can enjoy the best SiriusXM 

has to offer, anywhere life takes 

you. It’s the only package that 

gives you all of our premium pro-

gramming, including Howard 

How to subscribe to Siri-

usXM Radio Services

NOTICE

It is prohibited to copy, decom-

pile, disassemble, reverse engi-

neer, hack, manipulate, or 

otherwise make available any 

technology or software incorpo-

rated in receivers compatible 

with the SiriusXM Satellite 

Radio System or that support 

the SiriusXM website, the 

streaming service or any of its 

content. Furthermore, the 

AMBE

®

 voice compression soft-

ware included in this product is 

protected by intellectual prop-

erty rights including patent 

rights, copyrights, and trade 

secrets of Digital Voice Sys-

tems, Inc.

Note: this applies to SiriusXM 

Satellite Radio receivers only 

and not SiriusXM Ready 

devices.

-------------------------------------------------------------------------------------------------------------------------------------------------------------

311

5-6. Radio operation

COROLLA H/B_U

5

Audio

Stern, every NFL, MLB

®

 and NBA 

game, every NASCAR

®

 race, 

NHL

®

 games, 24/7 talk channels 

dedicated to the biggest leagues, 
and more. You get all kinds of 
commercial-free music, including 
artist-dedicated channels and 
more, plus sports, news, talk and 
entertainment.

Radio operation

• Look for the Sirius, XM, SiriusXM, 

Band, SAT, AUX, Radio or Source 
button and you’re in. If you can’t 
hear us, it’s easy to get started:
U.S.A.: 
Locate your Radio ID by turning to 
Channel 0. If you don’t see your 
number there, go to siri-
usxm.com/activationhelp to find it. 
Visit siriusxm.com/refresh or call 
1-855-MYREFRESH (697-3373) 
to send a refresh signal to your 
radio.
Canada: 
Locate your Radio ID by turning to 
Channel 0. 
Visit siriusxm.ca/refresh to send a 

refresh signal to your radio or call 
1-888-539-7474 for service.

Each SiriusXM tuner is identified 
with a unique radio ID. The radio 
ID is required when activating 
an SiriusXM service or when 
reporting a problem.

If “Ch 000” is selected using 
the “TUNE SCROLL” knob, 
the ID code, which is 8 alpha-
numeric characters, will be 
displayed. If another channel 
is selected, the ID code will no 
longer be displayed. The 
channel (000) alternates 
between displaying the radio 
ID and the specific radio 
code.

When problems occur with the SiriusXM tuner, a message will 
appear on the screen. Referring to the table below to identify the 
problem, take the suggested corrective action.

Displaying the radio ID

Refer to the table below to identify the problem and take 
the suggested corrective action

Message

Explanation

“Check 
Antenna”

The SiriusXM antenna is not connected. Check whether the 
SiriusXM antenna cable is attached securely. Contact your 
Toyota dealer for assistance.

A short circuit occurs in the antenna or the surrounding 
antenna cable. Contact your Toyota dealer for assistance.

“No Signal”

The SiriusXM signal is too weak at the current location. Wait 
until your vehicle reaches a location with a stronger signal.

-------------------------------------------------------------------------------------------------------------------------------------------------------------

312

5-6. Radio operation

COROLLA H/B_U

“Chan 
Unavailable”

The channel you selected is not broadcasting any program-
ming. Select another channel.

“Ch Unsub-
scribed”

The channel you selected is no longer available. Wait for 
about 2 seconds until the radio returns to the previous chan-
nel or “Ch 001”. If it does not change automatically, select 
another channel.

Message

Explanation

-------------------------------------------------------------------------------------------------------------------------------------------------------------

313

5-6. Radio operation

COROLLA H/B_U

5

Audio

1

Display the audio source 
selection screen. (

P.304)

2

Select the desired application 
screen button.

The internet radio application 
screen is displayed.

Perform operations accord-
ing to the displayed applica-
tion screen.

For the instrument panel 
operation method: 

P.304

If a compatible phone is 
already registered, it will be 
connected automatically.

Other applications can be acti-
vated while listening to internet 
radio.

Some parts of applications can be 
adjusted using the switches on the 
steering wheel.

For additional information, refer to
https://www.toyota.com/
audio-multimedia or call
1-800-331-4331 in the United 
States,
https://www.toyota.ca/connected 
or call
1-888-869-6828 in Canada, and

http://www.toyotapr.com/
audio-multimedia or call
1-877-855-8377 in Puerto Rico.

Internet radio

One of Toyota apps Connect 
features is the ability to lis-
ten to internet radio. In 
order to use this service, a 
compatible phone and the 
system needs to be set up. 
For details: 

P.385

Listening to internet radio

-------------------------------------------------------------------------------------------------------------------------------------------------------------

314

5-7. Media operation

COROLLA H/B_U

5-7.Media operation

The USB memory operation 
screen can be reached by the 
following methods: 

P.304

Connecting a USB memory 
(

P.305)

When an Apple CarPlay/Android 
Auto connection is established, 

this function will be unavailable.

*

*

: This function is not made avail-

able in some countries or areas.

USB audio

Select to display the audio 
source selection screen.

Select to return to the top 
screen.

Select to display a song list 
screen.

Select to display the play 
mode selection screen.

Select to display the sound 
setting screen. (

P.305)

Select to set repeat playback. 
(

P.315)

Select to change the 
file/track.
Select and hold to fast 
rewind.

Select to play/pause.

Select to change the 
file/track.
Select and hold to fast for-
ward.

Select to set random play-
back. (

P.315)

Select to change the 
folder/album.

Displays cover art

Select to change the artist.

USB video

1

Select “Browse”.

2

Select “Videos”.

3

Select the desired folder and 
file.

Select to display the audio 
source selection screen.

Select to return to the top 
screen.

Select to display a song list 
screen.

Select to display the play 
mode selection screen.

USB memory

Overview

Control screen

-------------------------------------------------------------------------------------------------------------------------------------------------------------

315

5-7. Media operation

COROLLA H/B_U

5

Au

dio

Select to display the sound 

setting screen. (

P.305)

Select to change the file.

Select and hold to fast 

rewind.
Select to play/pause.
Select to change the file.

Select and hold to fast for-

ward.
Select to display a full screen 

image.
Select to change the folder.

Press to change the 

file/track.

Press and hold to fast for-

ward/rewind.
Turn to change the file/track.

Turn to move up/down the 

list. Also, the knob can be 

used to enter selections on 

the list screens by pressing it.

While the vehicle is being driven, 

this function can only output 

sound.

If tag information exists, the 

file/folder names will be changed 

to track/album names.

The file/track or folder/album 

currently being listened to can 

be repeated.

1

Select .

Each time 

 is selected, the 

mode changes as follows:

When random playback is off

• file/track repeat 

 folder/album 

repeat 

 off

When random playback is on

• file/track repeat 

 off

Files/tracks or folders/albums 

can be automatically and ran-

domly selected.

1

Select .

Each time 

 is selected, the 

mode changes as follows:

• random (1 folder/album random) 

 folder/album random (all 

folder/album random) 

 off

Control panel

Repeating

Random order

WARNING

Do not operate the player’s con-

trols or connect the USB mem-

ory while driving.

NOTICE

Do not leave your portable 

player in the car. In particular, 

high temperatures inside the 

vehicle may damage the porta-

ble player.

-------------------------------------------------------------------------------------------------------------------------------------------------------------

316

5-7. Media operation

COROLLA H/B_U

*

: This function is not made avail-

able in some countries or areas.

The iPod/iPhone(Apple Car-

Play) operation screen can be 

reached by the following meth-

ods: 

P.304

Connecting an iPod/iPhone 

(

P.289, 305)

When an Android Auto connec-

tion is established, this function 
will be unavailable.

*

*

: This function is not made avail-

able in some countries or areas.

An Apple CarPlay connection 

is not established

NOTICE

Do not push down on or apply 

unnecessary pressure to the 

portable player while it is con-

nected as this may damage the 

portable player or its terminal.

Do not insert foreign objects into 

the port as this may damage the 

portable player or its terminal.

iPod/iPhone (Apple 

CarPlay

*

)

Overview

Control screen

-------------------------------------------------------------------------------------------------------------------------------------------------------------

317

5-7. Media operation

COROLLA H/B_U

5

Audio

An Apple CarPlay connection 
is established

Select to display the audio 
source selection screen.

Select to return to the top 
screen.

Select to display a song list 
screen.

Select to display the play 
mode selection screen.

Select to display the sound 
setting screen. (

P.305)

Select to set repeat playback. 
(

P.318)

Select to change the track.
Select and hold to fast 
rewind.

Select to play/pause.

Select to change the track.
Select and hold to fast for-
ward.

Select to set random play-
back. (

P.318)

Displays cover art

Select to change the album.

Select to change the artist.

Select to change the playlist.

Select to display the audio 

control screen of Apple Car-
Play.

Press to change the track.
Press and hold to fast for-
ward/rewind.

Turn to move up/down the 
list. Also, the knob can be 
used to enter selections on 
the list screens by pressing it.

Some functions may not be avail-
able depending on the type of 
model.

When an iPod/iPhone is con-
nected using a genuine 
iPod/iPhone cable, the 
iPod/iPhone starts charging its 
battery.

Depending on the iPod/iPhone, 
the video sound may not be able 
to be heard.

Depending on the iPod/iPhone 
and the songs in the iPod/iPhone, 
a cover art may be displayed. This 
function can be changed to “On” 
or “Off”. (

P.326) It may take time 

to display the cover art, and the 
iPod/iPhone may not be operated 
while the cover art display is in 
process.

When an iPod/iPhone is con-
nected and the audio source is 
changed to iPod/iPhone mode, 

Control panel

-------------------------------------------------------------------------------------------------------------------------------------------------------------

318

5-7. Media operation

COROLLA H/B_U

the iPod/iPhone will resume play-

ing from the same point it was last 

used.

Tracks selected by operating a 

connected iPod/iPhone may not 

be recognized or displayed prop-

erly.

The system may not function 

properly if a conversion adapter is 

used to connect a device.

The track currently being lis-

tened to can be repeated.

1

Select .

Each time 

 is selected, the 

mode changes as follows:

When shuffle is off (iPhone 5 or 

later)

• track repeat 

 album repeat 

 off

When shuffle is off (iPhone 4s or 

earlier)

• track repeat 

 off

When shuffle is on

• track repeat 

 off

Tracks or albums can be auto-

matically and randomly 

selected.

1

Select .

Each time 

 is selected, the 

mode changes as follows:

• shuffle (1 album shuffle) 

 album 

shuffle (all album shuffle) 

 off

Repeating

Random order

WARNING

Do not operate the player’s con-

trols or connect the iPod/iPhone 

while driving.

NOTICE

Do not leave your portable 

player in the vehicle. In particu-

lar, high temperatures inside the 

vehicle may damage the porta-

ble player.

Do not push down on or apply 

unnecessary pressure to the 

portable player while it is con-

nected as this may damage the 

portable player or its terminal.

Do not insert foreign objects into 

the port as this may damage the 

portable player or its terminal.

-------------------------------------------------------------------------------------------------------------------------------------------------------------

319

5-7. Media operation

COROLLA H/B_U

5

Au

dio

*

: This function is not made avail-

able in some countries or areas.

The Android Auto operation 

screen can be reached by the 

following methods: 

P.304

Connecting an Android device 

(

P.289, 290)

When an Apple CarPlay con-

nection is established, this func-
tion will be unavailable.

*

*

: This function is not made avail-

able in some countries or areas.

Select to display the audio 

source selection screen.
Select to return to the top 

screen.
Select to display the sound 

setting screen. (

P.305)

Select to display the audio 

control screen of Android 

Auto.
Select to change the track.

Select to play/pause.
Select to change the track.
Displays cover art

Press to change the track.
Turn to change the track.

Android Auto

*

Overview

Control screen

Control panel

WARNING

Do not connect smartphone or 

operate the controls while driving.

NOTICE

Do not leave your smartphone 

in the vehicle. In particular, high 

temperatures inside the vehicle 

may damage the smartphone.

Do not push down on or apply 

unnecessary pressure to the 

smartphone while it is con-

nected as this may damage the 

smartphone or its terminal.

Do not insert foreign objects into 

the port as this may damage the 

smartphone or its terminal.

-------------------------------------------------------------------------------------------------------------------------------------------------------------

320

5-7. Media operation

COROLLA H/B_U

The Bluetooth

®

 audio operation 

screen can be reached by the 
following methods: 

P.304

Connecting a Bluetooth

®


audio device (

P.322)

Depending on the type of porta-
ble player connected, some 
functions may not be available 
and/or the screen may look dif-
ferently than shown in this man-
ual.

When an Apple CarPlay/Android 
Auto connection is established, 

Bluetooth

®

 audio will be sus-

pended and become unavail-

able.

*

*

: This function is not made avail-

able in some countries or areas.

Select to display the audio 
source selection screen.

Select to return to the top 
screen.

Select to display a song list 
screen.

Select to display the play 
mode selection screen.

Select to display the portable 
device connection screen. 
(

P.322)

Select to display the sound 
setting screen. (

P.305)

Select to set repeat playback. 
(

P.321)

Select to change the track.
Select and hold to fast 
rewind.

Select to play/pause.

Select to change the track.
Select and hold to fast for-
ward.

Select to set random play-
back. (

P.321)

Bluetooth

®

 audio

The Bluetooth

®

 audio sys-

tem enables users to enjoy 
listening to music that is 
played on a portable player 
on the vehicle speakers via 
wireless communication.

This audio/visual system 

supports Bluetooth

®

, a wire-

less data system capable of 
playing portable audio 
music without cables. If 
your device does not sup-

port Bluetooth

®

, the Blue-

tooth

®

 audio system will not 

function.

Overview

Control screen

-------------------------------------------------------------------------------------------------------------------------------------------------------------

321

5-7. Media operation

COROLLA H/B_U

5

Audio

Select to change the album.

Displays cover art

Press to change the track.
Press and hold to fast for-
ward/rewind.

Turn to move up/down the 
list. Also, the knob can be 
used to enter selections on 
the list screens by pressing it.

The track or album currently 
being listened to can be 
repeated.

1

Select .

Each time 

 is selected, the 

mode changes as follows:

When random playback is off

• track repeat 

 album repeat 

 off

When random playback is on

• track repeat 

 off

Tracks or albums can be auto-
matically and randomly 
selected.

1

Select .

Each time 

 is selected, the 

mode changes as follows:

• random (1 album random) 


album random (all album random) 

 off

Depending on the Bluetooth

®


device that is connected to the 
system, the music may start play-
ing when selecting 

 while it is 

paused. Conversely, the music 
may pause when selecting 


while it is playing.

In the following conditions, the 
system may not function:

• The Bluetooth

®

 device is turned 

off.

• The Bluetooth

®

 device is not con-

nected.

• The Bluetooth

®

 device has a low 

battery.

When using the Bluetooth

®

 audio 

and Wi-Fi

®

 Hotspot functions at 

the same time, the following prob-
lems may occur:

• It may take longer than normal to 

connect to the Bluetooth

®

 device.

• The sound may cut out.

It may take time to connect the 
phone when Bluetooth

®

 audio is 

being played.

For operating the portable player, 
see the instruction manual that 
comes with it.

If the Bluetooth

®

 device is discon-

nected due to poor reception from 
the Bluetooth

®

 network when the 

engine switch is in ACC or ON, 
the system automatically recon-
nects the portable player.

If the Bluetooth

®

 device is discon-

nected on purpose, such as it was 
turned off, this does not happen. 

Control panel

Repeating

Random order

-------------------------------------------------------------------------------------------------------------------------------------------------------------

322

5-7. Media operation

COROLLA H/B_U

Reconnect the portable player 

manually.

Bluetooth

®

 device information is 

registered when the Bluetooth

®


device is connected to the Blue-

tooth

®

 audio system. When selling 

or disposing of the vehicle, 

remove the Bluetooth

®

 audio 

information from the system. 

(

P.299)

In some situations, sound output 

via the Bluetooth

®

 audio system 

may be out of sync with the con-

nected device or output intermit-

tently.

To use the Bluetooth

®

 audio 

system, it is necessary to regis-
ter a Bluetooth

®

 device with the 

system.

Registering an additional 

device

1

Display the Bluetooth

®

 audio 

control screen. (

P.320)

2

Select “Connect”.

3

Select “Add Device”.

When another Bluetooth

®

device is connected, a confir-

mation screen will be dis-

played. To disconnect the 
Bluetooth

®

 device, select 

“Yes”.

4

Follow the steps in “Register-
ing a Bluetooth

®

 phone for 

the first time” from step 

5

(

P.272)

Selecting a registered device

1

Display the Bluetooth

®

 audio 

control screen. (

P.320)

2

Select “Connect”.

3

Select the desired device to 

be connected.

WARNING

Do not operate the player’s con-

trols or connect to the Blue-

tooth

®

 audio system while 

driving.

Your audio unit is fitted with 

Bluetooth

®

 antennas. People 

with implantable cardiac pace-

makers, cardiac resynchroniza-

tion therapy-pacemakers or 

implantable cardioverter defibril-

lators should maintain a reason-

able distance between 

themselves and the Bluetooth

®


antennas. The radio waves may 

affect the operation of such 

devices.

Before using Bluetooth

®


devices, users of any electrical 

medical device other than 

implantable cardiac pacemak-

ers, cardiac resynchronization 

therapy-pacemakers or implant-

able cardioverter defibrillators 

should consult the manufacturer 

of the device for information 

about its operation under the 

influence of radio waves. Radio 

waves could have unexpected 

effects on the operation of such 

medical devices.

NOTICE

Do not leave your portable player 

in the vehicle. In particular, high 

temperatures inside the vehicle 

may damage the portable player.

Registering/Connecting a 

Bluetooth

®

 device

-------------------------------------------------------------------------------------------------------------------------------------------------------------

323

5-7. Media operation

COROLLA H/B_U

5

Audio

4

Check that a confirmation 
screen is displayed when the 
connection is complete.

If an error message is dis-
played, follow the guidance 
on the screen to try again.

-------------------------------------------------------------------------------------------------------------------------------------------------------------

324

5-8. Audio/visual remote controls

COROLLA H/B_U

5-8.Audio/visual remote controls

Some parts of the audio/visual 
system can be adjusted using 
the switches on the steering 
wheel.

Volume control switch

“MODE” switch

*1

: If equipped

*2

: If cached radio is enabled, press-

ing and holding the “MODE” 
switch pauses the broadcast. 
(Press and hold again to play 
back the cached radio program.)

*3

: When an Apple CarPlay is estab-

lished, this function will be 
unavailable.

*4

: When an Android Auto is estab-

lished, this function will be 
unavailable.

Seek switch

Steering switches

Steering switch operation

Mode

Operation/function

All

Press: Volume 
up/down

Press and hold (0.8 
sec. or more): Volume 
up/down continuously

Mode

Operation/function

AM/FM/

SXM

*1

Press: Change audio 
modes

Press and hold (0.8 

sec. or more): Mute

*2


(Press and hold again 
to resume the sound.)

USB

*3, 4

iPod/iPhon

e

*4

Android 

Auto

*3

Bluetooth

®


audio

*3, 4

APPS

*3, 4

Press: Change audio 
modes

Press and hold (0.8 
sec. or more): Pause 
(Press and hold again 
to resume the play 
mode.)

Mode

Operation/function

AM/FM

Press: Preset chan-
nel up/down

Press and hold (0.8 
sec. or more): Seek 
up/down

Press and hold (1.5 
sec. or more): Seek 
up/down continuously 
while the switch is 
being pressed

Mode

Operation/function

-------------------------------------------------------------------------------------------------------------------------------------------------------------

325

5-8. Audio/visual remote controls

COROLLA H/B_U

5

Audio

*1

: If equipped

*2

: When an Apple CarPlay is estab-

lished, this function will be 
unavailable.

*3

: When an Android Auto is estab-

lished, this function will be 
unavailable.

In the APPS mode, some opera-
tion may be done on the screen 
depend on the selected APPS.

SXM

*1

Press: Preset chan-
nel up/down

Press and hold (0.8 
sec. or more): Seek 
for stations in the rele-
vant program 
type/channel category

Press and hold (1.5 
sec. or more): Fast 
channel up/down

USB

*2, 3

iPod/iPhon

e

*3

, Blue-

tooth

®


audio

*2, 3

Press: Track/file 
up/down

Press and hold (0.8 
sec. or more): Fast 
forward/rewind

Android 

Auto

*2

Press: Track up/down

Mode

Operation/function

-------------------------------------------------------------------------------------------------------------------------------------------------------------

326

5-9. Audio settings

COROLLA H/B_U

5-9.Audio settings

1

Press the “MENU” button.

2

Select “Setup”.

3

Select “Audio”.

4

Select the desired items to 
be set.

Select to set the common 
settings. (

P.326)

Select to set the radio set-
tings. (

P.326)

1

Display the audio settings 
screen. (

P.326)

2

Select “Common”.

3

Select the desired items to 
be set.

Select to set the cover art 
display on/off.

Select to prioritize the display 
of information from the Gra-
cenote database.

Select to change the screen 

size.

*

 (

P.306)

Select to display the image 

quality adjustment screen.

*


(

P.307)

*

: Only in USB video mode

1

Display the audio settings 
screen. (

P.326)

2

Select “Radio”.

3

Select the desired number of 
preset radio stations dis-
played on the screen.

Setup

Detailed audio settings can 
be programmed.

Displaying the audio set-
tings screen

Audio settings screen

Common settings

Radio settings

-------------------------------------------------------------------------------------------------------------------------------------------------------------

327

5-10. Tips for operating the audio/visual system

COROLLA H/B_U

5

Au

dio

5-10.Tips for operating the audio/visual system

The use of a cellular phone inside 

or near the vehicle may cause a 

noise from the speakers of the 

audio/visual system which you are 

listening to. However, this does 

not indicate a malfunction.

Usually, a problem with radio 

reception does not mean there 

is a problem with the radio 

 it 

is just the normal result of condi-

tions outside the vehicle.
For example, nearby buildings 

and terrain can interfere with FM 

reception. Power lines or phone 

wires can interfere with AM sig-

nals. And of course, radio sig-

nals have a limited range. The 

farther the vehicle is from a sta-

tion, the weaker its signal will 

be. In addition, reception condi-

tions change constantly as the 

vehicle moves.
Here, some common reception 

problems that probably do not 

indicate a problem with the radio 

are described.

FM

Fading and drifting stations: 

Generally, the effective range of 

FM is about 25 miles (40 km). 

Once outside this range, you 

may notice fading and drifting, 

which increase with the distance 

from the radio transmitter. They 

are often accompanied by dis-

tortion.
Multi-path: FM signals are 

reflective, making it possible for 

2 signals to reach the vehicle’s 

antenna at the same time. If this 

happens, the signals will cancel 

each other out, causing a 

momentary flutter or loss of 

reception.
Static and fluttering: These 

occur when signals are blocked 

by buildings, trees or other large 

objects. Increasing the bass 

level may reduce static and flut-

tering.
Station swapping: If the FM sig-

nal being listened to is inter-

rupted or weakened, and there 

is another strong station nearby 

on the FM band, the radio may 

tune in the second station until 

the original signal can be picked 

up again.

AM

Fading: AM broadcasts are 

reflected by the upper atmo-

sphere 

 especially at night. 

These reflected signals can 

interfere with those received 

directly from the radio station, 

causing the radio station to 

sound alternately strong and 

weak.

Operating information

NOTICE

To avoid damage to the 

audio/visual system:

• Be careful not to spill beverages 

over the audio/visual system.

Radio

-------------------------------------------------------------------------------------------------------------------------------------------------------------

328

5-10. Tips for operating the audio/visual system

COROLLA H/B_U

Station interference: When a 
reflected signal and a signal 
received directly from a radio 
station are very nearly the same 
frequency, they can interfere 
with each other, making it diffi-
cult to hear the broadcast.

Static: AM is easily affected by 
external sources of electrical 
noise, such as high tension 
power lines, lightening or electri-
cal motors. This results in static.

SiriusXM

Cargo loaded on the roof lug-
gage carrier, especially metal 
objects, may adversely affect 
the reception of SiriusXM Sat-
ellite Radio.

Alternation or modifications 
carried out without appropri-
ate authorization may invali-
date the user’s right to 
operate the equipment.

Certification

For vehicles sold in the 
U.S.A., Guam and Puerto 
Rico

For vehicles sold in Canada

Use of the Made for Apple 
badge means that an acces-
sory has been designed to 
connect specifically to the 
Apple product(s) identified in 
the badge, and has been cer-
tified by the developer to meet 
Apple performance stan-
dards. Apple is not responsi-
ble for the operation of this 
device or its compliance with 
safety and regulatory stan-
dards. Please note that the 
use of this accessory with an 
Apple product may affect 
wireless performance.

iPhone

®

, iPod

®

, iPod clas-

sic

®

, iPod nano

®

, iPod 

touch

®

, and Lightning are 

trademarks of Apple Inc., reg-
istered in the U.S. and other 
countries.

Compatible models

The following iPod nano

®

, iPod 

touch

®

 and iPhone

®

 devices 

can be used with this system.

Made for
• iPhone X
• iPhone 8
• iPhone 8 Plus

iPod

-------------------------------------------------------------------------------------------------------------------------------------------------------------

329

5-10. Tips for operating the audio/visual system

COROLLA H/B_U

5

Audio

• iPhone 7
• iPhone 7 Plus
• iPhone SE
• iPhone 6s
• iPhone 6s Plus
• iPhone 6
• iPhone 6 Plus
• iPhone 5s
• iPhone 5c
• iPhone 5
• iPod touch (6th generation)
• iPod touch (5th generation)

This system only supports audio 
playback.

Depending on difference between 
models or software versions etc., 
some models might be incompati-
ble with this system.

This device supports high-reso-
lution sound sources.

The definition of high-resolution 
is based on the standards of 
groups such as the CTA (Con-
sumer Technology Association).

Supported formats and play-
able media are as follows.

Supported formats

WAV, FLAC, ALAC

Playable media

USB memory

*

: USB video only

High-resolution sound 
source

File information

Compatible USB devices

USB communi-
cation formats

USB 2.0 HS (480 
Mbps)

File formats

FAT 16/32

Correspon-
dence class

Mass storage 
class

Compatible audio format

Compatible compressed files

Item

USB

Compatible file 

format

MP3/WMA/AAC

WAV(LPCM)/FL

AC/ALAC/OGG 

Vorbis

MP4/AVI/WMV

Compatible file 

format (video)

*

MP4/AVI/WMV

Folders in the 

device

Maximum

3000

Files in the 

device

Maximum

9999

Files per folder

Maximum

255

-------------------------------------------------------------------------------------------------------------------------------------------------------------

330

5-10. Tips for operating the audio/visual system

COROLLA H/B_U

*1

: Only compatible with Windows 

Media Audio Standard

*2

: Sound source of 48kHz or more 

is down-converted to 
48kHz/24bit.

*1

: Variable Bit Rate (VBR) compati-

ble

*2

: Only compatible with Windows 

Media Audio Standard

Corresponding sampling fre-
quency

File type

Frequency (kHz)

MP3 files: 
MPEG 1 LAYER 
3

32/44.1/48

MP3 files: 
MPEG 2 LSF 
LAYER 3

16/22.05/24

WMA files: 

Ver. 7, 8, 9

*1


(9.1/9.2)

32/44.1/48

AAC files: 
MPEG4/AAC-LC

11.025/12/16/

22.05/24/32/

44.1/48

WAV (LPCM) 

files

*2

8/11.025/12/16/

22.05/24/32/

44.1/48/88.2/
96/176.4/192

FLAC

*2

8/11.025/12/16/

22.05/24/32/

44.1/48/88.2/
96/176.4/192

ALAC

*2

8/11.025/12/16/

22.05/24/32/

44.1/48/64/

88.2/96

OGG Vorbis

*2

8/11.025/16/

22.05/32/44.1/

48

Corresponding bit rates

*1

File type

Bit rate (kbps)

MP3 files:
MPEG 1 LAYER 
3

32 - 320

MP3 files:
MPEG 2 LSF 
LAYER 3

8 - 160

WMA files: Ver. 
7, 8

CBR 48 - 192

WMA files:

Ver. 9

*2

 (9.1/9.2)

CBR 48 - 320

AAC files:
MPEG4/AAC-LC

8 - 320

OGG Vorbis

32-500

File type

Quantization bit 

rate (bit)

WAV (LPCM) 
files

16/24

FLAC

ALAC

Compatible channel modes

File type

Channel mode

MP3 files

Stereo, joint ste-
reo, dual chan-
nel and 
monaural

WMA files

2ch

-------------------------------------------------------------------------------------------------------------------------------------------------------------

331

5-10. Tips for operating the audio/visual system

COROLLA H/B_U

5

Audio

MP3 (MPEG Audio Layer 3), 
WMA (Windows Media Audio) 
and AAC (Advanced Audio 
Coding) are audio compres-
sion standards.

This system can play 
MP3/WMA/AAC files on USB 
memory.

MP4, WMV and AVI files can 
use the following resolutions: 
128x96, 160x120, 176x144 
(QCIF), 320x240 (QVGA), 
352x240 (SIF), 352x288 
(CIF), 640x480 (VGA), 
720x480 (NTSC), 720x576 
(PAL)

When naming an 
MP3/WMA/AAC file, add an 
appropriate file extension 
(.mp3/.wma/.m4a).

This system plays back files 
with .mp3/.wma/.m4a file 
extensions as 
MP3/WMA/AAC files respec-
tively. To prevent noise and 
playback errors, use the 
appropriate file extension.

MP3 files are compatible with 
the ID3 Tag Ver. 1.0, Ver. 1.1, 
Ver. 2.2 and Ver. 2.3 formats. 
This system cannot display 

disc title, track title and artist 
name in other formats.

WMA/AAC files can contain a 
WMA/AAC tag that is used in 
the same way as an ID3 tag. 
WMA/AAC tags carry infor-
mation such as track title and 
artist name.

The emphasis function is 
available only when playing 
MP3 files.

This system can play back 
AAC files encoded by iTunes.

The sound quality of 
MP3/WMA files generally 
improves with higher bit rates.

m3u playlists are not compati-
ble with the audio player.

MP3i (MP3 interactive) and 
MP3PRO formats are not 
compatible with the audio 
player.

The player is compatible with 
VBR (Variable Bit Rate).

When playing back files 
recorded as VBR (Variable Bit 
Rate) files, the play time will 
not be correctly displayed if 
the fast forward or reverse 
operations are used.

It is not possible to check fold-
ers that do not include 
MP3/WMA/AAC files.

MP3/WMA/AAC files in fold-
ers up to 8 levels deep can be 
played. However, the start of 
playback may be delayed 

AAC files

1ch, 2ch (Dual 
channel is not 
supported)

WAV (LPCM)/

FLAC/ALAC/

OGG Vorbis

2ch

File type

Channel mode

-------------------------------------------------------------------------------------------------------------------------------------------------------------


Content      ..     3      4      5      6     ..