Toyota Sienna (2019 year). Instruction - part 31


  Index      Toyota     Toyota Sienna - instruction 2019 year in english


Search            


Content   ..  29  30  31  32   ..


Toyota Sienna (2019 year). Instruction - part 31


481

SIENNA_OM_OM08025U_(U)

7-2. Steps to take in an emergency

7

Wh
en tro

uble

 a

ris

es

If a warning message is displayed

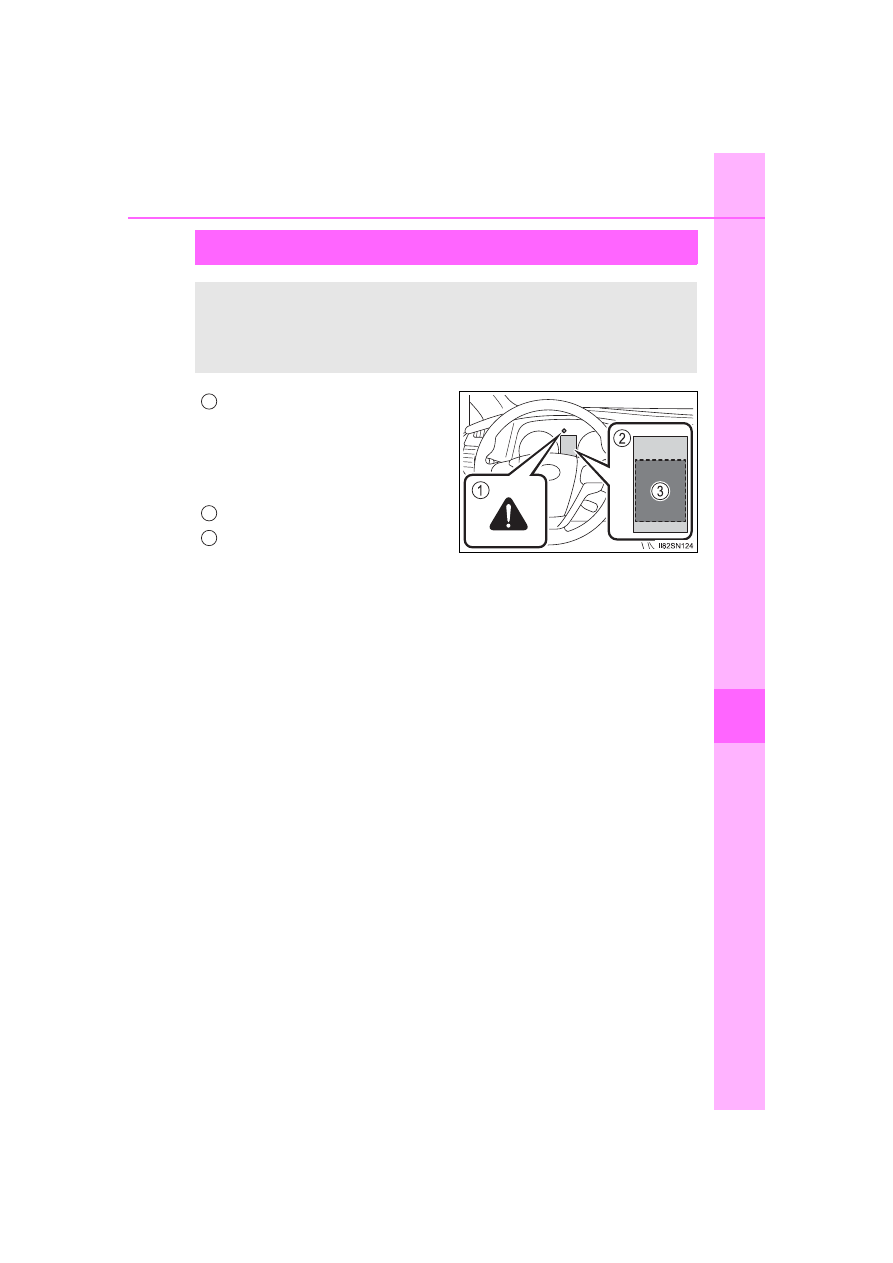
Master warning light

The  master  warning  light  also
comes  on  or  flashes  in  order  to
indicate  that  a  message  is  cur-
rently being displayed on the multi-
information display.

Multi-information display
Handling method

Follow the instructions of the mes-
sage  on  the  multi-information  dis-
play.

If any of the warning messages are shown again after the following
actions have been performed, contact your Toyota dealer.

The  multi-information  display  shows  warnings  of  system  mal-
functions, incorrectly performed operations, and messages that
indicate  a  need  for  maintenance.  When  a  message  is  shown,
perform the correction procedure appropriate to the message.

1

2
3

482

7-2. Steps to take in an emergency

SIENNA_OM_OM08025U_(U)

The warning lights and warning buzzers operate as follows depending
on the content of the message. If a message indicates the need for
inspection  by  a  dealer,  have  the  vehicle  inspected  by  your  Toyota
dealer immediately.

The  operation  of  the  warning  lights  and  warning  buzzers  may  differ
from  those  stated.  In  this  case,  perform  the  correction  procedure
according to the displayed message.

*

: A buzzer sounds the first time a message is shown on the multi-informa-

tion display.

Messages and warnings

System 

warning 

light

Warning 

buzzer

*

Warning

Comes on Comes on

Sounds

Indicates  an  important  situation,  such
as when a system related to driving is
malfunctioning  or  that  danger  may
result if the correction procedure is not
performed

Comes on

Sounds

Comes on 

or flashes

Sounds

Indicates  an  important  situation,  such
as  when  the  systems  shown  on  the
multi- information display may be mal-
functioning

Flashes

Sounds

Indicates  a  situation,  such  as  when
damage to the vehicle or danger may
result

Comes on

Does not 

sound

Indicates  a  condition,  such  as  mal-
function of electrical components, their
condition,  or  indicates  the  need  for
maintenance

Flashes

Does not 

sound

Indicates a situation, such as when an
operation  has  been  performed  incor-
rectly,  or  indicates  how  to  perform  an
operation correctly

483

7-2. Steps to take in an emergency

SIENNA_OM_OM08025U_(U)

7

Wh
en tro

uble

 a

ris

es

?

Warning messages
The warning messages explained below may differ from the actual messages
according to operation conditions and vehicle specifications.

?

If a message that indicates the need for contacting or visiting your TOY-
OTA dealer is shown
The system or part shown on the multi-information display is malfunctioning.
Have the vehicle inspected by your Toyota dealer.

?

If “Auto Power Off to Conserve Battery” is shown
Power was turned off due to the automatic power off function. Next time when
starting the engine, increase the engine speed slightly and maintain that level
for approximately 5 minutes to recharge the battery.

?

If “Shift to P Before Exiting Vehicle” is shown
The driver’s door is opened without turning the engine switch to off with the
shift lever in any position other than P. Shift the shift lever to P.

?

If  “Front  Camera  Unavailable”  or  “Front  Camera  Unavailable  Remove
Debris On Windshield” is shown
The  following  systems  may  be  suspended  until  the  problem  shown  in  the
message is resolved.

?

PCS (Pre-Collision system)

?

LDA (Lane Departure Alert with steering control)

?

Dynamic radar cruise control

?

Automatic High Beam

?

If  “AWD  System  Overheated  2WD  Mode  Engaged”  or  “AWD  System
Overheated Switching To 2WD Mode” is shown
The Active  Torque  Control  4WD  system  has  overheated.  Immediately  stop
the vehicle in a safe place and contact your Toyota dealer.

?

If “Low Engine Oil Add or Replace” is shown
The engine oil level is low. Check the level of engine oil, and add if necessary.
This  message  may  appear  if  the  vehicle  is  stopped  on  a  slope.  Move  the
vehicle to a level surface and check to see if the message disappears.

?

If “Maintenance Required Soon” is shown
The engine oil is scheduled to be changed. Check the engine oil, and change
if  necessary. After  changing  the  engine  oil,  the  message  should  be  reset.
(

P. 398)

484

7-2. Steps to take in an emergency

SIENNA_OM_OM08025U_(U)

?

If “Engine Coolant Temp is High” is shown
The  engine  coolant  temperature  is  too  high.  Following  the  instructions,
accordingly. (

P. 509)

?

If “Clean Park Sonar” is shown
The intuitive parking assist is dirty or covered with ice. Clean the sensor.

?

The messages that need for contacting your Toyota dealer

?

If any of the following messages is shown on the multi-information display, it
may  indicate  a  malfunction.  Have  the  vehicle  inspected  by  your  Toyota
dealer immediately.
• “Check Park Sonar System”
• “Check Vehicle Stability Control System”
• “Check Steering Lock System”

?

If any of the following messages is shown on the multi-information display, it
may indicate a malfunction. Immediately stop the vehicle and contact your
Toyota dealer.
• “Check Charging System”
• “Low Oil Pressure”
• “Check Brake System”

485

SIENNA_OM_OM08025U_(U)

7-2. Steps to take in an emergency

7

Wh
en tro

uble

 a

ris

es

If you have a flat tire (vehicles with a 

compact spare tire)

?

Stop the vehicle in a safe place on a hard, flat surface.

?

Set the parking brake.

?

Shift the shift lever to P.

?

Stop the engine.

?

Turn on the emergency flashers. (

P. 462)

Your  vehicle  is  equipped  with  a  spare  tire.  The  flat  tire  can  be
replaced with the spare tire.
For details about tires: 

P. 420

WARNING

?

If you have a flat tire
Do not continue driving with a flat tire. 
Driving even a short distance with a flat tire can damage the tire and the
wheel beyond repair, which could result in an accident.

Before jacking up the vehicle

486

7-2. Steps to take in an emergency

SIENNA_OM_OM08025U_(U)

Location of the spare tire, jack and tools

Spare tire
Jack handle
Tire bag
Jack

Wheel nut wrench
Adapter socket
Tire strap

1
2
3
4

5
6
7

487

7-2. Steps to take in an emergency

SIENNA_OM_OM08025U_(U)

7

Wh
en tro

uble

 a

ris

es

WARNING

?

Using the tire jack
Observe the following precautions. 
Improper use of the tire jack may cause the vehicle to suddenly fall off
the jack, leading to death or serious injury.

?

Do not use the tire jack for any purpose other than replacing tires or
installing and removing tire chains.

?

Only use the tire jack that comes with this vehicle for replacing a flat
tire. Do not use it on other vehicles, and do not use other tire jacks for
replacing tires on this vehicle.

?

Put the jack properly in its jack point.

?

Do not put any part of your body under the vehicle while it is supported
by the jack.

?

Do not start or run the engine while your vehicle is supported by the
jack.

?

Do not raise the vehicle while someone is inside.

?

When raising the vehicle, do not put an object on or under the jack.

?

Do  not  raise  the  vehicle  to  a  height  greater  than  that  required  to
replace the tire.

?

Use a jack stand if it is necessary to get under the vehicle.

?

When  lowering  the  vehicle,  make  sure  that  there  is  no-one  near  the
vehicle. If there are people nearby, warn them vocally before lowering.

488

7-2. Steps to take in an emergency

SIENNA_OM_OM08025U_(U)

Remove the cover.

Remove the adapter socket.

Remove the jack.

Remove the wheel nut wrench.

Taking out the jack and tools

1

2

3

4

489

7-2. Steps to take in an emergency

SIENNA_OM_OM08025U_(U)

7

Wh
en tro

uble

 a

ris

es

Slide the front passenger’s seat to the frontmost lock position and
the right side second seat to the rearmost lock position so they will
not interfere with the jack handle.
Open the right side sliding door
and you will find the flap on the
floor.  Pull  back  the  flap  to  find
the spare tire clamp bolt.

Attach  the  adapter  socket  over
the spare tire clamp bolt.
Connect  the  jack  handle  and
the  adapter  socket.  Turn  the
jack handle.

The  tire  will  be  lowered  com-
pletely to the ground.

Take  the  spare  tire  out  from
underneath  the  vehicle  and
remove the holding bracket.

Taking out the spare tire

1

2

3

4

WARNING

?

When taking out the spare tire from under the vehicle
Do  not  touch  the  exhaust  components,  as  they  can  become  very  hot
and burn you.

?

When storing the compact spare tire
Be careful not to catch fingers or other body parts between the compact
spare tire and the body of the vehicle.

490

7-2. Steps to take in an emergency

SIENNA_OM_OM08025U_(U)

Chock the tires.

Slightly  loosen  the  wheel  nuts
(one turn).

Turn the tire jack portion 

 by

hand until the notch of the jack
is in contact with the jack point.

The jack point guides are located

on  the  side  of  rocker  moulding.

They indicate the jack point posi-

tions.

Replacing a flat tire

1

Flat tire

Wheel chock positions

Front

Left-hand side

Behind the rear right-hand side tire

Right-hand side

Behind the rear left-hand side tire

Rear

Left-hand side

In front of the front right-hand side tire

Right-hand side

In front of the front left-hand side tire

2

3

A

491

7-2. Steps to take in an emergency

SIENNA_OM_OM08025U_(U)

7

Wh
en tro

uble

 a

ris

es

Raise the vehicle until the tire is
slightly raised off the ground.

Remove all the wheel nuts and
the tire.

When  resting  the  tire  on  the
ground, place the tire so that the
wheel  design  faces  up  to  avoid
scratching the wheel surface.

4

5

492

7-2. Steps to take in an emergency

SIENNA_OM_OM08025U_(U)

WARNING

?

Replacing a flat tire

?

Observe the following precautions. 
Failure to do so may result in serious injury:
• Do not touch the disc wheels or the area around the brakes immedi-

ately after the vehicle has been driven. 
After  the  vehicle  has  been  driven  the  disc  wheels  and  the  area
around the brakes will be extremely hot. Touching these areas with
hands, feet or other body parts while changing a tire, etc. may result
in burns.

• Remove the spare tire before jacking up the vehicle. If the spare tire

is removed after jacking up the vehicle, the tire carrier and the spare
tire may interfere with the jack and cause a serious accident.

?

Failure  to  follow  these  precautions  could  cause  the  wheel  nuts  to
loosen and the tire to fall off, resulting in death or serious injury.
• Have  the  wheel  nuts  tightened  with  a  torque  wrench  to  76 ft•lbf

(103 N•m, 10.5 kgf•m) as soon as possible after changing wheels.

• When installing a tire, only use wheel nuts that have been specifi-

cally designed for that wheel.

• If  there  are  any  cracks  or  deformations  in  the  bolt  screws,  nut

threads  or  bolt  holes  of  the  wheel,  have  the  vehicle  inspected  by
your Toyota dealer. 

• When  installing  the  wheel  nuts,  be  sure  to  install  them  with  the

tapered end facing inward. (

P. 433)

?

For vehicles with power sliding door and/or power back door: In cases
such as when replacing tires, make sure to turn off the power sliding
door main switch (

P. 124) and/or the power back door main switch

(

P. 136). Failure to do so may cause the sliding door and/or the back

door to operate unintentionally if the power sliding door switch and/or
the power back door switch is accidentally touched, resulting in hands
and fingers being caught and injured.

493

7-2. Steps to take in an emergency

SIENNA_OM_OM08025U_(U)

7

Wh
en tro

uble

 a

ris

es

Remove any dirt or foreign mat-
ter from the wheel contact sur-
face.

If  foreign  matter  is  on  the  wheel
contact  surface,  the  wheel  nuts
may loosen while the vehicle is in
motion,  causing  the  tire  to  come
off.

Install  the  tire  and  loosely
tighten each wheel nut by hand
by  approximately  the  same
amount.

Tighten  the  wheel  nuts  until  the
tapered portion comes into loose
contact with the disc wheel seat.

Lower the vehicle.

Firmly  tighten  each  wheel  nut
two  or  three  times  in  the  order
shown in the illustration.
Tightening torque:
76 ft•lbf (103 N•m, 10.5 kgf•m)

Stow the flat tire, tire jack and all tools.

Installing the spare tire

1

Tapered portion

Disc wheel 
seat

2

3

4

5

494

7-2. Steps to take in an emergency

SIENNA_OM_OM08025U_(U)

Take out the strap and tire bag.

Place  tire  standing  up  in  rear
tub,  after  putting  the  tire  in  the
tire bag.

Clip clasp to outboard hook.

Clip  other  clasp  to  center  or
opposite hook location.

Stowing the flat tire

1

2

3

4

495

7-2. Steps to take in an emergency

SIENNA_OM_OM08025U_(U)

7

Wh
en tro

uble

 a

ris

es

Pull strap to tighten and secure
tire.

Lay down the tire with the outer
side (valve stem) facing up, and
install the holding bracket.

Turn  the jack  handle clockwise
to raise the tire until the tire is in
the correct position as the jack
handle skips.

Stow the tools.

5

Stowing the spare tire

Valve stem

1

2

3

496

7-2. Steps to take in an emergency

SIENNA_OM_OM08025U_(U)

?

The compact spare tire

?

The  compact  spare  tire  is  identified  by  the  label  “TEMPORARY  USE
ONLY” on the tire sidewall.
Use the compact spare tire temporarily, and only in an emergency.

?

Make sure to check the tire inflation pressure of the compact spare tire.
(

P. 524)

?

After completing the tire change
The tire pressure warning system must be reset. (

P. 421)

?

When using the compact spare tire
As  the  compact  spare  tire  is  not  equipped  with  a  tire  pressure  warning
valve and transmitter, low inflation pressure of the spare tire will not be
indicated  by  the  tire  pressure  warning  system. Also,  if  you  replace  the
compact spare tire after the tire pressure warning light comes on, the light
remains on.

?

When the compact spare tire is equipped
The  vehicle  becomes  lower  when  driving  with  the  compact  spare  tire
compared to when driving with standard tires

?

If you have a flat front tire on a road covered with snow or ice
Install  the  compact  spare  tire  on  one  of  the  rear  wheels  of  the  vehicle.
Perform the following steps and fit tire chains to the front tires:

Replace a rear tire with the compact spare tire.
Replace the flat front tire with the tire removed from the rear of the vehi-
cle.
Fit tire chains to the front tires.

1

2

3


Content   ..  29  30  31  32   ..