Toyota 86 (2018 year). Instruction - part 16

2-4. Using other driving systems
■ Notes for hill-start assist control
● A slight jolt may be felt when starting off backward with the shift lever in R
and then moving forward.
● If the braking power of hill-start assist control is insufficient, depress the
brake pedal.
● While the vehicle is stopped, make sure to depress the brake pedal.
■ The system may be malfunctioning when
In the following situations, the system may be malfunctioning. Have the vehi-
2
cle inspected by your Toyota dealer.
● The slip indicator is illuminated.
● The hill-start assist control ON indicator turns off and a buzzer sounds.
WARNING
■ Hill-start assist control precautions
● Do not overly rely on hill-start assist control. Hill-start assist control may
not operate effectively on steep inclines and roads covered with ice.
● Unlike the parking brake, hill-start assist control is not intended to hold the
vehicle stationary for an extended period of time. Do not attempt to use
hill-start assist control to hold the vehicle on an incline, as doing so may
lead to an accident.
● Do not stop the engine while hill-start assist control is operating, as hill-
start assist control will stop operating, possibly leading to an accident.
255

2-5. Driving information
Cargo and luggage
Take notice of the following information about storage precau-
tions, cargo capacity and load:
● Stow cargo and luggage in the trunk whenever possible.
● Be sure all items are secured in place.
● To maintain vehicle balance while driving, position luggage
evenly within the luggage compartment.
● For better fuel economy, do not carry unnecessary weight.
Capacity and distribution
Cargo capacity depends on the total weight of the occupants.
(Cargo capacity) = (Total load capacity) - (Total weight of occupants)
Steps for Determining Correct Load Limit
(1)Locate the statement “The combined weight of occupants and
cargo should never exceed XXX kg or XXX lbs.” on your vehicle's
placard.
(2)Determine the combined weight of the driver and passengers that
will be riding in your vehicle.
(3)Subtract the combined weight of the driver and passengers from
XXX kg or XXX lbs.
(4)The resulting figure equals the available amount of cargo and lug-
gage load capacity.
For example, if the “XXX” amount equals 1400 lbs. and there will
be five 150 lb passengers in your vehicle, the amount of available
cargo and luggage load capacity is 650 lbs. (1400 - 750 (5 150) =
650 lbs.)
(5)Determine the combined weight of luggage and cargo being
loaded on the vehicle. That weight may not safely exceed the avail-
able cargo and luggage load capacity calculated in Step 4.
256

2-5. Driving information
(6)If your vehicle will be towing a trailer, load from your trailer will be
transferred to your vehicle. Consult this manual to determine how
this reduces the available cargo and luggage load capacity of your
vehicle.
(P. 458)
Toyota does not recommend towing a trailer with your vehicle. Your
vehicle is not designed for trailer towing.
Calculation formula for your vehicle
2
Cargo capacity
Total load capacity
(vehicle
capacity weight) (P. 458)
When 2 people with the combined weight of A lb. (kg) are riding in
your vehicle, which has a total load capacity (vehicle capacity weight)
of B lb. (kg), the available amount of cargo and luggage load capacity
will be C lb. (kg) as follows:
B*2 lb. (kg) - A*1 lb. (kg) = C*3 lb. (kg)
*1: A =Weight of people
*2: B =Total load capacity
*3: C =Available cargo and luggage load
In this condition, if 2 more passengers with the combined weight of D
lb. (kg) get on, the available cargo and luggage load will be reduced E
lb. (kg) as follows:
C lb. (kg) - D*4 lb. (kg) = E*5 lb. (kg)
*4: D =Additional weight of people
*5: E =Available cargo and luggage load
257

2-5. Driving information
As shown in the example above, if the number of occupants
increases, the cargo and luggage load will be reduced by an amount
that equals the increased weight due to the additional occupants. In
other words, if an increase in the number of occupants causes an
excess of the total load capacity (combined weight of occupants plus
cargo and luggage load), you must reduce the cargo and luggage on
your vehicle.
WARNING
■Things that must not be carried in the trunk
The following things may cause a fire if loaded in the trunk:
●Receptacles containing gasoline
● Aerosol cans
258

2-5. Driving information
WARNING
■Storage precautions
Observe the following precautions.
Failure to do so may result in death or serious injury.
●Stow cargo and luggage in the trunk whenever possible.
● To prevent cargo and luggage from sliding forward during braking, do
not stack anything in the enlarged trunk. Keep cargo and luggage low,
2
as close to the floor as possible.
●When you fold down the rear seats, long items should not be placed
directly behind the front seats.
●Never allow anyone to ride in the enlarged trunk. It is not designed for
passengers. They should ride in their seats with their seat belts prop-
erly fastened. Otherwise, they are much more likely to suffer death or
serious bodily injury, in the event of sudden braking, sudden swerving
or an accident.
●Do not place cargo or luggage in or on the following locations as the
item may get under the clutch, brake or accelerator pedal and prevent
the pedals from being depressed properly, block the driver’s vision, or
hit the driver or passengers, causing an accident:
• At the feet of the driver
• On the front passenger or rear seats (when stacking items)
• On the package tray
• On the instrument panel
• On the dashboard
●Secure all items in the occupant compartment, as they may shift and
injure someone during sudden braking, sudden swerving or an acci-
dent.
■Capacity and distribution
●Do not exceed the maximum axle weight rating or the total vehicle
weight rating.
●Even if the total load of occupant's weight and the cargo load is less
than the total load capacity, do not apply the load unevenly. Improper
loading may cause deterioration of steering or braking control which
may cause death or serious injury.
259

2-5. Driving information
Vehicle load limits
Vehicle load limits include total load capacity, seating capacity,
towing capacity and cargo capacity.
■ Total load capacity (vehicle capacity weight): (P. 458)
Total load capacity means the combined weight of occupants, cargo
and luggage.
■ Seating capacity
Seating capacity means the maximum number of occupants whose
estimated average weight is 150 lb. (68 kg) per person.
■ Towing capacity
Toyota does not recommend towing a trailer with your vehicle.
■ Cargo capacity
Cargo capacity may increase or decrease depending on the weight
and the number of occupants.
■ Total load capacity and seating capacity
These details are described on the tire and loading information label.
(P. 353)
WARNING
■Overloading the vehicle
Do not overload the vehicle.
It may not only cause damage to the tires, but also degrade steering and
braking ability, resulting in an accident.
260

2-5. Driving information
Winter driving tips
Carry out the necessary preparations and inspections before driving
the vehicle in winter. Always drive the vehicle in a manner appropri-
ate to the prevailing weather conditions.
■ Pre-winter preparations
● Use fluids that are appropriate to the prevailing outside tem-
peratures.
• Engine oil
2
• Washer fluid
● Have a service technician inspect the condition of the battery.
● Have the vehicle fitted with four snow tires.
Make sure to install 4 tires that are of the specified size, and that
all 4 tires are the same size, same maker, same brand and tread
pattern.
■ Before driving the vehicle
Perform the following according to the driving conditions.
● Do not try to forcibly open a window or move a wiper that is
frozen. Pour warm water over the frozen area to melt the ice.
Wipe away the water immediately to prevent it from freezing.
● To ensure proper operation of the climate control system fan,
remove any snow that has accumulated on the air inlet vents
in front of the windshield.
● Check for and remove any excess ice or snow that may have
accumulated on the exterior lights, vehicle's roof, chassis,
around the tires or on the brakes.
● Remove any snow or mud from the bottom of your shoes
before getting in the vehicle.
261

2-5. Driving information
● If a door is opened and closed when its side window is frozen,
the window safety device will operate and the side window
open/close function linked to door operation may not operate
correctly. If this occurs, perform the following after the ice has
melted.
STEP
1
Open the side window until it is approximately halfway open
with the door closed.
Fully close the window by pulling the switch up to the one-
STEP
2
touch closing position and continue holding the switch for 1
second or more after the window fully closes.
The window position is reset and the safety device operations will
be released.
■ When driving the vehicle
Accelerate the vehicle slowly, keep a safe distance between you
and the vehicle ahead, and drive at a reduced speed suitable to
road conditions.
■ When parking the vehicle (in the winter time or in the cold
latitudes)
Park the vehicle and move the shift lever to P (automatic trans-
mission) or 1 or R (manual transmission) without setting the
parking brake. The parking brake may freeze up, preventing it
from being released. If necessary, block the wheels to prevent
inadvertent sliding or creeping.
262

2-5. Driving information
Tire chains
Tire chains cannot be used on your vehicle because of the lack of
clearance between the tires and vehicle body.
When tire chains cannot be used, use of another type of traction
device (such as spring chains) may be acceptable if use on your vehi-
cle is recommended by the device manufacturer, taking into account
tire size and road conditions.
2
Follow the device manufacturer's instructions, especially regarding
maximum vehicle speed.
To help avoid damage to your vehicle, drive slowly, readjust or
remove the device if it is contacting your vehicle, and do not spin your
wheels. Damage caused to your vehicle by use of a traction device is
not covered under warranty.
Make certain that any traction device you use is an SAE class “S”
device, and use it on the rear wheels only.
Always use the utmost care when driving with a traction device. Over-
confidence because you are using a traction device could easily lead
to a serious accident.
Selecting tire chains
We recommend that you consult your Toyota dealer for information
about the chains that you can use.
263

2-5. Driving information
WARNING
■Driving with snow tires
Observe the following precautions to reduce the risk of accidents.
Failure to do so may result in a loss of vehicle control and cause death or
serious injury.
●Use tires of the specified size, and that are the same size, same
maker, same brand and tread pattern.
● Maintain the recommended level of air pressure.
●Do not drive in excess of 75 mph (120 km/h), regardless of the type of
snow tires being used.
●Use snow tires on all, not just some wheels.
NOTICE
■Repairing or replacing snow tires
Request repairs or replacement of snow tires from Toyota dealers or
legitimate tire retailers.
This is because the removal and attachment of snow tires affects the
operation of the tire pressure warning valves and transmitters.
■Fitting tire chains
The tire pressure warning valves and transmitters may not function cor-
rectly when tire chains are fitted.
264

2-5. Driving information
Trailer towing
Toyota does not recommend towing a trailer with your vehicle.
Toyota also does not recommend the installation of a tow hitch or
the use of a tow hitch carrier for a wheelchair, scooter, bicycle, etc.
Your Toyota is not designed for trailer towing or for the use of tow
hitch mounted carriers.
2
265

2-5. Driving information
Dinghy towing
Your vehicle is not designed to be dinghy towed (with 4 wheels on
the ground) behind a motor home.
NOTICE
■ To avoid serious damage to your vehicle
Do not tow your vehicle with four wheels on the ground.
266

Interior features
3
3-1.
Using the air
3-4.
Using the storage
conditioning system
features
and defogger
List of storage features
291
Manual air conditioning
• Glove box
292
system
268
• Bottle holders
293
• Cup holders/
Automatic air conditioning
console tray
294
system
275
Rear window and outside
rear view mirror
3-5.
Other interior features
defoggers
284
Sun visors
296
Vanity mirrors
297
3-2.
Using the audio system
Clock
298
Using the AUX/
Power outlets
299
USB port
286
Seat heaters
301
Steering wheel audio
Floor mat
303
switches
287
Using the microphone
288
3-3.
Using the interior lights
Interior lights list
289
• Interior light
290
267

3-1. Using the air conditioning system and defogger
Manual air conditioning system
Air outlet selection dial
Temperature control dial
Outside air or recirculated air mode
Air conditioning on/off button
Fan speed control dial
Adjusting the settings
STEP
1
To adjust the fan speed, turn the fan speed control dial clock-
wise (increase) or counterclockwise (decrease).
Turning the dial to “0” turns off the fan.
STEP
2
To adjust the temperature setting, turn the temperature control
dial clockwise (warm) or counterclockwise (cool).
is not pressed, the system will blow ambient temperature air
or heated air.
STEP
3
To select the air outlets, set the air outlet selection dial to the
desired position.
The positions between the air outlet selections shown below can
also be selected for more delicate adjustment.
: If equipped
268

3-1. Using the air conditioning system and defogger
Defogging the windshield
STEP
1
Set the air outlet selection dial to
position.
The air intake is automatically
switched to outside air mode. It is
not possible to return to recircu-
lated air mode when the switch is
on.
STEP
2
Perform the following operations accordingly:
● To adjust the fan speed, turn the fan speed control dial.
3
● To adjust the temperature setting, turn the temperature con-
trol dial.
● If the dehumidification function is not operating, press
to operate the dehumidification function.
To defog the windshield and the side windows early, turn the
air flow and temperature up.
269

3-1. Using the air conditioning system and defogger
■ Air outlets and air flow
Air flows to the upper body.
Air flows to the upper body and
feet.
Air flows to the feet.
Air flows to the feet and the
windshield defogger operates.
The air intake is automatically
switched to outside air mode. It is
not possible to return to recircu-
lated air mode when the switch is
on.
270
3-1. Using the air conditioning system and defogger
Switching between outside air and recirculated air modes
Press
The mode switches between outside air mode (introduces air from out-
side the vehicle) (indicator off) and recirculated air mode (recycles air
inside the vehicle) (indicator on) each time the button is pressed.
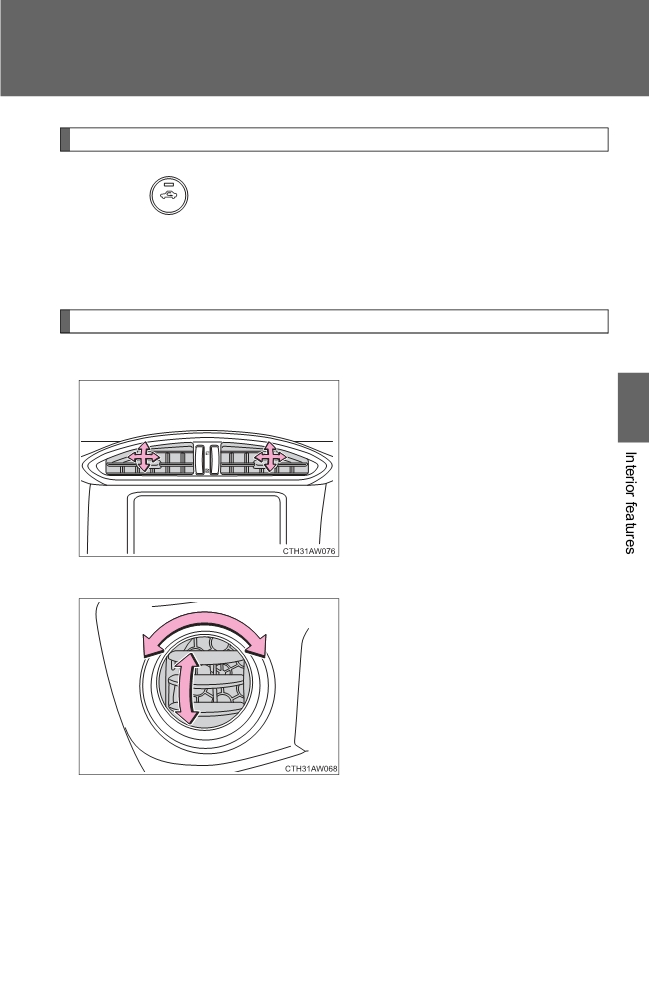
Adjusting the position of the air outlets
Center outlets
Direct air flow to the left or right,
3
up or down.
Right and left side outlets
Direct air flow to the left or right,
up or down.
When defrosting the side win-
dows, face the right and left side
outlets toward them.
271