Index Toyota Toyota Yaris iA - instruction 2017 year in english
|
|
|

OVERVIEW
Instrument panel
Audio and
Cruise control
multimedia controls
1 If equipped.
Steering wheel controls
Wiper and washer controls
“ENGINE START STOP” button
Audio and navigation1 system
Dashboard illumination knob
Emergency flasher button
Instrument cluster
Headlight and turn signals
Tire Pressure Monitoring (warning)
System (TPMS) set switch
Air conditioning controls
Dynamic Stability
Control (DSC) OFF switch
Smart City Brake
AUX port/USB port
Support (SCBS)1 switch
Trunk release button
Remote fuel-filler lid release
“SPORT” mode switch1
Hood release lever
Tilt and telescopic steering lock
release lever
2
3
OVERVIEW
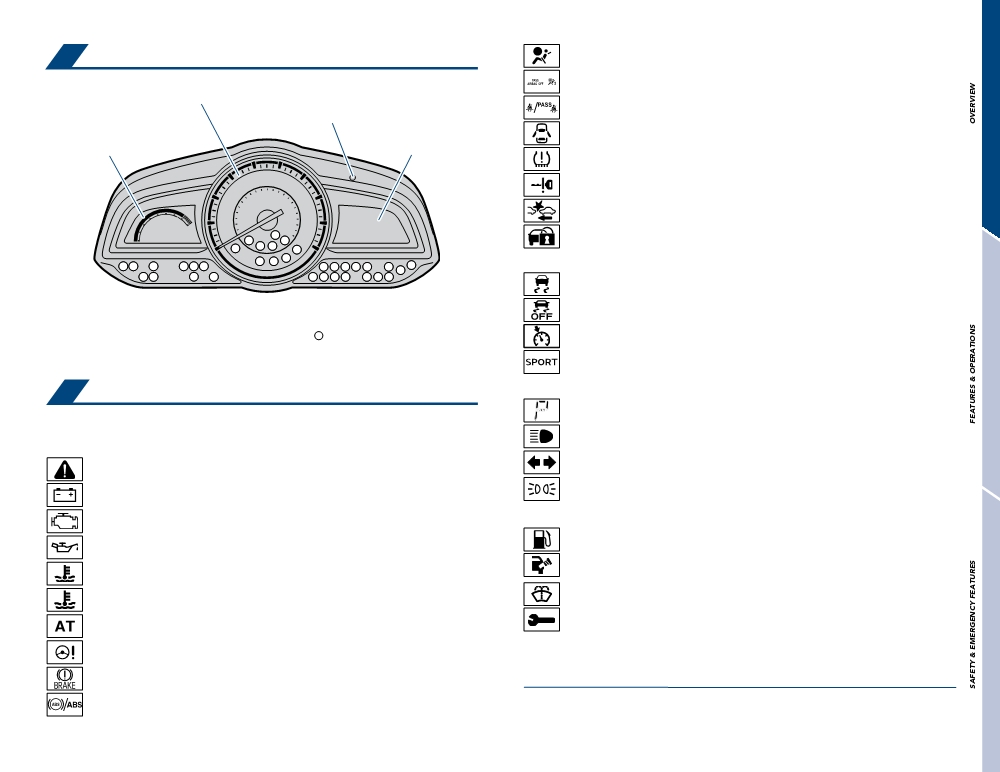
Instrument cluster
Air Bag/Front Seat Belt Pretensioner System Warning1
Front Passenger Air Bag Deactivation Indicator1
Speedometer
Dashboard illumination, odometer,
Seat Belt Warning (Front seat)
trip meter and trip meter slector
Tachometer*, odometer, trip
Fuel gauge and outside
Door-Ajar Warning
meter and trip meter selector
temperature display
Tire Pressure Monitoring System Warning1
KEY Warning [Red]1
Smart City Brake Support (SCBS) Warning [Amber]
Security Indicator1
TSC/DSC Indicator1
DSC OFF Indicator1
* If equipped
Service indicators and reminders
Cruise control indicator
Select Mode Indicator3
Instrument symbols
For details, refer to “Indicators and warning lights,” Section 3-2, 2017 Owner’s
Shift Position Indication3
Manual.
Headlight High-Beam Indicator
Turn Signal/Hazard Warning Indicator
Master Warning1
Lights-On Indicator
Charging system warning1
Malfunction/Check Engine indicator1
Low Fuel Warning
Low engine oil pressure warning1
Check Fuel Cap Warning1
High Engine Coolant Temperature Warning [Red]1
Low Washer Fluid Level Warning
Low Engine Coolant Temperature Indicator [Blue]
Wrench Indicator1
Automatic Transaxle Warning1,3
Power Steering Malfunction Indicator1
Brake System Warning1,2
1 If indicator does not come on or turn off within a few seconds of starting engine, there may be
ABS Warning1
a malfunction. Have vehicle inspected by your Toyota dealer.
2 The light turns on continuously when the parking brake is applied.
3 If equipped
4
5
OVERVIEW
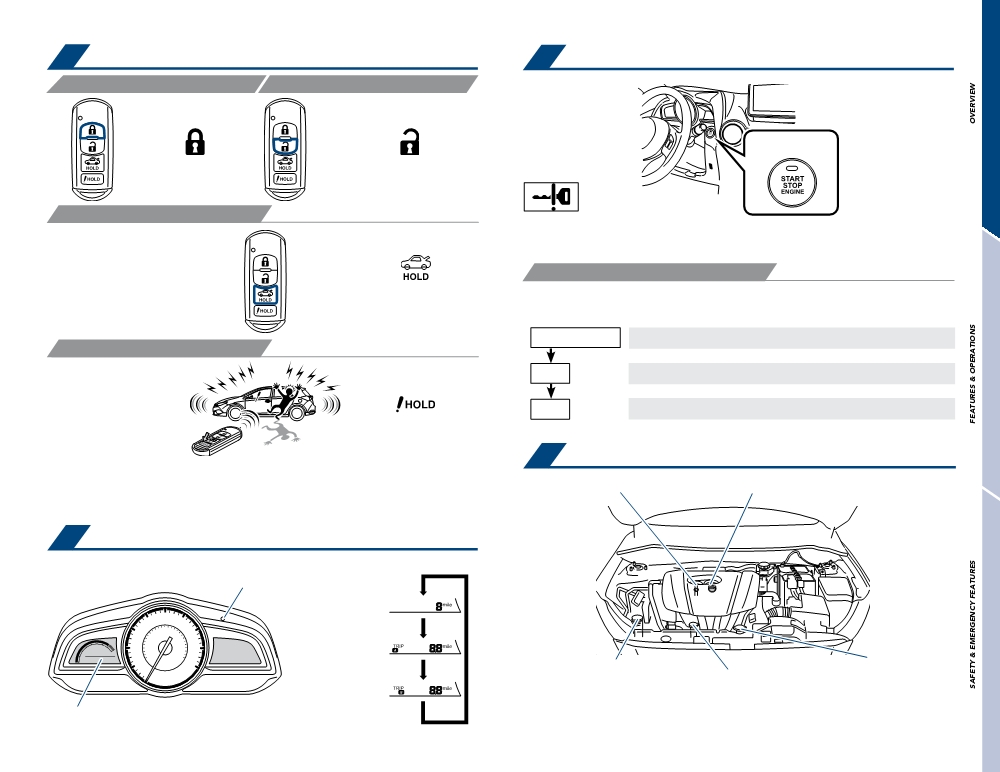
Keyless entry
Smart Key system
LOCKING OPERATION
UNLOCKING OPERATION
Push
Push
ONCE: Driver door
TWICE: All doors
TRUNK BUTTON
NOTE: Carry the electronic key to enable start function. Gear shift lever must
be in Park and brake pedal depressed.
POWER (WITHOUT STARTING ENGINE)
Push and hold
Without depressing the brake pedal, pressing the engine switch will change the
operation mode in succession from:
ACCESSORY
All systems OFF.
PANIC BUTTON
ON
Accessories such as the radio will operate.
OFF
Power ON; the engine is not running.
Push and hold
Engine maintenance
NOTE: If a door is not opened within 60 seconds of unlocking, all doors will
relock for safety.
Engine oil level dipstick
Engine oil filler cap
Trip information/meter light control
Push to cylce through and change trip information;
Turn to control dim & brightness
Odometer
Trip meter A
Windshield washer fluid tank
Engine coolant cap
Trip meter B
Engine coolant reservoir
NOTE: Regularly scheduled maintenance, including oil changes, will help
Display
extend the life of your vehicle and maintain performance. Please refer to the
“Warranty Maintenance Guide.”
6
7
OVERVIEW
FEATURES & OPERATIONS
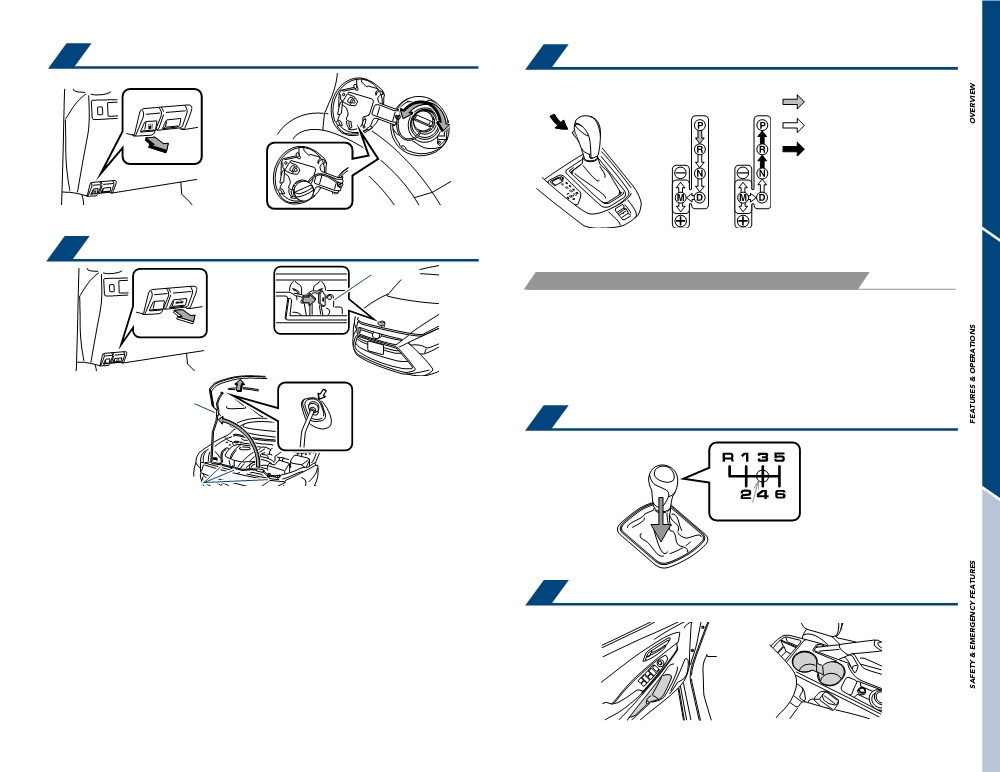
Fuel tank door release and cap
Automatic Transaxle (if equipped)
Turn to open
Pull
Depress brake pedal and hold-in
Lock-release button
lock-release button to shift
Shift
Hold in lock-release button to shift
Store
Hood release
The ignition switch must be “ON.”
Latch/lever
“M” 6-SPEED SPORT SEQUENTIAL SHIFTMATIC MODE
Push shift lever to the left from “D” position, to “M” position.
+: Upshift (pull and release)
Pull
-:
Downshift (push and release)
Slide latch/lever to the
right and lift hood
Downshifting increases power going uphill, or provides engine braking downhill. For
best fuel economy during normal driving conditions, always drive with the shift lever in
the “D” position.
Pad
Manual Transaxle (if equipped)
Engage support rod
Clips
Neutral position
For safety,
Push entire shift lever down to shift into R
Bottle holders/cup holders
Bottle holders
Cup holders
8
9
FEATURES & OPERATIONS
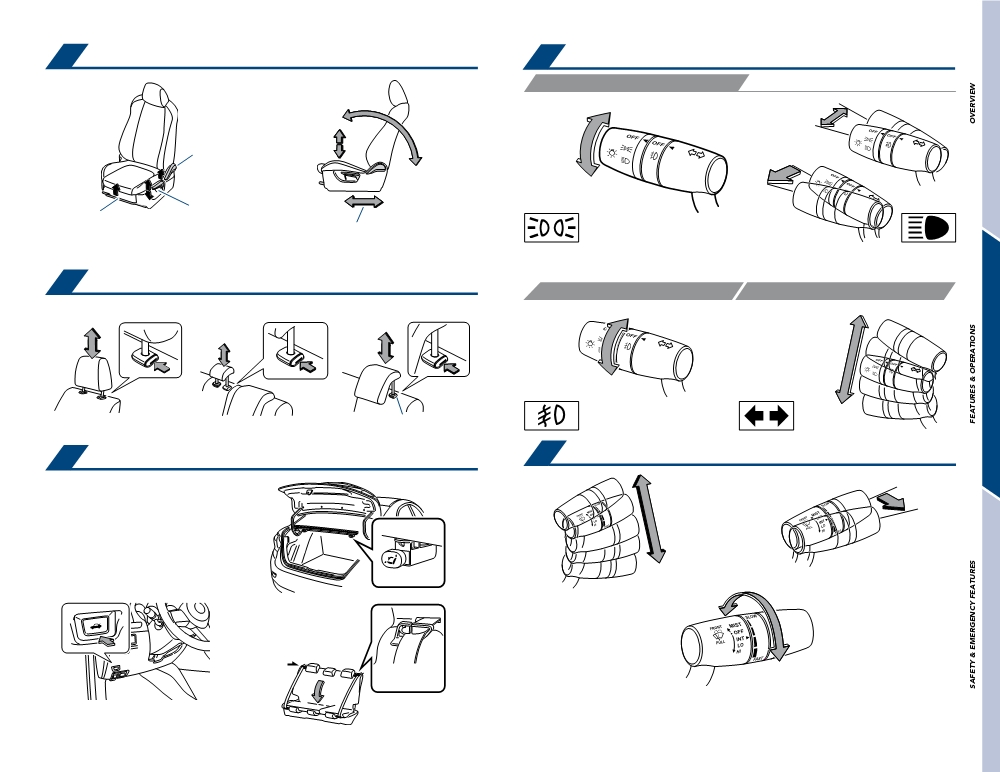
Seat adjustments-Front
Lights & turn signals
HEADLIGHTS
Lights off
High beam on
Seatback angle
Parking lights
High beam off
Height crank
Seatback angle
Headlights
High beam
flasher
Seat position
Height crank
(driver side only)
Seat position (forward/backward)
Pull lever up to move seat forward/backward
When the headlights are turned off, the high beams will only operate in the flasher
mode.
Seats-Head restraints
FOG LIGHTS (IF EQUIPPED)
TURN SIGNALS
Front
Rear center
Rear outside
Right turn
OFF
Lane change
Off
Lane change
Fog light
Left turn
Stop-catch release button
Windshield wipers & washers
Seat-Folding down rear seat
Mist
Pull to wash and wipe
Off
Tip. To fold rear seats, the release button is
Interval wipe
located in the trunk
Slow
Fast
(2) Pull
(1) Push to open the trunk door
Slow
Adjust frequency*
(3) Make sure
Fast
belt is in guide
* Intermittent windshield wiper frequency adjustment
Rotate to increase/decrease wipe frequency.
(4) Fold down
With the wiper lever in the OFF or INT position, the wipers will operate continuously until
the lever is released.
10
11

FEATURES & OPERATIONS
Windows
Cruise control
Driver side
On switch
Cancel switch2
Up
Depressed
Resume switch1
Down
Up
Set +/Set - switch
Window lock switch
Off switch
Amber indicator - system is activated
Automatic operation (driver’s window only) Push the switch completely down and
Green indicator - cruising speed is set
release to fully open. To stop the window partway, operate the switch in the opposite
direction.
1 The set speed may be resumed once vehicle speed reaches approximately 16 mph.
Window lock switch Deactivates all passenger windows. Driver’s window remains
2 The set speed may also be cancelled by depressing the brake pedal or the clutch pedal (manual
operable.
transmission only).
Air conditioning/heating
Parking brake
Fan control dial
Set
Release
A/C switch
Rear window defogger switch
Pull
(1) Pull slightly
Temperature control dial
Mode selector dial
(2) Push
(3) Lower
Air intake button (outside)
Air intake button (recirculated)
Power outlet
With CD player
Without CD player
Pull open outlet cover
Pull open outlet cover
Designed for car accessories. Ignition switch must be in the “ACC” or “ON” position to
use.
12
13
FEATURES & OPERATIONS
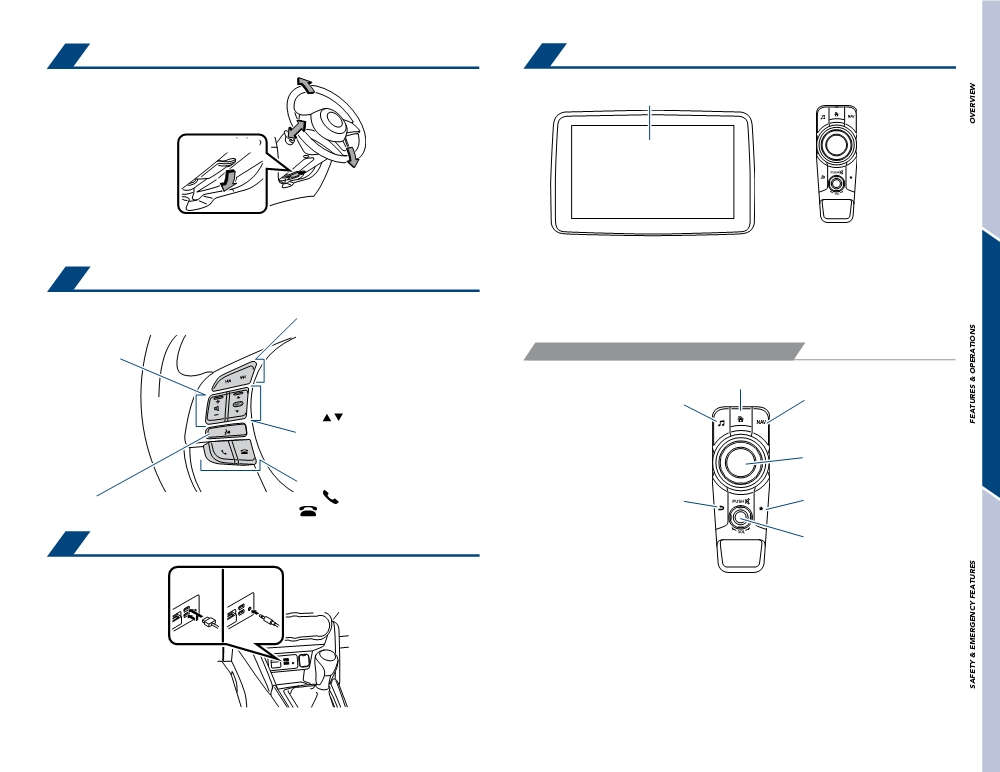
Tilt & telescopic steering wheel
Audio/navigation (if equipped)
Audio display touchscreen
Length
Lock release lever
Commander
Angle
Hold wheel, push lever down, set angle and return lever.
NOTE: Do not attempt to adjust while the vehicle is in motion.
Audio Set has three different human interfaces.
● Commander switch
Steering wheel switches (if equipped)
● Touch panel
●
Steering wheel switches
Multimedia controls
Seek Switch
Seek radio station, song, channel etc... from
AM/FM radio, USB Audio/Bluetooth® Audio,
COMMANDER SWITCH
Volume adjust
Pandora®*/Aha™*/Stitcher™ Radio*.
“+” : increase
“-” : decrease
Home screen
Entertaiment screen
Navigation screen*
Trip Computer, INFO Switch
Push
to switch display;
Distance-to-empty mode, Average fuel
economy mode, Current fuel economy
Operation knob
mode, Average vehicle speed mode.
(turn to choose, push to select)
Pick-up button
Talk button
Push
receive phone call, push
Return to previous screen
Favorites screen
Push for voice command input*.
to hang-up.
Volume (Push to mute)
AUX port/USB port
USB
AUX
*If equipped
Ignition switch must be in the “ACC” or “ON” position to use. Use these ports to
connect a portable audio device and listen to it through the vehicle’s speakers.
14
15

FEATURES & OPERATIONS
SAFETY & EMERGENCY FEATURES
Rear view monitor system (if equipped)
Door locks
Driver side
Passenger side
Lock
Unlock
Lock
Unlock
The rear view monitor system displays an image of the view from the bumper of the
rear area of the vehicle. The camera for the rear view monitor system is located above
Doors-Child safety locks
the license plate.
Picture quality adjustment can be done while the shift lever is in reverse (R). There are
Rear door
four settings which can be adjusted including, brightness, contrast, tint, and color.
When adjusting, pay sufficient attention to the vehicle surroundings.
Unlock
Do not over rely on the system when backing up. Pay attention to the vehicle
surroundings.
Refer to the Owner‘s Manual for limitations and more details on this system.
Lock
Smart City Brake Support (SCBS)
Moving the lever downward will allow the door to be opened only from the outside.
Seat belts-Shoulder belt anchor
Laser sensor
Push up to raise
Push lock release to lower
Smart City Brake Support (SCBS) is designed to reduce damage in the event of
a collision by operating the brake control (SCBS brake) when the system’s laser
sensor detects a vehicle ahead and determines that a collision with a vehicle ahead is
unavoidable.
Refer to the Owner‘s Manual for limitations and more details on this system.
16
17
SAFETY & EMERGENCY FEATURES
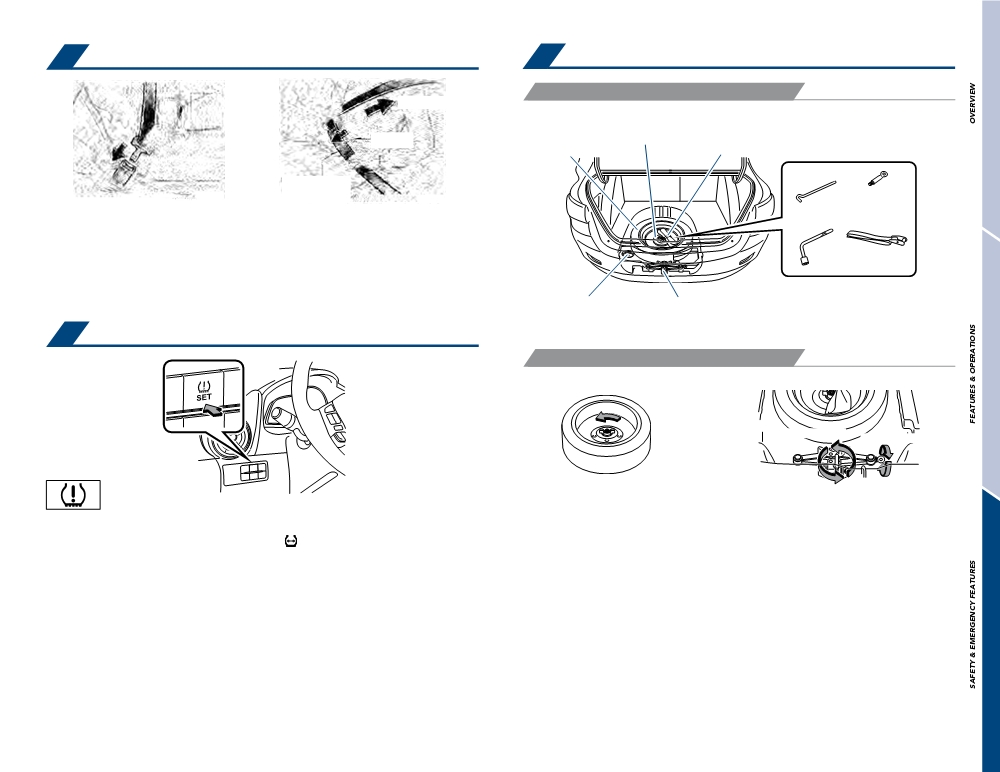
Seat belts
Spare tire & tools
TOOL AND SPARE TIRE LOCATION
Take up slack
Spare tire hold-down bolt
Too high
Spare tire
Tool bag
Jack lever
Keep as low on
hips as possible
Tiedown eyelet
(if equipped)
NOTE: If a passenger’s seat belt is fully extended, then retracted even slightly,
Lug wrench
the Automatic locking retractor (ALR) will prevent it from being re-extended
beyond that point, unless fully retracted again. This feature is used to help
Flat tire belt
hold child restraint systems securely.
To find more information about seat belts, and how to install a child restraint system,
refer to the Owner’s Manual.
Jack point attachment
Jack
Tire Pressure Monitoring (warning) System (TPMS)
REMOVING THE JACK AND SPARE TIRE
(1)
(2)
Wing bolt
Jack screw
(1) Loosen the spare tire hold-down bolt.
If tire pressure indicator is on, check/adjust each tire.
(2) Turn the wing bolt and jack screw counterclockwise.
After adjusting tire pressures, or after tires have been rotated or replaced, turn the
Refer to the Owner’s Manual for jack positioning and tire changing procedures.
ignition switch to “ON” and press and hold the “ SET” button until indicator blinks
twice and a beep sound once. Let the vehicle sit for a few minutes to allow initialization
to complete.
Refer to the load label on the door jamb or the Owner’s Manual for tire inflation
specifications.
If the tire pressure indicator flashes for more than 60 seconds and then remains on,
take the vehicle to your local Toyota dealer.
NOTE: The warning light may come on due to temperature changes or
changes in tire pressure from natural air leakage. If the system has not been
initialized recently, setting the tire pressures to factory specifications should
turn off the light.
18
19
SAFETY & EMERGENCY FEATURES
Safety System
BRAKE OVER-RIDE SYSTEM (BOS)
Your new Toyota vehicle comes standard with an active Safety System, which
Brake Over-ride System automatically reduces driving torque when the accelerator and
combines Traction Control System (TCS), Electronic Brake-force Distribution (EBD),
brake pedals are pressed simultaneously under certain conditions.
Dynamic Stability Control (DSC), Brake Assist (BA), Anti-lock Brake System (ABS), and
BOS doesn’t engage if the brake pedal is depressed before the accelerator pedal,
Brake Over-Ride System (BOS). Thus, your vehicle is equipped with safety systems
allowing vehicles to start on a steep hill and safely accelerate without rolling backward.
similar to each of those that together comprise Toyota’s Star Safety System.
Refer to the Owner’s Manual for more details and important information on limitations
to these systems.
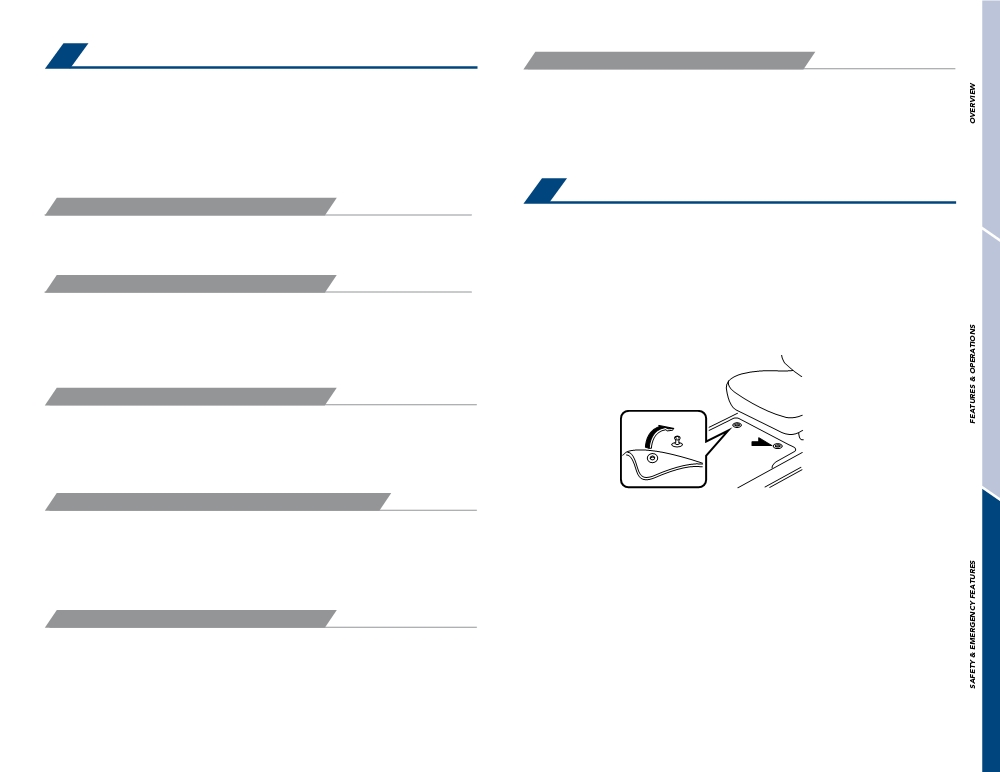
Floor mat installation
DYNAMIC STABILITY CONTROL (DSC)
There are two types of Toyota floor mats: carpeted and all-weather. Each vehicle
DSC automatically controls braking and engine torque in conjunction with systems such
has model-specific floor mats. Installation is easy.
as ABS and TCS to help control side slip when driving on slippery surfaces, or during
To keep your floor mat properly positioned, follow these steps:
sudden or evasive maneuvering, enhancing vehicle safety.
• Only use Toyota floor mats designed for your specific model.
TRACTION CONTROL SYSTEM (TCS)
• Use only one floor mat at a time, using the retaining hooks to keep the mat in
place.
TCS enhances traction and safety by controlling engine torque and braking. When the
• Install floor mats right side up.
TCS detects driving wheel slippage, it lowers engine torque and operates the
brakes to prevent loss of traction.
This means that on a slick surface, the engine adjusts automatically to provide optimum
power to the drive wheels, limiting wheel spin and loss of traction.
BRAKE ASSIST (BA)
During emergency braking situations when it is necessary to depress the brake pedal
with greater force, the brake assist system provides braking assistance, thus enhancing
braking performance.
When the brake pedal is depressed hard or depressed more quickly than for non-
emergency stops, the system applies the brakes more firmly.
ELECTRONIC BRAKE-FORCE DISTRIBUTION (EBD)
EBD makes it easier to maintain vehicle control and shortens the stopping distance
when there is a large load on the rear wheels, such as when the car is carrying a full
load of passengers. EBD optimally distributes the braking power between the front and
rear wheels depending on the load in order to increase the effectiveness of the rear-
wheel braking and minimize the difference in stopping distance between when the car
is fully loaded and when it is not.
ANTI-LOCK BRAKE SYSTEM (ABS)
ABS control unit continuously monitors the speed of each wheel. If one wheel is about
to lock up, the ABS responds by automatically releasing and reapplying that wheel’s
brake.
20
21
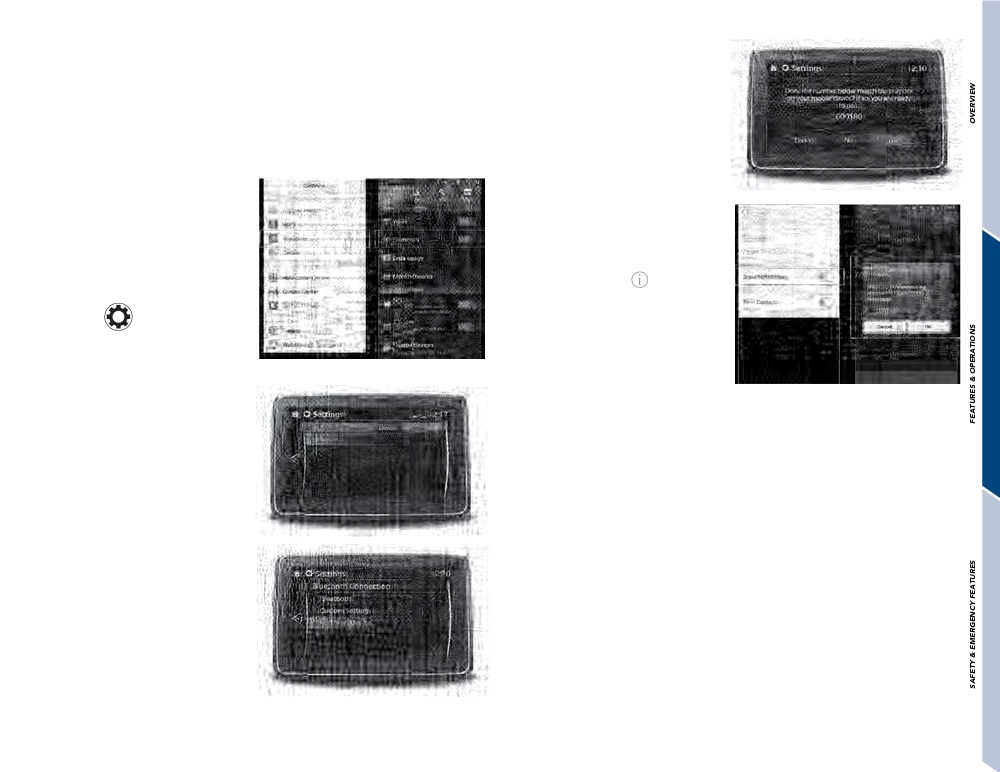
PAIRING BLUETOOTH® PHONE FOR THE FIRST TIME
Yaris iA Display Audio and Display Audio with Navigation1
7. Verify the PIN. Select "Pair" on
your device and select "Yes" on the
To use the hands-free3 features of the Yaris iA Display Audio system, it
head unit. [See Figure 5]
is necessary to first pair a compatible Bluetooth®2 mobile device to the
vehicle. This operation cannot be performed while driving.
You can pair up to 7 devices.
1. Activate the Bluetooth®2
Figure 5
connection setting of your mobile
device. [See Figures 1 & 2]
8. To enable text message
notification on your mobile device,
follow the appropriate directions
below:
2. Using the remote commander
iPhone: Select the
icon next
knob or touch-screen, select
to the paired vehicle on your
phone, and switch the "Show
"Settings
" from the home
Notifications" toggle to on.
screen of the vehicle display (far
[See Figure 6]
right circle)
Android: Your device might pop up
Figure 1: iOS
Figure 2: Android
two messages asking to allow the
vehicle head unit to access your
Figure 6: iOS
Figure 7: Android
contacts and messages. You may
3. Within "Settings", you will see
choose to select "Yes" to both.
tabs on the top. Hit the >> arrow until
[See Figure 7]
the "Devices" tab is available. Select
"Devices". [See Figure 3]
4. Within the "Devices" tab, select
"Bluetooth®".[See Figure 3]
Figure 3
5. Within the "Bluetooth®" menu,
select "Add New Device".
[See Figure 4]
1. Availability & accuracy of the information provided by the navigation system is dependent upon many factors. Use common sense
when relying on information provided. Services & programming subject to change. Services not available
6. On your mobile device, find and
in every city or roadway. Updates may be available from your dealer at an additional cost. See Owner’s Manual for details. 2. The
Bluetooth® word mark and logos are registered trademarks owned by Bluetooth® SIG, Inc. and any use of
select "My Toyota" or your vehicle
such marks by Toyota is under license. A compatible Bluetooth® enabled phone must first be paired. Phone performance depends on
software, coverage & carrier. 3. Concentrating on the road should always be your first priority while
within the Bluetooth® device list.
driving. Do not use the hands-free phone system if it will distract you. 4. iPhone® is not included. iPhone® is registered trademarks of
Apple, Inc.
Figure 4
22
23
NOTES
NOTES
24
25
cuStoMeR exPeRience centeR
1-800-331-4331
fPo
Printed in u.S.A. 10/16
16-MkG-09646
00505QRG17YARIA
|