Toyota Tundra (2015 year). Manual - part 2176


  Index      Toyota     Toyota Tundra (2015 year) - Service and Repair Manual


Search            copyright infringement  


Content   ..  2174  2175  2176  2177   ..


Toyota Tundra (2015 year). Manual - part 2176


OK:

The Techstream display changes normally when master switch is operated.

NG

GO TO STEP 5

OK

END (DUE TO KEEPING SWITCH OPERATED FOR 20

SECONDS OR MORE)

5.

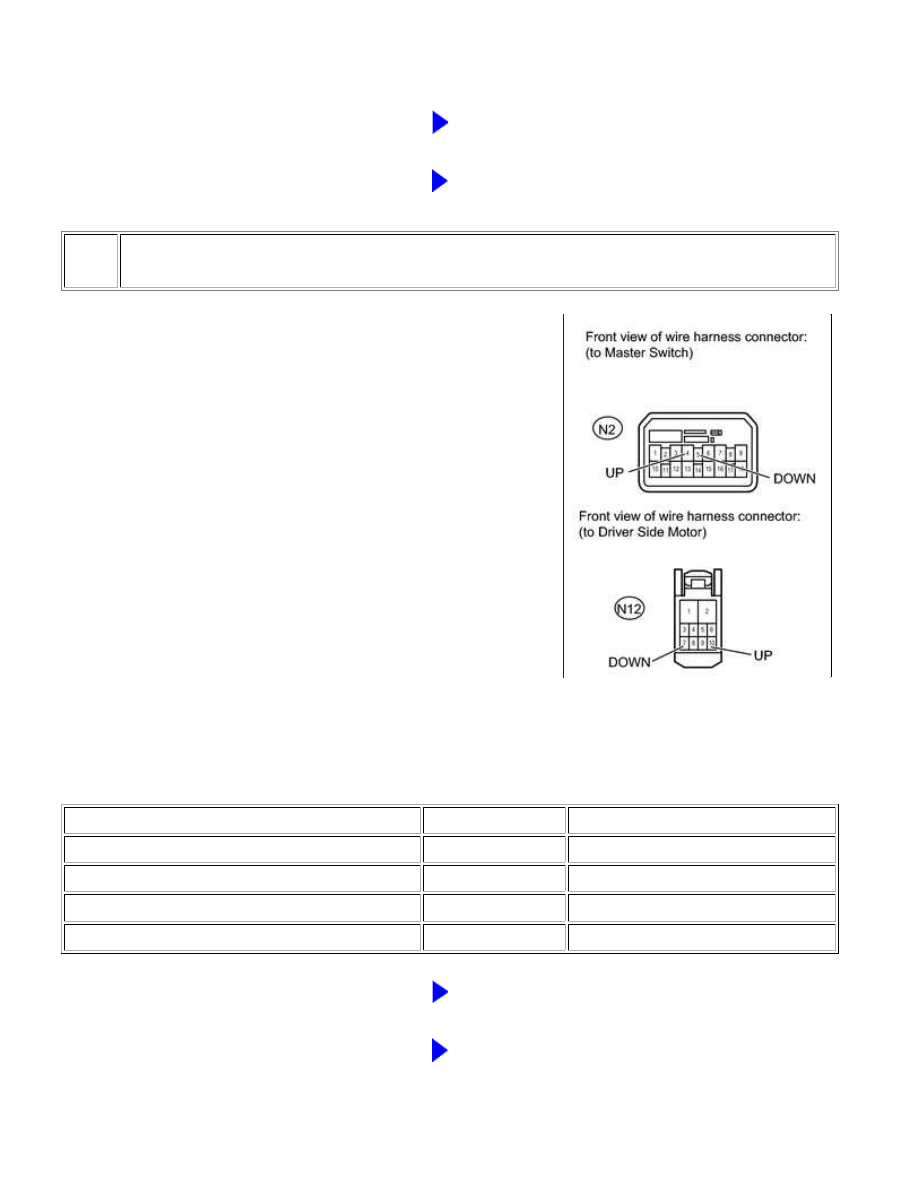
CHECK HARNESS AND CONNECTOR (MASTER SWITCH - DRIVER SIDE MOTOR)

(a) Disconnect the N2 master switch connector.

(b) Disconnect the N12 motor connector.

(c) Measure the resistance according to the value(s) in the table below.

Standard Resistance:

TESTER CONNECTION

CONDITION

SPECIFIED CONDITION

N2-4 (UP) - N12-10 (UP)

Always

Below 1 Ω

N2-5 (DOWN) - N12-7 (DOWN)

Always

Below 1 Ω

N2-4 (UP) - Body ground

Always

10 kΩ or higher

N2-5 (DOWN) - Body ground

Always

10 kΩ or higher

NG

REPAIR OR REPLACE HARNESS OR CONNECTOR

OK

REPLACE POWER WINDOW REGULATOR MOTOR

ASSEMBLY LH

WINDSHIELD / WINDOWGLASS: POWER WINDOW CONTROL ...

6.

READ VALUE USING TECHSTREAM (FRONT PASSENGER SIDE MOTOR)

(a) Use the Data List to check if the front passenger side motor is functioning properly.

P-Door Motor

TESTER

DISPLAY

MEASUREMENT ITEM/RANGE

NORMAL CONDITION

DIAGNOSTIC

NOTE

P Door P/W

Auto SW

Front passenger side power window auto

UP/DOWN switch signal / ON or OFF

ON: Power window regulator

switch assembly operated

OFF: Power window regulator

switch assembly not operated

-

P Door P/W

Up SW

Front passenger side power window manual

UP switch signal / ON or OFF

ON: Power window regulator

switch assembly operated

OFF: Power window regulator

switch assembly not operated

-

P Door P/W

Down SW

Front passenger side power window manual

DOWN switch signal / ON or OFF

ON: Power window regulator

switch assembly operated

OFF: Power window regulator

switch assembly not operated

-

OK:

The Techstream display changes normally when master switch is operated.

NG

GO TO STEP 7

OK

END (DUE TO KEEPING SWITCH OPERATED FOR 20

SECONDS OR MORE)

7.

INSPECT POWER WINDOW REGULATOR SWITCH ASSEMBLY

(a) Remove the power window regulator switch assembly 


.

(b) Measure the resistance according to the value(s) in the table below.

WINDSHIELD / WINDOWGLASS: POWER WINDOW CONTROL ...

OK

Standard Resistance:

TESTER CONNECTION

SWITCH CONDITION

SPECIFIED CONDITION

6 (UP) - 1 (GND)

Manual UP operation

Below 1 Ω

7 (DOWN) - 1 (GND)

Manual DOWN operation

Below 1 Ω

8 (AUTO) - 1 (GND)

AUTO UP/DOWN operation

Below 1 Ω

6 (UP) - 1 (GND)

Not operated

10 kΩ or higher

7 (DOWN) - 1 (GND)

Not operated

10 kΩ or higher

8 (AUTO) - 1 (GND)

Not operated

10 kΩ or higher

NG

REPLACE POWER WINDOW REGULATOR SWITCH

ASSEMBLY

8.

CHECK HARNESS AND CONNECTOR (POWER WINDOW REGULATOR SWITCH - FRONT
PASSENGER SIDE MOTOR)

(a) Disconnect the M10 switch connector.

(b) Disconnect the M11 motor connector.

(c) Measure the resistance according to the value(s) in the table below.

Standard Resistance:

TESTER CONNECTION

CONDITION

SPECIFIED CONDITION

WINDSHIELD / WINDOWGLASS: POWER WINDOW CONTROL ...

TESTER CONNECTION

CONDITION

SPECIFIED CONDITION

M10-6 (UP) - M11-10 (UP)

Always

Below 1 Ω

M10-7 (DOWN) - M11-7 (DOWN)

Always

Below 1 Ω

M10-8 (AUTO) - M11-4 (AUTO)

Always

Below 1 Ω

M10-6 (UP) - Body ground

Always

10 kΩ or higher

M10-7 (DOWN) - Body ground

Always

10 kΩ or higher

M10-8 (AUTO) - Body ground

Always

10 kΩ or higher

NG

REPAIR OR REPLACE HARNESS OR CONNECTOR

OK

REPLACE FRONT POWER WINDOW REGULATOR

MOTOR ASSEMBLY RH

WINDSHIELD / WINDOWGLASS: POWER WINDOW CONTROL ...


Content   ..  2174  2175  2176  2177   ..