Toyota Tundra (2015 year). Manual - part 1013


  Index      Toyota     Toyota Tundra (2015 year) - Service and Repair Manual


Search            copyright infringement  


Content   ..  1011  1012  1013  1014   ..


Toyota Tundra (2015 year). Manual - part 1013


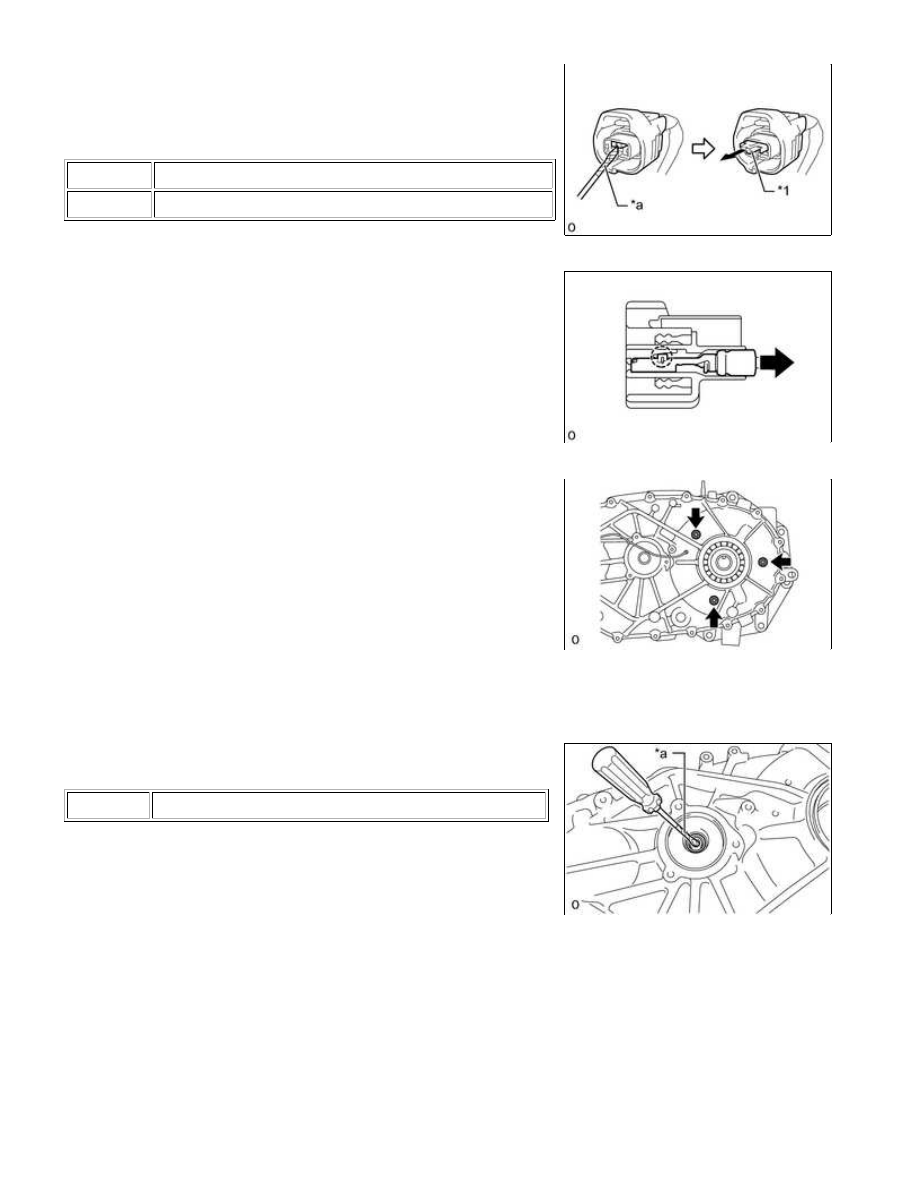
(1) Remove the retainer from the coupler as shown in the

illustration.

Text in Illustration

*1

Retainer

*a

Protective Tape

(2) Detach the claw and disconnect the solenoid coil

sub-assembly terminal.

(b) Remove the 3 nuts and solenoid coil sub-assembly.

NOTICE:

Be careful not to drop the solenoid coil sub-assembly.

9. REMOVE TRANSFER COVER TYPE T OIL SEAL

(a) Using a screwdriver, remove the transfer cover type T oil seal.

Text in Illustration

*a

Protective Tape

NOTICE:

Do not damage the rear transfer case.

HINT:

Tape the screwdriver tip before use.

10. REMOVE TRANSFER DRIVEN SPROCKET BEARING (REAR)

WF1AM TRANSFER: TRANSFER ASSEMBLY: DISASSEMBLY; 20...

(a) Using SST, remove the transfer driven sprocket bearing (rear).

SST: 09612-65014

09612-01040

Text in Illustration

*a

Hold

*b

Turn

11. REMOVE REAR TRANSFER OUTPUT SHAFT RADIAL BALL BEARING

(a) Using a screwdriver, remove the transfer output shaft rear shaft

snap ring.

Text in Illustration

*a

Protective Tape

HINT:

Tape the screwdriver tip before use.

(b) Remove the rear transfer output shaft radial ball bearing.

12. REMOVE SOLENOID COVER

(a) Remove the No. 1 transfer output shaft spacer and solenoid

cover.

Text in Illustration

*1

No. 1 Transfer Output Shaft Spacer

*2

Solenoid Cover

13. REMOVE TRANSFER SELECT RETURN SPRING

(a) Remove the transfer select return spring.

WF1AM TRANSFER: TRANSFER ASSEMBLY: DISASSEMBLY; 20...

14. REMOVE TRANSFER HIGH AND LOW SHIFT FORK SHAFT

(a) Remove the transfer high and low shift fork shaft.

15. REMOVE SOLENOID LOCK PLATE WITH NO. 2 TRANSFER GEAR SHIFT FORK

(a) Remove the solenoid lock plate together with the No. 2 transfer

gear shift fork.

Text in Illustration

*1

Solenoid Lock Plate

*2

No. 2 Transfer Gear Shift Fork

(b) Remove the No. 2 transfer gear shift fork from the solenoid lock plate.

16. REMOVE CONTROL SELECT SHAFT SUB-ASSEMBLY

Then remove the control select shaft sub-assembly.

Text in Illustration

*1

No. 1 Transfer Gear Shift Fork

*2

Control Select Shaft Sub-assembly

17. REMOVE TRANSFER DRIVE SPROCKET SUB-ASSEMBLY

WF1AM TRANSFER: TRANSFER ASSEMBLY: DISASSEMBLY; 20...

(a) Remove the transfer drive sprocket sub-assembly together with

the front transfer drive chain and transfer driven sprocket.

Text in Illustration

*1

Transfer Drive Sprocket Sub-assembly

*2

Front Transfer Drive Chain

*3

Transfer Driven Sprocket

NOTICE:

Do not drop the transfer drive sprocket sub-assembly, front

transfer drive chain and transfer driven sprocket.

(b) Remove the transfer drive sprocket sub-assembly and transfer driven sprocket from the front transfer

drive chain.

18. REMOVE TRANSFER OIL PUMP BODY SUB-ASSEMBLY

(a) Using a T25 ''TORX'' socket wrench, remove the bolt and the

transfer oil pump body sub-assembly together with the transfer

oil tube and transfer oil strainer sub-assembly.

Text in Illustration

*1

Transfer Oil Pump Body Sub-assembly

*2

Transfer Oil Tube

*3

Transfer Oil Strainer Sub-assembly

HINT:

The sleeve does not have to be removed.

The transfer oil strainer sub-assembly comes with the sleeve

installed.

(b) Remove the transfer oil tube from the transfer oil pump body sub-assembly.

(c) Remove the transfer oil strainer sub-assembly from the transfer oil tube.

19. REMOVE TRANSFER CASE MAGNET

(a) Remove the transfer case magnet.

20. REMOVE NO. 1 TRANSFER GEAR SHIFT FORK

WF1AM TRANSFER: TRANSFER ASSEMBLY: DISASSEMBLY; 20...


Content   ..  1011  1012  1013  1014   ..