Skoda Octavia (2019 year). Manual - part 12


  Index      Skoda     Skoda Octavia (2019 year) - manual in english


Search            copyright infringement  


Content      ..     10      11      12      13     ..


Skoda Octavia (2019 year). Manual - part 12


For some vehicles it is possible to set an alert when exceeding the permitted

speed limited set by a road sign.

Tap the 



 sensor field and then the function surface  → Driver assistance →

Speed warning:.

For trailer towing, we recommend that you activate recognition of road signs

relevant to trailers.

Tap the 



 sensor field and then the function surface  → Driver assistance →

Show road signs relevant to trailers.

Route guidance

Introduction to the subject

route is created by starting route guidance to a destination. Additional inter-

mediate destinations can be added to the route.
The route guidance takes place as follows

Through graphical driving instructions on the Infotainment screen and in the

display of the instrument cluster.

With nav. announcements.

Infotainment tries to allow for continued guidance even if the navigation data

is incomplete or there is no data at all for the given area.
The route is recalculated each time if you ignore driving recommendations or

change the route.

CAUTION

The nav. announcements provided may vary from the actual situations, e.g. due

to out-of-date navigation data.
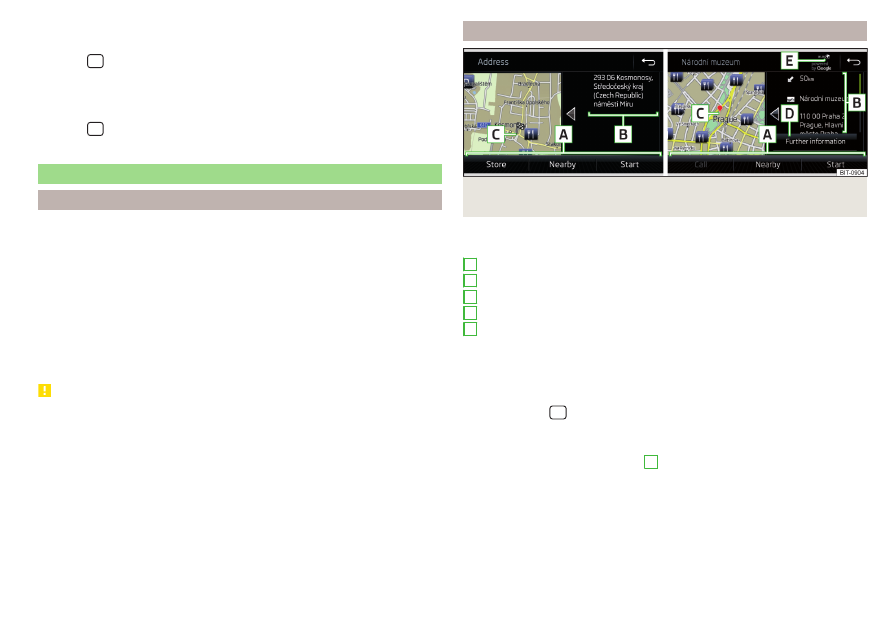
Destination details

Fig. 229  Details of the: in the navigation data / destination searched for

online

The following menu items and information are displayed in the destination de-

tails 

» Fig. 229

.

Area with function surfaces
Detailed destination information
Destination position in the map
Detailed target information (if available)
Status of online services

Display the destination details

The destination details can be displayed in one of the following ways.

While entering a destination.

By tapping on the function surface  in the destination list.

By tapping the 



 sensor field in the Navigation main menu (not applicable

to Infotainment Columbus), the details of the last destination are displayed.

Function surfaces

Using function surfaces in the field 

A

 the following functions can be per-

formed, depending on the context.

Start / stop route guidance.

Search for a nearby destination 

» page 179

.

Setting route options.

Store destination.

A
B
C
D

E

189

Navigation

-------------------------------------------------------------------------------------------------------------------------------------------------------------

Edit destination (the object can be deleted, renamed or saved).

Dial the POI phone number (if Infotainment is connected to a

phone

» page 159

Pairing and connecting).

Route calculation and start route guidance

Fig. 230 

Alternative routes

Route calculation is done on the basis of the set route options. The route op-

tions can be set:  → Route options.

Alternative routes

With selection of alternative routes turned on, the following menu is displayed

after the calculation of a new route 

» Fig. 230

.

 Calculate the most economical route with shortest travelling time and

distance travelled – the route is highlighted green

 Calculate the fastest route to the destination, even if a detour is neces-

sary - the route is highlighted in red

 Calculate the shortest route to the destination, even if a longer travel-

ling time is required - the route is highlighted in orange

In the function surfaces of the alternative routes, information on the route

length and the estimated travel time and the following symbols are displayed

(applies to Infotainment Columbus).

Use of a toll motorway
Use of a train / ferry
Using a tunnel
Use of a toll road
Using a vignette duty highway

It is possible to select an already calculated alternative route before the calcu-

lation of the remaining routes is completed.

A

B

C

Selecting the type of route will start the route guidance.
If no route selection is made within 30 s after the calculation of all routes, the

route guidance is automatically started according to the preferred route type.

Route calculation for the trailer

When driving with a trailer or any other accessory connected to the trailer

socket, we recommend that you switch on the trailer recognition, if necessary

to set the maximum speed for towing a trailer.

For calculating the route for towing a trailer, tap the function surface in the

main navigation menu  → Route options →  .

To set the maximum speed for towing a trailer, tap the 



 sensor field and

then the function surface  → Driver assistance → Trailer recognition → Maximum

speed for trailer.

Demo mode

The Demo mode provides a travel simulation to the entered destination. The

function offers the option to travel through the calculated route “virtually”.
When the Demo mode is turned on, a menu for route guidance in the Demo

mode or in normal operation is displayed before the start of route guidance.

To switch on/offin the main menu Navigation, tap on the function surface 

→ Advanced settings → Demo mode.

When the Demo mode is switched on, the route starting point can be defined.

In the Navigation main menu, tap on function surface  Tap→ Advanced set-

tings → Define demo mode starting point.

Define the starting point by entering the address or the current vehicle posi-

tion.

The demo mode starting point can also be set provided demo mode is turned

on by tapping on the desired map location and selecting the menu item Start

Demo Mode 

» page 181

Entering a destination via the map point.

190

Infotainment

-------------------------------------------------------------------------------------------------------------------------------------------------------------

Graphical driving recommendations

Fig. 231  Driving recommendations / travel recommendation detail

The display of the graphical driving recommendations is carried out in the split

screen Manoeuvre as well as the display of the instrument cluster.
In the split screen Manoeuvre the following driving recommendations are shown

» Fig. 231

.

Street name / street number of the current vehicle position
Driving recommendations with street names / road numbers, with the

route and the travel time to the manoeuvre location
Details of driving recommendation (is displayed near the manoeuvre)
Lane guidance

In the split screen Manoeuvre, Infotainment also announces TMC traffic obstruc-

tions and on motorways, car parks, petrol stations or restaurants.

Speed limits

With activated function  → Advanced settings → Note:National border crossed ,

display the country-specific speed limits when crossing international borders.
These speed limits can be displayed by tapping on function surface  → Top

speed in the main menu navigation.

Navigation announcements

Infotainment issues nav. announcements during route guidance.
The nav. announcements are generated by the instrument system. Flawless

clarity of the message (e.g., road or city name) cannot always be guaranteed.

A
B

C
D

The last navigation announcement can be repeated in the main Navigation

menu by tapping on the function surface  →  .
The timing of the navigation announcement is dependent on the type of road

and on the driving speed.
The type of nav. announcements can be set:  → Navigation announcements.

Note

Route guidance on the most frequently travelled route takes place without

navigation announcements.

Most common routes

The most frequently travelled routes are automatically saved by Infotainment.

Of these, up to 3 routes can be offered, which best match the current time,

day of the week as well as the vehicle position.
A route guidance to one of the routes used most frequently can be started as

long as no route guidance takes place.

To display the menu with the most frequently travelled routes, in the split

screen, tap on tje function surface Freq. routes → Show on map.

Select the desired route.

Then a selected route is calculated and the route guidance starts.

The menu display in the split screen can be turned on/off in the main menu

navigation by tapping the function surface  → Route options → Freq. Routes .
The stored most frequent routes can be deleted in the main menu navigation

by tapping the function surface  → Manage memory → Delete user data → Freq.

Routes .

Note

Route guidance on the most frequently travelled route takes place without

navigation announcements.

Finish route guidance

The route guidance can be finished in one of the following ways.

The final destination is reached.

In the main menu Navigation by tapping the function surface  → Stop route

guidance.

191

Navigation

-------------------------------------------------------------------------------------------------------------------------------------------------------------

By turning off the ignition for longer than 120 minutes.

Abort route guidance

If the ignition is switched off and on again, then the route guidance is contin-

ued depending on the stop time in one of the following ways.

Within 15 min. - route guidance continues to take the calculated route into

account.

From 15 min to 120 min - after confirming the message on the infotainment

screen, the route guidance continues, taking into account the calculated

route.

After 120 min - the route guidance is cancelled.

Route

Route details

Fig. 232  Route details: a route destination / several route destinations

During route guidance, the Route details (Information about the current route)

can be displayed.

In the Navigation main menu, tap on function surface  → Route details.

A route destination

In the route plan, the following information is displayed at the destina-

tion

» Fig. 232

 - .

Area with function surfaces
Destination information

Estimated time of arrival at destination / remaining driving time to desti-

nation

A
B



Remaining distance to the destination
Chosen route type (economic, fastest, shortest)
Current vehicle position (address / GPS coordinates)

The display of the arrival time or the remaining driving time can be adjusted as

follows.

In the Navigation main menu, tap on function surface  → Advanced settings →

Time display:.

Several route destinations

In the route plan, the following information is displayed at the respective desti-

nations

» Fig. 232

 - .

Area with function surfaces
Stopover (with sequential number)
Final destination
Estimated time of arrival at destination / stopover
Driving distance to destination / stopover
Change destinations with each other
Delete the destination
Continuation of the route guidance from the selected target (previous

waypoints are skipped)
Display the destination details 

» page 189

Insert destination into the route

In the area 

A

, tap on the function surface Enter destination and enter a new

destination.

or: Tap on the area 

A

 the function surface destinations and select an object in

the list of stored destinations.

Each additional destination is added to the list as the first subsequent destina-

tion route.

Change positions of destinations with each other

The relevant function surface  and move the destination to the desired po-

sition.

With destinations on the route already reached the note Dest. reached is dis-

played below the destination name. It is not possible to change the position of

these destinations with each other.

C
D

A

192

Infotainment

-------------------------------------------------------------------------------------------------------------------------------------------------------------

Store route

In the area 

A

, tap the function surface Save.

Save the edited route as a new route or replace the existing saved route.

The route is saved in the route list 

» page 193

.

Stop route guidance

In the area 

A

, tap the function surface stop .

Route change in the map

Only valid for Infotainment Columbus.

Fig. 233  Route change in the map / route transit point

A route in which no waypoints are contained, can be changed during route

guidance by adding a transit point.

Add a transit point

In the Navigation main menu, tap on function surface  → Change route in map.

Touch the screen in the route field and move the cross-point to the desired

location on the map, e.g. 

A

, move 

» Fig. 233

).

The transit point 

B

 is added to the route 

» Fig. 233

.

Tap on the function surface  .

Then a route is recalculated and the route guidance starts.

Customise transit point

In the Navigation main menu, tap on function surface  → Change route in map.

Touch the transit point 

B

 and move to a different location on the map.

Tap on the function surface  .

Then a route is recalculated and the route guidance starts.

Remove transit point

In the Navigation main menu, tap on function surface  → Change route in map.

Tap on function surface Delete waypoint.

Tap on the function surface  .

Then a route is recalculated and the route guidance starts.

route list

In the route list, it is possible to create routes, save, delete, or start navigation.

New route

In the Navigation main menu, tap on function surface  → Routes → New route.

Insert a route destination in one of the following ways.

Tap on the function surface Enter destination and enter a new destination.

or: Tap on the function surface Destinations and select a destination from the

list of saved destinations.

To save the created route, tap the function surface Store.

Tap the function surface Startto start route guidance.

route import

A prerequisite for importing the route is that “Infotainment Online” 

» page 14

services are activated.
A route that has been created in the user profile on the “ŠKODA Connect

Portal” website and sent to the Infotainment system can be imported into the

Infotainment memory even before switching on the ignition .
If the route was created when the ignition was switched on and sent to Info-

tainment, Infotainment is not imported until after switching off (for at least 15

minutes) and after switching the ignition back on again.

Switch on the ignition. When a new route is available, a message regarding

the option to import this route appears in the Infotainment screen automati-

cally.

If the user opts not to import the route immediately, the route can be impor-

ted manually later, as follows.

In the main Navigation menu, tap the function surface  → Routes Tap to

check if a new route is available.

or: Tap the 



 sensor field and then the function surface  →  .

The function surface import routes Tap.

193

Navigation

-------------------------------------------------------------------------------------------------------------------------------------------------------------

If a new route available, then a message is displayed on the Infotainment.

Tap the function surface Retrieveto start route guidance.

After being successfully imported, the route is displayed in the list of saved

routes.

Managing saved routes

In the Navigation main menu, tap on function surface  → routes .

Choose the desired route, and then select one of the following functions.

Clear saved route

- Edit the route 

» page 192

Route details

- Calculate route and start route guidance 

» page 190

Route calculation

and start route guidance

Waypoint mode

Introduction to the subject

Only valid for Infotainment Columbus.

This mode is suitable for off-road navigation or for areas where maps are not

available.
Infotainment allows the recording of waypoint tours driven using automatic of

manually entered waypoints.
Then there is the possibility to start route guidance to the stored waypoint

tour or to save the waypoint tour on the SD card.

Main menu

Fig. 234 

Waypoint mode: Main

menu

In the Navigation main menu, tap the function surface  → Waypoint mode.

Delete
Edit
Start

The main menu is displayed

» Fig. 234

.

Any ongoing route guidance is terminated after the selection of this way-

point mode menu.

Description of the function interfaces 

A


» Fig. 234

Context-dependent:

No route guidance is taking place - Start recording a waypoint

tour/display saved waypoint tour management/exit menu

A waypoint tour is being recorded - Stop recording a waypoint

tour/manually adjust waypoint/exit menu

Route guidance is taking place - Stop route guidance/skip the next

waypoint/exit menu

Setting the map display / show/hide the additional window / activate/de-

activate the display of POIs on the map

Operation of Radio/Mediaplayback

Setting Navigation is not available in theWaypoint mode menu

Record waypoints

Fig. 235 

Recording a waypoint

tour

Start recording a waypoint tour

In the Waypoint mode main menu, tap on the function surface  → Record

waypoint tour.

Select one of the following recording types.

Select on map - Enter destination on the map and start recording waypoints

Start recording - Start recording waypoints without entering a destination

Recording a waypoint tour

After starting the recording of a waypoint tour the following contextual infor-

mation may be displayed 

» Fig. 235

.



194

Infotainment

-------------------------------------------------------------------------------------------------------------------------------------------------------------

Automatically set waypoints
Manually set waypoints
Split screen Waypoints with the number of already set waypoints / maxi-

mum number of waypoints

Add waypoint manually

In the Waypoint mode main menu, tap on function surface  → Add waypoint

manually.

Stop recording

In the Waypoint mode main menu, tap on the function surface  → Stop re-

cording.

The recording also stops when the waypoint mode menu is exited.
The recorded waypoints are merged to a waypoint tour and stored in the way-

point memory after completion of the recording.
The recording cannot be continued once it has been stopped. A new recording

must be started.

Guide along a saved waypoint tour

Fig. 236  Display a waypoint / Guide along a waypoint tour

Start guidance

In the Waypoint mode main menu, tap on the function surface  → Waypoint

memory.

Select the desired route from the displayed list.

Tap on the function surface  .

Select one of the following menus 

A


» Fig. 236

.

A
B
C

Reverse tour - Reverse the order of waypoints (suitable for guiding along a

waypoint tour in the reverse direction)

Next. Waypoint. - Skip to the next waypoint

Start - starts route guidance

Route guidance

During the guidance along a waypoint tour, no nav. announcements are made

by Infotainment.
When driving along the waypoint tour shown, follow as closely as possible the

information shown on the Infotainment screen.
While driving along a waypoint tour, the split screen shows the Waypoints and

the direction to drive as well as the distance to the next waypoint, the se-

quence number of the next waypoint and the total number of waypoints 

B

» Fig. 236

.

The waypoint tour from the vehicle position to the next waypoint “reduces”

continuously while driving “ ” 

C


» Fig. 236

 .

If you drive past but very close to the next waypoint, the route guidance will

continue with the next waypoint.
If you drive past a waypoint and this does “not disappear” from the waypoint

tour (e.g. because the distance to this waypoint is too large), then there is the

possibility to “skip” over this waypoint and continue the guidance to the next

waypoint.

In the Waypoint mode main menu, tap on function surface  → Skip waypoint.

Stop route guidance

In the Waypoint mode main menu, tap on function surface  → Stop route guid-

ance.

The guidance also stops when waypoint mode is exited.

Manage waypoint tour memory

to display a list of saved and imported waypoint tours, from main menu

Waypoint mode, tap the function surface  → Waypoint memory.

The name of the waypoint tour, the date and time of storage and the number

of waypoints appears in the function surface for the waypoint tour.

Choose the desired waypoint tour, and then select one of the following menu

items.

195

Navigation

-------------------------------------------------------------------------------------------------------------------------------------------------------------

Store the waypoint tour on the SD card
Delete the waypoint tour
Rename the waypoint tour
Display the waypoint tour 

» Fig. 236

 on page 195

Import waypoint tour from the SD card

In the Waypoint mode main menu, tap on the function surface  → Waypoint

memory → Import.

Select the source of the waypoint tour recording and confirm the import.

Traffic reports

List of traffic reports

Fig. 237 

List of traffic reports

The Infotainment system enables the reception of traffic reports, which in-

clude information regarding traffic congestion, using TMC (Traffic Message

Channel) or online (when “Infotainment Online”

» page 14

 services are activa-

ted).
ŠKODA AUTO does not accept responsibility for the availability, content, up-

to-dateness or evaluation of TMC traffic reports or other data provided by

third parties. ŠKODA AUTO is not entitled to examine or adapt this data in any

way. The data can only be edited by Infotainment in areas where it is available.

To display the list of traffic reports, tap on the 



 sensor field and then tap

the function surface  .

In the list of traffic messages and the map, a max. of 6 messages are displayed,

that are provided with a letter and a traffic obstruction symbol (e.g. , , )

A


» Fig. 237

.

At present on the route traffic information is taken by using a nav. announce-

ment.

Source of Traffic Information

On the position 

C


» Fig. 237

 can the following symbols are displayed.

TMC Traffic Information (with strikethrough icon, the Infotainment is out

of range of any traffic information provider)
Online traffic information

Display options

Route guidance is disabled - All traffic messages are displayed.

Route guidance is taking place - After tapping function surface 

B

» Fig. 237

 in the displayed menu, you can select all traffic messages by tap-

ping the function surface All areasor you can select only the traffic messages

present on the route by tapping the function surface Route.

A traffic report may contain some of the following information.

Symbol of the traffic obstruction

Number of road affected

Name of the location affected

Description of the traffic obstruction

Distinguish the importance of a TMC message traffic obstruction using

colour

The symbol for traffic obstruction (e.g. , , ) precedes the obstruction and

the length of the obstruction is shown in the map on the right along the route.
Depending on the context, the symbol for the obstruction is displayed in one

of the following ways.
No route guidance is taking place

Red - All traffic obstructions

Route guidance is not taking place

Grey - The traffic obstruction is not on the route

Red - The traffic obstruction is on the route, the route will not be recalcula-

ted and the route passes through the traffic obstruction

Orange - The traffic obstruction is on the route, the route is recalculated and

an alternative route is available

Distinguish the importance of a TMC message traffic obstruction using

colour

The colour differentiation of traffic conditions on the provider of the online

traffic reports depends.



196

Infotainment

-------------------------------------------------------------------------------------------------------------------------------------------------------------

To change the map orientation, go to the Navigation main menu and tap on

function surface  → Map → Traffic flow settings.

Update

The list of traffic reports will be updated by Infotainment on a continuous ba-

sis.

Detail of the traffic report

Fig. 238 

Details of the traffic report

The details of the traffic message depends on the source of the traffic mes-

sage.

To display this, select the desired traffic report from the list of traffic re-

ports.

or: Tap on the traffic obstruction icon in the map.

Depending on the context, the following information and function surfaces are

displayed 

» Fig. 238

.

Map of the affected location
Description of the traffic obstruction
Reception timing and information relating to the traffic report provider

(if “ŠKODA Connect” is the provider, it is an online traffic report)
Symbol of the traffic obstruction
Length of the traffic obstruction

Dynamic route

Infotainment allows an evaluation of the traffic reports received during the

route guidance. In fulfilling the following conditions, a bypass route is calcula-

ted, and the appropriate announcement is issued.

A
B
C

D

E

The dynamic route function is turned on.
The traffic congestion included in the traffic information is on the route.
The traffic obstruction will be evaluated by Infotainment as of great im-

portance.

To switch on/offin the main menu Navigation, tap on the function surface 

→ Route options → Dynamic route.

Entering/removing a traffic obstruction on the route manually

If a traffic obstruction is detected during route guidance (e.g. traffic jam), this

traffic obstruction be manually entered into the route.
After entering, Infotainment calculates and provides an alternative route.

Enter traffic obstruction

In the Navigation main menu, tap on function surface  → Congestion ahead.

Adjust the length of the traffic obstruction.

The traffic obstruction will be displayed in red in the map to the right along the

route.

Remove traffic obstruction

The traffic obstruction is removed from the route after completion of the

route guidance or can manually be removed as follows.

In the Navigation main menu, tap on function surface  → Delete "congestion

ahead".

197

Navigation

-------------------------------------------------------------------------------------------------------------------------------------------------------------

Vehicle systems

CAR - Vehicle settings

Introduction to the subject

In the menu CAR , journey data and vehicle information can be displayed and

some vehicle systems can be set.

Reset to factory settings

You can reset to factory settings in the infotainment system in menu 



/  →

 → Factory settings menu.

Note

Settings relating to the vehicle systems can only be made when the ignition is

switched on.

Main menu

Fig. 239 

Function surfaces in the main

menu

Tap on the button/sensor field 



/



 →  to display the main menu with

the following function surfaces 

» Fig. 239

.

Selecting the following menu points

Dig. Instrument panel

Sport (applies to Infotainment Columbus, Amundsen)

Convenience consumers

Journey data

DriveGreen

Vehicle status

Operating playback - Radio / Media



Depending on the vehicle equipment with manual air conditioning: Set-

ting the auxiliary heating and ventilation / operating the heated wind-

screen
Operation of the steering wheel heating
Vehicle system settings



198

Infotainment

-------------------------------------------------------------------------------------------------------------------------------------------------------------

Driving

Starting-off and Driving

Starting and stopping the engine

Introduction

Depending on equipment fitted, it is possible to switch the ignition on/off and

start/stop the engine with the key in the ignition or using the starter button.

WARNING

Never switch off the engine before the vehicle is stationary – risk of acci-

dent!

The ignition must always be switched during the journey when the engine

is idling. Otherwise, the steering may lock - danger of an accident!

Do not withdraw the ignition key from the ignition lock until the vehicle

has come to a stop 

» page 204

Parking. Otherwise, the steering may lock -

danger of an accident!

Never leave the vehicle unattended with the engine running - there is a

risk of theft etc!

Never run the engine in an enclosed space (e.g. in garages) - there is the

danger of poisoning and death!

CAUTION

Only start the engine when the engine and the vehicle are stationary - there

is a danger of starter and engine damage!

Do not push-start the engine – there is a risk of damaging the engine and the

catalytic converter! The battery from another vehicle can be used as a push-

start aid.

On vehicles with the starter button, pay attention to where the key is loca-

ted. The system can recognize the valid key, even if it has been accidentally

left on the vehicle roof - there is danger of loss or damage to the key!

Note

Do not warm up the engine while the vehicle is stationary. If possible, start

your journey as soon as the engine has started. The engine will reach its oper-

ating temperature faster.

Electronic immobiliser and steering lock

Read and observe   and   on page 199 first.

The electronic immobiliser (hereinafter referred to as immobiliser) makes it

more difficult for someone to attempt to steal or use your vehicle without au-

thorisation.

Immobilizer

The immobilizer allows the engine to be started only with the original car key.

Malfunction of the immobilizer

If the immobiliser in the key fails, it is not possible to start the engine. A mes-

sage appears in the display of the instrument cluster to explain that the immo-

biliser is active.
To start, use the other vehicle key or seek help from a specialist garage.

Steering lock - lock

On vehicles with ignition lock, remove the key and turn the steering wheel

until the steering lock engages.

On vehicles with a starter button, switch off the ignition and open the driv-

er's door. If the driver's door is opened and the ignition is switched off after-

wards, the steering is only locked automatically after the vehicle has been

locked.

Steering lock - unlock

On vehicles with ignition lock, insert the key into the ignition and turn on the

ignition. If this is not possible, move the steering wheel slightly back and

forth and thereby unlock the steering lock.

On vehicles with starter button, get into the car and close the driver's door.

Under certain circumstances, the steering lock can be unlocked only when

the ignition is switched on or the engine is started.

WARNING

Never let the vehicle roll with locked steering lock - there is a risk of acci-

dent!

199

Starting-off and Driving

-------------------------------------------------------------------------------------------------------------------------------------------------------------

Switching the ignition on/off

Fig. 240  Positions of the vehicle key in the ignition lock / starter button

Read and observe   and   on page 199 first.

Positions of the vehicle key in the ignition lock

» Fig. 240

 - 

Ignition switched off, engine switched off
Ignition switched on
Starting engine

Switching on /off ignition in vehicles with starter button

Press the 

» Fig. 240

 -  button, the ignition is turned on / off.

On vehicles with manual transmission the pedal must not be depressed to

switch on / off the ignition, otherwise the engine will start.
On vehicles with automatic transmission, the brake pedal must not be de-

pressed to switch on / off the ignition, otherwise the engine will start.

Starting engine / Stopping

Read and observe   and   on page 199 first.

Before starting the engine

Firmly apply the handbrake.

For vehicles with manual transmission, shift gear stick to neutral, depress

the clutch pedal and hold it there until the engine starts.

For vehicles with automatic transmission, place the selector lever in position

P or N and 

» 

depress the brake pedal until the engine starts.

1

2
3

Starting engine

On vehicles with Ignition lock, turn the key to position 

3

 and the engine

starts

» Fig. 240

 on page 200 . Release the key, the engine will start auto-

matically.

If the engine does not start within 10 seconds, turn the key to position 

1

. Re-

peat the starting process after 30 seconds.

On vehicles with starter button, press the button briefly 

» Fig. 240

 on

page 200 - , the motor will start automatically.

In vehicles with diesel engines, the glow plug warning light 

 lights up after

the ignition is switched on. The engine can be started after the indicator light

goes out.

Stopping the engine

Stop the vehicle.

On vehicles with ignition lock, turn the key to position 

1


» Fig. 240

 on

page 200 .

On vehicles with starter button, press the button 

» Fig. 240

 on page 200 -

, The engine and the ignition will be switched off simultaneously.

For vehicles with automatic transmission, the ignition key can only be removed

if the selector lever is in position P .
Do not switch the engine off immediately at the end of your journey after the

engine has been running for a prolonged period at high loads. Leave it to run at

an idling speed for about 1 minute. This prevents any possible accumulation of

heat when the engine is switched off.

Emergency shutdown of the engine in vehicles with starter button

The system is equipped with a protective device against accidental switching

off, the engine can only be shut off while driving in the event of an emergency.

Keep the knob pressed 

» Fig. 240

 on page 200 -  or press it twice within 1

second.

After the emergency stop of the engine, the steering lock will remain un-

locked.

CAUTION

When the outdoor temperature is below -10 ° C, the selector lever when start-

ing must always be in P mode.

200

Driving

-------------------------------------------------------------------------------------------------------------------------------------------------------------

Note

The engine running noises may be louder at first for a short time after start-

ing the cold engine.

You should not switch on any major electrical components during the heating

period, otherwise the vehicle battery will be drained unnecessarily.

After switching off the ignition, the radiator fan may intermittently continue

to run for approx. 10 minutes (also continuously).

Problems with the engine start - vehicles with starter button

Fig. 241 

Starting the engine - press the

button with the key

Read and observe   and   on page 199 first.

If no engine start is possible and the display of the instrument cluster shows a

message that the key could not be detected by the system or there is a sys-

tem fault, then try to start the engine as follows.

Press the starter button with the key 

» Fig. 241

.

If the engine does not start, the help of a specialist garage is required.

CAUTION

The key may not be detected by the system if the battery in the key is running

out of charge or the signal fails.

START-STOPsystem

Introduction

The START-STOPsystem (hereinafter referred to as the system) reduces

CO

2

emissions and harmful emissions, and saves fuel.

If the system determine that the engine is not needed when the vehicle stops

or is at a standstill (e.g. at the traffic lights), it turns off the engine and starts it

again when moving off.
The system function depends on many factors. Some of them are down to the

driver, while others are systemic and can neither be influenced nor identified.
For this reason, the system may react differently in situations which seem

identical from the driver's perspective.
The system is automatically activated every time the ignition is switched on

(even when it has previously been manually deactivated with the  button).

Note

If the engine has stopped due to the system, the ignition remains switched on.

Operation

Fig. 242 

Display

Vehicles with manual transmission

The engine is automatically switched off as soon as the vehicle comes to a

halt, the shift lever is moved into neutral and the clutch pedal is released.
The engine is automatically started as soon as the clutch pedal is depressed.

Vehicles with automatic transmission

The engine is automatically switched off as soon as the vehicle comes to a

halt and the brake pedal is operated.
The engine is automatically started as soon as the brake pedal is released.

201

Starting-off and Driving

-------------------------------------------------------------------------------------------------------------------------------------------------------------

Conditions for the system function

The following conditions must be met for the system to function correctly.

The driver's door is closed.
The driver has fastened the seat belt.
The driving speed after the last stop was higher than 4 km/h.

System status

The system status is shown in the display when the vehicle comes to a halt

» Fig. 242

.

The engine is switched off automatically; when moving off, the ignition

process will be initiated automatically.
The engine is not switched off automatically.

When stopping, the engine will not switch off for the following reasons,

among others.

The engine temperature for the proper function of the system has not yet

been reached.

The charge state of the vehicle battery is too low.

The current consumption is too high.

High air conditioning or heating output (high blower speed, big difference

between the desired and actual interior temperature).

If the engine is shut down automatically and the system detects that the en-

gine is required, such as when the brake pedal is pressed repeatedly, then the

system automatically starts the engine.
More information about the current system status can be displayed in the info-

tainment screen in menu 



/  →  → display Vehicle status.

If there is a system fault, the following message will appear in the display of

the instrument cluster. Seek help from a specialist garage.

Note

If the driver's seat belt is removed for more than approx. 30 seconds or the

driver's door is opened during automatic stop mode, the engine will have to be

started manually.

No automatic engine shut-down takes place when a vehicle with automatic

transmission is moving at low speed (e.g. during a traffic jam) and remains sta-

tionary after pressing the brake pedal lightly. Automatic engine shut-down

takes place if you press the brake pedal down with more force.

For vehicles with automatic transmission there is no automatic engine shut-

down when the system detects a manoeuvring action due to a large steering

angle.

manually activate/deactivate system

Fig. 243 

Button for the START-STOP sys-

tem

To deactivate/activate, press the  button 

» Fig. 243

.

When the system is deactivated, the 

 symbol lights up in the button.

If the system is deactivated, it will be reactivated automatically after the igni-

tion has been switched off and on.

Note

If the system is deactivated when the engine is turned off automatically, then

the automatic start process takes place.

202

Driving

-------------------------------------------------------------------------------------------------------------------------------------------------------------

Brakes and Parking

Introduction

The wear of the brake pads is dependent on the operating conditions and driv-

ing style. Under difficult conditions (e.g. urban, sporty driving style) the condi-

tion of the brakes should also be checked by a specialist garage between the

service intervals.
The performance of the brakes can be delayed if the brakes are damp, iced up

in winter or if covered in a layer of salt. The brakes are cleaned and dried by

applying the brakes several times 

» 

.

Corrosion on the brake discs and dirt on the brake pads occur if the vehicle

has been parked for a long period and if you do not make much use of the

braking system. The brakes are cleaned by applying the brakes several times

» 

.

Before travelling a long distance with a steep gradient, reduce speed and

shift into the next lowest gear. As a result, the braking effect of the engine will

be used, reducing the load on the brakes. If you do have to brake, this should

be carried out at intervals.
Emergency braking display - when an emergency braking is performed, the

automatic flashing of the brake lights are used to alert the traffic behind.
New brake pads must first be “worn in” because these do not initially have the

best possible braking effect. Drive especially carefully for the first 200 km or

so.
A too low brake fluid level can cause faults in the braking system, and the

warning light 

 lights up in the instrument cluster

» page 41

 Brake system.

If the warning light does not illuminate and an extended stopping distance is

required, the driving style should be adapted according to the unknown cause

of fault and restricted braking effect - seek the assistance of a specialist ga-

rage immediately.
The brake booster increases the pressure generated with the brake pedal. The

brake booster only operates when the engine is running.

WARNING

Greater physical effort is required for braking when the engine is switch-

ed off – risk of accident!

During the braking procedure on a vehicle with manual transmission,

when the vehicle is in gear and at low revs, press the clutch pedal. Other-

wise, the functionality of the brake system may be impaired – risk of acci-

dent!

Do not press the brake pedal if braking is now required. This causes the

brakes to overheat and can also result in a longer braking distance and ex-

cessive wear - risk of accident!

Braking for the purpose of drying and cleaning the brake discs should be

carried out only if the traffic conditions permit. Do not place any other road

users in jeopardy.

Recommendations for new brake pads have to be observed.

When stopping and parking, the parking brake should always be applied

firmly, otherwise the vehicle could move off - There is a risk of an accident!

If a front spoiler, full wheel trim, etc. is mounted retrospectively, it must

be ensured that the air supply to the front wheel brakes is not reduced.

Otherwise, the functionality of the brake system may be impaired – risk of

accident!

Handbrake

Fig. 244 

Handbrake

Read and observe   on page 203 first.

The handbrake secures the vehicle against unwanted movement when stop-

ping and parking.

Apply

Pull the handbrake lever firmly upwards.

203

Starting-off and Driving

-------------------------------------------------------------------------------------------------------------------------------------------------------------

Release

Pull the handbrake lever up slightly and at the same time push in the locking

button 

» Fig. 244

.

Move the lever right down while pressing the lock button.

The handbrake warning light 

 lights up in the instrument cluster when the

handbrake is applied and the ignition is on.
A warning signal sounds if the vehicle is inadvertently driven off with the hand-

brake applied. The handbrake warning is activated if the vehicle is driven at a

speed of over 5 km/h for more than 3 seconds.

WARNING

Disengage the handbrake completely. A handbrake which is only partially

disengaged can result in the rear brakes overheating. This can have a nega-

tive effect on the operation of the brake system – risk of accident!

Note

Push the armrest cover all the way back to the stop before applying the hand-

brake

» page 87

.

Parking

Read and observe   on page 203 first.

When stopping and parking, look for a place with a suitable surface 

» 

 .

Only carry out the activities while parking in the specified order.

Bring the vehicle to a stop and depress the brake pedal.

Firmly apply the handbrake.

For vehicles with automatic transmission, place the selector lever in the P

position.

Switch off the engine.

For vehicles with manual transmission, select 1st gear or reverse gear R.

Release the brake pedal.

WARNING

The exhaust system components can become very hot. Therefore, never

stop the vehicle at places where the underside of your vehicle can come in-

to contact with flammable materials such as dry grass, undergrowth,

leaves, spilled fuel or such like. - Risk of fire and serious injury can occur!

When leaving the vehicle, never leave people who could, for example, lock

the vehicle or release the brake, unattended in the vehicle - risk of accident

and injury!

Manual gear changing and pedals

Introduction

CAUTION

When stopping on a slope, never try to hold the vehicle using the accelerator

pedal – this may lead to gear damage.

Manual gear changing

Fig. 245 

The shift pattern

Read and observe   on page 204 first.

The gearshift pattern for the individual gear positions is shown on the gear lev-

er 

» Fig. 245

.

The gear shift indicator should be observed when changing gear 

» page 50

.

Always depress the clutch pedal all the way down. This prevents uneven wear

on the clutch.

Reverse gear is engaged

Stop the vehicle.

204

Driving

-------------------------------------------------------------------------------------------------------------------------------------------------------------


Content      ..     10      11      12      13     ..