Skoda Kodiaq (2019 year). Manual - part 11


  Index      Skoda     Skoda Kodiaq (2019 year) - manual in english


Search            copyright infringement  


Content      ..     9      10      11      12     ..


Skoda Kodiaq (2019 year). Manual - part 11


Data connection

Internet connection

Infotainment Columbus

Fig. 209  WLAN (wi-fi) / Bluetooth® / SIM card

Possible connection types 

» Fig. 209

Using WLAN, by connecting the Infotainment system to the hot spot of

the external device 

» page 175

Connect Infotainment to the hotspot of

the external device.
By connecting to a mobile phone (it is connected to the Internet) using the

Bluetooth

®

rSAP profile 

» page 174

Establishing a connection using the

Bluetooth 

®

 rSAP profile.

Using a SIM Card with a data tariff 

» page 174

Establishing a connection

using a SIM card in the external module.

A

B

C

Connecting Infotainment Amundsen

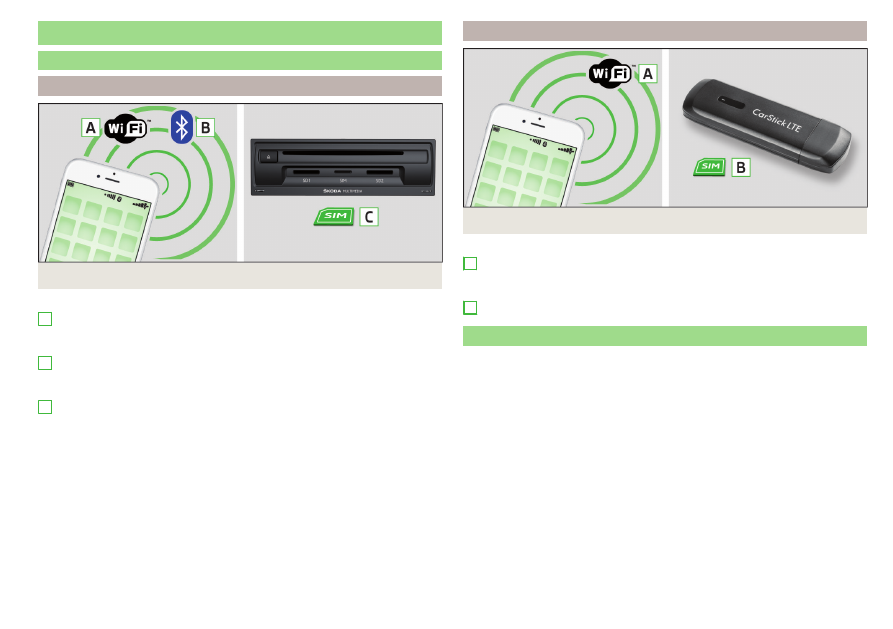
Fig. 210  WLAN (Wi-Fi) / CarStick

Possible connection types 

» Fig. 210

Using WLAN, by connecting the Infotainment system to the hot spot of

the external device 

» page 175

Connect Infotainment to the hotspot of

the external device.
Using the CarStick USB device 

» page 173

.

Connecting via the CarStick device

Applies to Infotainment Amundsen.

The CarStick USB device can be purchased from the original accessories.

Insert a SIM card with activated data services into the CarStick device.

The required dimensions of the SIM card, as well as the correct procedure dur-

ing insertion can be found in the instructions enclosed with the CarStick ŠKO-

DA original accessory.

Turn on the ignition and switch on Infotainment.

Insert the CarStick into the USB input at the front 

» Fig. 113

 on page 98,

Wait approximately one minute until the red light on Carstick stays continu-

ously lit (if the red lights up, then disconnect and re-insert the Carstick).

If the SIM card is protected by a PIN code, then the PIN code of the SIM card

must be entered.

Confirm the entered PIN code by tapping  confirm.

or: Tap the functional surface  to save and confirm the PIN code.

A

B

173

Data connection

-------------------------------------------------------------------------------------------------------------------------------------------------------------

If necessary, set the required network of the data service provider.

If your data provider is not available in the list, ask your provider whether one

of the displayed providers can be used.

The parameters of the telephone service provider network can be set in the

menu item 



 →  → Network → Network settings.

CAUTION

If you insert a SIM card of the wrong size or in the wrong direction, there is a

risk of damage to the CarStick device.

Establishing a connection using a SIM card in the external module

Applies to Infotainment Columbus with the SIM card slot in the external mod-

ule.

A SIM card size “mini” (standard size 25x15 mm) with enabled data services

must be used.

Turn on the ignition and switch on Infotainment.

In the Telephone main menu, switch on the  → Business phone “interface”.

Insert a SIM card into the corresponding slot into the external module in the

storage compartment on the passenger's side 

» Fig. 204

 on page 167.

Insert the SIM card with the bevelled corner on the left and the contacts

facing downwards until it “locks”.

Select the SIM card usage type:

Calls too - enabling data and telephone services.
Only data connections - enabling of data services only.

If the SIM card is protected by a PIN code, then the PIN code of the SIM card

must be entered.

Confirm the entered PIN code by tapping  confirm.

or: Tap the functional surface  to save and confirm the PIN code.

Set the data service provider’s required network and confirm the Internet

connection.

If your data provider is not available in the list, ask your provider whether one

of the displayed providers can be used.

The parameters of the telephone service provider network can be set in the

menu item 



 →  → Network → Network settings.

The data connection setting using the SIM card can be configured in the 



 →

 → Network → Data connection:.

CAUTION

When inserting an incorrectly sized SIM card or in the wrong direction, there is

a risk of damage to the external module.

Establishing a connection using the Bluetooth 

®

 rSAP profile

Applies to Infotainment Columbus with the SIM card slot in the external mod-

ule.

The prerequisite for establishing an Internet connection is using a telephone

with a SIM card with active data services.

Turn on the ignition and switch on Infotainment.

Switch on the “Business” function in Infotainment, the sensor field 



 and

then the function surface  →  → Phone interface “Business”.

Switch on Bluetooth

®

, the sensor field 



 and then the function surface  →

Bluetooth → Bluetooth.

Turn on Infotainment visibility (tap the 



 sensor field and then tap the

function surface  → Bluetooth → Visibility: → Visible.

Switch on Bluetooth

®

 and its visibility in the phone.

Connect and pair the phone with Infotainment 

» page 164

.

Connecting via WLAN

Introduction to the subject

Applies to Infotainment Columbus, Amundsen.

WLAN can be used to connect to the Internet, to playback audio files in the

menu media or for operating the Infotainment system using an application in

the external device (e.g. “ŠKODA Media Command”).
It is possible to connect up to 8 external devices to the Infotainment hotspot

and at the same time to connect Infotainment to another hotspot.

Switching the Infotainment hotspot on/off

Switch on the ignition.

Switch the hotspot on/off in menu item 



 →  → WLAN → Mobile hotspot →

Mobile hotspot.

174

Infotainment

-------------------------------------------------------------------------------------------------------------------------------------------------------------

Setting the Infotainment hotspot

The Infotainment hotspot is factory set.
The setting can be changed in menu item 



 →  → WLAN → Mobile hotspot →

Hotspot (WLAN) settings.

Security level: - Type of access protection (always set to WPA2)

Network key - Access password

SSID: ... - Hotspot name

Do not send network name (SSID) - Switch the visibility of the hotspot on/off

To save the configured parameters, tap the Store function surface.

Connecting an external device to the Infotainment hotspot

Switch on the ignition.

Switch on WLAN in the external device and search for the infotainment hot-

spot.

Select the Infotainment hotspot and enter the required password.

Confirm the connection.

Note

The name of the Infotainment hotspot (SSID) and the access password can be

found in menu item 



 →  → WLAN → Mobile hotspot → Hotspot (WLAN) settings.

Connect Infotainment to the hotspot of the external device

Fig. 211 

Main menu of the Infotainment

WLAN

The Infotainment system can only be connected to a hotspot with WPA2

access protection.

Switch on the ignition.

If the Infotainment WLAN is not activated, activate it in the menu item 



 →

 → WLAN → WLAN → WLAN.

In area 

A


» Fig. 211

, a list of available or previously connected hotspots is dis-

played.
The hotspot list can be updated by tapping the function surface 

B

.

Select the hotspot and enter the password.

If the hotspot is not visible, you can establish the connection to it manually.

Tap the function surface Manual settings.

Set the required hotspot parameters.

Tap the function surface Connect.

Icons and function surfaces in the list of available hotspots 

A


» Fig. 211

Connected hotspot
Signal strength of the connected hotspot
Delete the hotspot

Hotspot connection recommendations

Only leave the hotspot to be connected switched on, switch off the other

hotspot.

On some hotspots, the connection setup takes longer, wait for the end of

the connection setup.

If the connection is interrupted, search for available hotspots again and re-

peat connection setup.

Delete unused hotspots. This shortens the time required for connection set-

up.

Note

It is not possible to connect Infotainment Columbus to the hotspot of the ex-

ternal device as long as a SIM card with enabled data services is in the external

module of Infotainment or a phone connected to Infotainment via the Blue-

tooth

®

rSAP profile.

An Infotainment Amundsen connection with external device hotspot is not

possible, as long as there is an active connection using the Carstickdevice.

Connect via WPS

Applies to Infotainment Amundsen.

It is not necessary to enter the access password when connecting via WPS.

175

Data connection

-------------------------------------------------------------------------------------------------------------------------------------------------------------

Connecting the Infotainment system to the hotspot of the external device

Switch on the ignition.

In the external device, switch on the hotspot, its visibility, and the WPS con-

nection option.

In the Infotainment system, switch on WLAN in menu item 



 →  → WLAN

→ WLAN → WLAN.

Tap the function surface WPS fast connection (WPS button).

Connecting the external device to the Infotainment hotspot

Switch on the ignition.

Switch on the Infotainment hotspot in menu item 



 →  → WLAN → Mobile

hotspot → Mobile hotspot.

Tap the function surface WPS fast connection (WPS button).

In the external device, switch on the WPS connection option.

SmartLink

Introductory information

Introduction to the subject

Fig. 212 

Information on SmartLink on the

ŠKODA websites

SmartLink offers the ability to display certified applications on an external de-

vice equipped with a USB device on the Infotainment screen and to operate

them.
SmartLink supports the following communication systems.

“Android Auto”

“Apple CarPlay”

“MirrorLink

®

Using the applications in the connected external device it is possible to use the

navigation to make a call, to listen to music.
For reasons of safety, the operation of some applications while driving is not

possible or only limited.
Read in the QR code

» Fig. 212

orenter the following address in the web brows-

er to open the website with information on the SmartLink communication sys-

tem.

http://go.skoda.eu/connectivity-smartlink

Depending on the model of the connected external device, some applications

can be operated via the Infotainment system, using your voice or using the

buttons on the multi-function steering wheel.
To activate voice control for the connected external device, hold down 



 or



 or hold down the button  on the multifunction steering wheel.

176

Infotainment

-------------------------------------------------------------------------------------------------------------------------------------------------------------

CAUTION

To establish the connection, it is necessary for the date and time in Infotain-

ment to be set correctly. If the date and time setting is based on the GPS sig-

nal, then problems may arise with establishing a connection with a poor GPS

signal reception.

Note

We recommend that you use extension cords from ŠKODA Original Acces-

sories.

With some connected external devices, it is necessary for the connected ex-

ternal device to be “unlocked” for trouble-free functioning of the SmartLink

function.

Main menu

Fig. 213  Supported communication systems / Example of available

communication systems of the connected external device

to display the SmartLink main menu, tap on the sensor field 



 or press the



 button.

or: Tap the 



 sensor field and then the function surface  .

If no external device is connected, then a menu with supported communica-

tion systems SmartLink is displayed 

A


» Fig. 213

,

Main menu 

» Fig. 213

Supported communication systems
Available communication systems of the connected external device
Display of information about SmartLink
Disconnection of the active connection
Settings of the SmartLink 

» page 142

 menu or 

» page 147

A
B

Android Auto

Connection set-up / disconnection

Prerequisites for establishing a connection

The external device to be connected must support the “Android Auto”

communication system.
In the external device to be connected, the “Android Auto” application

must be installed.
Some applications require the data connection in the connected external

device to be switched on.

A list external of devices, supported regions and applications that the “Android

Auto” connection supports can be found on the websites of Google Inc..

Connection set-up

Switch on the ignition.

Switch on the Infotainment system.

Switch on the external device.

Connect the external device to the USB input using a cable 

» page 98

.

Select the connection using “Android Auto” 

B


» Fig. 213

 on page 177.

Disconnection of the active connection

In the “Android Auto” main menu, tap the function surface  .

Tap the “ŠKODA” function surface to go back to the main menu SmartLink.

Tap the function surface  .

or: Disconnect the cable from the USB input. When reconnected, the exter-

nal device is automatically connected.

Function restriction of Infotainment

For the duration of the connection, the external device cannot be used as an

audio source in the Media menu.
By connecting the external device with “Android Auto”, all currently connected

Bluetooth

®

 devices will be disconnected and the external device will automati-

cally be connected as the main telephone.
For the duration of the connection, no Bluetooth devices can be connected to

the infotainment system. The SIM card inserted in the external module can on-

ly be used for data connection.

177

SmartLink

-------------------------------------------------------------------------------------------------------------------------------------------------------------

If route guidance is taking place at this moment in Infotainment, then there

is the option to start the route guidance in the “Android Auto” application. And

vice versa, if route guidance is currently taking place in the “Android Auto”

application, then there is the possibility that this will be terminated by the

start of route guidance by the Infotainment system.

main menu

Fig. 214 

Android Auto: Main menu

Main menu 

» Fig. 214

Navigation applications
Telephone applications
Overview regarding current applications, telephone calls, accepted text

messages, tasks in the working directory, weather or similar.
Music applications
Display of other available applications as well as the option of returning to

the SmartLink main menu
Switching on voice control (Google Voice)

The symbol appears next to the function surface in the area

A

 , Then, by

tapping on this function surface again, a list of new applications is displayed.

Apple CarPlay

Connection set-up / disconnection

Prerequisites for establishing a connection

The external device to be connected must support the “Apple CarPlay”

communication system.
The data connection of the external device to be connected must be ac-

tive.
The voice control (Siri) of the external device to be connected must be ac-

tive.

A list external of devices, supported regions and applications that the “Apple

CarPlay” connection supports can be found on the websites of Apple Inc..

Connection set-up

Switch on the ignition.

Switch on the Infotainment system.

Switch on the external device.

Connect the external device to the USB input using a cable 

» page 98

.

Select the connection using “Apple CarPlay” 

B


» Fig. 213

 on page 177.

Disconnection of the active connection

In the main menu “Apple CarPlay”, tap the function surface of the “ŠKODA”

application, the main menu SmartLink is displayed.

Tap the function surface  .

or: Disconnect the cable from the USB input. When reconnected, the exter-

nal device is automatically connected.

Function restriction of Infotainment

For the duration of the connection, the external device cannot be used as an

audio source in the Media menu.
By connecting the external device with “Apple CarPlay”, all currently connec-

ted Bluetooth

®

 devices will be disconnected.

For the duration of the connection, no Bluetooth devices can be connected to

the infotainment system. The SIM card inserted in the external module can on-

ly be used for data services.

178

Infotainment

-------------------------------------------------------------------------------------------------------------------------------------------------------------

If route guidance is taking place at this moment using Infotainment, then this

is terminated by starting the route guidance in the “Apple CarPlay” application.

And vice versa, if route guidance is currently taking place in the “Apple

CarPlay” application, then this will be terminated by the start of route guid-

ance by the Infotainment system.

Note

Some phone features of the connected external device can be operated in the

display of the instrument cluster 

» page 56

.

main menu

Fig. 215 

Apple CarPlay: Main menu

Main menu 

» Fig. 215

List of available applications
More pages with applications
Depending on how long the function surface is pressed:

Tap - Return to “Apple Carplay” main menu

Hold - Switch on voice control (Siri)

MirrorLink

®

Connection set-up / disconnection

Prerequisites for establishing a connection

The external device to be connected must support the communication

system “MirrorLink

®

”.

The external device to be connected must have at least one

“MirrorLink

®

”application installed.

Some applications require the data connection in the connected external

device to be switched on.

A
B

Connection set-up

Switch on the ignition.

Switch on the Infotainment system.

Switch on the external device.

Connect the external device to the USB input using a cable 

» page 98

.

Select the connection using “MirrorLink

®

” 

B


» Fig. 213

 on page 177.

Disconnection of the active connection

In the main menu of “MirrorLink 

®

”, tap the function surface  The SmartLink

main menu is displayed.

Tap the functional surface  .

or: Disconnect the cable from the USB input. When reconnected, the exter-

nal device is automatically connected.

Function restriction of Infotainment

applies to Infotainment Columbus, Amundsen, Bolero: If you wish to use the

device to be connected in the Telephone menu, the external device must be

paired with and connected to the Infotainment system before establishing the

connection

» page 164

.

Applies to Infotainment Swing. By connecting the external device to all cur-

rently connected Bluetooth

®

 devices will be disconnected and the external de-

vice will automatically be connected as the main telephone. Depending on the

device to be connected, a connection confirmation may be required.
For the duration of the connection, the external device cannot be used as an

audio source in the Media menu.

main menu

Fig. 216 

MirrorLink®: Main menu

179

SmartLink

-------------------------------------------------------------------------------------------------------------------------------------------------------------

Main menu 

» Fig. 216

Return to SmartLink main menu 

» page 177

List of running applications
Display of the last running application in the connected external device
Settings of the SmartLink 

» page 142

 menu or 

» page 147

List of applications
More pages with applications
Applications cannot be operated while driving

Display of the function surfaces during the running application

Return to “MirrorLink 

®

” main menu

Show function surfaces at the top/bottom (applies to Infotainment

Amundsen, Bolero)

Move the functional surfaces in the desired corner of the screen

(applies to the infotainment Swing)

To show/hide the function surfaces, press the controller  (applies to Infotain-

ment Amundsen, Bolero).

function problems

If problems occur with the “MirrorLink 

®

”connection, then one of the following

messages may occur on the screen.

Fault: transfer - Disconnect and reconnect the external device

MirrorLink® audio is unavailable. - Disconnect and reconnect the external device

MirrorLink® availability on this mobile device is restricted. - it is not possible to use the

connected device during the journey or the device only has limited availabili-

ty (applies to Infotainment swing)

The mobile device is locked. Please unlock the mobile device to use MirrorLink® - “unlock”

the connected external device

Unable to start app or app not working. - Disconnect and reconnect the external

device

A
B

  

      

Application“ŠKODA OneApp”

Introductory information

Fig. 217 

Information on the ŠKODA

OneApp application on the ŠKO-

DA websites

A mobile telephone connected to the Infotainment system allows you to edit

and evaluate journey data in the “ŠKODA One App” application.
After entering the following address into the web browser, the website is

opened with information on the ŠKODA mobile applications.
http://go.skoda.eu/service-app
The “ŠKODA OneApp” application is available in the App Store and Google

Play online shops.

“ŠKODA OneApp” application

Scan the QR code 

» Fig. 217

 .

For the full functionality of the “ŠKODA One App” application, data transfer

from external devices must be activated.
Applies to Infotainment Columbus, Amundsen, Bolero

To activate data transfer from external devices , tap the 



 sensor field

and then tap the function surface  → Mobile device data transfer → Activate data

transfer for ŠKODA Apps.

Applies to Infotainment Swing

To activate data from external devices, press the 



 button, then tap on

function surface → Activate data transfer for ŠKODA apps.

Note

Some functions of the application are not available in all countries or there is a

function restriction during the journey 

» page 126

Mobile devices and applica-

tions.

180

Infotainment

-------------------------------------------------------------------------------------------------------------------------------------------------------------

Connecting to Infotainment

The mobile telephone can be connected to the Infotainment system using the

SmartLink function or via WLAN.

Connection by SmartLink

Switch on the ignition.

Establish the connection via SmartLink (eg “MirrorLink

®

”)

» page 176

.

In the list of available applications, select the “ŠKODA One App” application.

Depending on the model of the connected external device, some applications

can be started using voice activation, via the Infotainment screen, using the

operating elements on Infotainment, or using the buttons on the multi-func-

tion steering wheel.
Once connected, the contents of the application in the infotainment screen

may be displayed.
A possible connection between the mobile telephone and the Infotainment

system via WLAN will be terminated after a connection is established using

SmartLink.

Connection via WLAN (applies to Infotainment Columbus, Amundsen)

Switch on the ignition.

Establish the WLAN connection 

» page 174

.

In the mobile telephone, start the “ŠKODA OneApp” application.

Disconnect the connection

The connection can be switched off in one of the following ways.

Switch off the ignition for longer than 5 seconds (for vehicles with a starter

button, switch off the engine and open the driver's door).

End the connection in the “ŠKODA OneApp” application.

Disconnect the mobile telephone from the USB port or terminate the WLAN

connection.

Navigation

Introductory information

Navigation - function sequence

Applies to Infotainment Columbus, Amundsen.

Route guidance is started as follows.

Search for/ enter a new destination or Select one of the stored destinations.

Confirm the route calculation in the destination details or if necessary, adjust

the route options.

Select the preferred route type, if this is requested by Infotainment.

A route calculation occurs and route guidance starts.
The route guidance is provided by graphical nav. announcements.
There is an option to add additional destinations during route guidance, or to

adapt the route.
If a traffic radio station is available, information concerning traffic delays is

evaluated by Infotainment and, if necessary, an alternative route is offered.
If you deviate from the route, then a new route calculation is carried out.

GPS satellite signal

Infotainment uses the GPS (Global Positioning System) satellite signal for

route guidance.
Outside the range of the GPS satellite signal (e.g. in dense vegetation, in tun-

nels, parking garages, etc.), Infotainment navigates only with restrictions using

vehicle sensors.
The unit offers the possibility to show in the split screen display the following

Position 

» Fig. 220

 on page 184 information about the current geographical po-

sition of the vehicle and the satellite signal.

Geographical latitude
Geographical longitude
Elevation
Number of received/available satellites

If no GPS satellite signal is available, no values are displayed.

181

Navigation

-------------------------------------------------------------------------------------------------------------------------------------------------------------

Navigation data

Columbus navigation data source

The navigation data is stored in the internal Infotainment memory.

Amundsen navigation data source

The navigation data is stored on an Original SD card.
In order to ensure the function of the navigation, the Original SD card, with the

navigation data, must be inserted in the respective slot in the external module

» page 128

.

If the original SD card should be damaged or lost, a new original SD card can

be purchased from the ŠKODA Original Accessories.
With a non-original SD Card, the navigation does not work.

Finding out the version of the navigation data

In the Navigation main menu, tap the function surface  → Version information .

Update navigation data

We recommend that you update the navigation data on a regular basis.
The Infotainment can give incorrect driving recommendations if the road con-

dition or the traffic situation does not match the navigation data. This can lead

to route guidance being carried out using a different route or proposing a

change of direction in a one-way street. Therefore, observe the respective

traffic signs while driving, which always have priority over the driving recom-

mendations.
The information on updating the navigation data is to be obtained from a

ŠKODA partner or on the following ŠKODA Internet pages.

http://go.skoda.eu/updateportal

When activated online services “Infotainment online” 

» page 14

 can the naviga-

tion data for the Infotainment Columbus Updating online 

» page 182

Naviga-

tion data and POI categories Import / Update online,

Navigation data and POI categories Import / Update online

Manual update

When “Infotainment Online” 

» page 14

 online services are activated, there is

the option of downloading/updating navigation data (applies to Infotainment

Columbus) or of downloading POI categories created in the user profile on the

“ŠKODA Connect Portal” website.

In the Navigation main menu, tap the function surface  → Version information

→ Update (online) → Retrieve.

or: Tap the 



 sensor field and then the function surface  →  .

A menu for importing/updating the navigation data and POI categories is dis-

played.

Tap the functional surface  and select one of the following menu items.

All - Import all the available navigation data

Favourites - Import of navigation data preferably countries / regions (applies to

the infotainment Columbus)

POIs - Import of the POI category created in the user profile on the “ŠKODA

Connect Portal” website 

» page 190

Maps - Import of the navigation data available for the respective countries/re-

gions (applies to Infotainment Columbus)

Select the desired list entries.

Tap on function surface Retrieve and confirm the deletion.

Automatic update

Applies to vehicles with the Infotainment Columbus: if the online services

“Infotainment Online” 

» page 14

 are activated and an update of the navigation

data for the current vehicle position or the route destination is available, the

infotainment will issue this automatic note and offer an update option.
During the upgrade process, infotainment is usable without limitation.
To complete the update of the navigation data, the ignition and Infotainment

must be switched off for at least 30 min.

Main menu

Fig. 218  Navigation: Main menu

182

Infotainment

-------------------------------------------------------------------------------------------------------------------------------------------------------------

To display, tap the sensor field 



.

or: Tap the 



 sensor field and then the function surface  .

Description of the function interfaces 

A


» Fig. 218

Context-dependent:

Route guidance is disabled - Search / enter a new destination

Route guidance is enabled - The following menu is displayed:

Route details - Displays the route details 

» page 197

Change route in map - Displays a menu for the route change in the map

(valid for Infotainment Columbus) 

» page 198

Congestion ahead - Manual adjusts traffic conditions 

» page 202

Enter destination - Search / enter a new destination / stopover 

» page 184

Stop route guidance - Stops route guidance 

» page 196

The following menu is displayed:

Curr. current position - Store the current vehicle position as the flagged

destination 

» page 188

Routes - Displays the list of saved routes 

» page 198

Destinations - Display the list of stored destinations 

» page 187

Last destinations - Display the list of recent destinations to which route

guidance was carried out 

» page 187

Home address - Route guidance to your home address 

» page 188

Search for POIs in categories 

 and 

Map display options 

» page 191

Playback control Media/Radio (does not apply to vehicles with Infotain-

ment Amundsen and the digital instrument cluster)
Display for the volume setting of the navigation announcements/repeti-

tion of the navigation announcement 

» page 196

Navigation settings 

» page 143

Change the map display between the digital instrument cluster and the In-

fotainment screen (applies to vehicles with Infotainment Amundsen and

the digital instrument cluster)

  

B

Map

Fig. 219 

Card description

The following information and function surfaces can be displayed in the

map. 

» Fig. 219

Vehicle position
Route
Function interfaces for card use 

» page 191

Functional surface of the POI
Functional surface for the POI list
Function surface for displaying a traffic incident 

» page 202

Information on the maximum permitted speed
Destination position
Intermediate destination position
Destination position Home address
Favourite position

Information in the status line

Street name / street number of the current vehicle position
Distance to destination
Route to the stopover
Estimated travelling time to the destination
Estimated travel time to the stopover
Estimated time of arrival at destination / stopover

A
B
C
D

E
F

G

183

Navigation

-------------------------------------------------------------------------------------------------------------------------------------------------------------

additional window

Fig. 220 

Split screen

Applies to vehicles with Infotainment Amundsen and the digital instrument

cluster: when the map display is displayed in the digital instrument cluster, the

split screen is always shown and cannot be dimmed.

To switch on/offin the main menu Navigation, tap on the function surface 

→ Split screen.

To select content of the additional window 

A


» Fig. 220

 tap the function

surface  Tap and select one of the following menus, depending on the con-

text.

Audio - Operation of Radio/Mediaplayback

Compass - Displays the current vehicle location in relation to the compass di-

rections

Freq. Routes - Displays the three most frequently travelled routes (if route

guidance is disabled) 

» page 196

Manoeuvre - Display graphical driving recommendations (if route guidance is

enabled) 

» page 196

Position - Displays the geographical coordinates of the current vehicle loca-

tion

Map - Preview card display (applies to vehicles with Infotainment Columbus,

without the digital instrument cluster) 

» page 193

Search for destination and enter

Selecting the type of destination search/destination entry

Fig. 221 

Selecting the type of destina-

tion search/destination entry

Route guidance is disabled - From the navigation main menu, the function

surface  →  .

 Route guidance is enabled - From the main menu navigation, tap on the

function surface  → Enter destination →  .

Function surfaces 

» Fig. 221

Search for a destination or POI (point of interest) by name 

» page 184

Destination entry by address 

» page 185

Online POI search 

» page 184

Search for a point along the route (only works with active route guidance)

» page 184

Destination input via the map point or using the GPS coordinates

» page 186

Search POI destination /

Fig. 222 

Menu for the destination search

A
B
C
D

E

184

Infotainment

-------------------------------------------------------------------------------------------------------------------------------------------------------------

Fig. 223  List of destinations visited: in the navigation data / online

The feature allows a full text search of locations or points of interest (POI) by

entering keywords.

Show menu

Route guidance is disabled - From the navigation main menu, the function

surface  →  .

 Route guidance is enabled - From the main menu navigation, tap on the

function surface  → Tap Enter destination

Then tap the function surface of one of the menu items for the destination

search 

A

C

 or 

D


» Fig. 221

 on page 184.

Function surfaces 

» Fig. 222

 and 

» Fig. 223

Input line
Depending on the search mode, the following symbols are displayed

 - Display the map as well as the list of the destinations listed in the navi-

gation database

 - Display the map as well as the list of online destinations

 - Select the destination search/destination entry 

» page 184

List of last destinations (if no character is entered) / List of visited destina-

tions
Keypad
Status of online services

Find destination

Enter the POI name or the POI category (POI) and, if required, the place and

street name or house number/postal code.

A list of the destinations found is displayed in area 

D


» Fig. 222

.

A
B

C
D

E
F

Select the desired destination and the destination details will be displayed.

or: Tap the 

B


» Fig. 222

 function surface.

A map with the following symbols and a list of the destinations found is dis-

played.

Destinations found in the navigation data 

» Fig. 223

 - .

Destinations found online 

» Fig. 223

 - .

Select the desired destination and the destination details will be displayed.

Enter destination using the address

Fig. 224  Enter destination using the address: Main menu / List of visited

destinations

Show menu

Route guidance is disabled - From the navigation main menu, the function

surface  .

 Route guidance is enabled - From the main menu navigation, tap on the

function surface  → Tap Enter destination

Then tap the function surface  → 

B


» page 184

Enter destination

Enter the destination address and then confirm 

» Fig. 224

 - .

Tap the function surface  to see the destination details.

Relevant names (e.g. Place/street names) are offered in the entry line during

entry, depending on the context. The location of the proposed destination can

be displayed by tapping the function surface Map.
Depending on the number of places visited, a map with a list of visited places

can be displayed automatically 

» Fig. 224

 - .

185

Navigation

-------------------------------------------------------------------------------------------------------------------------------------------------------------

The map with the list of visited locations can be accessed manually by tapping

the function surface  .

Entering a destination via the map point and using GPS coordinates

Fig. 225  Enter destination: via the map point / using the GPS coordi-

nates

Show menu

Route guidance is disabled - From the navigation main menu, the function

surface  .

 Route guidance is enabled - From the main menu navigation, tap on the

function surface  → Tap Enter destination

Then tap the function surface  → 

E


» Fig. 221

 on page 184.

Enter destination via map point

By sliding the screen move the desired destination into the cross-hair

» Fig. 225

 - .

Tap the function surface  to see the destination details.

Enter destination through GPS coordinates

Tap in the values of the GPS coordinates one at a time and adjust 

» Fig. 225

 -

,

Tap the function surface  to see the destination details.

If information is available about the point entered in the navigation data, then

these will be displayed instead of the GPS coordinates (e.g. address 

A

» Fig. 225

).

Entering a destination via the map point

Fig. 226 

Menu after tapping the map

point

Tap on the map to display the symbol  and a menu with the following menu

items (depending on the context) 

» Fig. 226

.

Display the destination details 

» page 194

Display the POI details/display the POI list (function surface) )
Start route guidance to the selected point
Paste the selected point as the next destination in the current route

guidance
Start route guidance to the favourite
Start route guidance to the home address
Destination search in the vicinity of the selected point 

» page 184

Define the starting point for demo mode (if it is turned on) 

» page 195

Find petrol station, restaurant or car park

Fig. 227  List of petrol stations visited: in the navigation data / online

A
B

C

186

Infotainment

-------------------------------------------------------------------------------------------------------------------------------------------------------------

Fig. 228  List of car parks visited: in the navigation data / online

The Infotainment allows you to find petrol stations, restaurants or car parks

quickly in the navigation data as well as online.

In the Navigation main menu, tap the function surface  .

The function surface of the desired category button.

or: Tap the 



 sensor field and then the function surface  →  or  .

Search destination in the navigation data

Depending on the context below a list be examined POIs in the selected cate-

gory is displayed.

There is no route guidance - The nearest destinations in a radius of 200 km

from the current vehicle position are displayed.

There is a route guidance - Destinations on the route or near the route are

displayed.

Find Target online

When “Infotainment Online” 

» page 14

 services are activated, a list of POIs

from the selected category in a radius around the current vehicle position is

displayed, regardless of whether or not route guidance is taking place.
After performing destination search, it is possible to switch between the list of

visited in the navigation data or online goals by one of the following functional

areas on the position 

A


» Fig. 227

 or. 

» Fig. 228

 is tapped.

Displays the list of destinations visited in the navigation data.
Displays list of last destinations

Note

With activated function  → Fuel options → Select preferred fuel station function ac-

tivated, the preferred fuel stations are displayed in the first three positions

during the fuel station search.

Saved destinations

Last destinations

List of last destinations

In the Navigation main menu, tap the function surface  → Last destinations.

Details of the last destination (not applicable to Infotainment Columbus)

In the main Navigation menu, tap the 



 sensor field.

If route guide is disabled, then the details of the last destination are displayed

to where the route guidance was carried out. If route guidance is enabled,

Then the details of the final destinations are displayed.

Last destinations menu for destination / POI search

In the menu for finding destinations in 

D


» page 184

, a short list of the most

recent destinations is displayed.

Function surfaces in the list of last destinations

- Destination search by name (the function surface is displayed with

more than 5 entries available)
- Display the details of the selected destination 

» page 194

target memory

Fig. 229  Select list of stored destinations / categories of saved destina-

tions

Search

187

Navigation

-------------------------------------------------------------------------------------------------------------------------------------------------------------

List of stored destinations

In the Navigation main menu, tap the function surface  → Destinations.

Tap on function surface 

A


» Fig. 229

 and select one of the following catego-

ries of saved destinations 

B


» Fig. 229

.

All saved destinations

 - Flagged destination (vehicle position at the time of storage)

 - Stored destination (manually saved destination/destination impor-

ted in vCard format)

 - Favourite (destination with additional favourite property)

Favourites (the favourite location is shown in the map by the symbol 

).

Telephone contact addresses of the connected telephone or the inserted

SIM card.
Online destinations created in the user profile on the “ŠKODA Connect

Portal” website or in the “ŠKODA Connect” application 

» page 190

Function surfaces in the list of stored destinations

- Destination search by name (the function surface is displayed if there

are several entries on the next page of the list)
- Display the destination details 

» page 194

Store target

In the Navigation main menu, tap the function surface  → Last destinations.

Tap the functional surface  Tap on the desired destination, the destination

details are displayed.

Tap on the function surface Store .

Rename the destination if necessary and confirm storage.

“Flagged destination” Save (current vehicle position)

In the Navigation main menu, tap the function surface  → Store → Store cur-

rent position.

By then pressing the function surface Rename the flagged destination can be

renamed and stored as a destination in the dest. memory.

By storing the next flagged destination, the last flagged destination will be

overwritten. To maintain the existing flag destination, this destination must be

stored in the Infotainment memory.

Save as a favourite / cancel

It is not possible to store a contact, a vCard or target image as a favourite.

In the Navigation main menu, tap the function surface  → Destinations.

Tap the functional surface  and select the desired list of destinations.

Search

Show the destination details by tapping on the function surface  at the de-

sired destination.

Tap the function surface Edit .

Tap on the function surface Favourite .

Delete destination

In the Navigation main menu, tap the function surface  → Destinations.

Tap the functional surface  and select the desired list of destinations.

Show the destination details by tapping on the function surface  at the de-

sired destination.

Tap the function surface Edit .

Tap the function surface Delete and confirm the deletion.

Home address

Define home address

When your home address is not entered, then proceed as follows.

In the Navigation main menu, tap the function surface  → Home address.

Defining the home address using the current vehicle position or by entering

the address.

Change the home address

In the Navigation main menu, tap the function surface  → Manage memory →

Define home address.

Tap the function surface Edit .

Edit the home address or set one up using the current vehicle position or by

entering the address.

Delete home address

In the Navigation main menu, tap the function surface  → Manage memory →

Delete user data → Home address.

Tap the function surface Delete and confirm the deletion.

188

Infotainment

-------------------------------------------------------------------------------------------------------------------------------------------------------------


Content      ..     9      10      11      12     ..