Skoda Fabia (2019 year). Manual - part 4


  Index      Skoda     Skoda Fabia (2019 year) - manual in english


Search            copyright infringement  


Content      ..     2      3      4      5     ..


Skoda Fabia (2019 year). Manual - part 4


Closing

Press and hold the  button on the key.

or: Switch off the ignition, open the driver's door and hold the key 

A

 until it

stops in the closed position 

» Fig. 52

 on page 58.

In the KESSY system, hold your finger on the sensor on the outside of the

door handle of the front door 

» Fig. 45

 on page 53.

The convenience operation will only function correctly if all the windows auto-

matically open/close properly.
Convenience opening or closing the window using the key in the driver's door

locking cylinder is only possible within 45 seconds of locking the vehicle.
The movement of the window is stopped immediately when the respective

button is released.

Malfunctions

Read and observe   and   on page 58 first.

Repeatedly opening and closing the window can cause the window mechanism

to overheat and become temporarily blocked. You will be able to operate the

window again as soon as the operating mechanisms has cooled down.
After disconnecting the vehicle battery, automatic opening / closing the win-

dow can be deactivated. In this case, the system must be activated as follows.

Activating window operation

Switch on the ignition.

Pull the top edge of the button and close the window.

Release the button.

Pull up the respective button and hold for 1 second.

Lights and visibility

Light

Introduction

The lights work only with the ignition on, unless otherwise stated.
For the basic position of the light switch, use position .

Note

The headlights may mist up temporarily. When the light is on, the light-emit-

ting surface demists after a short time.

Operating the lights
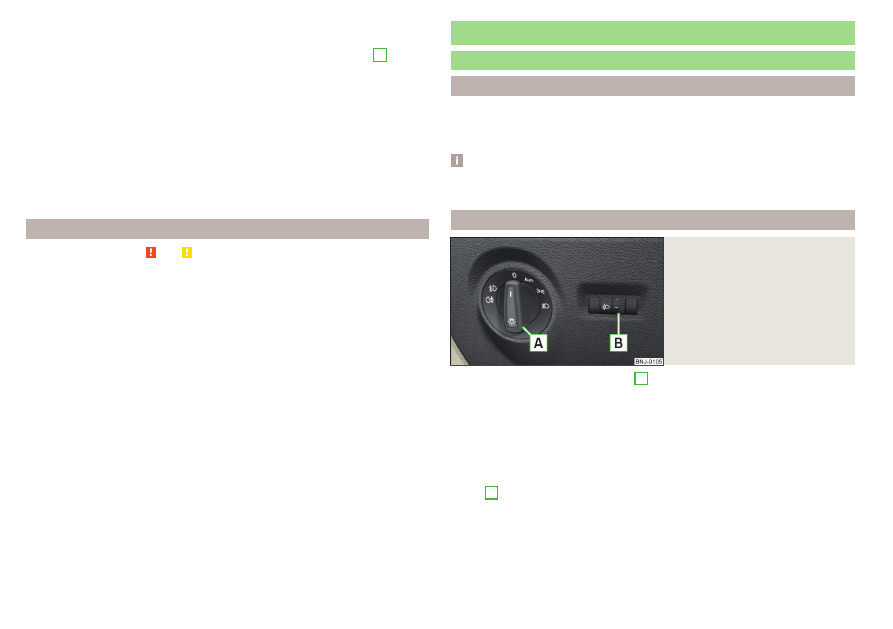
Fig. 54 

Light switch and control dial for

headlight range adjustment

Toswitch the lights on/off,turn the 

A


» Fig. 54

 switch to one of the following

positions (equipment-dependent).

Switching off lights (except daytime running lights)

Switching the light on/off automatically 

» page 62

Switching on the parking lights or parking lights on both sides 

» page 64

Switch on low beam

Depending on the vehicle load, adjust the headlight range by turning the con-

troller 

B


» Fig. 54

 to the following positions.

Front seats occupied, boot empty
All seats occupied, boot empty
All seats occupied, boot loaded
Driver seat occupied, boot loaded



60

Operation

-------------------------------------------------------------------------------------------------------------------------------------------------------------

The LEDFront headlights s automatically adjust to vehicle loading and driving

conditions, so they do not have manual headlight range control.

WARNING

Always adjust the headlight beam to meet the following conditions - other-

wise there is a risk of an accident.

The vehicle does not dazzle other road users, especially oncoming vehi-

cles.

The beam range is sufficient for safe driving.

Note

If, with a dipped beam, the ignition is turned off, then the dipped beam will

automatically switch off and the parking lights will come on. Does not apply to

the position , as long as the conditions are met for the COMING HOME

function . The parking lights are switched off when the ignition key is removed

(for vehicles with the start button, after opening the driver's door).

If there is a fault in the light switch, the low beam comes on automatically.

Daytime running lights

The daytime running lights (hereinafter only referred to as "function") lights

the front and rear vehicle area (only valid for some countries).
The lights are switched on automatically if the following conditions are

met.

The light switch is in the position  or .
The ignition is switched on.
The parking aid is activated.

Activating/deactivating function on vehicles with Infotainment

The function can be deactivated/activated in the Infotainment system in menu



 →  → Light.

Deactivating on vehicles without Infotainment

Turn off the ignition, pull the indicator/main beam lever towards the steering

wheel, push down and hold in this position.

Switch on the ignition and hold the lever in the above position until an audible

signal sounds (about 3 s).

Activating on vehicles without Infotainment

Turn off the ignition, pull the indicator/main beam lever towards the steering

wheel, push up and hold in this position.

Switch on the ignition and hold the lever in the above position until an audible

signal sounds (about 3 s)..

WARNING

Always switch on the low beam when the visibility is poor.

Turn signal and main beam

Fig. 55 

Operating lever: Turn signal and

main beam operation

Control stalk positions 

» Fig. 55

Switch on right turn signal
Switch on left turn signal
Switch on high beam

Switching off main beam / switching on headlamp flasher (spring-loaded

position)

The main beam can only be switched on when the low beam lights are on.
The headlight flasher can be used even if the ignition is switched off.
The turn signal switches off automatically, depending on the steering angle af-

ter completing the turn.

Comfort flashing

When the operating lever is pressed lightly up or down, the indicator in ques-

tion flashes three times.
If during the convenience turn signal, the operating lever is pressed in the op-

posite direction, the indicating will stop.
Comfort flashing can be activated / deactivated in the Infotainment menu 



→  → Light.



61

Lights and visibility

-------------------------------------------------------------------------------------------------------------------------------------------------------------

WARNING

Only turn on the main beam or the headlight flasher if other road users will

not be dazzled.

Automatic driving light control

Fig. 56 

Light switch: Position 

The light switch is in position  

» Fig. 56

 then depending on the equipment

the automatic switch on / off the lights corresponding to the light or weather

conditions (rain) takes place.
If the light switch is in position , the lettering 



 illuminates next to the

light switch. If the light is switched on automatically, the symbol 

 also illumi-

nates next to the light switch.

Automatic driving light control in the rain (hereafter referred to as function)

The dipped beam is switched on automatically if the following conditions are

met.

The parking aid is activated.
The light switch is in the position .
The windscreen wipers are on for more than 15 s.

The light turns off automatically about 4 minutes after turning off the wipers.

Setting, activation/deactivation

The following functions can be activated/deactivated in the Infotainment

menu 



 →  → Light.

Sensitivity adjustment of the sensor for determining the lighting conditions

for automatic driving light control

Automatic driving-light control during rain

WARNING

The automatic driving lamp control (position ) only operates as a sup-

port and does not release the driver from his responsibility to check the

lights and, if necessary, to switch on the light depending on the prevailing

light conditions.

CAUTION

Poorer visibility is detected by a sensor mounted below the windscreen in the

holder of the inside mirror or in the control panel. Do not cover the sensor -

the system can be affected.

Light Assist

Fig. 57  Installation location of the sensor / system on/off

The system automatically switches the high beam on/off in accordance with

the existing traffic (other vehicles) and environmental conditions (e.g. driving

through a lit village).
The high beam on/off is controlled by a sensor or a camera 

» Fig. 57

.

Activating / Deactivating the system takes place in the Infotainment menu



 →  → Light → Light Assist.

Conditions for the system function

The system is activated.
The light switch is in the position .
The vehicle speed is over 60 km/h or for some countries more than 40

km/h.
The windscreen is clean in the sensor area.

62

Operation

-------------------------------------------------------------------------------------------------------------------------------------------------------------

Switch on the system

Push the lever into the sprung position 

A


» Fig. 57

. The following indicator

light  lights up in the instrument cluster display.

Switch off the system

If the high beam is switched on automatically, move the lever into the sprung

position 

B

. The warning light  goes out. The high beam turns off.

If the high beam is is not switched on automatically, move the lever into the

sprung position 

A

. The warning light  goes out. The high beam turns on.

The high beam switches off automatically when the speed falls below 30 km/h

(but the system remains switched on).
If there is a fault, the error message will appear in the instrument cluster dis-

play. Seek help from a specialist garage.

WARNING

The system is used only for support, thus the driver is not released from his

obligation to manually adjust the main or low beam according to the given

ambient conditions (e.g. in unfavourable lighting and weather conditions, as

when passing poorly lit road users, if necessary, when the area in front of

the sensor is covered by an obstacle).

CAUTION

Do not cover the sensor and keep the front screen clean - system functionality

can be impaired.

Fog lights/rear fog light

Fig. 58 

Light switch - Switch front/rear

fog light

Switching on the fog lights / rear fog lights is possible if the following con-

ditions apply.

The lights switch is in position ,  or  

» Fig. 58

.

To switch on the fog lights, turn the light switch to position 

1

; the warning

light 

 illuminates in the instrument cluster.

To turn on the rear fog light, pull the light switch to position 

2

, the indicator

light 

 will light up in the instrument cluster.

If the vehicle is not fitted with fog lights, the rear fog light is switched on by

pulling out the light switch to the only possible setting.
The fog lights/rear fog light are switched off in the reverse order.

Note

If an accessory is connected to the trailer socket, the rear fog lamp does not

light up on the vehicle.

function CORNER

The CORNER function automatically switches on the fog lights on the respec-

tive side of the vehicle (e.g. when cornering or steering), if the following condi-

tions are fulfilled.

The turn signal is turned on or the front wheels are severely locked (in the

event of conflict between the two versions, has turn signal has the higher

priority).
The vehicle speed is below 40 km/h.
The low beam is switched on.
The fog lights are not switched on.

The two fog lights are switched on when you shift into the reverse gear.

COMING HOME / LEAVING HOME

The function COMING HOME ensures that the vehicle's environment is illumi-

nated after switching off the ignition and opening the driver's door.
The function LEAVING HOME ensures that the vehicle's environment is illumi-

nated after unlocking the vehicle with the radio remote control unit.
The function switches the light on only if there is poorer visibility and the light

switch is in the position .

The two functions can be activated/deactivated and adjusted in the Infotain-

ment menu 



 →  → Light.

63

Lights and visibility

-------------------------------------------------------------------------------------------------------------------------------------------------------------

CAUTION

Poorer visibility is detected by a sensor mounted below the windscreen in

the holder of the inside mirror or in the control panel. Do not cover the sensor

- the system can be affected.

If this option is always enabled, then the battery is heavily loaded.

Hazard warning light system

Fig. 59 

Button for hazard warning light

system

To switch on/off, press the 

 button 

» Fig. 59

.

When first switched on, the turn signal lights and the warning light 

 buttons

all flash at the same time as the warning lights 


 in the instrument cluster.

The hazard warning light system can also be operated if the ignition is switch-

ed off.
The hazard warning light system will switch on automatically if one of the air-

bags is deployed.
When the hazard warning system is on and the turn signal is switched on, the

hazard warning light system is switched off temporarily and only the turn sig-

nal flashes on the relevant side of the vehicle (applies with active comfort

flashing).

Parking light

The side light is provided for lighting of the parked vehicle.

Switching on the side light  on one side

Switch off the ignition.

Press the control lever all the way into position  or  until it stops 

» Fig. 55

on page 61.

The parking light is turned on, on the relevant side of the vehicle.

Switching on the parking lights on both sides 

Turn the ignition on and turn the light switch to position  

» page 60

.

Switch off the ignition and lock the vehicle.

After pulling out the ignition key and opening the driver's door, an audible

warning sounds. After a few seconds or after closing the driver's door, the au-

dible warning is turned off.

CAUTION

Turning on the parking light means the battery is heavily loaded.

The parking lights may switch off automatically due to a low battery charge.

If the two-sided parking lights are switched on when the ignition is off, the

parking lights will not switch on automatically!

Driving abroad

When driving in countries with opposing traffic system (traffic on the

left/right), the headlights may dazzle oncoming traffic.
Therefore, the LEDFront headlight setting must be adjusted by turning on

travel mode in infotainment in the menu 



 →  → light

Interior lighting

Introduction

The inner lighting also works if the ignition is switched off. With the ignition

off (or after a door is opened),the lights will automatically switch off after ap-

proximately 10 minutes.

64

Operation

-------------------------------------------------------------------------------------------------------------------------------------------------------------

Front interior lights

Fig. 60  Operation of the front light: Version 1/version 2

Positions of the sliding light switch 

A


» Fig. 60

Switching on
Switching off
Automatic operation

Switching on / off (by pressing the relevant switch 

B

) 

» Fig. 60

Reading lamp left
Reading lamp right

Automatic operation - position 

The system is turned on when any of the following is present.

The vehicle is unlocked.

One of the doors is opened.

The ignition key is removed.

The system is turned off when any of the following is present.

The vehicle is locked.

The ignition is switched on.

About 30 seconds after all the doors have been closed.

Rear interior lights

Fig. 61 

Interior lights at the rear

Operation (by moving the lens 

A

) 

» Fig. 61

Switching on
Automatic operation (the light is switched on/off automatically together

with the front light)
Switching off

LED storage compartment lighting

The LED lighting illuminates the storage compartment in the centre console.
The switching on of the lighting takes place automatically after opening the

door; switching off occurs automatically after the locking of the vehicle or 30

seconds after the closing of the door.
The brightness level of the lighting when the low beam or parking lights are

switched on can be adjusted in the Infotainment menu 



 →  → Ambient light-

ing.

Visibility

Introduction

WARNING

No objects should be attached to the sun visor that could restrict the view

or endanger the vehicle occupants during sudden braking or in a collision.

65

Lights and visibility

-------------------------------------------------------------------------------------------------------------------------------------------------------------

Rear window heater

Fig. 62 

Button for rear window heater

Read and observe   on page 65 first.

The heater for quick defrosting and ventilation of the rear window.
The heating only works when the engine is running.

To switch the heating on / off, press  button

» Fig. 62

.

When the heater is switched on, a lamp illuminates inside the button.

The heating automatically switches off after 10 minutes.

Note

If the on-board voltage decreases, the heating switches off automatically

» page 214

Automatic consumer shutdown - Discharge protection of the ve-

hicle battery.

Front sun visors

Fig. 63  Fold down visor / flip up visor / make-up mirror and parking per-

mit holder

Read and observe   on page 65 first.

Operation and description of the sun visor 

» Fig. 63

Swivel cover towards the windscreen
Swivel cover towards the door
Make-up mirror with cover (the cover can be pushed in the direction of

the arrow)
Ticket holder

Sunshade of the panoramic roof

Fig. 64 

Open sun screen

Read and observe   on page 65 first.

The sunshade of the panoramic roof can be opened manually in the direction

of arrow or closed in the opposite direction of the arrow 

» Fig. 64

.

WARNING

When operating the sun blind, proceed with caution to avoid causing

crushing injuries – risk of injury!

Windscreen wipers and washers

Introduction

The windscreen wipers and the wash system operate if the ignition is switched

on and the bonnet and boot are closed.

1

2

A

B

66

Operation

-------------------------------------------------------------------------------------------------------------------------------------------------------------

WARNING

Do not use the windscreen washer system at low temperatures without

heating the windscreen beforehand. The window washer fluid could other-

wise freeze on the windscreen and restrict the view to the front.

CAUTION

If the windscreen wipers are in rest position, they cannot be folded out from

the windscreen. The wipers must be set to the service position to raise them

off the windscreen 

» page 233

.

In cold temperatures and during the winter, check before switching on the

ignition that the wiper blades are not frozen to the windscreen. If the wind-

screen wipers are switched on when the blades are frozen to the windscreen,

this may damage both the blades and windscreen wiper motor.

Carefully separate frozen windscreen wiper blades from the windscreen and

free from snow and ice.

Handle the windscreen wipers with care - there is a risk of damage to the

windscreen by the windscreen wiper arms.

Do not switch on the ignition when the wiper arm is raised from the wind-

screen - there is a risk of damage to the bonnet by the wiper arms.

Note

Depending on vehicle equipment, the windscreen washer jets can be heated

automatically after starting the engine.

Front wipers and washers

Fig. 65 

Operating the front windscreen

wipers and washer system

Read and observe   and   on page 67 first.

High-speed wiping

Slow-speed wiping





Depending on equipment fitted:

Intermittent wiping

Automatic windscreen wiping in the rain

Wipers and washers off
Single wipe of the windscreen (spring-loaded position)

 Setting of windscreen wiper interval for the position  - by setting the

switch in the direction of the arrow, the windscreen wipers will wipe more

often
Spraying and wiping the screen (spring-loaded position) – after releasing

the operating lever the wipers continue for another 1 to 3 strokes

Automatic windscreen wiping during rain can be activated/deactivated in

the Infotainment menu 



 →  → Mirrors and wipers.

WARNING

Automatic wiping during rain is only a support. The driver is still responsible

for setting the function of the windscreen wipers manually depending on

the visibility conditions.

Note

If the wiping is carried out without interruption, the wiping speed varies de-

pending on the vehicle speed.







A

67

Lights and visibility

-------------------------------------------------------------------------------------------------------------------------------------------------------------

Rear wipers and washer

Fig. 66 

Operating the windscreen wip-

ers and washing system

Read and observe   and   on page 67 first.

Spraying and wiping the windscreen (sprung position) - after releasing the

control stalk, the wipers perform another 2 to 3 wiper strokes
Rear screen wiping
Wipers and washers off

The rear window is wiped once automatically if the windscreen wipers are on

when reverse gear is selected. The function can be activated / deactivated in

the Infotainment menu 



 →  → Mirrors and wipers.

Headlight cleaning system

Read and observe   and   on page 67 first.

Headlights are cleaned under the following conditions.

The low beam is switched on.
The outside temperature is about -11° C to +36° C.

To clean the headlights, the headlamp is also sprayed after spraying the wind-

screen every first and tenth time. Setting the spray interval can be carried out

by a specialist garage.
To ensure the correct functioning of the system, even in winter, this needs to

be regularly cleared of snow and ice (e.g. using the de-icing spray).



Rear view mirror

Introduction

WARNING

Exterior mirrors increase the field of view, however, they make objects ap-

pear smaller and further away. Therefore, use the interior mirror whenever

possible for assessing the distances to the vehicles following behind.

WARNING

The mirrors with automatic dimming contain electrolyte fluid which may

leak if the mirror glass is broken - this can irritate skin, eyes and the respira-

tory system.

If your eyes or skin come into contact with the electrolytic fluid, immedi-

ately wash the affected area for several minutes plenty of water. If neces-

sary get medical assistance.

Interior mirror dimming

Fig. 67  Interior rear-view mirror: with manual dimming/auto-darkening

Read and observe   on page 68 first.

Mirrors with manual dimming 

» Fig. 67

Basic mirror position (not darkened)
Mirror dimming

Mirror with automatic dimming

The mirror dimming 

» Fig. 67

 is automatically controlled after the engine start.

1

2

68

Operation

-------------------------------------------------------------------------------------------------------------------------------------------------------------

When the interior lights are switched on or the reverse gear is engaged, the

mirror moves back into the basic position (not dimmed).

WARNING

Attach external devices (e.g. navigation system) not in the vicinity of the

mirror with automatic dimming. The illuminated display of an external de-

vice can affect the function of the rear-view mirror - it could cause an acci-

dent.

The automatic dimming mirror only functions smoothly if the light falling

on the sensors is not compromised (e.g. by the sunshade at the back). The

sensors are located on the front and back of the mirror.

Exterior mirrors

Fig. 68 

Exterior mirror operation

Read and observe   on page 68 first.

To adjust the mirror surface, move the knob in the direction of arrows

» Fig. 68

.

If the electrical mirror setting fails at any time, the mirrors can be adjusted by

hand by carefully pressing on the edge of the mirror surface.

The knob for the electrically adjustable mirrors can be moved to the following

positions 

» Fig. 68

.

Adjust the left-hand exterior mirror
Switch off mirror control
Adjust the right-hand exterior mirror
Exterior mirror heater (only operates when the engine is running)

Folding in the exterior mirrors

The mirror can be manually folded in towards the side window. To restore it to

its original position, fold back from the side window until it audibly clicks into

place.

WARNING

Do not touch the exterior mirror surfaces if the exterior mirror heater is

switched on - risk of burns.

69

Lights and visibility

-------------------------------------------------------------------------------------------------------------------------------------------------------------

Seats and head restraints

Front seats

Introduction

WARNING

Only adjust the driver's seat when the vehicle is stationary – otherwise

risk of accident!

Caution when adjusting the seat! You may suffer crushing injuries as a re-

sult of adjusting the seat without paying proper attention.

Adjusting the front seats

Fig. 69 

Control elements on the seat

Read and observe   on page 70 first.

Adjusting the seat in the longitudinal direction (after releasing, the control

lever must lock audibly)
Adjusting the seat height
Adjusting the tilt of the backrest (do not lean on the backrest when adjust-

ing)

Note

After a certain time, play can develop within the adjustment mechanism for

the backrest angle.

A

B
C

Armrest setting

Fig. 70 

Adjusting the armrest

Read and observe   on page 70 first.

To adjust the height, lift the armrest in the direction of the arrow 

A

 into one

of the locking positions 

» Fig. 70

.

To close, lift the armrest in the direction of arrow 

A

 past the stop and then

fold down again.

Rear seats

Seat backrests

Fig. 71  Fold seat backrest forwards / standby position of the seat belt

Before folding the seat backrests forwards, adjust the position of the front

seats in such a way that they are not damaged by the seat backrests. Remove

the rear headrests if required 

» page 72

.

Folding forward

Push the headrest into the seat backrest up to the latch.

Pull the outer seat belt to the side panel in the direction of arrow 

1


» Fig. 71

.

70

Operation

-------------------------------------------------------------------------------------------------------------------------------------------------------------

Push the release lever 

A

 in the direction of arrow 

2

 and fold down the seat

backrest in the direction of arrow 

3

.

Withthe undivided backrest, the two external security belts must be pulled to-

wards the side panel and the release handles 

A

 to press on both sides of the

backrest simultaneously.

Folding backwards

Pull the outer seat belt to the side panel in the direction of arrow 

1


» Fig. 71

.

Raise the seat backrest against the direction of arrow 

3

 until the release

handle 

A

 audibly locks. Check this by pulling on the seat backrest.

Make sure that the red pin 

B

 is hidden.

In the undivided seat back, pull the two outer belts to the side panel. After

folding back the backrest, the release handles 

A

 should audibly click into

place on both sides of the backrest and the red mark 

B

 should not be visible

on either side of the backrest.

WARNING

The seat backs in occupied rear seats must be properly engaged.

When transporting objects in the luggage compartment that has been en-

larged by folding the backrest forward, ensure the safety of the passengers

transported on the other rear seats.

The seat backrests must be securely latched in position so that no objects

from the luggage compartment can slip into the passenger compartment

under sudden braking – risk of injury.

CAUTION

When moving the seat backrest the seat belts should not be trapped - there is

a risk of damage to the seat belts.

Note

The belt tongue of the outer seat belts 

C

 can be inserted into the side panel.

Ready position

» Fig. 71

.

Rear seat

Applies to the Fabia Estate

Fig. 72  Fold rear seat forward / remove split rear bench seat

Fig. 73 

Fold the rear seat back

The luggage space can be increased by folding the rear seat forward and re-

moving it.
For vehicles with split rear seats, the parts of the rear seat can be folded for-

ward individually and removed.

To fold, pull up the bench in the direction of arrow 

1

 and fold down in arrow

direction 

2


» Fig. 72

.

To Remove, press the wire clamps in the direction of arrows 

3

 so that they

become detached from the holders, and remove the seat.

To use, press the wire clamps in the direction of arrows 

3

 and insert it into

the brackets.

To open, lift the armrest in the direction of arrow 

4


» Fig. 73

.

Place the rear seat on the eyelets 

A

, so that the eyelets 

A

 click into the re-

cesses in the plastic caps for  

B

 .

71

Seats and head restraints

-------------------------------------------------------------------------------------------------------------------------------------------------------------

WARNING

The rear seat may not be pulled in under the eyelets 

A

 when folding back.

The rear seat could not be properly secured.

CAUTION

The rear seat must not be pulled in under the eyelets 

A

 when being folded

back - there is a risk of damaging the rear seat.

Headrests

Introduction

Note

The middle rear headrest is only adjustable in two positions.

In sports seats, the headrests are integrated into the seat backrests and can-

not be adjusted in height.

Adjusting the height

Fig. 74  Setting the height of the back headrest

Height adjustment of the headrests is the same in the front and rear.

Grasp the headrest and move upwards in the direction of arrow 

1


» Fig. 74

.

To move the headrest down, press the securing button 

A

 in the direction of

arrow 

2

 and hold it down while pressing the headrest in the direction of ar-

row 

3

.

CAUTION

If the tablet holder adapter is secured to the guide rods of the front headrests

» page 80

, do not push the headrests down to the stop – risk of damaging the

headrests.

Removing/inserting

Fig. 75  Removing/instaling the headrest

The removal and installation of headrests is the same in the front and rear.

Before removing/installingthe headrests, fold the corresponding seat back-

rest slightly forward 

» page 70

.

To remove the headrest, pull it out of the seat backrestup to the latch.

Press locking button 

A

 in the direction of arrow 

1,

 and pull out the head

restraint in the direction of arrow 

2


» Fig. 75

.

To insert the headrest, push the headrest into the seat backrest in the direc-

tion of arrow 

3

 until the locking button clicks into place.

Front seat heater

Fig. 76 

Buttons for front seat heater

The seat backrests and seats can be heated electrically.

72

Operation

-------------------------------------------------------------------------------------------------------------------------------------------------------------

Buttons for the seat heating 

» Fig. 76

Left seat heating
Right seat heating

To turn onthe heater at maximum heat (level 2) press button  or .

By repeatedly pressing the button, the heat is turned down until it is complete-

ly switched off. The level of the seat heating is indicated by the number of illu-

minated warning lights in the switch.
The seat heating only operates when the engine is running.

WARNING

If you are sensitive to pain and/or temperature, e.g. through medication, pa-

ralysis or because of chronic illness (e.g. diabetes), we recommend not to

use the seat heating. If the seat heater is used, we recommend to make

regular breaks in your journey when driving long distances, so that the body

can recuperate from the stress of the journey. Please consult your doctor,

who can evaluate your specific condition.

CAUTION

The following instructions must be observed to avoid damage to the seats.

Do not kneel on the seats or otherwise apply concentrated pressure to them.

Do not switch on the heating for unoccupied seats.

Do not switch on the heating for seats which have objects on them (e.g. a

child seat, bag or similar).

Do not switch on the heating for seats which have seat covers or protective

covers on them.

Note

If the heaters for the rear seats are set to their highest intensity (level 2),

they are automatically switched down to level 1 after 10 minutes.

If the on-board voltage decreases, the seat heating switches off automatical-

ly 

» page 214

Automatic consumer shutdown - Discharge protection of the

vehicle battery.

Useful features

Passenger compartment features

Introduction

WARNING

Do not place anything on the dash panel. These objects might slide or fall

down when driving and may distract you from concentrating on the traffic

– risk of accident!

Make sure that while driving no objects can enter the driver's footwell -

they could cause an accident!

Do not transport any objects on the front passenger seat other than ob-

jects intended for this purpose (e.g. child safety seat) – risk of accident.

No objects should be placed in the storage compartments nor in the

drinks holders; the vehicle occupants could be endangered if there is sud-

den braking or the vehicle collides with something.

For safety reasons, lockable storage compartments should be closed

while driving - there is a risk of injury from the opened lid or through the

loose objects in the compartment.

Make sure no objects protrude from the storage compartments - There is

a risk of injury!

Do not exceed the permissible loads for the storage compartments and

pockets - risk of injury and risk of damage to the compartments and pock-

ets!

Ash, cigarettes, cigars etc. should only be stored in the ashtray - danger

of fire/burns!

The storage compartments, multimedia holder and waste container are

not a substitute for the ashtray and must not be used for such purposes –

risk of fire!

CAUTION

Do not place any large or sharp objects in the storage compartments and

pockets - there is a risk of damage to the compartments and pockets.

73

Useful features

-------------------------------------------------------------------------------------------------------------------------------------------------------------

Ticket holder

Fig. 77 

Ticket holder

Read and observe   and   on page 73 first.

The ticket holder is provided for the attachment of e.g. parking tickets.

Storage compartments in the doors

Fig. 78  Storage compartments: in the front door/in the rear door

Read and observe   and   on page 73 first.

Storage compartments 

» Fig. 78

Storage compartment
Bottle holder with a capacity of max. 1.5 l
Bottle holder with a capacity of max. 0.5 l

The reflective vest can be stowed in the storage compartments in the door

» page 221

.

A
B
C

WARNING

Storage compartment 

A


» Fig. 78

 is to be used exclusively for storing ob-

jects which do not stick out – danger of restricting the effectiveness of the

side airbags.

Storage compartment in the front centre console

Fig. 79 

Storage compartment

Read and observe   and   on page 73 first.

The open storage compartment is in the front of the centre console 

» Fig. 79

.

USB inputs

Fig. 80  Front USB input/rear USB inputs

Read and observe   and   on page 73 first.

The USB input is above the storage compartment in the front centre console

and, depending on the equipment, also in the rear centre console 

» Fig. 80

.

74

Operation

-------------------------------------------------------------------------------------------------------------------------------------------------------------

The USB input in the front centre console can be used for charging and for da-

ta transmission. The USB inputs in the rear centre console can be used only for

charging.
Information for use 

» page 122

USB input.

Coin and card holders

Fig. 81 

Coin and card holders

Read and observe   and   on page 73 first.

The coin holder 

A

 and card holder 

B

 are located in the front centre console

» Fig. 81

.

Storage compartment in the dashboard

Fig. 82 

Storage compartment

Read and observe   and   on page 73 first.

The storage compartment is located in the middle part of the panel 

» Fig. 82

.

Cup holders

Fig. 83 

Cup holder

Read and observe   and   on page 73 first.

Two beverage containers can be placed into the cup holder 

» Fig. 83

.

WARNING

Do not use cups or beakers made of brittle material (e.g. glass, porcelain).

This could lead to injuries in the event of an accident.

Never put hot beverage containers in the cup holder. They may spill as

the vehicle moves – there is a risk of scalding.

CAUTION

Do not leave open beverage containers in the cup holder during the journey.

There is a risk of spilling e.g. when braking which may cause damage to the

electrical components or seat upholstery.

Waste container

Fig. 84  Waste container: inserting and moving/opening

75

Useful features

-------------------------------------------------------------------------------------------------------------------------------------------------------------


Content      ..     2      3      4      5     ..