Renault Scenic 3 Chassis. Manual - part 7


  Index      Renault     Renault Scenic 3 Chassis - Manual


Search            


Content   ..  5  6  7  8   ..


Renault Scenic 3 Chassis. Manual - part 7


31A

-

4

FRONT AXLE ASSEMBLIES

Brake calliper

31A

When replacing brake pads or a disc, be sure to re-
place the pads or disc on the opposite side.

REMOVAL

Mount the vehicle on a two post lift.

Fit the pedal press tool to the brake pedal to restrict
the outflow of brake fluid.

Unlock the steering wheel.

Remove the front wheels.

Undo the brake hose from the brake calliper.
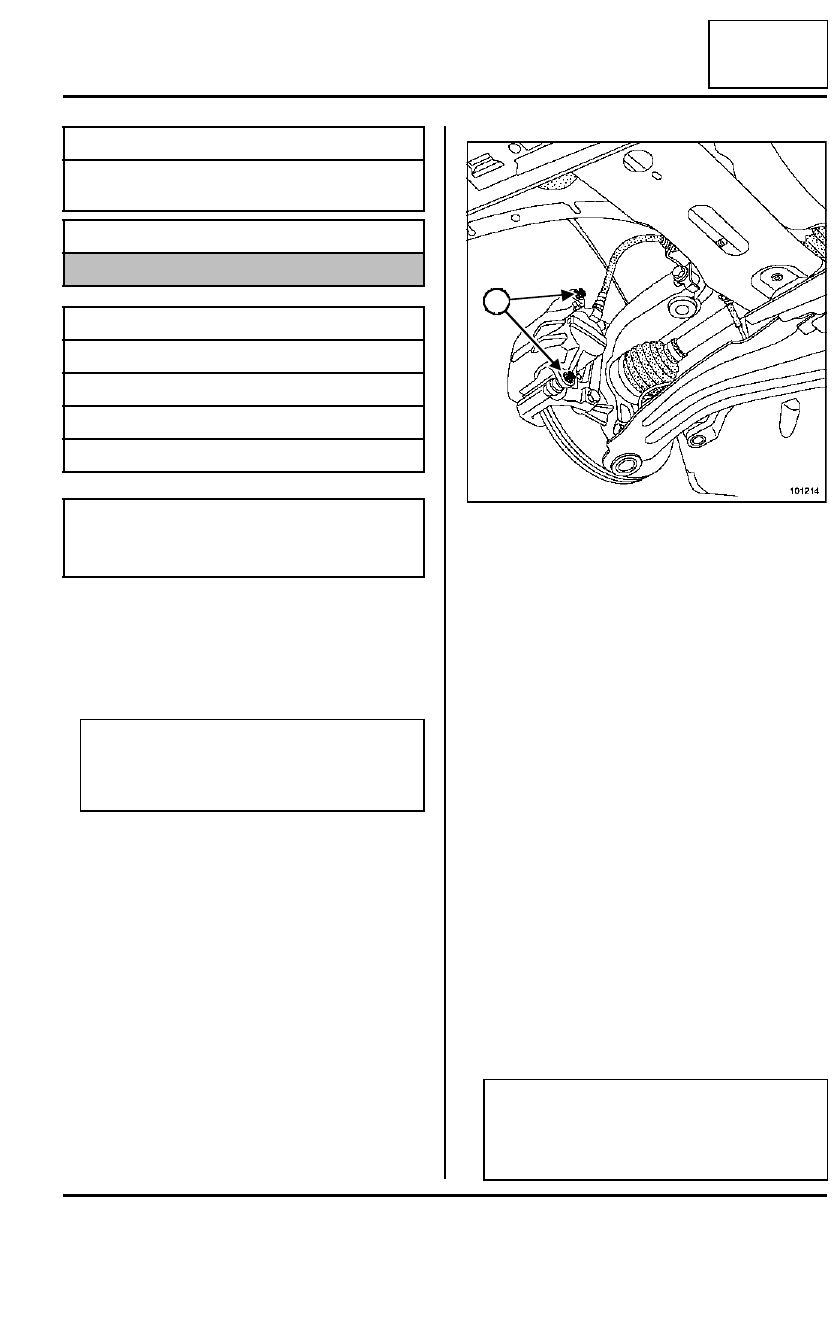
Remove:

- the two guide pin bolts (1),

- the brake calliper,

- the brake pads,

Check the condition of the braking components (re-
place faulty parts).

Clean the calliper supports and callipers.

REFITTING

Push the piston back using tool (Fre. 1190-01) until
it is at the end of its bore.

Fit the pads, starting with the inside.

Refit:

- the calliper,

- the guide pin bolt.

Torque tighten:

- the guide pin bolts (3.2 daNm),

- the brake hose (1.7 daNm).

Special tooling required

Fre. 1190-01

Tool for pushing calli-
per pistons back

Equipment required

pedal press

Tightening torques

m

guide pin bolts

3.2 daNm

brake hose

1.7 daNm

bleed screw

0.65 daNm

wheel bolts

13 daNm

Note:

The callipers supplied as replacement parts are
pre-filled.

WARNING

Prepare for brake fluid outflow,  to  prevent
damage to the mechanical parts and bodywork
around the braking system.

101214

WARNING

- Mount the brake hose and wheel speed sensor

wiring, if they have been unclipped.

- Do not twist the brake hose.

1

31A

-

5

FRONT AXLE ASSEMBLIES

Brake calliper

31A

Refit the wheels.

Torque tighten:

- the bleed screw (0.65 daNm),

- the wheel bolts (13 daNm).

Bleed the brake circuit partially if the compensation
reservoir is not completely emptied during the proce-
dure. Otherwise, carry out a full bleed ( General Ve-
hicle Information
Section).

Check the brake fluid level.

31A

-

6

FRONT AXLE ASSEMBLIES

Brake calliper mount

31A

When replacing brake pads or a disc, it is essential
to change the pads or disc on the opposite side.

REMOVAL

Mount the vehicle on a two post lift.

Remove the front wheels.

Remove the guide pin bolts (1).

Suspend the brake calliper from the suspension
spring.

Remove:

- the brake pads,

- the two calliper support mounting bolts (2),

- the calliper support.

Check the condition of the braking components (re-
place faulty parts).

Clean the calliper supports and callipers.

REFITTING

Push back the piston using tool (Fre. 1190-01) until
it is at the end of its housing.

The calliper support bolts and the guide pin bolts
must be coated with FRENBLOC or similar product
before being fitted.

Refit:

- the calliper support,

- the calliper support mounting bolts.

Torque tighten the calliper support bolts  (10.5
daNm)
.

Fit the pads, starting with the inside.

Refit:

- the calliper,

- the guide pin bolts.

Check the brake fluid level.

Torque tighten the guide pin bolts (3.2 daNm).

Refit the wheels.

Torque tighten the wheel bolts (13 daNm).

Check the brake fluid level.

Special tooling required

Fre. 1190-01

Tool for pushing calli-
per pistons back

Tightening torques

m

calliper suppor t bolts

10.5 daNm

guide pin bolts

3.2 daNm

wheel bolts

13 daNm

101215

2

1

WARNING

- Mount the brake hose and wheel speed sensor

wiring if they have been unclipped.

- Do not twist the brake hose.

IMPORTANT

Depress the brake pedal several times to bring
the pistons, the brake pads and discs into con-
tact.

31A

-

7

FRONT AXLE ASSEMBLIES

Brake discs

31A

REMOVAL

Brake discs are not regrindable. If there is excessive
scoring or wear, they will need to be replaced.

When replacing a brake disc, be sure to replace the
disc on the opposite side.

Be sure to replace the brake pads if the brake discs
are being replaced.

Mount the vehicle on a two post lift.

Unlock the steering wheel.

Remove the front wheels.

Remove both calliper support bolts (1).

Suspend the calliper / calliper support assembly.

Remove

- the calliper support,

- the two disc mounting bolts (2),

- the disc.

REFITTING

Clean the calliper supports and callipers.

Proceed in the reverse order to removal. 

Torque tighten:

- the disc mounting bolts  (1.5 daNm),

- the calliper support bolts  (10.5 daNm).

The calliper support bolts must be coated with
FRENBLOC or similar product before they are fitted.

Refit the wheels.

Torque tighten the wheel bolts (13 daNm).

Tightening torques

m

disc mounting bolts 

1.5 daNm

calliper suppor t bolts 

10.5 daNm

wheel bolts

13 daNm

101215

1

101212

WARNING

- Mount the hose and wheel speed sensor wiring,

if they were unclipped.

- Do not twist the brake hose. 

2


Content   ..  5  6  7  8   ..