Peugeot 406 C (2004 year). Instruction - part 8

32
MAINTENANCE OF YOUR 406 COUPE
CHANGING A WHEEL
Tools
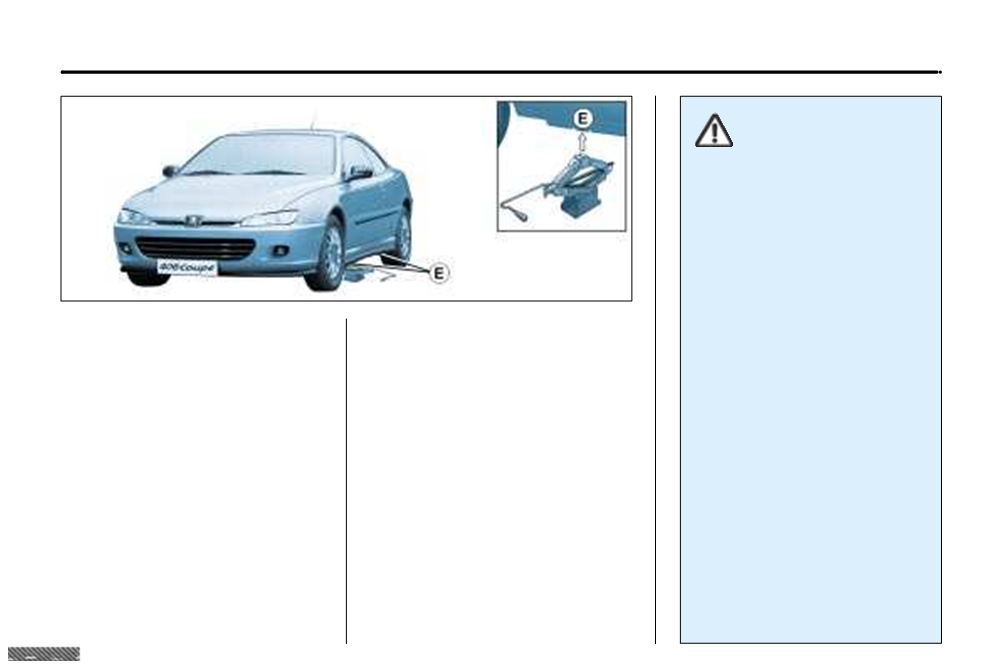
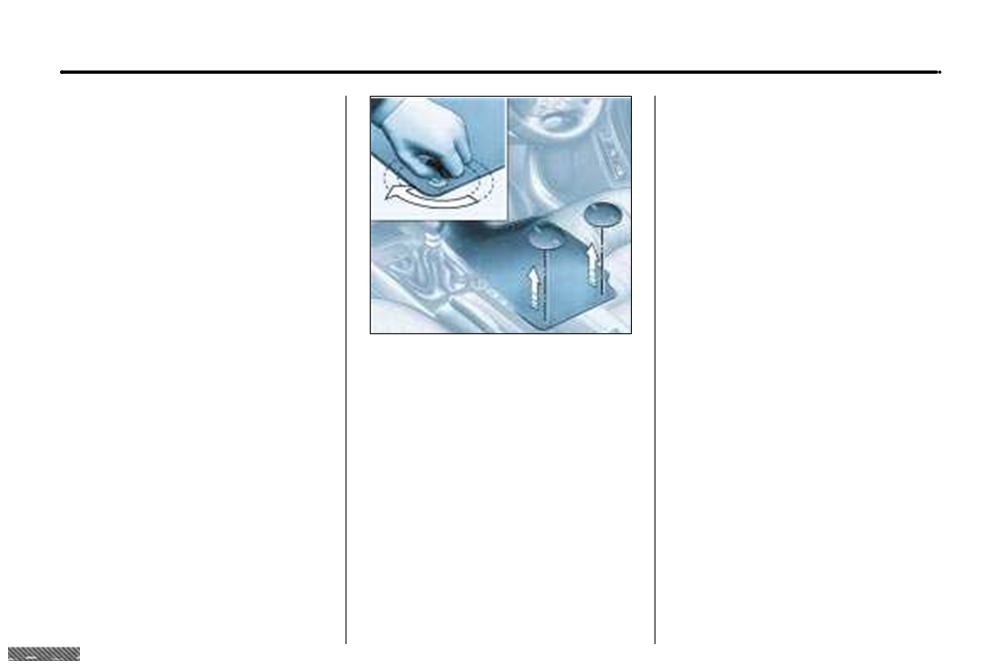
Removal
Access to the spare wheel and
1 - Wheel brace.
- Park the vehicle on level, stable
jack
and non-slippery ground.
2 - Centralising tool.
- Apply the handbrake, engage first
Lift the boot carpet using the lifting
3 - Trim remover/wheel brace
or reverse gear (position P for the
hook. Secure the hook behind the
extension.
automatic gearbox).
boot seal.
4 - Jack.
- Remove the chrome trims using
5 - Removable towing eye.
the tool
6
(see the paragraph in
this chapter entitled 'Special fea-
6 - Chrome trim tool.
tures of alloy wheels').
The tool holder supports the boot
Note: when the vehicle is delivered,
floor. Reposition it to prevent any
the anti-theft sockets are in the glove
deformation of the floor when
box.
loaded.
- Loosen the wheel bolts.
Tighten the spare wheel securing
strap to prevent noise and for your
safety in the event of a frontal
impact.
02-02-2004
33
MAINTENANCE OF YOUR 406 COUPE
For your safety, always
change the wheel:
- on level, stable, non-slippery
ground,
- with the handbrake applied,
- with first or reverse gear
engaged
(position P for the
automatic gearbox).
- never go underneath a vehicle
which is supported only by a
jack (use a ramp).
- The jack is fitted with a system
Fitting a wheel
which enables it to be folded or
After changing the wheel
- Position the wheel using the cen-
unfolded rapidly. Take the jack
tralising tool to assist you.
- have the tightening of the bolts
from the toolkit and close it by
and the tyre pressure checked
pressing the ends A. Place the
- Tighten the bolts by hand, and
by a PEUGEOT dealer as soon
jack at one of the four locations E
remove the centralising tool.
as possible,
underneath the vehicle, as close
- Partly tighten the bolts using the
as possible to the wheel to be
- have the punctured tyre
wheelbrace.
changed. Unfold it by pulling the
repaired and refit it to the vehi-
ends A.
- Fold the jack and remove it.
cle as soon as possible.
- Extend the jack using the wheel-
- Fully tighten the wheel bolts using
brace 1 and the extension 3.
the wheelbrace.
- Take out a wheel bolt at the top
- Replace the centre trim by pres-
and fit the centralising tool 2.
sing it with the palm of your hand.
- Loosen the wheel bolts and
remove the wheel.
02-02-2004

34
MAINTENANCE OF YOUR 406 COUPE
Special features of alloy
Fitting the spare wheel
Anti-theft bolts*
wheels
If your vehicle is fitted with a steel
If your wheels are fitted with an anti-
spare wheel, when fitting it, it is
theft bolt (one per wheel), the chrome
Bolt covers
normal when tightening the bolts to
trim and then the plastic cover must
Alloy wheel bolts are covered by
notice that the washers do not come
be removed using tool
6, before
chrome trims.
into contact with the rim. The spare
unscrewing the bolt using one of the
wheel is secured by the cone shape
two anti-theft sockets
(which were
Use tool 6 to remove the trims before
of each bolt.
given to you on delivery of your vehi-
slackening the bolts.
cle along with the duplicate keys and
the confidential card) and the wheel
brace 1.
Fitting snow tyres
If you fit snow tyres mounted on steel
Note: make a careful note of the code
wheels onto your vehicle, it is
number engraved on the head of the
essential to use special bolts avail-
anti-theft socket. This will enable you
able from your PEUGEOT dealer.
to obtain duplicate anti-theft sockets
from a PEUGEOT dealer.
* According to model or destination.
02-02-2004

35
MAINTENANCE OF YOUR 406 COUPE
CHANGING A BULB
Direction indicator repeater
(WY 5 W)
1 - Dipped beam headlamps
- Pull the rear section of the trans-
2 - Main beam headlamps
parent cover and release the
Two bulbs (H7-55 W).
assembly.
- Remove the red plastic cover.
- Turn the connector a quarter turn
- Press the tab and remove the protective cover corresponding to the faulty bulb.
and remove it.
- Disconnect the connector.
- Change the bulb.
- Press the end of the securing clip to remove it. Change the bulb.
- When fitting, ensure that the direction notches are positioned correctly and that
the securing clip is corrrectly fixed.
Amber bulbs must be
- Reconnect the connector.
replaced by bulbs of iden-
- Replace the protective cover.
tical specification and
colour.
3 - Side lights (W 5 W)
Turn the socket using the lever and remove it. Change the bulb.
In certain climatic conditions (low
temperatures, humidity), the
4 - Direction indicators (PY 21 W)
presence of condensation on
Turn the bulb holder a quarter turn and remove it. Change the bulb.
the inside of the headlamp
glass is normal
; it disappears a
Notes: only handle H7 bulbs using a dry cloth.
few minutes after the lights switch
To replace the left-hand bulbs, remove the battery protective cover.
on.
02-02-2004

36
MAINTENANCE OF YOUR 406 COUPE
Rear lights
Number plate lights (W 5 W)
1 - Direction indicators (P 21 W).
Remove the translucent protector.
2 - Reversing lights (P 21 W).
Change the faulty bulb.
3 - Brake lights/Side lights (P 21/5 W).
4 - Side lights (P 21/5 W).
5 - Fog lamp (P 21 W).
These 5 bulbs are changed from inside the boot:
- remove the retaining clips then release the carpet,
- remove the connector by pressing the tab A,
- remove the bulb holder by squeezing the tabs,
- change the faulty bulb.
02-02-2004

37
MAINTENANCE OF YOUR 406 COUPE
Removing and changing a fuse
Before changing a fuse you must find out the cause of the fault and have it put
right. The fuse numbers are indicated on the fuse box.
Use the special pliers A attached to the box.
Always change a faulty fuse for one of the same rating.
Correct
Incorrect
Pliers A
CHANGING A FUSE
Fuse no.
Rating
Functions
The fuse boxes are under the fascia
and in the engine compartment.
A
20 A
Locking/Unlocking.
B
10 A
Rear fog lamps.
Fascia fuse box
C
40 A
Demisting the mirrors.
Turn the three screws a quarter turn
with a coin. Pull at A and tilt the
D
-
Not used.
cover to access the fuses.
E
30 A
Electric windows.
F
15 A
Supply to instrument panel -
Display - Audio equipment -
Satellite navigation system -
Air conditioning.
Remove the fascia lower trim to access the Built-in Systems Interface.
02-02-2004
40
MAINTENANCE OF YOUR 406 COUPE
Engine compartment fuses
The electrical system of
Fuse box
your vehicle is designed
to operate with standard
To access the fuse box in the engine
or optional equipment.
compartment
(beside the battery),
Before installing other electrical
unclip the cover.
equipment or accessories on your
Carefully close the cover when
vehicle, contact a PEUGEOT
you have finished.
dealer.
Some electrical accessories or the
way in which they are fitted can
have damaging effects on the
operation of your vehicle; the
electronic control circuits, the
audio circuit and the battery
Fuse N°
Rating
Functions
charging circuit.
PEUGEOT will not accept respon-
1*
10 A
Reversing lights - Double injection relay - Engine oil
sibility for the cost incurred in
temperature - Oil level - Air conditioning compressor.
repairing your vehicle or for recti-
fying malfunctions resulting from
2*
15 A
Fuel pump - Canister solenoid valve.
the installation of accessories not
supplied and not recommended
3*
10 A
Control unit.
by PEUGEOT and not installed in
accordance with its instructions, in
4*
10 A
Engine control unit and automatic gearbox.
particular where the equipment in
question consumes more than
5
10 A
Particulate Emission Filter control unit.
10 milliamperes.
6
15 A
Front fog lamps.
7
20 A
Headlamp wash.
8*
20 A
Direct petrol injection engine control unit -
Clutch pedal.
9*
15 A
Left-hand dipped beam.
10*
15 A
Right-hand dipped beam.
02-02-2004

41
MAINTENANCE OF YOUR 406 COUPE
Fuse N°
Rating
Functions
11*
10 A
Left-hand main beam.
12*
10 A
Right-hand main beam.
13*
15 A
Horn.
14
10 A
Front screenwash pump.
15*
30 A
Ignition coil - Windscreen wiper - Oxygen sensor - Oil pressure - Injection system.
16*
30 A
Air pump and oil temperature - Oil level - Brake lights operation - Alternator -
Water in diesel detector - Injection relay control.
17*
30 A
Passenger electric seat.
18
40 A
Heater blower - Starter - Windscreen wiper slow speed.
* The maxi-fuses provide additional protection for the electrical systems. All work must be carried out by a
PEUGEOT dealer.
02-02-2004

37
MAINTENANCE OF YOUR 406 COUPE
Removing and changing a fuse
Before changing a fuse you must find out the cause of the fault and have it put
right. The fuse numbers are indicated on the fuse box.
Use the special pliers A attached to the box.
Always change a faulty fuse for one of the same rating.
Correct
Incorrect
Pliers A
CHANGING A FUSE
Fuse no.
Rating
Functions
The fuse boxes are under the fascia
and in the engine compartment.
A
20 A
Locking/Unlocking.
B
10 A
Rear fog lamps.
Fascia fuse box
C
40 A
Demisting the mirrors.
Turn the three screws a quarter turn
with a coin. Pull at A and tilt the
D
-
Not used.
cover to access the fuses.
E
30 A
Electric windows.
F
15 A
Supply to instrument panel -
Display - Audio equipment -
Satellite navigation system -
Air conditioning.
Remove the fascia lower trim to access the Built-in Systems Interface.
02-02-2004

38
MAINTENANCE OF YOUR 406 COUPE
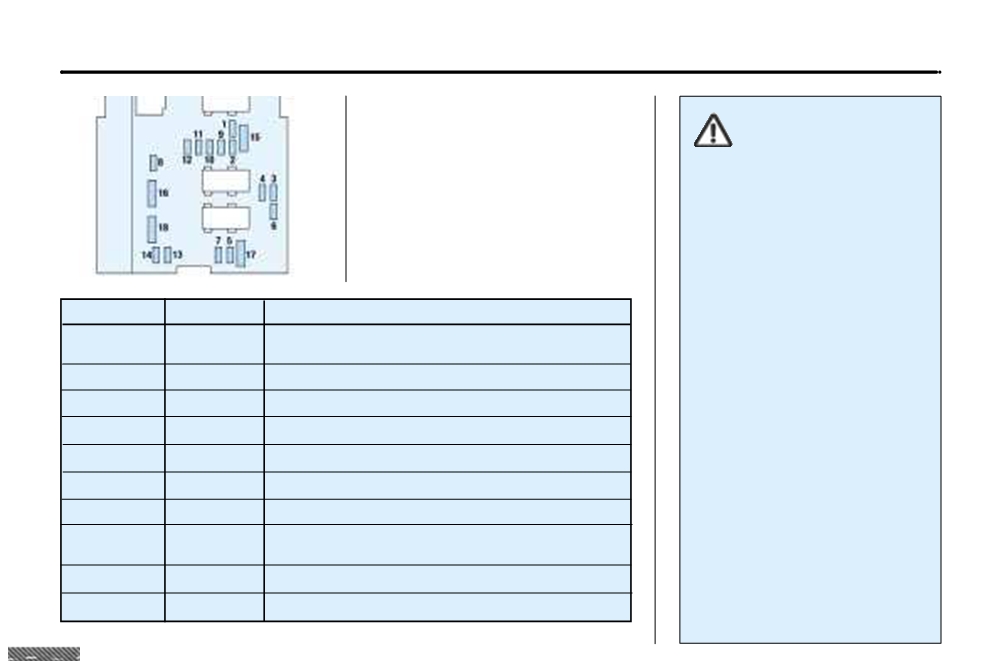
Fascia panel fuse box
Fuse N°
Rating
Functions
1
shunt
Central air bag.
2
5 A
Ventilation controls.
3
10 A
Instrument panel.
4
5 A
Ignition +ve signal for Built-in Systems Interface.
5
-
Not used.
6
10 A
Steering wheel controls.
7
15 A
Alarm siren.
8
10 A
Satellite navigation system.
9
5 A
Battery +ve signal for Built-in Systems Interface.
10
15 A
Audio equipment.
11
10 A
Third brake light.
12
10 A
Right-hand brake light.
13
20 A
Driver's one-touch electric window.
14
30 A
Passenger's one-touch electric window.
15
-
Battery +ve towing socket.
16
20 A
Seat memorisation.
17
20 A
Passenger's electric seat.
18
10 A
Lighting for lighter - Display - Lighting for switches and ash tray -
Automatic gearbox programme selector lever.
02-02-2004

39
MAINTENANCE OF YOUR 406 COUPE
Fuse N°
Rating
Functions
19
10 A
Rear fog lamps.
20
10 A
Rear right and front left side light.
21
10 A
Rear left and front right side light.
22
10 A
Lighting for glove box - Map reading light - Courtesy mirror - Front and rear courtesy
lights - Lighting for electric window control pad and electrochrome rear view mirror.
23
20 A
Lighter.
24
-
Not used.
25
20 A
Audio equipment.
26
-
Not used.
27
5 A
Accessories +ve.
28
15 A
Heated seats.
R
5 A
Replacement fuse.
R2
10 A
Replacement fuse.
R3
30 A
Replacement fuse.
R4
20 A
Replacement fuse.
R5
15 A
Replacement fuse.
02-02-2004

42
MAINTENANCE OF YOUR 406 COUPE
BATTERY
Economy mode
To charge the battery using a battery charger:
With the engine switched off and the
ignition key in the "running" or
- Disconnect the battery,
"accessories" position for about half
- Follow the instructions for use given by the battery charger manufacturer,
an hour, certain electrical equipment
- Reconnect starting with the negative (-) terminal,
(displays, instrument panel, warning
lights, courtesy lights, electric win-
- Check that the terminals and connectors are clean. If they are covered with sul-
dows, wipers etc.) will switch off
phate (white or greenish deposit), disconnect them and clean them.
automatically to avoid draining the
battery.
To start the vehicle from another battery:
Once the electrical equipment goes
- Connect the red cable to the positive (+) terminals of the two batteries,
into economy mode, it is necessary
to start the engine to enable the
- Connect one end of the green or black cable to the negative (-) terminal of the
equipment to work again.
slave battery,
- Connect the other end of the green or black cable to an earth point on the bro-
ken down vehicle, as far as possible from the battery,
Operate the starter, let the engine run.
Wait for the engine to return to idle, then disconnect the cables.
It is advisable to disconnect the battery if the vehicle is not to be used
for a period of more than one month.
- Never disconnect a terminal when the engine is running.
- Never charge a battery without first disconnecting the terminals.
- Close the sunroof before disconnecting the battery. If it does not oper-
ate normally following re-connection of the battery, you must re-initialise
it by turning the control to the maximum tilt position and pressing it for a
few seconds.
- After every reconnection of the battery, switch on the ignition and wait
1 minute before starting to allow the electronic systems to be initialised. If
slight difficulties are experienced after this, please contact a PEUGEOT
dealer.
02-02-2004
43
MAINTENANCE OF YOUR 406 COUPE
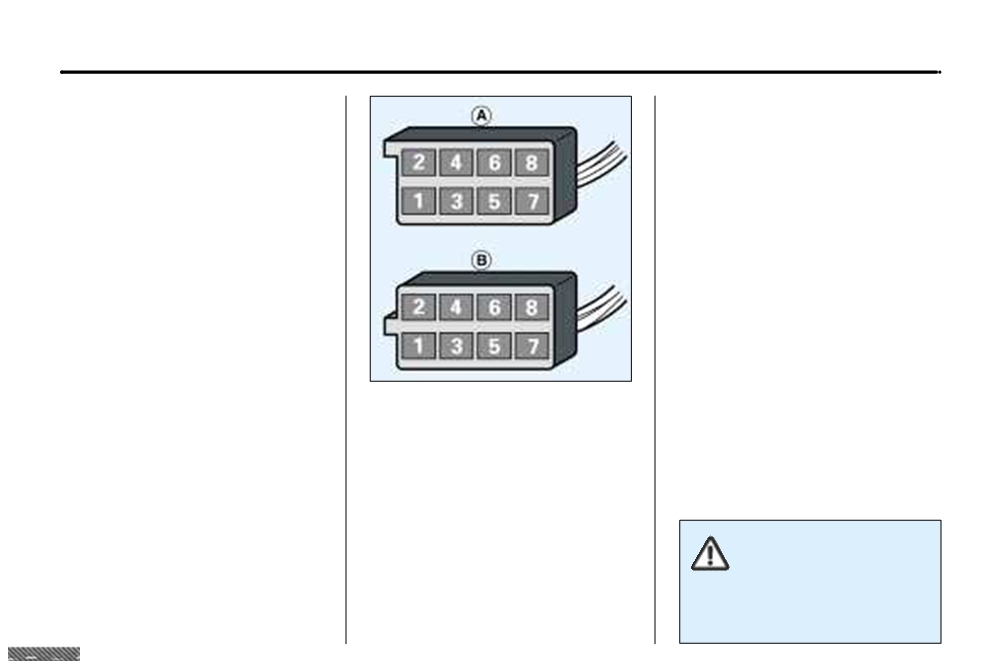
FITTING AUDIO EQUIPMENT
B1
:
(+ve) Rear right loud-speaker
and tweeter.
Your vehicle is equipped with certain
factory-fitted audio equipment:
B2
:
(-ve) Rear right loud-speaker
and tweeter.
- roof aerial,
- coaxial aerial cable,
B3
:
(+ve) Front right loud-speaker
and tweeter.
- basic interference suppression,
- supply to front speakers,
B4
:
(-ve) Front right loud-speaker
and tweeter.
- supply to rear speakers and tweeters,
- two 8-way connectors.
B5
:
(+ve) Front left loud-speaker
and tweeter.
B6
:
(-ve) Front left loud-speaker
and tweeter.
FITTING THE SPEAKERS
B7
:
(+ve) Rear left loud-speaker
The factory-fitted equipment allows
and tweeter.
you to fit:
B8
:
(-ve) Rear left loud-speaker
- 165 mm diameter speakers to the
and tweeter.
front doors,
- 55 mm diameter tweeters to the
Wiring positions and
fascia,
functions
- special elliptical shaped speakers
on the rear shelf,
A1
: Mute.
- 65 mm diameter tweeters on the
A2
: Do not use.
rear panels.
A3
: Do not use.
A4
: Do not use.
A5
: Spare.
Before installing audio
equipment or speakers in
A6
:
(+ve) Accessories.
your vehicle, contact a
A7
:
(+ve) Permanent.
PEUGEOT dealer.
A8
: Earth.
02-02-2004
44
MAINTENANCE OF YOUR 406 COUPE
Special features of the
automatic gearbox
When towing with four wheels on the
ground, the following rules must be
obeyed:
- gear lever in position N,
- tow the vehicle at less than
30 m.p.h. (50 km/h) over a maxi-
mum distance of 30 miles (50 km).
- do not add oil to the gearbox.
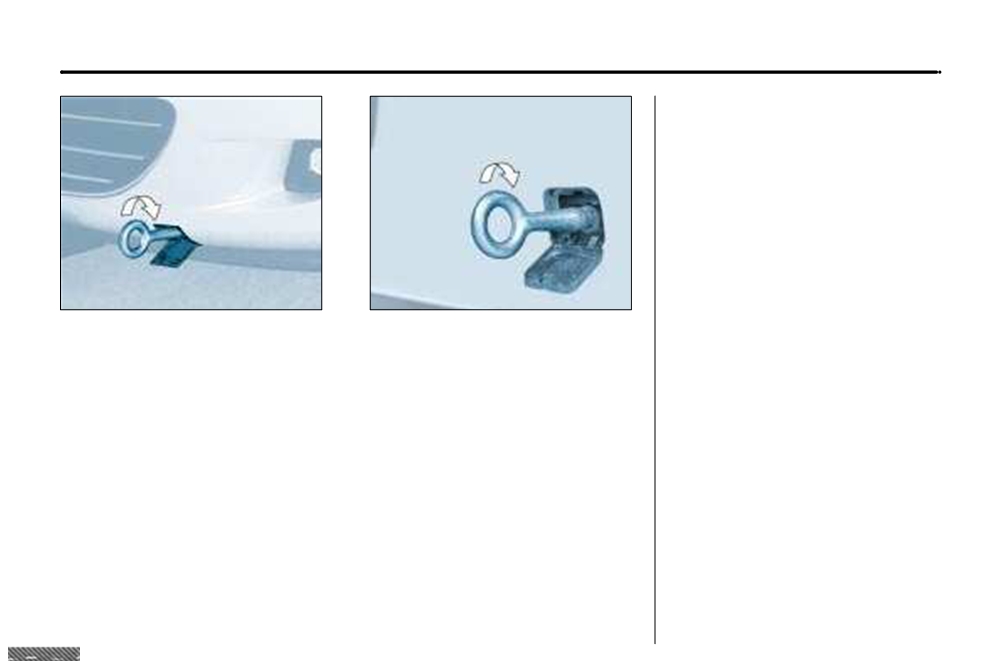
TOWING YOUR VEHICLE
Without lifting (4 wheels on the road)
You should always use a tow bar.
The towing eye is inside the spare wheel.
From the front:
Unclip the upper section of the cover and tilt it.
Screw in the towing eye until it locks.
From the rear:
Unclip the cover by passing your hand behind the bumper and pushing.
Screw in the towing eye until it locks.
Lifting (2 wheels on the road only)
It is preferable to raise the vehicle by the wheels.
Never use the radiator crossmember.
02-02-2004

45
MAINTENANCE OF YOUR 406 COUPE
TOWING A TRAILER,
Driving advice
Tyres: Check the tyre pressures of
CARAVAN, BOAT etc.
the towing vehicle and of the trailer,
Distribution of loads: Distribute the
observing the recommended pres-
Only use original PEUGEOT tow
load in the trailer so that the heaviest
sures.
bars that have been tested and
items are as close as possible to the
approved from the design stage of
axle and the nose weight approaches
your vehicle.
the maximum permitted without
Braking: Towing increases the brak-
exceeding it.
The tow bar must be fitted by a
ing distance.
PEUGEOT dealer.
Your vehicle is primarily designed for
Cooling: Towing a trailer on a slope
Lights: Check the electrical signalling
transporting people and luggage but
increases the temperature of the
on the trailer.
it may also be used for towing a trailer.
coolant.
Driving with a trailer subjects the
As the fan is electrically controlled,
towing vehicle to more significant
its cooling capacity is not dependent
Side wind: Take into acount the
stress and its driver must be particu-
on the engine speed.
increased sensitivity to side wind.
larly careful.
On the contrary, use a high gear to
Air density decreases with altitude,
lower the engine speed and reduce
thus reducing engine performance.
your speed.
Above 1 000 metres, the maximum
The maximum towing load on a long
towing load must be reduced by 10 %
slope depends on the gradient and
and so on for every 1 000 metres of
the outside temperature.
altitude.
In all cases, pay attention to the
coolant temperature.
If the warning light comes on, stop
the vehicle and switch off the engine
as soon as possible.
02-02-2004
46
MAINTENANCE OF YOUR 406 COUPE
BOOT LUGGAGE CARRIER*
A boot luggage carrier is available
from your PEUGEOT dealer.
This equipment is not compatible
with the fitting of a rear spoiler.
When it is used, take care not to
conceal the third brake light.
Follow the manufacturer's recom-
mendations.
Removing the mat
When removing the mat on the dri-
ver's side, move the seat as far back
as possible and remove the fixings.
When refitting the mat, position it
and replace the fixings by turning
them a quarter of a turn.
* Available as an accessory.
02-02-2004

47
MAINTENANCE OF YOUR 406 COUPE
406 COUPE ACCESSORIES
For your PEUGEOT only use accessories and original parts approved by the manufacturer.
These accessories and parts are all adapted to your PEUGEOT, after being tested and approved for reliability and safety,
which PEUGEOT cannot guarantee for other products.
Awide choice of original accessories, approved by PEUGEOT, is available through the dealer network. They all carry the
PEUGEOT guarantee.
- Security
: Alarms, window engraving, wheel anti-theft devices, first aid kit, warning triangle, safety jacket, etc.
– Protection
:
Carpets, door sill protector, boot tray mat, styling strips, seat covers compatible with side air
bags, protective film for bumpers.
- Communication
:
Telephone, hands-free kits, satellite navigation systems, audio equipment, CD changer, speakers.
– Customisation
:
Alloy wheels, spoiler, sports exhaust, leather gear lever knob, leather steering wheel.
– Comfort
: Storage facilities, telephone console, armrest.
– Leisure pursuits
:
Tow bar, boot rack, snow chains.
– Children
: Booster seats and child seats.
- Maintenance products
:
Windscreen wash fluid, internal and external cleaning and maintenance products.
Before fitting any electrical accessory to your vehicle, consult a PEUGEOT dealer.
02-02-2004