Opel Grandland X (2020 year). Manual in english - page 7
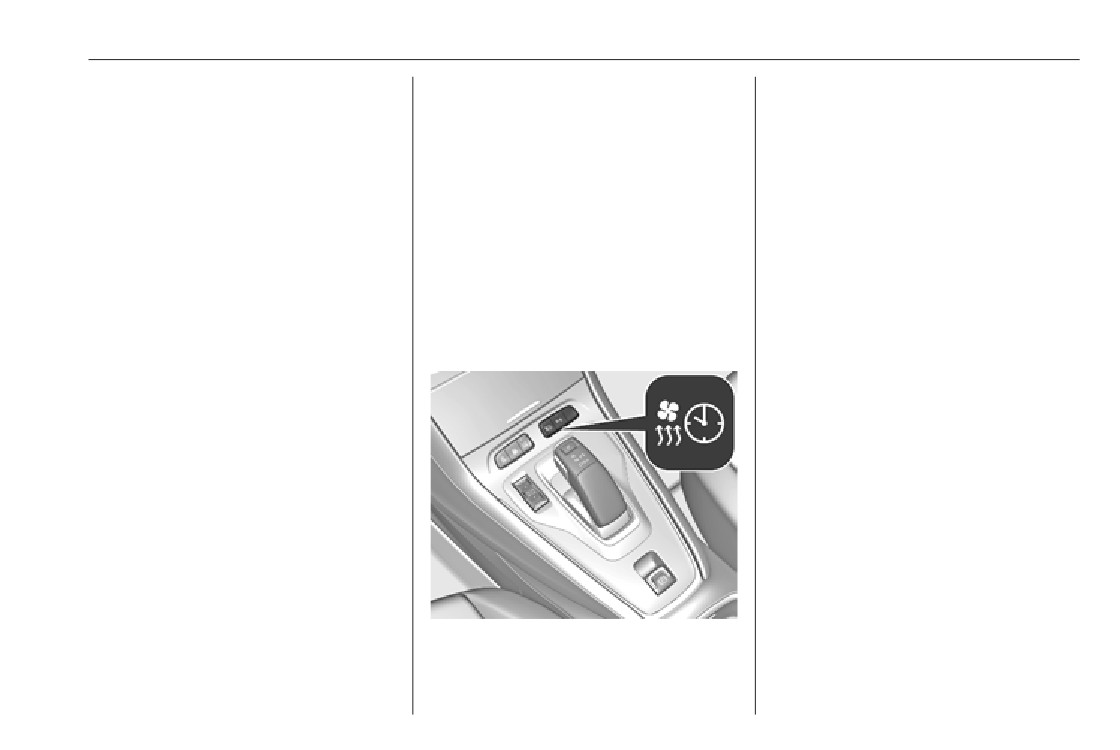
Climate control
131
Note
● LED illuminates: A timer has
Auxiliary heater
If à is pressed while the engine is
been set.
running, an Autostop will be inhibited
Air heater
● LED flashes: The system is
until à is pressed again.
operating.
Quickheat is an electric auxiliary air
If à is pressed while the engine is in
heater which automatically warms up
The LED is extinguished at the end of
an Autostop, the engine will restart
the passenger compartment more
the heating operation or when the
automatically.
quickly.
parking heater is stopped using the
remote control.
Stop-start system 3 139.
The parking heater can be
Parking heater
Deactivation of electronic climate
programmed using the Graphic Info
control system
The parking heater allows to heat the
Display / Colour Info Display.
vehicle's interior and to ventilate the
Cooling, fan and automatic mode can
Additionally, the parking heater can
vehicle's interior with ambient air.
be switched off by turning the rotary
be switched on and off using a remote
ring around the AUTO button
control.
anticlockwise.
Note
Activation by switching on the fan or
The programmed heating /
pressing AUTO.
ventilation is only activated if the
Heated rear window, windscreen and
ignition is off and the vehicle is
exterior mirrors b 3 41.
locked.
Heated seats ß 3 51.
If the charging level of the high
voltage battery is below 50%, the
programmed heating / ventilation is
not activated.
If a recurrent heating / ventilation is
programmed and two heating /
The operating status of the parking
ventilation procedures are carried
heater is shown by an indicator with a
out without operating the vehicle, the
LED.
programmation is deactivated.
132
Climate control
Colour Info Display
Outer air vents in the instrument
Air vents
panel
Adjustable air vents
Air vents in the instrument panel
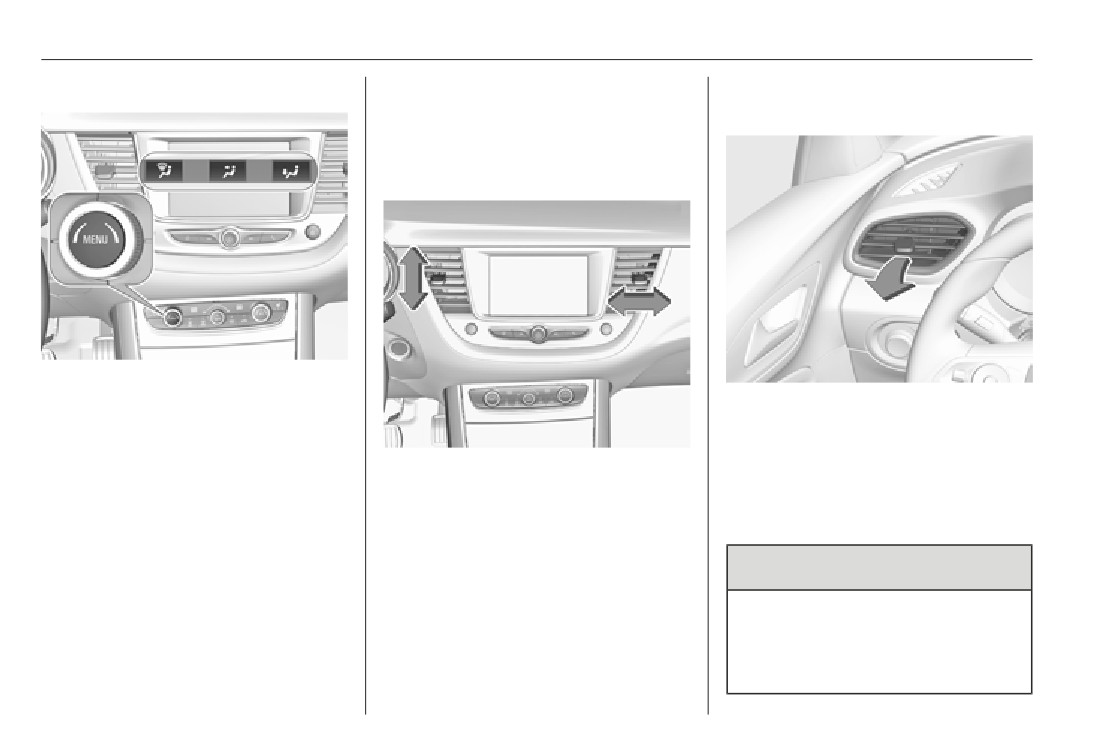
Press MENU to enter the menu.
Select Temperature conditioning.
Direct the flow of air by tilting and
swivelling the slats.
Select heating or ventilation.
To close the vent, swivel the slats
Define a timer.
Direct the flow of air by tilting and
outwards.
Save the timer settings.
swivelling the slats.
At least two air vents must be open
Activate the timer.
To close the vent, swivel the slats
while cooling is on.
inwards.
9 Warning
Do not attach any objects to the
slats of the air vents. Risk of
damage and injury in case of an
accident.
Climate control
133
Fixed air vents
Maintenance
Air conditioning regular
Additional air vents are located
operation
beneath the windscreen and door
Air intake
In order to ensure continuously
windows and in the foot wells.
efficient performance, cooling must
be operated for a few minutes once a
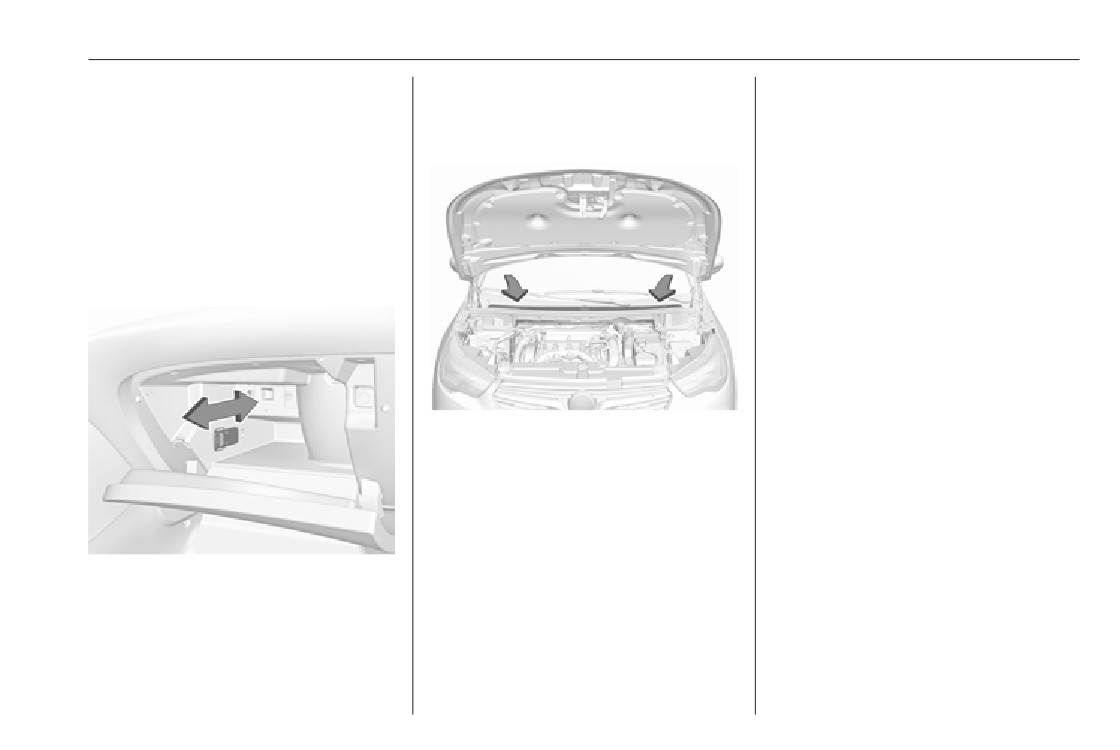
Glovebox cooler
month, irrespective of the weather
and time of year. Operation with
The air conditioning system draws
cooling is not possible when the
cooled air into the glovebox through a
outside temperature is too low.
noozle.
Service
For optimal cooling performance, it is
recommended to annually check the
climate control system, starting
three years after initial vehicle
The air intake in front of the
registration, including:
windscreen in the engine
● functionality and pressure test
compartment must be kept clear to
● heating functionality
allow air intake. Remove any leaves,
dirt or snow.
● leakage check
● check of drive belts
● cleaning of condenser and
Move the slider back or forth in order
evaporator drainage
to enable or disable glovebox cooling.
● performance check
134
Driving and operating
Fault
150
Lane departure warning
191
Driving and
Interruption of power supply
150
Lane keep assist
192
Driver alert
194
operating
Manual transmission
151
Charging
195
Drive systems
152
Programmable charging
198
Drive modes
152
Charging status
199
All-wheel drive
152
Driving hints
135
Charge cord
199
Control of the vehicle
135
Brakes
153
Steering
135
Antilock brake system
153
Fuel
202
Parking brake
154
Fuel for petrol engines
202
Starting and operating
135
Brake assist
156
Fuel for diesel engines
203
New vehicle running-in
135
Hill start assist
156
Refuelling
204
Ignition switch positions
135
Regenerative braking
156
Trailer hitch
206
Power button
136
General information
206
Starting the engine
137
Ride control systems
157
Driving characteristics and
Overrun cut-off
139
Electronic Stability Control and
towing tips
206
Stop-start system
139
Traction Control system
157
Trailer towing
206
Parking
141
Selective ride control
158
Towing equipment
207
Sport mode
159
Engine exhaust
142
Trailer stability assist
209
Exhaust filter
142
Driver assistance systems
160
Catalytic converter
143
Cruise control
160
AdBlue
143
Speed limiter
163
Adaptive cruise control
165
Automatic transmission electri-
Forward collision alert
171
fied
147
Active emergency braking
173
Automatic transmission
148
Front pedestrian protection
176
Transmission display
148
Parking assist
177
Gear selection
148
Advanced parking assist
180
Manual mode
149
Side blind spot alert
185
Electronic driving programmes 150
Panoramic view system
186
Rear view camera
189
Driving and operating
135
Driving hints
Steering
Starting and operating
If power steering assist is lost
Control of the vehicle
because the engine stops or due to a
New vehicle running-in
system malfunction, the vehicle can
Do not brake unnecessarily hard for
Never coast with engine not
be steered but may require increased
the first few journeys.
running
effort.
During the first drive, smoke may
Many systems will not function in this
occur because of wax and enginge oil
situation (e.g. brake servo unit, power
evaporating off the exhaust system.
steering). Driving in this manner is a
Park the vehicle in the open for a
danger to yourself and others.
while after the first drive and avoid
All systems function during an
inhaling the fumes.
Autostop.
During the running-in period, fuel and
Stop-start system 3 139.
engine oil consumption may be
higher.
Pedals
Additionally, the cleaning process of
the exhaust filter may take place more
To ensure the pedal travel is
often.
uninhibited, there must be no mats in
the area of the pedals.
Exhaust filter 3 142.
Use only floor mats, which fit properly
and are fixed by the retainers on the
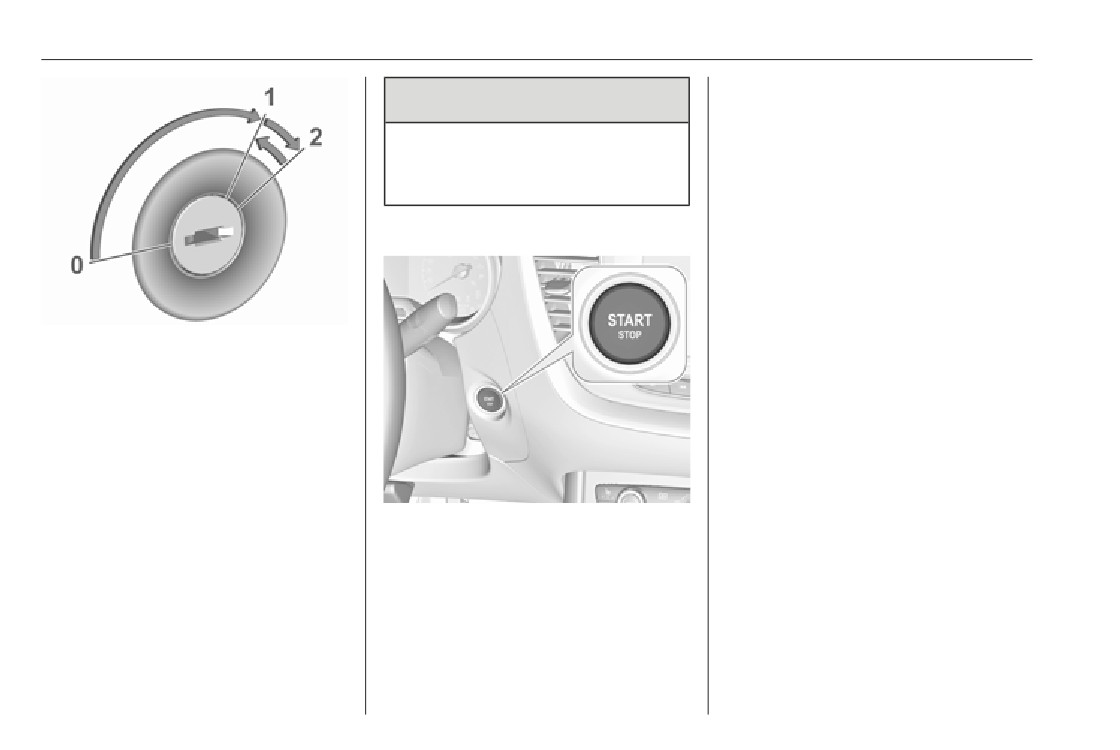
Ignition switch positions
driver side.
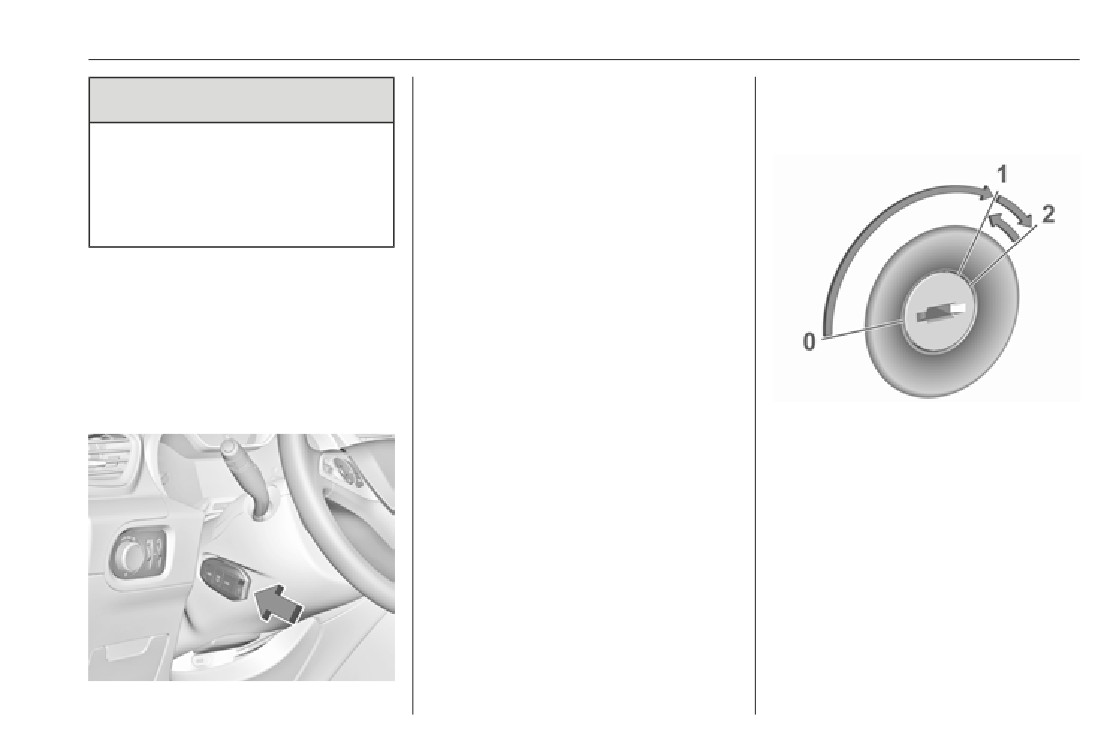
Turn key:
136
Driving and operating
Ignition on power mode without
9 Danger
starting the engine
Press Start/Stop without operating
Never remove the key from
clutch or brake pedal. Control
ignition switch during driving as
indicators illuminate and most
this will cause steering wheel lock.
electrical functions are operable.
Engine and ignition off
Power button
Press Start/Stop briefly in each mode
or when engine is running and vehicle
is stationary. Some functions remain
active until driver's door is opened,
provided the ignition was on
0
:
ignition off: some functions
previously.
remain active until key is
Emergency shut off during driving
removed or driver's door is
Press Start/Stop for 5 seconds
opened, provided the ignition was
3 137. Steering wheel locks as soon
on previously
as vehicle is stationary.
1
:
ignition on power mode: ignition
is on, diesel engine is preheating,
Steering wheel lock
control indicators illuminate and
The steering wheel lock activates
most electrical functions are
The electronic key must be inside the
automatically when:
operable
vehicle.
2
:
engine start: release key after
● The vehicle is stationary.
engine has been started
Engine start
● The ignition has been switched
Operate the clutch pedal (manual
off.
Steering wheel lock
transmission), the brake pedal and
To release steering wheel lock, open
press Start/Stop.
Remove key from ignition switch and
and close driver's door and switch the
turn steering wheel until it engages.
ignition on power mode or start the
engine directly.
Driving and operating
137
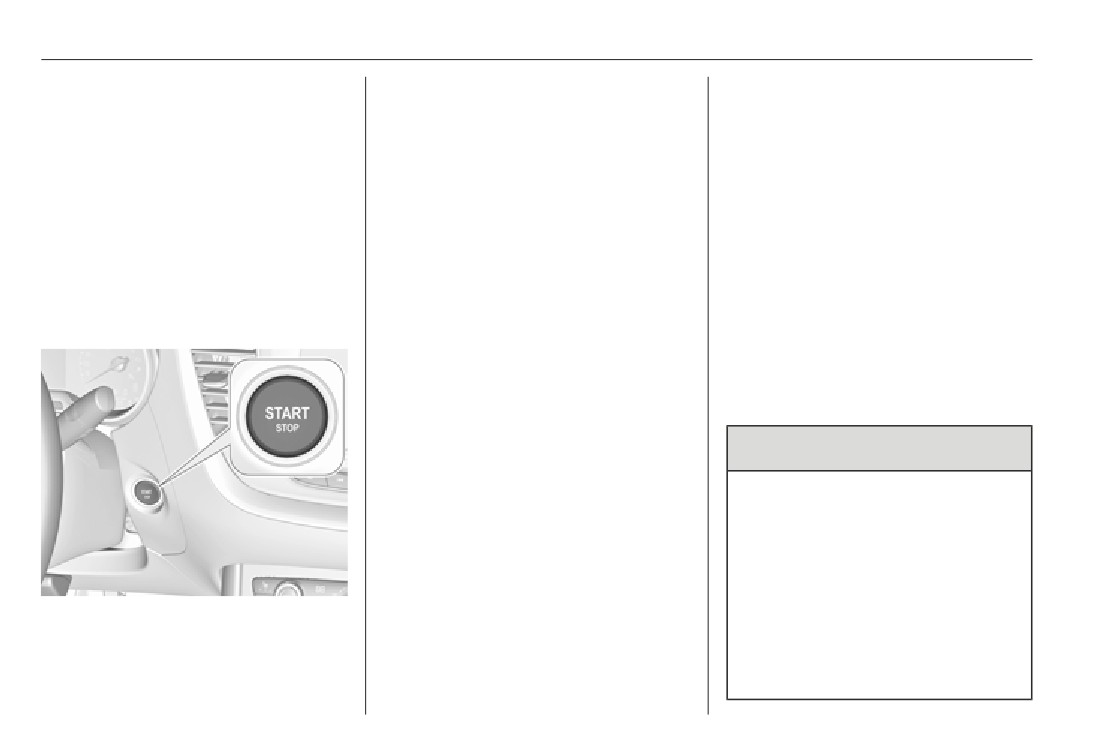
Hold the electronic key with buttons
Starting the engine
9 Warning
outside at the marking on the steering
column cover as shown in the
Vehicles with ignition switch
If the vehicle battery is discharged,
illustration.
the vehicle must not be towed,
Operate the clutch pedal (manual
tow-started or jump-started as the
transmission), the brake pedal and
steering wheel lock cannot be
press Start/Stop.
disengaged.
This option is intended for
Operation on vehicles with
emergencies only. Replace the
electronic key system in case of
electronic key battery as soon as
possible 3 23.
failure
For unlocking or locking the doors,
If either the electronic key fails or the
see fault in radio remote control unit
battery of the electronic key is weak,
or electronic key system 3 24.
a message may be displayed in the
Driver Information Centre.
Turn key to position 1 to release the
steering wheel lock.
Manual transmission: operate clutch
and brake pedal.
Automatic transmission: operate
brake pedal and move selector lever
to P or N.
Do not operate accelerator pedal.
Diesel engines: wait until control
indicator ! extinguishes.
138
Driving and operating
Turn key briefly to position 2 and
● Manual transmission: operate
Hybrid vehicles
release after engine has been
clutch and brake pedal.
● Press Start/Stop button.
started.
● Automatic transmission: operate
● Depress brake pedal.
Manual transmission: during an
brake pedal and move selector
● Press Start/Stop button.
Autostop, the engine can be started
lever to P or N.
● Keep the brake pedal depressed
by depressing the clutch pedal
● Do not operate accelerator pedal.
until the activation of the hybrid
3 139.
● Press Start/Stop button.
system is confirmed by the
Automatic transmission: during an
illumination of READY in the
● Release button after starting
Autostop, the engine can be started
instrument cluster and an
procedure begins. Diesel engine
by releasing the brake pedal 3 139.
accoustic signal.
starts after control indicator ! for
Vehicles with power button
preheating extinguishes.
Emergency shut off during driving
● Before restarting or to switch off
the engine when vehicle is
If the engine needs to be switched off
stationary, press Start/Stop once
during driving in case of emergency,
more briefly.
press Start/Stop for 5 seconds.
To start the engine during an
9 Danger
Autostop:
● Manual transmission: during an
Switching off the engine during
Autostop, the engine can be
driving may cause loss of power
started by depressing the clutch
support for brake and steering
pedal 3 139.
systems. Assistance systems and
● Automatic transmission: during
airbag systems are disabled.
an Autostop, the engine can be
Lighting and brake lights will
started by releasing the brake
extinguish. Therefore power down
pedal 3 139.
the engine and ignition while
driving only when required in case
of emergency.

139
Driving and operating
Starting the vehicle at low
Depending on driving conditions, the
Deactivation
temperatures
overrun cut-off may be deactivated.
Starting the engine without additional
Stop-start system
heaters is possible down to -25 °С for
diesel engines and -30 °C for petrol
The stop-start system helps to save
engines. Required is an engine oil
fuel and to reduce the exhaust
with the correct viscosity, the correct
emissions. When conditions allow, it
fuel, performed services and a
switches off the engine as soon as the
sufficiently charged vehicle battery.
vehicle is at a low speed or at a
With temperatures below -30 °C the
standstill, e.g. at a traffic light or in a
automatic transmission requires a
traffic jam.
warming phase of approx. 5 minutes.
The selector lever must be in position
Activation
P.
The stop-start system is available as
Deactivate the stop-start system
soon as the engine is started, the
manually by pressing Ò. The
Turbo engine warm-up
vehicle starts-off and the conditions
deactivation is indicated when the
Upon start-up, engine available
as stated below in this section are
LED in the button illuminates.
torque may be limited for a short time,
fulfilled.
especially when the engine
Autostop
The system is ready to operate when
temperature is cold. The limitation is
the LED in the button Ò is not
Vehicles with manual transmission
to allow the lubrication system to fully
illuminated. To activate the system
An Autostop can be activated at a
protect the engine.
when the system is deactivated,
standstill.
press Ó.
Activate an Autostop as follows:
Overrun cut-off
If the stop-start system is temporarily
● Depress the clutch pedal.
The fuel supply is automatically cut off
not available and the button Ò is
● Set the selector lever to neutral.
during overrun, i.e. when the vehicle
pressed, the LED in the button
is driven with a gear engaged but
flashes.
● Release the clutch pedal.
accelerator pedal is released.

140
Driving and operating
The engine will be switched off while
●
The stop-start system is not
Note
the ignition stays on.
manually deactivated.
The Autostop may be inhibited for
several hours after a battery
Vehicles with automatic transmission
●
The driver's door is closed or the
replacement or reconnection.
If the vehicle is at a standstill with
driver's seat belt is fastened.
depressed brake pedal, Autostop is
●
The vehicle battery is sufficiently
Certain settings of the climate control
activated automatically.
charged and in good condition.
system may inhibit an Autostop.
The engine will be switched off while
●
The engine is warmed up.
Climate control 3 124.
the ignition stays on.
●
The engine coolant temperature
Immediately after higher speed
The stop-start system will be disabled
is not too high.
driving an Autostop may be inhibited.
on inclines of 12% or more.
●
The engine exhaust temperature
New vehicle running-in 3 135.
is not too high, e.g. after driving
Indication
Vehicle battery discharge protection
with high engine load.
To ensure reliable engine restarts,
●
The ambient temperature is not
several vehicle battery discharge
too low or too high.
protection features are implemented
●
The climate control system
as part of the stop-start system.
allows an Autostop.
Power saving measures
●
The brake vacuum is sufficient.
During an Autostop, several electrical
●
The self-cleaning function of the
An Autostop is indicated by control
features such as auxiliary electric
exhaust filter is not active.
indicator D.
heater or rear window heating are
●
The vehicle was driven at least at
disabled or switched to a power
During an Autostop, the heating and
walking speed since the last
saving mode. The fan speed of the
brake performance will be
Autostop.
climate control system is reduced to
maintained.
Otherwise an Autostop will be
save power.
Conditions for an Autostop
inhibited.
The stop-start system checks if each
of the following conditions is fulfilled.
Driving and operating
141
Restart of the engine by the driver
●
stop-start system manually
Parking
deactivated
Vehicles with manual transmission
●
driver's seat belt unfastened and
9 Warning
Depress the clutch pedal without
driver's door opened
depressing the brake pedal to restart
●
engine temperature too low
●
Do not park the vehicle on an
the engine.
easily ignitable surface. The
●
charging level of vehicle battery
high temperature of the
Vehicles with automatic transmission
below a defined level
exhaust system could ignite the
The engine is restarted in the
●
brake vacuum not sufficient
surface.
following cases:
●
vehicle driven at least at walking
●
Apply the parking brake.
● brake pedal released while the
speed
selector lever in position D or M
●
If the vehicle is on a level
●
climate control system requests
surface or uphill slope, engage
● brake pedal released or selector
engine start
first gear or set the selector
lever in position N when selector
●
air conditioning manually
lever to position P. On an uphill
lever is moved to position D or
switched on
slope, turn the front wheels
M
away from the kerb.
If an electrical accessory, e.g. a
● selector lever moved to position
portable CD player, is connected to
If the vehicle is on a downhill
R
the power outlet, a brief power drop
slope, engage reverse gear or
during the restart might be noticeable.
set the selector lever to position
Restart of the engine by the stop-
P. Turn the front wheels
start system
towards the kerb.
The selector lever must be in neutral
●
Close the windows.
to enable an automatic restart.
●
Switch off the engine.
If one of the following conditions
●
Remove the ignition key from
occurs during an Autostop, the
the ignition switch or switch off
engine will be restarted automatically
ignition on vehicles with power
by the stop-start system:
142
Driving and operating
Note
button. Turn the steering wheel
Engine exhaust
In the event of an accident with
until the steering wheel lock is
airbag deployment, the engine is
felt to engage.
switched off automatically if the
9 Danger
vehicle comes to a standstill within a
●
For hybrid vehicles, make sure
certain time.
READY is not illuminated in the
Engine exhaust gases contain
instrument cluster.
In countries with extreme low
poisonous carbon monoxide,
temperatures it may be necessary to
which is colourless and odourless
●
Lock the vehicle.
park the vehicle without applied
and could be fatal if inhaled.
●
Activate the anti-theft alarm
parking brake. Make sure to park the
If exhaust gases enter the interior
system.
vehicle on a level surface.
of the vehicle, open the windows.
●
The engine cooling fans may run
Have the cause of the fault
after the engine has been
rectified by a workshop.
switched off 3 214.
Avoid driving with an open load
compartment, otherwise exhaust
Caution
gases could enter the vehicle.
After running at high engine
speeds or with high engine loads,
Exhaust filter
operate the engine briefly at a low
Automatic cleaning process
load or run in neutral for
approx. 30 seconds before
The exhaust filter system filters soot
switching off, in order to protect
particles out of the exhaust gases.
the turbocharger.
The start of saturation of the exhaust
filter is indicated by the temporary
illumination of % or
C,
accompanied by a message in the
Driver Information Centre.
143
Driving and operating
As soon as the traffic conditions
Catalytic converter
AdBlue
permit, regenerate the filter by driving
The catalytic converter reduces the
at a vehicle speed of at least 60 km/h
General information
amount of harmful substances in the
until the control indicator
exhaust gases.
The selective catalytic reduction
extinguishes.
(BlueInjection) is a method to
Note
Caution
substantially reduce the nitrogen
On a new vehicle, the first exhaust
oxides in the exhaust emission. This
filter regeneration operations may
Fuel grades other than those listed
is achieved by injecting a Diesel
be accompanied by a burning smell,
on pages 3 202, 3 261 could
Exhaust Fluid (DEF) into the exhaust
which is normal. Following
damage the catalytic converter or
system. The ammonia released by
prolonged operation of the vehicle at
electronic components.
the fluid reacts with nitrous gases
very low speed or at idle, water
(NOx) from the exhaust and turns it
Unburnt petrol will overheat and
vapour can be emitted at the
damage the catalytic converter.
into nitrogen and water.
exhaust on acceleration. This does
Therefore avoid excessive use of
The designation of this fluid is
not affect the behaviour of the
the starter, running the fuel tank
AdBlue®. It is a non-toxic, non-
vehicle or the environment.
dry and starting the engine by
flammable, colourless and odourless
Cleaning process not possible
pushing or towing.
fluid which consists of 32% urea and
68% water.
If % or
C
stays on, accompanied
In the event of misfiring, uneven
by an audible signal and a message,
engine running, a reduction in engine
9 Warning
this indicates that the exhaust filter
performance or other unusual
additive level is too low.
problems, have the cause of the fault
Avoid contact of your eyes or skin
The reservoir must be topped-up
rectified by a workshop as soon as
with AdBlue.
without delay. Seek the assistance of
possible. In an emergency, driving
In case of eye or skin contact,
a workshop.
can be continued for a short period,
rinse off with water.
keeping vehicle speed and engine
speed low.
144
Driving and operating
1. The first possible warning is Top
Restart of the engine is not
Caution
up emissions additive: Starting
possible. The following warning
prevented in 2400 km.
message will be displayed:
Avoid contact of the paintwork with
When switching on the ignition,
Top up emissions additive:
AdBlue.
this warning will show up once
Starting prevented
In case of contact, rinse off with
briefly with the calculated range.
water.
Additionally, control indicator u
Additionally, control indicator u
will flash and a chime will sound.
will illuminate and a chime will
AdBlue freezes at a temperature of
Refill the tank to a level of at least
sound. Driving is possible without
approx. -11 °C. As the vehicle is
5 l of AdBlue, otherwise restarting
any restrictions.
equipped with an AdBlue preheater,
of the engine is not possible.
the emissions reduction at low
When driving, the message is
temperatures is ensured. The AdBlue
displayed every 300 km until the
High emission warnings
preheater works automatically.
additive tank has been topped-up.
In the event of a fault with the
2. The next warning level is entered
Note
emissions control system, different
with a range below 600 km. The
Frozen and again liquefied AdBlue is
messages are displayed in the Driver
message with the current range
usable without quality loss.
Information Centre. The messages
will always be displayed when
and the restrictions are a legal
The typical AdBlue consumption is
ignition is switched on.
requirement.
approx. 0.85 l per 1000 km, but can
Additionally, control indicator u
also be higher depending on driving
1. If a fault is detected for the first
will flash and a chime will sound.
behaviour (e.g. high load or towing).
time, the warning Emissions fault
Refill AdBlue before entering the
is displayed.
next warning level.
Level warnings
Additionally, control indicators u,
When driving, the message is
Depending on the calculated range of
C
and Z will illuminate and a
displayed every 30 seconds until
AdBlue, different messages are
chime will sound. Driving is
the additive tank has been
displayed in the Driver Information
possible without any restrictions.
topped-up.
Centre. The messages and the
If it is a temporary fault, the alert
3. The last warning level is entered
restrictions are a legal requirement.
disappears during the next
when the AdBlue tank is empty.
Driving and operating
145
journey, after self-diagnosis of the
Refilling AdBlue
Since AdBlue has a limited
emissions control system.
durability, check the date of expiry
before refilling.
2. If the fault is confirmed by the
Caution
emission control system, the
Note
following message will be
Only use AdBlue that complies
Refill the tank to a level of at least
displayed:
with European standards
5 l to ensure that the new AdBlue
DIN 70 070 and ISO 22241-1.
level is being detected.
Emissions fault: Starting
prevented in 1100 km.
Do not use additives.
In case AdBlue refill is not
Do not dilute AdBlue.
successfully detected:
Additionally, control indicators u,
C
and Z will illuminate and a
Otherwise the selective catalytic
1. Continuously drive the vehicle
chime will sound.
reduction system could be
for 10 min making sure that
damaged.
vehicle speed is always higher
When driving, the message is
than 20 km/h.
displayed every 30 seconds while
the fault persists.
Note
2. If AdBlue refill is detected
Whenever a filling pump with a
successfully, AdBlue supply-
3. If the last warning level is entered,
nozzle for passenger cars is not
driven warnings or limitations will
the following warning message
available at a filling station, use only
disappear.
will be displayed:
AdBlue bottles or canisters with a
If AdBlue refill is still not detected,
Emissions fault: Starting
sealed refill adapter for refilling, to
seek the assistance of a workshop.
prevented
prevent splashback and overspill,
If AdBlue must be refilled at
and in order to ensure that the fumes
Additionally, control indicators u,
temperatures below -11 °C, the
from the tank are captured and do
C
and Z will illuminate and a
refilling of AdBlue may not be
not emerge. AdBlue in bottles or
chime will sound.
detected by the system. In this
canisters is available in many filling
Consult a workshop for
event, park the vehicle in a space
stations and can be purchased e.g.
assistance.
with a higher ambient temperature
at Opel dealers and other retail
until AdBlue is liquified.
outlets.
146
Driving and operating
Note
9. Unscrew the hose from the filler
When unscrewing the protective cap
neck.
from the filler neck, ammonia fumes
10. Mount the protective cap and turn
may emerge. Do not inhale as the
clockwise until it engages.
fumes have a pungent smell. The
Note
fumes are not harmful by inhalation.
Dispose of AdBlue canister
The AdBlue tank should be filled
according to environmental
completely. This must be done if the
requirements. Hose can be reused
warning message regarding
after flushing with clear water before
prevention of an engine restart is
AdBlue dries out.
already displayed.
The vehicle must be parked on a level
surface.
4. Unscrew protective cap from the
filler neck.
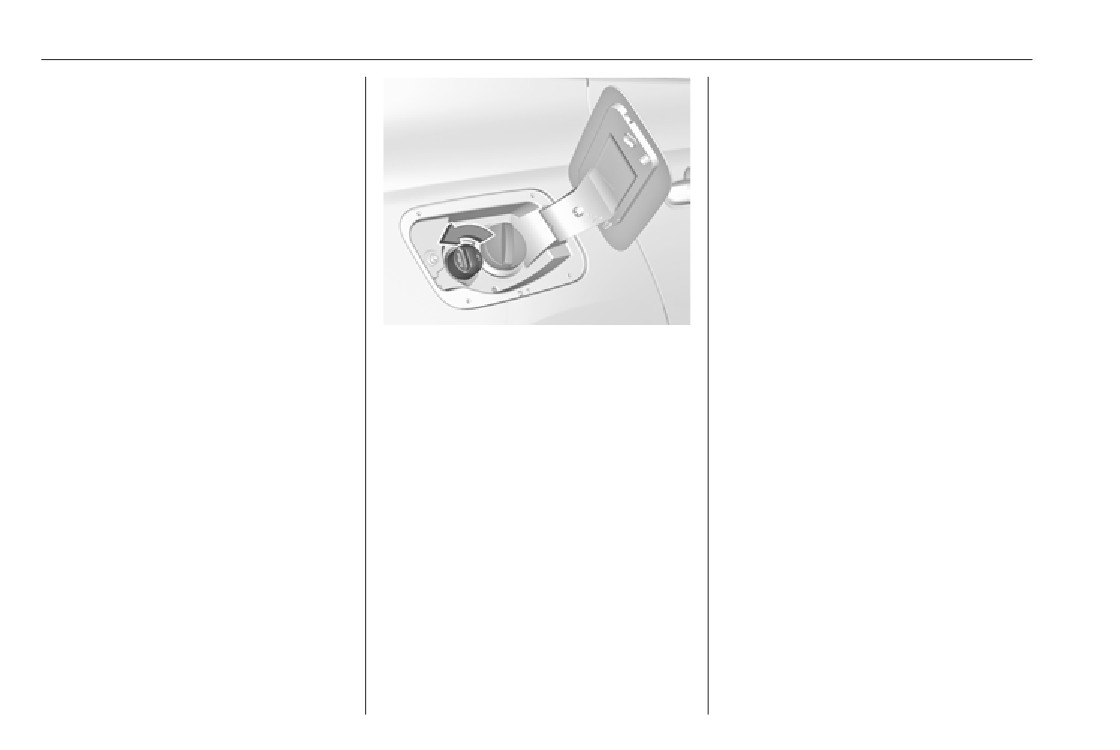
The filler neck for AdBlue is located
behind the fuel filler flap, which is
5. Open AdBlue canister.
located at right rear side of the
6. Mount one end of the hose on the
vehicle.
canister and screw the other end
The fuel filler flap can only be opened
on the filler neck.
if the vehicle is unlocked.
7. Lift the canister until it is empty, or
1. Remove key from ignition switch.
until the flow from the canister has
stopped. This can take up to
2. Close all doors to avoid ammonia
5 minutes.
fumes entering the interior of the
vehicle.
8. Place the canister on the ground
to empty the hose, wait
3. Release the fuel filler flap by
15 seconds.
pushing the flap 3 204.
Driving and operating
147
Gear selection
When a gear is engaged, the vehicle
Automatic transmission
slowly begins to creep when the
electrified
brake is released.
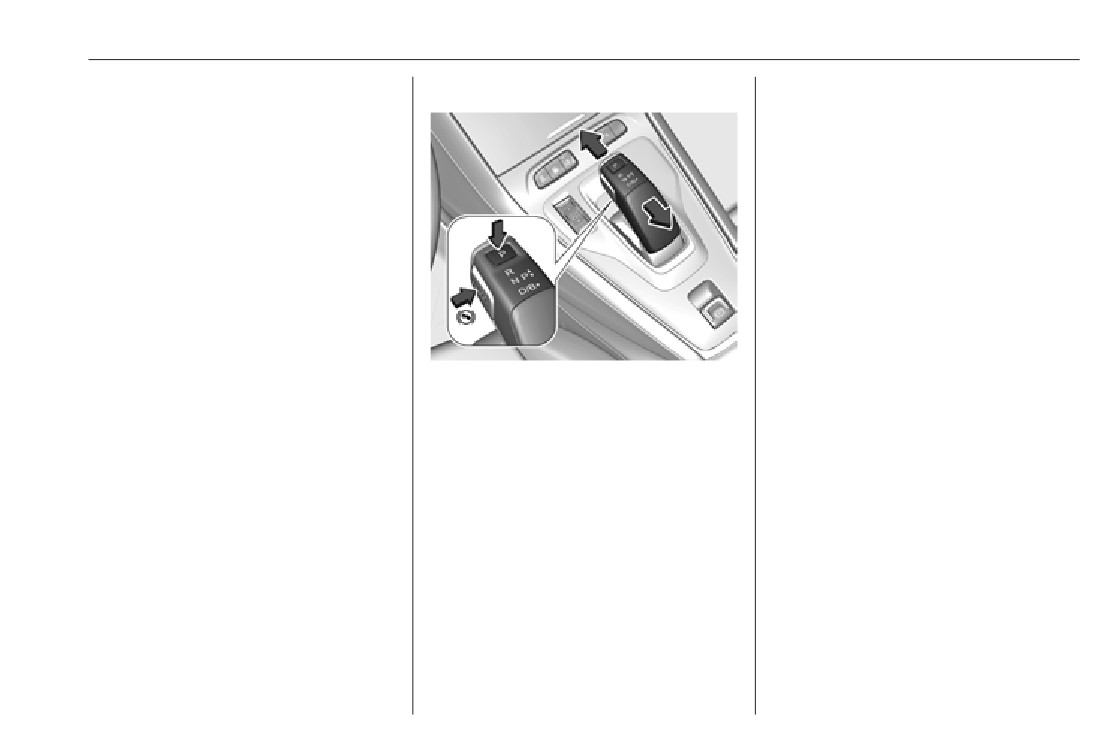
Shifting in / out of P
This vehicle is a plug-in hybrid
To shift into P, press P on the selector
vehicle. It has a combustion engine
lever.
and an automatic transmission with
To shift out of P:
integrated electrical engine which
enables electrical driving and
1. Depress brake pedal and press
charging of the battery during the
the release button.
deceleration and the braking of the
2. To shift into R, push the selector
vehicle. Additionally, the battery can
forwards beyond the point of
be charged using a cable, e.g., at
resistance.
domestic electric outlets or public
To shift into D, push the selector
charging stations. The all-wheel drive
P
:
park position, front wheels are
backwards beyond the point of
version has a second electrical
locked, engage only when the
resistance.
engine for the rear axle.
vehicle is stationary and the
To shift into N, push the selector
parking brake is applied
forwards or backwards without
R
:
reverse gear, engage only
passing the point of resistance.
when the vehicle is stationary
N/P : neutral
Shifting into R
D/B : automatic mode / automatic
1. Depress the brake pedal and
mode with one-pedal driving
press the release button.
2. Shift into R using the gear
Do not accelerate while engaging a
selector.
gear. Never depress the accelerator
pedal and brake pedal at the same
Shifting into / out of B
time.
B can only be activated if D is
selected.
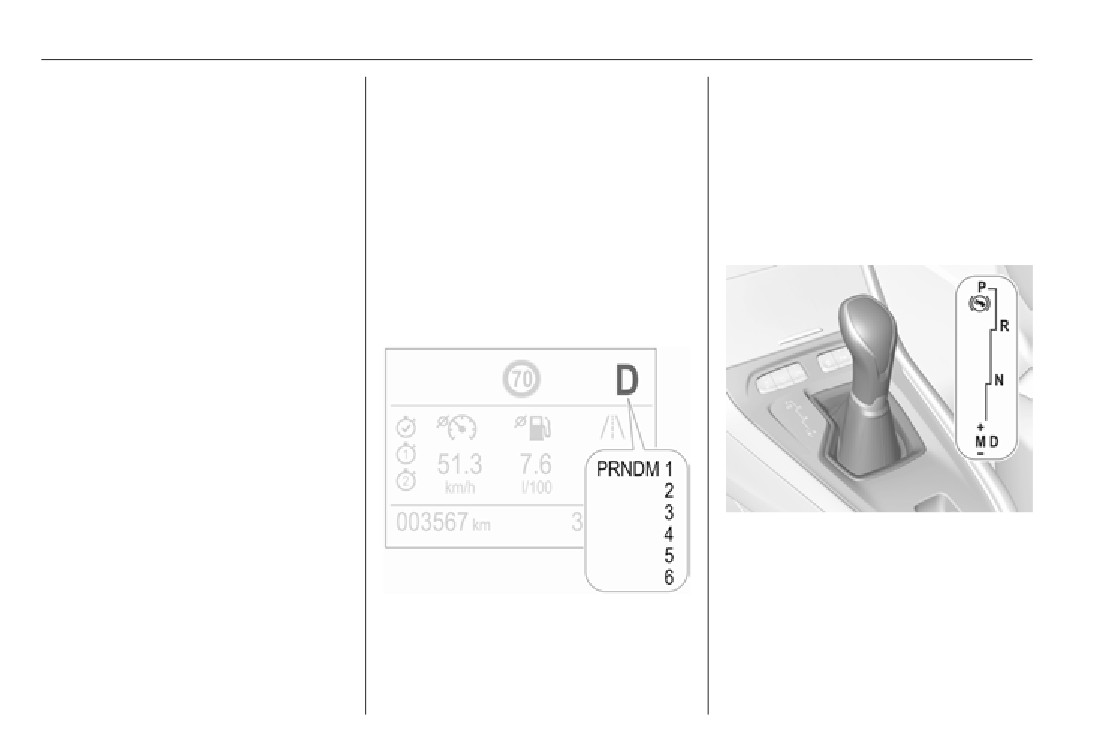
148
Driving and operating
To shift into B:
In manual mode, M and the number
Automatic transmission
of the selected gear is indicated.
1. Shift into D.
2. Push the selector backwards
The automatic transmission permits
R indicates reverse gear.
without passing the point of
automatic gearshifting (automatic
N indicates neutral position.
resistance.
mode) or manual gearshifting
P indicates park position.
(manual mode).
To shift from B to D, push the selector
backwards without passing the point
Manual shifting is possible in manual
Gear selection
of resistance.
mode by tapping the selector lever to
+ or - 3 149.
One-pedal driving
With one-pedal driving, the
Transmission display
accelerator pedal can be used to
control the deceleration of the vehicle
down to a complete stop.
Quick releasing of the accelerator
pedal will result in aggressive
deceleration. Slow releasing of the
accelerator pedal will allow the
deceleration of the vehicle to be
adjusted as desired.
Move the selector lever in the shifting
To use one-pedal driving, shift into B.
gate as shown in the illustration
B is only selectable when the vehicle
above.
is in D. Press the accelerator pedal to
achieve the desired speed. The
The mode or selected gear is shown
deceleration provided by one-pedal
in the Driver Information Centre.
driving provides full regenerative
braking by charging the high voltage
In automatic mode, the driving
battery.
programme is indicated by D.

Driving and operating
149
P : park position, front wheels are
Engine braking
Manual mode
locked, engage only when the
To utilise the engine braking effect,
vehicle is stationary and the
select a lower gear in good time when
parking brake is applied
driving downhill, see manual mode.
R : reverse gear, engage only when
the vehicle is stationary
Rocking the vehicle
N : neutral
D : automatic mode
Rocking the vehicle is only
M : manual mode
permissible if the vehicle is stuck in
+
: upshift in manual mode
sand, mud or snow. Move the selector
-
: downshift in manual mode
lever between D and R in a repeat
pattern. Do not race the engine and
The selector lever is locked in P and
avoid sudden acceleration.
can only be moved when the ignition
is on and the brake pedal is applied.
Parking
Move selector lever out of position D
The engine can only be started with
Apply the parking brake and engage
towards the left in position M.
the selector lever in position P or N.
P.
When position N is selected, press
Tap the selector lever to the front + to
the brake pedal or apply the parking
shift to a higher gear.
brake before starting.
Tap the selector lever to the rear - to
Do not accelerate while engaging a
shift to a lower gear.
gear. Never depress the accelerator
If a higher gear is selected when
pedal and brake pedal at the same
vehicle speed is too low, or a lower
time.
gear when vehicle speed is too high,
When a gear is engaged, the vehicle
the shift is not executed. This can
slowly begins to creep when the
cause a message in the Driver
brake is released.
Information Centre.
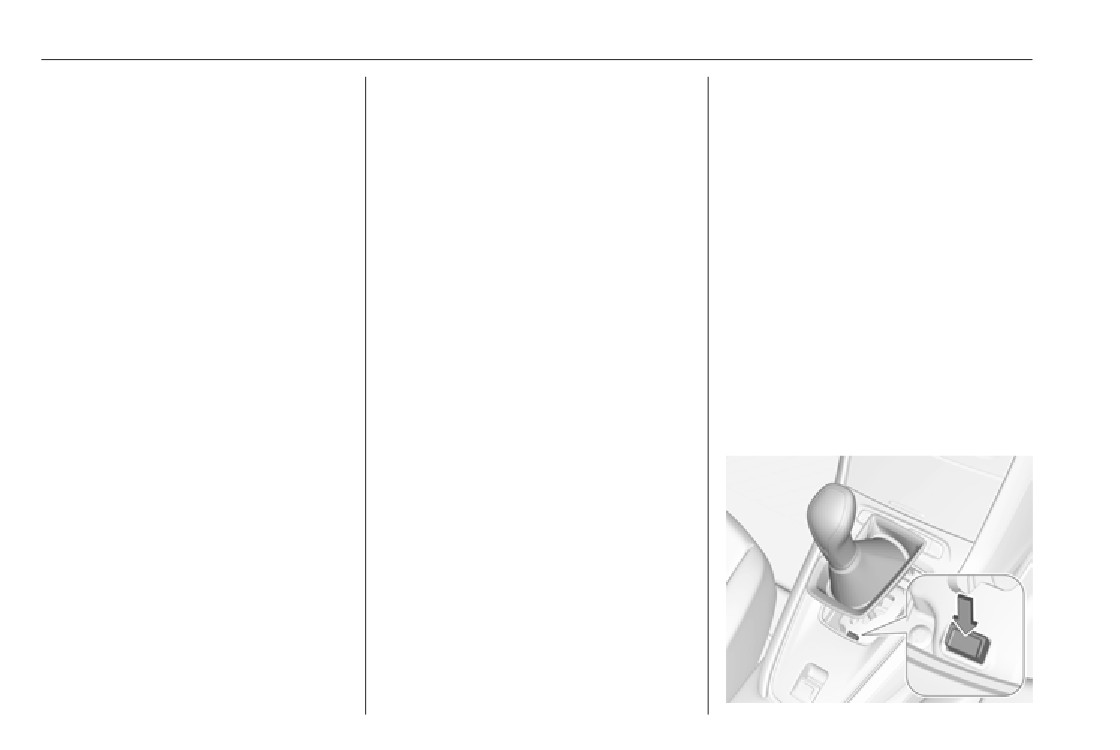
150
Driving and operating
In manual mode, no automatic
enables the driver to select
Interruption of power supply
shifting to a higher gear takes place
manually first, second or third
In the event of an interruption of
at high engine revolutions.
gear for starting off.
power supply, the selector lever
Gear shift indication
Kickdown
cannot be moved out of the P
position.
The symbol R or S with a number
Pressing down the accelerator pedal
If the vehicle battery is discharged,
beside it is indicated when
beyond the kickdown detent will lead
start the vehicle using jump leads
gearshifting is recommended for fuel
to maximum acceleration
3 244.
saving reasons.
independent of selected driving
mode. The transmission shifts to a
If the vehicle battery is not the cause
Shift indication appears only in
lower gear depending on engine
of the fault, release the selector lever.
manual mode.
speed.
1. Apply the parking brake.
2. Release the selector lever trim
Electronic driving
Fault
from the centre console. Poke
programmes
with a finger into the leather
In the event of a fault a message is
● Following a cold start, the
socket below the selector lever
displayed in the Driver Information
operating temperature
and push the trim upwards.
Centre.
programme increases engine
Vehicle messages 3 107.
speed to quickly bring the
catalytic converter to the required
Electronic transmission control
temperature.
enables only third gear. The
transmission no longer shifts
● Special programmes
automatically.
automatically adapt the shifting
points when driving up inclines or
Do not drive faster than 100 km/h.
down hills.
Have the cause of the fault remedied
● In snowy or icy conditions or on
by a workshop.
other slippery surfaces, the
electronic transmission control
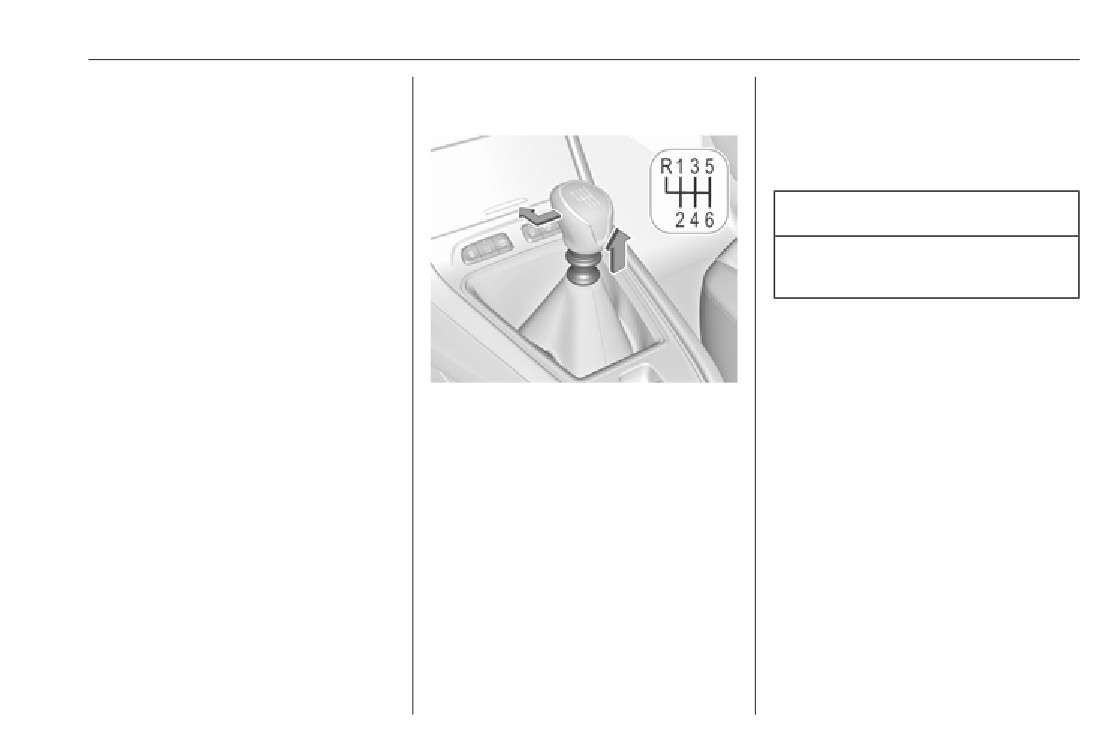
Driving and operating
151
3. Push down the button and move
When clutch slip is detected for a
Manual transmission
the selector lever out of P. Have
specific time, the engine power will be
the cause of the power supply
reduced. A warning is displayed in the
interruption remedied by a
Driver Information Centre. Release
workshop.
the clutch.
4. Mount the selector lever trim onto
the centre console and refit.
Caution
It is not advisable to drive with the
hand resting on the selector lever.
Gear shift indication 3 97.
Stop-start system 3 139.
To engage reverse on 6-speed
transmission, depress the clutch
pedal, pull the ring under the selector
lever and move the selector lever
quite to the left and front.
If the gear does not engage, set the
selector lever to neutral, release the
clutch pedal and depress again. Then
repeat gear selection.
Do not slip the clutch unnecessarily.
When operating, depress the clutch
pedal completely. Do not use the
pedal as a foot rest.