Opel Meriva (2017 year). Manual - part 7


  Index      Opel     Opel Meriva (2017 year) - manual in english


Search            copyright infringement  


Content      ..     5      6      7      8     ..


Opel Meriva (2017 year). Manual - part 7


102

Instruments and controls

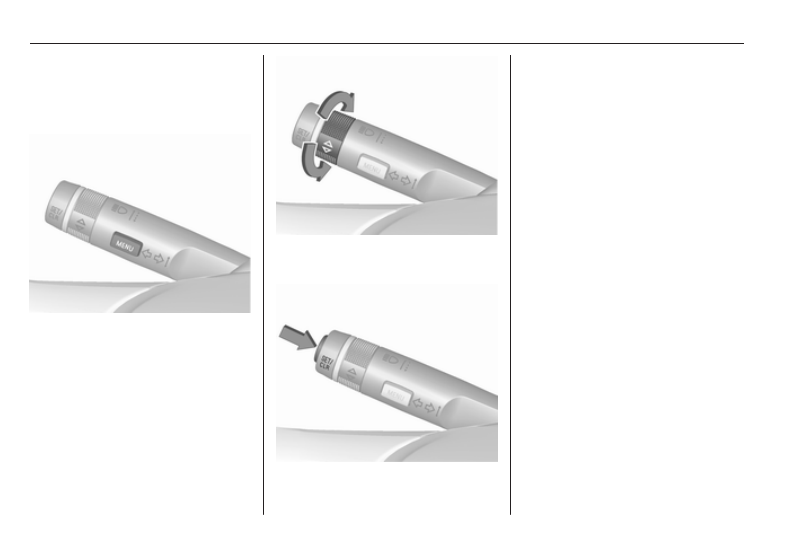
Selecting menus and functions

The menus and functions can be

selected via the buttons on the turn

signal lever.

Press MENU to switch between the

menus or to return from a submenu to

the next higher menu level.

Turn the adjuster wheel to highlight a

menu option or to set a numeric value.

Press SET/CLR to select a function or

to confirm a message.

Vehicle Information Menu

Press MENU to select the Vehicle

Information Menu, or on Uplevel-

Combi-Display select X.
Turn the adjuster wheel to select a

submenu. Press SET/CLR to confirm.
Follow the instructions given in the

submenus.
Possible submenus can be,

depending on the version:

● Unit: Displayed units can be

changed.
On vehicles with Midlevel-

Display following settings can be

selected:
● Unit1: Great Britain
● Unit2: United States
● Unit3: Europe

● Tyre Pressure System: Checks

tyre pressure of all wheels during

driving 3 198.

● Tyre Load: Select tyre pressure

category according to the

actually inflated tyre pressure

3

 198.

-------------------------------------------------------------------------------------------------------------------------------------------------------------

Instruments and controls

103

● Remaining Oil Life: Indicates

when to change the engine oil

and filter 3 91.

● Speed Warning: If exceeding the

preset speed, a warning chime

will be activated.

● Language: Displayed language

can be changed if the vehicle is

not equipped with a radio.

Selection and indication can be

different between Midlevel-, Uplevel-,

and Uplevel-Combi-Display.

Trip/Fuel Information Menu

Press MENU to select the Trip/Fuel

Information Menu, or select W on

Uplevel-Combi-Display.
Turn the adjuster wheel to select a

submenu. Press SET/CLR to confirm.

● trip odometer 1
● trip odometer 2
● digital speed

Trip odometer 2 and digital speed are

only available on vehicles with

Uplevel-Display or Uplevel-Combi-

Display.
Reset trip odometer by pressing

SET/CLR on the turn signal lever for

a few seconds or by pressing the

reset knob between speedometer

and Driver Information Centre with

the ignition on.
On vehicles with trip computer more

submenus are available.
Selection and indication can be

different between Midlevel-, Uplevel-,

and Uplevel-Combi-Display.
Trip/Fuel Information Menu, Trip

Computer 3 109.

-------------------------------------------------------------------------------------------------------------------------------------------------------------

104

Instruments and controls

Graphic-Info-Display,

Colour-Info-Display

Depending on the vehicle

configuration the vehicle has a

● Graphic-Info-Display

or

● Colour-Info-Display

The Info-Display is located in the

instrument panel above the

Infotainment system.

Graphic-Info-Display

Depending on the Infotainment

system, the Graphic-Info-Display is

available in two versions.

Graphic-Info-Display indicates:

● time 3 86
● outside temperature 3 85
● date 3 86
● electronic climate control settings

3

 132

● Infotainment system, see

description for Infotainment

system in the Infotainment

manual

● settings for vehicle

personalisation 3 112

Colour-Info-Display

The Colour-Info-Display indicates in

colour:

● time 3 86
● outside temperature 3 85
● date 3 86
● electronic climate control settings

3

 132

● rear view camera 3 158
● Infotainment system, see

description for Infotainment

system in the Infotainment

manual

-------------------------------------------------------------------------------------------------------------------------------------------------------------

Instruments and controls

105

● navigation, see description for

Infotainment system in the

Infotainment manual

● system settings
● vehicle messages 3 106
● settings for vehicle

personalisation 3 112

The type of information and how it is

displayed depends on the equipment

of the vehicle and the settings made.

Selecting menus and settings

Menus and settings are accessed via

the display.

Selections are made via:

● menus
● function buttons and

multifunction knob of the

Infotainment system

Selecting with the Infotainment

system

Select a function via the Infotainment

system buttons. The menu of the

selected function is displayed.
The multifunction knob is used to

select an item and to confirm.

Multifunction knob

The multifunction knob is the central

control element for the menus:
Turn

● to mark a menu option
● to set a numeric value or to

display a menu option

Press (the outer ring)

● to select or activate the marked

option

● to confirm a set value
● to switch a system function on/off

BACK
Press BACK to:

● exit a menu without changing

settings

● return from a submenu to a

higher menu level

● delete the last character in a

character sequence

Press and hold BACK for a few

seconds to delete the entire entry.
Vehicle personalisation 3 112,

Memorised settings 3 22.

-------------------------------------------------------------------------------------------------------------------------------------------------------------

106

Instruments and controls

Vehicle messages

Messages are indicated mainly in the

Driver Information Centre, in some

cases together with a warning and

signal buzzer.

Press SET/CLR, MENU or turn the

adjuster wheel to confirm a message.

Vehicle messages on the

Midlevel-Display

The vehicle messages are displayed

as code numbers.
No. Vehicle message
2

No radio remote control

detected, depress clutch pedal

for a restart

3

Engine coolant level low

4

Air conditioning off

5

Steering wheel is locked

No. Vehicle message
6

Depress brake pedal to release

electrical parking brake

7

Turn steering wheel, switch

ignition off and then on

9

Turn steering wheel, start

engine again

12 Vehicle overloaded
13 Compressor overheated
15 Centre high-mounted brake

light failure

16 Brake light failure
17 Headlight levelling malfunction
18 Left low beam failure
19 Rear fog light failure
20 Right low beam failure
21 Left sidelight failure
22 Right sidelight failure
23 Reversing light failure
24 Number plate light failure

-------------------------------------------------------------------------------------------------------------------------------------------------------------

Instruments and controls

107

No. Vehicle message
25 Left front turn signal failure
26 Left rear turn signal failure
27 Right front turn signal failure
28 Right rear turn signal failure
29 Check trailer brake light
30 Check trailer reversing light
31 Check left trailer turn signal
32 Check right trailer turn signal
33 Check trailer rear fog light
34 Check trailer rear light
35 Replace battery in radio remote

control

48 Clean side blind zone alert

system

53 Tighten gas cap
54 Water in diesel fuel filter
55 Diesel particle filter is full

3

 145

No. Vehicle message
56 Tyre pressure imbalance on

front axle

57 Tyre pressure imbalance on

rear axle

58 Tyres without TPMS sensors

detected

59 Open and then close driver

window

60 Open and then close front

passenger window

61 Open and then close rear left

window

62 Open and then close rear right

window

65 Theft attempted
66 Service theft alarm system
67 Service steering wheel lock
68 Service power steering
69 Service suspension system
70 Service level control system

No. Vehicle message
71 Service rear axle
74 Service AFL
75 Service air conditioning
76 Service side blind zone alert

system

79 Top up engine oil
81 Service transmission
82 Change engine oil soon
83 Service adaptive cruise control
84 Engine power is reduced
89 Service vehicle soon
94 Shift to park before exiting
95 Service airbag
128 Bonnet open
134 Park assist fault, clean bumper
136 Service parking assist

-------------------------------------------------------------------------------------------------------------------------------------------------------------

108

Instruments and controls

No. Vehicle message
174 Low vehicle battery
258 Park assist off

Vehicle messages on the

Uplevel-Display or

Uplevel-Combi-Display

The vehicle messages are displayed

as text. Follow the instructions given

in the messages.
The system displays messages

regarding the following topics:

● fluid levels
● anti-theft alarm system

● brakes
● drive systems
● ride control systems
● cruise control
● object detection systems
● lighting, bulb replacement
● wiper/washer system
● doors, windows
● radio remote control
● seat belts
● airbag systems
● engine and transmission
● tyre pressure
● diesel particle filter

Vehicle messages on the

Colour-Info-Display

Some important messages appear

additionally in the

Colour-Info-Display. Press the

multifunction knob to confirm a

message. Some messages only pop-

up for a few seconds.

Warning chimes

Only one warning chime will sound at

a time.
The warning chime regarding

unfastened seat belts has priority

over any other warning chime.

When starting the engine or whilst

driving

● If seat belt is not fastened.
● If a door or the tailgate is not fully

closed when starting-off.

● If a certain speed is exceeded

with parking brake applied.

● If a programmed speed is

exceeded.

● If a warning message or a

warning code appears in the

Driver Information Centre.

● If the parking assist detects an

object.

● If reverse gear is engaged and

the rear end carrier is extended.

-------------------------------------------------------------------------------------------------------------------------------------------------------------

Instruments and controls

109

● If a fault in the automatic locking

system is detected.

● If the diesel particle filter has

reached the maximum filling

level.

When the vehicle is parked and/or

the driver's door is opened

● With exterior lights on.

During an Autostop

● If the driver's door is opened.

Battery voltage

When the vehicle battery voltage is

running low, a warning message or

warning code 174 will appear in the

Driver Information Centre.

1. Switch off immediately any

electrical consumers which are

not required for a safe ride, e.g.

seat heating, heated rear window

or other main consumers.

2. Charge the vehicle battery by

driving continuously for a while or

by using a charging device.

The warning message or warning

code will disappear after the engine

has been started twice consecutively

without a voltage drop.
If the vehicle battery cannot be

recharged, have the cause of the fault

remedied by a workshop.

Trip computer

The menus and functions can be

selected via the buttons on the turn

signal lever 3 101.

Press MENU to select the Trip/Fuel

Information Menu, or select W on

the Uplevel-Combi-Display.

-------------------------------------------------------------------------------------------------------------------------------------------------------------

110

Instruments and controls

Trip/Fuel Information Menu on

Uplevel-Display
Turn the adjuster wheel to select one

of the submenus:

● trip odometer 1
● trip odometer 2
● range
● average consumption
● instantaneous consumption
● average speed
● digital speed

Trip/Fuel Information Menu on

Uplevel-Combi-Display
Turn the adjuster wheel to select a

page:

Page 1:

● trip odometer 1
● average consumption 1
● average speed 1

Page 2:

● trip odometer 2
● average consumption 2
● average speed 2

-------------------------------------------------------------------------------------------------------------------------------------------------------------

Instruments and controls

111

Page 3:

● digital speed
● range
● instantaneous consumption

Trip computer 1 and 2

The information of two trip computers

can be reset separately for odometer,

average consumption and average

speed by pressing SET/CLR, making

it possible to display different trip

information for different drivers.

Trip odometer

Trip odometer displays the recorded

distance since a certain reset.
Trip odometer counts up to a distance

of 2,000 km and then restarts at 0.

Reset trip odometer by pressing

SET/CLR on the turn signal lever for

a few seconds or, on vehicles with

reset knob, by pressing the reset

knob near the speedometer

separately for selected page 1 or 2.

Fuel range

Range is calculated from current fuel

tank level and current consumption.

The display shows average values.
After refuelling, the range is updated

automatically after a brief delay.
When the fuel level in the tank is low,

a message appears in the display.

-------------------------------------------------------------------------------------------------------------------------------------------------------------

112

Instruments and controls

When the tank has to be refuelled

immediately, a warning message is

displayed.
Additionally the control indicator i in

the fuel gauge illuminates or flashes

3

 99.

Fuel range LPG version

Display of approximate fuel range

available with the remaining fuel in

each respective fuel tank of gasoline

and LPG fuel, along with a total range

of both fuel types together. Switch

between the mode by pressing

SET/CLR.

Average consumption

Display of average consumption. The

measurement can be reset at any

time and starts with a default value.
To reset, press SET/CLR for a few

seconds separately for selected page

1 or 2.
On vehicles with LPG engines:

Average consumption is indicated for

the currently selected mode; LPG or

Gasoline.

Instantaneous consumption

Displays the instantaneous

consumption.
On vehicles with LPG engines:

Instantaneous consumption is

indicated for the currently selected

mode; LPG or Gasoline.

Average speed

Display of average speed. The

measurement can be reset at any

time.
To reset, press SET/CLR for a few

seconds separately for selected page

1 or 2.

Digital speed

Digital display of the instantaneous

speed.

Vehicle personalisation

The vehicle's behaviour can be

personalised by changing the settings

in the Info-Display.
Some of the personal settings for

different drivers can be memorised

individually for each vehicle key.

Memorised settings 3 22.
Depending on vehicle equipment and

country-specific regulations some of

the functions described below might

not be available.
Some functions are only displayed or

active when the engine is running.

Personal settings in the

Graphic-Info-Display

CD 300/CD 400/CD 400plus

-------------------------------------------------------------------------------------------------------------------------------------------------------------

Instruments and controls

113

Press CONFIG. The menu Settings is

displayed.

The following settings can be

selected by turning and pressing the

multifunction knob:

● Languages
● Time Date
● Radio settings
● Phone settings
● Vehicle settings

In the corresponding submenus the

following settings can be changed:

Languages

Selection of the desired language.

Time Date

See Clock 3 86.

Radio settings

See description for Infotainment

system in the Infotainment manual.

Phone settings

See description for Infotainment

system in the Infotainment manual.

Vehicle settings

● Climate and air quality

Auto fan speed: Modifies the

level of the cabin airflow of the

climate control in automatic

mode.
Climate control mode: Controls

the state of the cooling

compressor when the vehicle is

started. Last setting

(recommended) or at vehicle

start either always ON or always

OFF.
Auto rear demist: Activates

automatically rear heated

window.

-------------------------------------------------------------------------------------------------------------------------------------------------------------

114

Instruments and controls

● Comfort settings

Chime volume: Changes the

volume of warning chimes.
Personalization by driver:

Activates or deactivates the

personalisation function.
Rear auto wipe in reverse:

Activates or deactivates

automatic switching on of the

rear window wiper when reverse

gear is engaged.

● Park assist / Collision detection

Park assist: Activates or

deactivates the ultrasonic

parking assist.

● Exterior ambient lighting

Duration upon exit of vehicle:

Activates or deactivates and

changes the duration of exit

lighting.
Exterior lighting by unlocking:

Activates or deactivates the

welcome lighting.

● Remote locking, unlocking,

starting
Remote door unlock: Changes

the configuration to unlock only

the driver's door or the whole

vehicle whilst unlocking.

● Restore factory settings

Restore factory settings: Resets

all settings to the default settings.

Settings in the Colour-Info-

Display

CD 600/Navi 650/Navi 950

Press CONFIG on the Infotainment

system faceplate to enter the

Configuration Settings menu.
Turn the multifunction knob to scroll

upwards or downwards in the list.

Press the multifunction knob

(Navi 950 / Navi 650: press the outer

ring) to select a menu item.

-------------------------------------------------------------------------------------------------------------------------------------------------------------

Instruments and controls

115

● Languages
● Time and Date
● Radio Settings
● Phone Settings
● Navigation Settings
● Display Settings
● Vehicle Settings

In the corresponding submenus the

following settings can be changed:

Languages

Selection of the desired language.

Time and Date

See Infotainment manual for further

information.

Radio Settings

See Infotainment manual for further

information.

Phone Settings

See Infotainment manual for further

information.

Navigation Settings

See Infotainment manual for further

information.

Display Settings

● Home Page Menu:

See Infotainment manual for

further information.

● Rear Camera Options:

Press to adjust the rear camera

options 3 158.

● Display Off:

See Infotainment manual for

further information.

● Map Settings:

See Infotainment manual for

further information.

Vehicle Settings

● Climate and Air Quality

Auto Fan Speed: Modifies the fan

regulation. Changed setting will

be active after switching the

ignition off and on again.
Air Conditioning Mode: Activates

or deactivates cooling when

switching on the ignition or uses

the last chosen setting.
Auto Demist: Activates or

deactivates auto demist.
Auto Rear Demist: Activates

automatically the rear heated

window.

● Comfort and Convenience

Chime Volume: Changes the

volume of warning chimes.
Personalisation by Driver:

Activates or deactivates the

personalisation function.
Auto Reverse Gear Wiper:

Activates or deactivates

automatically switching on of the

rear window wiper when reverse

gear is engaged.

-------------------------------------------------------------------------------------------------------------------------------------------------------------

116

Instruments and controls

● Collision Detection Systems

Park Assist: Activates or

deactivates the ultrasonic

sensors.

● Lighting

Vehicle Locator Lights: Activates

or deactivates the entry lighting.
Exit Lighting: Activates or

deactivates and changes the

duration of exit lighting.

● Remote Lock/Unlock/Start

Remote Door Unlock: Changes

the configuration to unlock only

the driver's door or the whole

vehicle whilst unlocking.

● Return to Factory Settings?:

Resets all settings to the default

settings.

OnStar

OnStar is a personal connectivity and

service assistant with integrated

Wi-Fi hotspot. The OnStar service is

available 24 hours a day, seven days

a week.

Note

OnStar is not available for all

markets. For further information,

contact your workshop.
Note

In order to be available and

operational, OnStar needs a valid

OnStar subscription, functioning

vehicle electrics, mobile service and

GPS satellite link.

To activate the OnStar services and

set up an account, press Z and speak

with an advisor.
Depending on the equipment of the

vehicle, the following services are

available:

● Emergency services and support

in the case of a vehicle

breakdown

● Wi-Fi hotspot

● Smartphone application
● Remote control, e.g. location of

the vehicle, activation of horn and

lights

● Stolen vehicle assistance
● Vehicle diagnostics
● Destination download

Note

The OnStar module of the vehicle is

deactivated after ten days without an

ignition cycle. Functions requiring a

data connection will be available

again after switching on the ignition.

OnStar buttons

-------------------------------------------------------------------------------------------------------------------------------------------------------------

Instruments and controls

117

Privacy button

Press and hold j until a message is

heard to activate or deactivate the

transmission of the vehicle location.
Press j to answer a call or to end a

call to an advisor.
Press j to access the Wi-Fi settings.

Service button

Press Z to establish a connection to

an advisor.

SOS button

Press [ to establish a priority

emergency connection to a specially

trained emergency advisor.

Status LED

Green: The system is ready.
Green flashing: The system is on a

call.
Red: A problem arose.
Off: System is in standby mode.
Red / green flashing for a short period

of time: Transmission of the vehicle

location has been deactivated.

OnStar services

General services

If you need any information

concerning e.g. opening hours, points

of interest and destinations or if you

need any support e.g. in the case of a

vehicle breakdown, a flat tyre and

empty fuel tank, press Z to establish

a connection to an advisor.

Emergency services

In the case of an emergency situation,

press [ and talk to an advisor. The

advisor then contacts emergency or

assistance service providers and

directs them to your vehicle.
In the case of an accident with

activation of airbags or belt

tensioners, an automatic emergency

call is established. The advisor is

immediately connected to your

vehicle to see whether help is

needed.

Wi-Fi hotspot

The Wi-Fi hotspot of the vehicle

provides internet connectivity with a

maximum speed of 4G/LTE.

Note

The Wi-Fi hotspot functionality is not

available for all markets.

Up to seven devices may be

connected.
To connect a mobile device with the

Wi-Fi hotspot:

1. Press j and then select Wi-Fi

settings on the Info-Display. The

settings displayed include the Wi-

Fi hotspot name (SSID),

password and connection type.

2. Start a Wi-Fi network search on

your mobile device.

3. Select your vehicle hotspot

(SSID) when listed.

4. When prompted, enter the

password on your mobile device.

Note

To change the SSID or password,

press Z and talk to an advisor or log

in to your account.

To switch off the Wi-Fi hotspot

functionality, press Z to call an

advisor.

-------------------------------------------------------------------------------------------------------------------------------------------------------------


Content      ..     5      6      7      8     ..