Opel Frontera UBS. Manual - part 1294


  Index      Opel     Opel Frontera UBS - service repair manual 1998-2002 year


Search            


Content   ..  1292  1293  1294  1295   ..


Opel Frontera UBS. Manual - part 1294
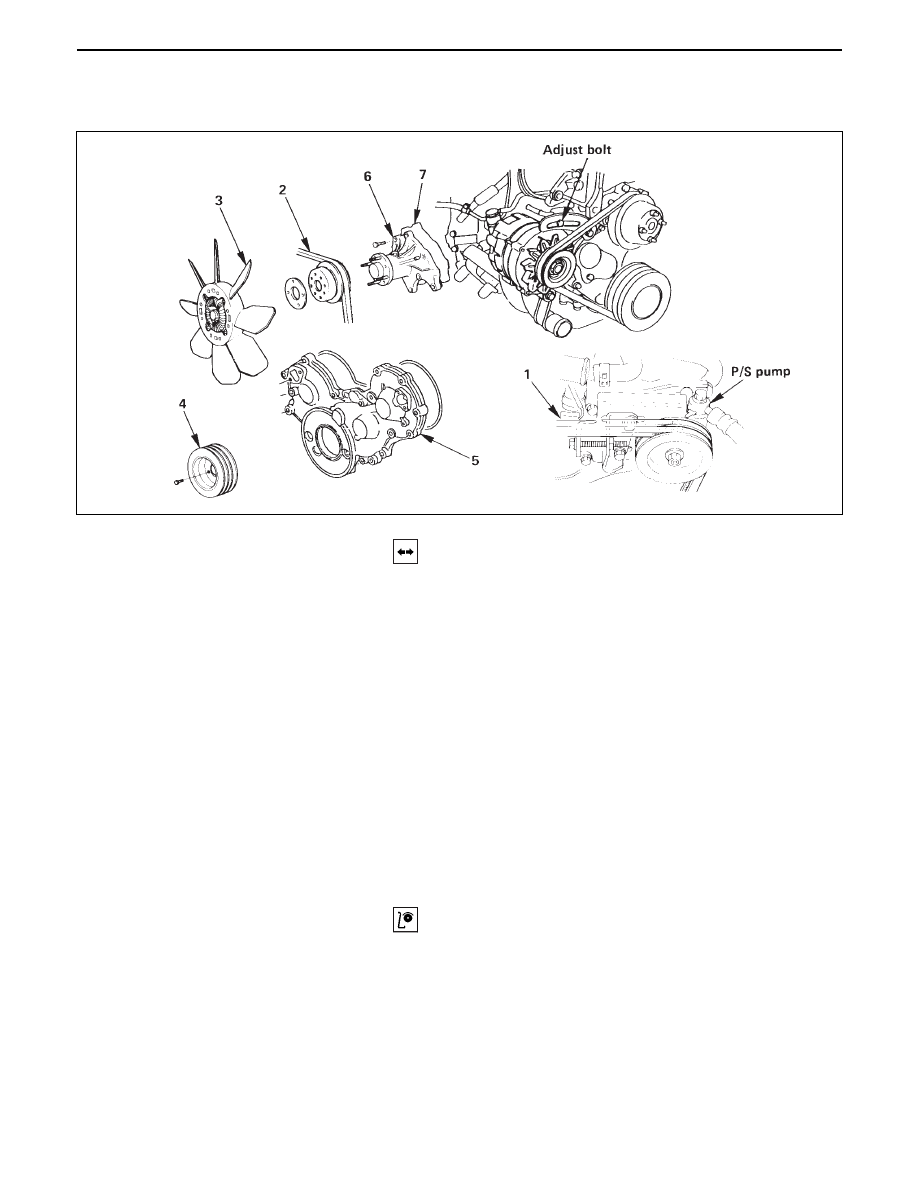


ENGINE COOLING 6B – 5

ON-VEHICLE SERVICE

WATER PUMP

REMOVAL

Preparation

Drain coolant.

1. P/S pump Drive Belts

Loosen P/S pump mounting bolt, loosen adjust
bolts and remove the drive belts.

2. AC Generator Drive Belt

Loosen AC Generator mounting bolt (bottom
side), adjust plate lock bolt, and remove the drive
belt.

3. Cooling Fan Assembly

Remove lock nut and take out cooling fan
assembly, distance piece, and fan pulley.

4. Crankshaft Damper Pulley.

5. Gear Case Cover.

6. Water Pump Assembly

7. O-ring

INSPECTION

Make necessary repair and parts replacement if extreme
wear or damage is found during inspection. Should any
of the following problems occur, the entire water pump
assembly must be replaced.

Cracks in the coolant pump body

Coolant leakage from the seal unit

Play or abnormal noise in the bearing

Cracks or corrosion in the impeller

6B – 6 ENGINE COOLING

INSTALLATION

7. O-ring

Set O-ring in water pump body groove.

6. Water Pump Assembly

Install water pump assembly, and tighten to
specified torque.

20(2.0/14)

N·m (Kg·m/lb.ft)

5. Gear Case Cover

Install gear case cover, and tighten to specified
torque.

8(0.8/69)

N·m (Kg·m/lb·in)

4. Crankshaft Damper Pulley

Install crankshaft damper pulley, and tighten to
specified torque.

3. Cooling Fan Assembly

Install fan pulley, distance piece, and cooling fan
assembly in this order on water pump, and tighten
to specified torque.

19(1.9/14)

N·m (Kg·m/lb·ft)

2. AC Generator Drive Belt

Install AC Generator drive belt and adjust belt
tension.

(Refer to Drive Belt Adjustment in this Section).

1. P/S Pump Drive Belts

Install P/S pump drive belts and adjust belt
tension.

(Refer to Drive Belt Adjustment in this Section).

8(0.8/69)

N·m (Kg·m/lb·in)

ENGINE COOLING 6B – 7

THERMOSTAT

REMOVAL

Preparation

Disconnect battery ground cable.

Drain coolant from the radiator and engine.

1.

Water Hose; Turbocharger (4JG2-T Only)

2.

Outlet Pipe

Remove mounting bolt and remove outlet pipe
together with radiator hose.

3.

Gasket

4.

Thermostat

INSPECTION

Submerge the thermostat assembly in the water.
Place wooden blocks on the bottom of the water
container.
Not to directly heat the thermostat.
Gradually increase the water temperature. Stir the water
so that the entire water is same temperature.

Make sure that primary valve begins to open at the
specified temperature.

82 (180 )

°C (°F)

Valve Opening Temperature

6B – 8 ENGINE COOLING

Make sure that secondary valve opens fully at the
specified temperature.

Make necessary repair and parts replacement if extreme
wear or damage is found during inspection.

INSTALLATION

4. Thermostat
3. Gasket
2. Outlet Pipe

Connect outlet pipe and tighten bolts to the
specified torque.

19(1.9/14)

N·m (Kgm/lb·ft)

1. Water Hose: Turbocharger (4JG2-T Only)

Install battery ground cable.

Pour coolant,

Start the engine and check coolant leakage.

95 (203)

°C (°F)

Valve Full Open Temperature


Content   ..  1292  1293  1294  1295   ..