Opel Frontera UBS. Manual - part 122


  Index      Opel     Opel Frontera UBS - service repair manual 1998-2002 year


Search            


Content   ..  120  121  122  123   ..


Opel Frontera UBS. Manual - part 122


4A2B–8

DIFFERENTIAL (REAR 244mm)

Differential Assembly

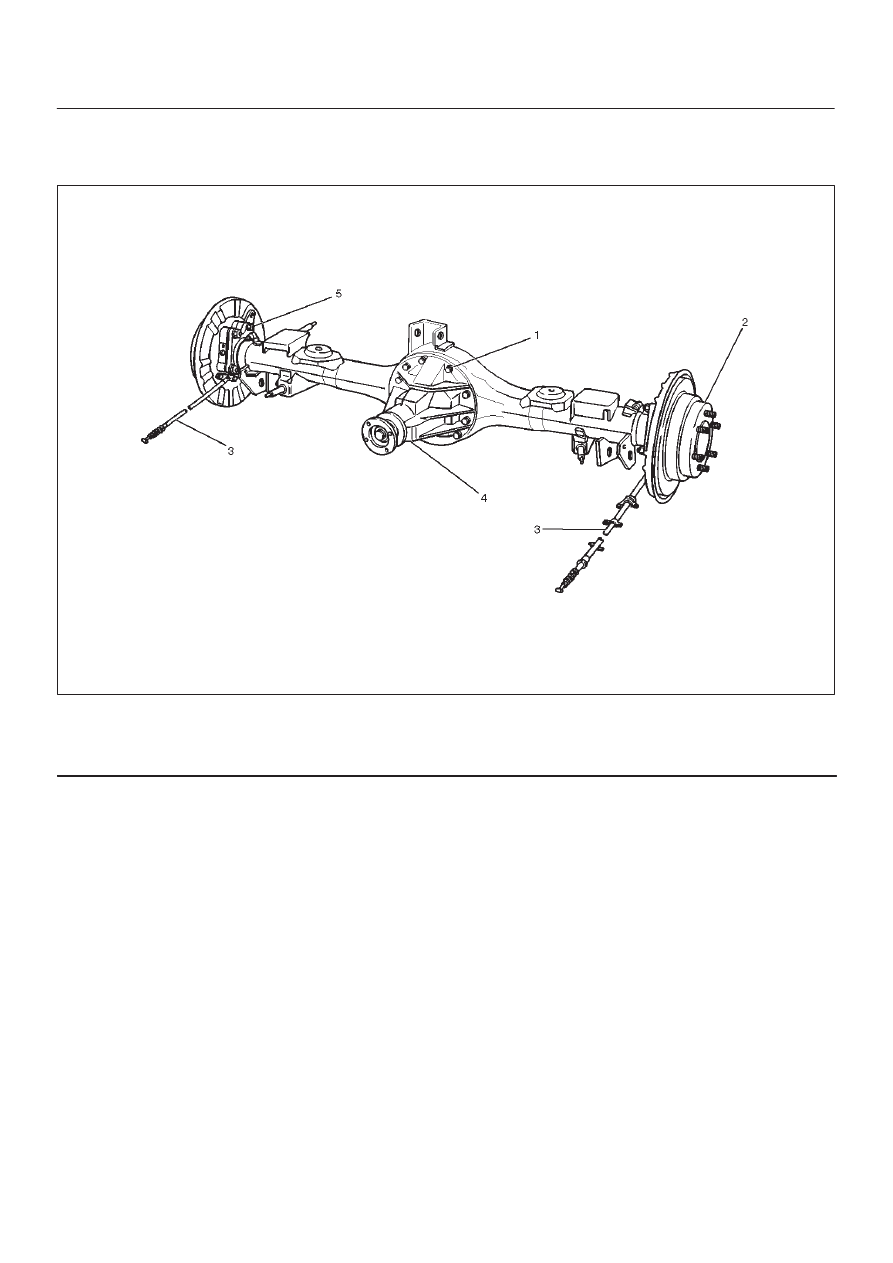
Differential Assembly and Associated Parts

425RW044

Legend

(1) Bolt and Nut
(2) Axle Shaft Assembly

(3) Parking Brake Cable
(4) Differential Assembly
(5) Nut

Removal

1. Jack up and support the frame with stands.
2. Remove the wheel and tire.  Refer to Wheel in

Steering section.

3. Drain the differential oil.
4. Remove the propeller shaft.  Refer to Rear Propeller

Shaft in this section.

5. Remove the ABS speed sensor.  Refer to  Anti–lock

Brake System  in Brakes section.

6. Remove the parking brake cable fastening clip and

disconnect the equalizer section.  Refer to Parking
Brakes in Brake section.

7. Remove the bearing holder fixing nuts.
8. Remove axle shaft assembly, be sure not to damage

the oil seal by axle shaft.

9. Remove differential carrier mounting bolts and nuts.

10. Remove differential assembly.

DIFFERENTIAL (REAR 244mm)

4A2B–9

Installation

1. Clean the contact surfaces of the axle and differential

carrier.  As shown in the drawing, apply Three Bond
TB1215 or equivalent then install differential
assembly.

425RS006

2. Install bolt and nut. Tighten the differential carrier

mounting bolts and nuts to the specified torque.

Torque:Nuts 44N·m (4.5kg·m/33 lb ft) 

Bolts 64N·m (6.5kg·m/47 lb ft) 

3. Install axle shaft assembly.  Be sure not to damage

the oil seal by axle shaft.

4. Install nut, refer to Axle Shaft in this section.
5. Install parking brake cable, refer to Parking Brakes in

Brake section.

NOTE: After completing the assembling work, fill the
prescribed gear oil to the filler hole.

Lubricant capacity: 3.0 liter (2.6 Imp qt/3.2
US qt) 

6. Tighten the oil filler plug to the specified torque.

Torque: 78N·m (8.0kg·m/58 lb ft) 

4A2B–10

DIFFERENTIAL (REAR 244mm)

Disassembled View

415RW002

Legend

(1) Flange Nut and Washer
(2) Flange
(3) Oil Seal
(4) Oil Seal Slinger
(5) Outer Bearing
(6) Outer Bearing Outer Race
(7) Diff Carrier
(8) Bearing Cap
(9) Bolt

(10) Inner Bearing Outer Race

(11) Collapsible Spacer

(12) Inner Bearing
(13) Adjust Shim (Pinion Position)
(14) Drive Pinion Shaft
(15) Adjust Shim (Diff Cage Assembly)
(16) Diff Preload/Backlash
(17) Side Bearing
(18) Side Bearing Outer Race

DIFFERENTIAL (REAR 244mm) 4A2B–11

Disassembly

1. Using holding fixture 5–8840–2029–0 and holding

fixture base 5–8840–0003–0, fix the differential
assembly to the bench.

425RW058

2. Apply a setting mark to the side bearing cap and the

differential carrier then remove bearing cap.

425RS009

3. Remove differential cage assembly.
4. Remove side bearing outer race. After removal, keep

the right and left hand side bearing assemblies
separate to maintain inner and outer race
combinations.

5. Remove side bearing by  using remover

5–8840–2587–0 and adapter 5–8840–2576–0.
Select collet halves 44803 in remover kit
5–8840–2587–0 for side bearing removal and insert
is not required for this operation.

415RW041

6. Note the thickness and position of the shims then

remove adjust shim.

7. Remove the flange nut and washer by using pinion

flange holder 5–8840–0133–0 after raising up its
staked parts completely.

415RW040


Content   ..  120  121  122  123   ..