Nissan Sentra (2022 year). Manual in english - page 14


  Index      Manuals     Nissan Sentra (2022 year). Manual in english


Search            copyright infringement  


Content      ..     12      13      14      15     ..


Nissan Sentra (2022 year). Manual in english - page 14


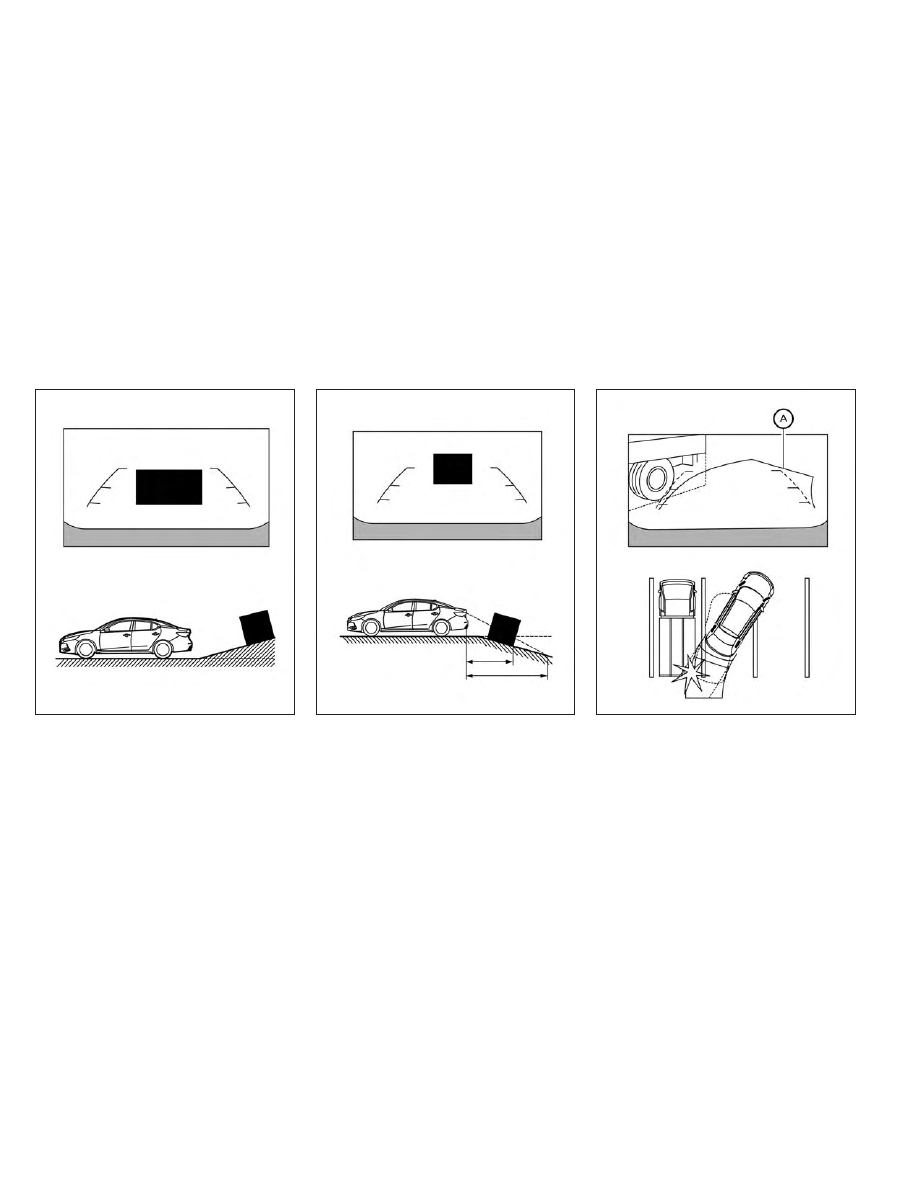
Backing up on a steep uphill

When backing up the vehicle up a hill, the
distance guide lines and the vehicle width
guide lines are shown closer than the ac-
tual distance. Note that any object on the
hill is further than it appears on the
monitor.

Backing up on a steep downhill

When backing up the vehicle down a hill,
the distance guide lines and the vehicle
width guide lines are shown farther than
the actual distance. Note that any object
on the hill is closer than it appears on the
monitor.

Backing up near a projecting
object

The predicted course lines

O

A

do not touch

the object in the display. However, the ve-
hicle may hit the object if it projects over
the actual backing up course.

LHA5322

LHA5323

LHA4995

4-20

Monitor, climate, audio, phone and voice recognition systems

Backing up behind a projecting
object

The position

O

C

is shown farther than the

position

O

B

in the display. However, the po-

sition

O

C

is actually at the same distance as

the position

O

A

. The vehicle may hit the

object when backing up to the position

O

A

if the object projects over the actual back-
ing up course.

HOW TO PARK WITH PREDICTED
COURSE LINES

WARNING

If the tires are replaced with different
sized tires, the predicted course lines
may be displayed incorrectly.

On a snow-covered or slippery road,
there may be a difference between
the predicted course line and the ac-
tual course line.

If the battery is disconnected or be-
comes discharged, the predicted
course lines may be displayed incor-
rectly. If this occurs, please perform
the following procedures:

Turn the steering wheel from lock
to

lock

while

the

engine

is

running.

Drive the vehicle on a straight road
for more than 5 minutes.

When the steering wheel is turned
with the ignition switch in the ACC
position, the predicted course lines
may be displayed incorrectly.

1. Visually check that the parking space is

safe before parking your vehicle.

2. The rear view of the vehicle is displayed

on the screen

O

A

when the shift lever is

moved to the R (Reverse) position.

LHA5324

LHA5043

Monitor, climate, audio, phone and voice recognition systems

4-21

3. Slowly back up the vehicle adjusting the

steering wheel so that the predicted
course lines

O

B

enter the parking space

O

C

.

4. Maneuver the steering wheel to make

the vehicle width guide lines

O

D

parallel

to the parking space

O

C

while referring

to the predicted course lines.

5. When the vehicle is parked in the space

completely, move the shift lever to the P
(Park) position and apply the parking
brake.

HOW TO SWITCH THE DISPLAY

With the ignition switch in the ON position,
press the CAMERA button or move the shift
lever to the R (Reverse) position to operate
the Intelligent Around View Monitor.

The Intelligent Around View Monitor dis-
plays different split screen views depend-
ing on the position of the shift lever. Press
the CAMERA button to switch between the
available views.

If the shift lever is in the R (Reverse) position,
the available views are:
• Rear view/bird’s-eye view split screen
• Rear view/front-side view split screen
• Full screen rear view

If the shift lever is in the P (Park) or D (Drive)
position, the available views are:
• Front view/bird’s-eye view split screen
• Front view/front-side view split screen

The display will switch from the Intelligent
Around View Monitor screen when:
• The shift lever is in the D (Drive) position

and the vehicle speed increases above
approximately 6 mph (10 km/h)

• A different screen is selected.

LHA4770

4-22

Monitor, climate, audio, phone and voice recognition systems

ADJUSTING THE SCREEN

1. While on the main menu screen, touch

the “Settings” key.

2. Use the arrow to tab to the next screen

and touch the “Camera” key.

3. Touch the “Display Settings” key.

4. Touch the “Brightness”, “Contrast”, Tint”,

“Color”, or “Black Level” key.

5. Adjust the item by touching the “+” or “–”

key on the touch-screen display.

NOTE:

Do not adjust any of the display settings
of the Intelligent Around View Monitor
while the vehicle is moving. Make sure
the parking brake is firmly applied.

INTELLIGENT AROUND VIEW
MONITOR SYSTEM LIMITATIONS

LHA5047

LHA4808

Monitor, climate, audio, phone and voice recognition systems

4-23

WARNING

Listed below are the system limitations
for Intelligent Around View Monitor.
Failure to operate the vehicle in accor-
dance with these system limitations
could result in serious injury or death.

Do not use the Intelligent Around
View Monitor with the outside mir-
rors in the stored position, and make
sure that the trunk is securely closed
when operating the vehicle using the
Intelligent Around View Monitor.

The apparent distance between ob-
jects

viewed

on

the

Intelligent

Around View Monitor differs from the
actual distance.

The cameras are installed on the
front grille, the outside mirrors and
above the rear license plate. Do not
put anything such as a license plate
frame on the vehicle that covers or
blocks the view of the cameras.

When washing the vehicle with high
pressure water, be sure not to spray it
around the cameras. Otherwise, wa-
ter may enter the camera unit caus-
ing water condensation on the lens, a
malfunction, fire or an electric shock.

Do not strike the cameras. They are
precision

instruments.

Doing

so

could cause a malfunction or cause
damage resulting in a fire or an elec-
tric shock.

There are some areas where the system
will not show objects and the system does
not warn of moving objects. When in the
front or rear view display, an object below
the bumper or on the ground may not be
viewed

O

1

. When in the bird’s-eye view, a tall

object near the seam

O

2

of the camera

viewing areas will not appear in the
monitor.

The following are operating limitations and
do not represent a system malfunction:
• There may be a delay when switching

between views.

• When the temperature is extremely high

or low, the screen may not display objects
clearly.

• When strong light directly shines on the

camera, objects may not be displayed
clearly.

• The screen may flicker under fluorescent

light.

• The colors of objects on the Intelligent

Around View Monitor may differ some-
what from the actual color of objects.

• Objects on the Intelligent Around View

Monitor may not be clear and the color
of the object may differ in a dark
environment.

• There may be differences in sharpness

between each camera view of the bird's-
eye view.

• Do not use wax on the camera lens. Wipe

off any wax with a clean cloth that has
been dampened with a diluted mild
cleaning agent, then wipe with a dry
cloth.

4-24

Monitor, climate, audio, phone and voice recognition systems

System temporarily unavailable

When the “!” icon is displayed on the screen,
there are abnormal conditions in the Intel-
ligent Around View Monitor. This will not
hinder normal driving operation but the
system should be inspected. It is recom-
mended that you visit a NISSAN dealer for
this service.

When the “[X]” icon is displayed on the
screen, the camera image may be receiv-
ing temporary electronic disturbances
from surrounding devices. This will not hin-
der normal driving operation but the sys-
tem should be inspected if it occurs fre-
quently. It is recommended that you visit a
NISSAN dealer for this service.

SYSTEM MAINTENANCE

CAUTION

Do not use alcohol, benzine or thin-
ner to clean the camera. This will
cause discoloration.

Do not damage the cameras as the
monitor screen may be adversely
affected.

If dirt, rain or snow accumulates on any of
the cameras

O

1

, the Intelligent Around

View Monitor may not display objects
clearly. Clean the camera by wiping with a
cloth dampened with a diluted mild clean-
ing agent and then wiping with a dry cloth.

LHA3591

LHA3592

LHA5325

Monitor, climate, audio, phone and voice recognition systems

4-25

1. CAMERA button

LHA5320

MOVING OBJECT DETECTION (MOD)
(if so equipped)

4-26

Monitor, climate, audio, phone and voice recognition systems

WARNING

Failure to follow the warnings and in-
structions for proper use of the Moving
Object Detection (MOD) system could
result in serious injury or death

The MOD system is not a substitute
for proper vehicle operation and is
not designed to prevent contact with
objects

surrounding

the

vehicle.

When maneuvering, always use the
outside mirrors and rearview mirror
and turn and check the surroundings
to ensure it is safe to maneuver.

The system is deactivated at speeds
above 5 mph (8 km/h). It is reacti-
vated at lower speeds.

The MOD system is not designed to
detect

surrounding

stationary

objects.

The MOD system can inform the driver of
moving objects near the vehicle when
backing out of garages, maneuvering in
parking lots and in other such instances.

The MOD system detects moving objects
by using image processing technology on
the image shown in the display.

MOD SYSTEM OPERATION

The MOD system will turn on automatically
under the following conditions:
• When the shift lever is in the R (Reverse)

position.

• When the CAMERA button is pressed to

activate the camera view on the display.

• When vehicle speed decreases below ap-

proximately 6 mph (10 km/h) and the
camera screen is displayed.

The MOD system operates in the following
conditions when the camera view is
displayed:
• When the shift lever is in the P (Park) or N

(Neutral) position and the vehicle is
stopped, the MOD system detects mov-
ing objects in the bird’s-eye view. The
MOD system will not operate if the out-
side mirrors are moving in or out, in the
stowed position, or if either front door is
opened.

LHA4190

Front and bird’s-eye views

Monitor, climate, audio, phone and voice recognition systems

4-27

• When the shift lever is in the D (Drive)

position and the vehicle speed is below
approximately 6 mph (10 km/h), the MOD
system detects moving objects in the
front view.

• When the shift lever is in the R (Reverse)

position and the vehicle speed is below
approximately 6 mph (10 km/h), the MOD
system detects moving objects in the
rear view. The MOD system will not oper-
ate if the trunk is open.

The MOD system does not detect moving
objects in the front-side view. The MOD
icon is not displayed on the screen when in
this view.

When the MOD system detects moving ob-
jects near the vehicle, a chime will be heard
when in front or rear view and a yellow
frame will be displayed on the view where
the objects are detected. While the MOD
system continues to detect moving ob-
jects, the yellow frame continues to be
displayed.

NOTE:

While the RCTA chime is beeping, the
MOD system does not chime.

In the bird’s-eye view, the yellow frame

O

1

is

displayed on each camera image (front,
rear, right, left) depending on where mov-
ing objects are detected.

The yellow frame

O

2

is displayed on each

view in the front view and rear view modes.

A blue MOD icon

O

3

is displayed in the view

where the MOD system is operative. A gray
MOD icon is displayed in the view where the
MOD system is not operative.

LHA5171

Rear and bird’s-eye views

LHA4997

Rear and front-side views

LHA4998

Full screen rear view

4-28

Monitor, climate, audio, phone and voice recognition systems

If the MOD system is turned off, the MOD
icon

O

3

is not displayed.

TURNING MOD ON AND OFF (if so
equipped)

Some vehicles include the option to allow
the MOD system to be turned on or off.

To turn the MOD system on or off:

1. Touch the “Setting” key.

2. Touch the “Camera” key.

3. Touch the “Moving Object Detection” key

to switch between ON or OFF.

MOD SYSTEM LIMITATIONS

WARNING

Listed below are the system limitations
for MOD. Failure to operate the vehicle
in accordance with these system limi-
tations could result in serious injury or
death.

Do not use the MOD system when
towing a trailer. The system may not
function properly.

Excessive noise (for example, audio
system volume or open vehicle win-
dow) will interfere with the chime
sound, and it may not be heard.

The MOD system performance will be
limited according to environmental
conditions and surrounding objects
such as:

When there is low contrast be-

tween background and the mov-
ing objects.

When there is a blinking source of

light.

When strong light such as another

vehicle’s headlight or sunlight is
present.

When camera orientation is not in

its usual position, such as when a
mirror is folded.

When there is dirt, water drops or

snow on the camera lens.

When the position of the moving

objects in the display is not
changed.

The MOD system might detect flow-
ing water droplets on the camera
lens, white smoke from the muffler,
moving shadows, etc.

The MOD system may not function
properly depending on the speed, di-
rection, distance or shape of the
moving objects.

If your vehicle sustains damage to
the parts where the camera is in-
stalled, leaving it misaligned or bent,
the sensing zone may be altered and
the MOD system may not detect ob-
jects properly.

When the temperature is extremely
high or low, the screen may not dis-
play objects clearly. This is not a
malfunction.

NOTE:
The blue MOD icon will change to or-
ange if one of the following has oc-
curred:

When the system is malfunctioning.

When the component temperature
reaches a high level (icon will blink).

When the RearView camera has de-
tected a blockage (icon will blink).

If the icon light continues to illuminate
orange, have the MOD system checked. It
is recommended that you visit a NISSAN
dealer for this service.

Monitor, climate, audio, phone and voice recognition systems

4-29

SYSTEM MAINTENANCE

CAUTION

Do not use alcohol, benzine or thin-
ner to clean the camera. This will
cause discoloration.

Do not damage the camera as the
monitor screen may be adversely
affected.

If dirt, rain or snow accumulates on any of
the cameras

O

1

, the MOD system may not

operate properly. Clean the camera by wip-
ing with a cloth dampened with a diluted
mild cleaning agent and then wiping with a
dry cloth.

Adjust air flow direction by moving the vent
slides or vent knobs.

For side vents: Move the slide toward
to close the vent and away from

to

open it.

For center vents: Rotate the knob clock-
wise to close the vent and counterclock-
wise to open it.

LHA5325

LHA5328

Side vents

LHA5329

Center vents

VENTS

4-30

Monitor, climate, audio, phone and voice recognition systems

1.

Fan speed control dial

2.

Heated seat switches (if so

equipped)

3.

Front defroster button

4.

Rear window and outside mirror

(if so equipped) defroster switch

5.

Air recirculation button

6.

MAX A/C / temperature control dial

7.

Air flow control buttons

8.

A/C (air conditioner) button

WARNING

The air conditioner cooling function
operates only when the engine is
running.

Do not leave children or adults who
would normally require the assis-
tance of others alone in your vehicle.
Pets should also not be left alone.
They could accidentally injure them-
selves or others through inadvertent
operation of the vehicle. Also, on hot,
sunny days, temperatures in a closed
vehicle could quickly become high
enough to cause severe or possibly
fatal injuries to people or animals.

Do not use the recirculation mode for
long periods as it may cause the inte-
rior air to become stale and the win-
dows to fog up.

NOTE:
• Odors from inside and outside the ve-

hicle can build up in the air conditioner
unit. Odor can enter the passenger
compartment through the vents.

• When parking, set the heater and air

conditioner controls to turn off air re-
circulation to allow fresh air into the
passenger compartment. This should
help reduce odors inside the vehicle.

LHA4783

HEATER AND AIR CONDITIONER
(manual) (if so equipped)

Monitor, climate, audio, phone and voice recognition systems

4-31

CONTROLS

Fan speed control dial

The

fan speed control dial turns the

fan on and off and controls fan speed.

Air flow control buttons

The air flow control buttons allow you to
select the air flow outlets.

Air flows from center and side
vents.

Air flows from center and side
vents and foot outlets.

Air flows mainly from foot out-
lets.

Air flows from defroster outlets
and foot outlets.

Air flows mainly from defroster
outlets.

Temperature control dial

The temperature control dial allows you to
adjust the temperature of the outlet air. To
lower the temperature, turn the dial to the
left. To increase the temperature, turn the
dial to the right.

Turn the dial to the MAX A/C position for
maximum cooling. Air will flow from center
and side vents.

MAX A/C is an automatic change to recir-
culate, A/C on and vent mode to improve
A/C performance.

Air recirculation button

On position (Indicator light on):

Interior air is recirculated inside the vehicle.

Press the

button to the on position

when:
• driving on a dusty road.
• to prevent traffic fumes from entering

passenger compartment.

• for maximum cooling when using the air

conditioner.

Off position (Indicator light off):

Outside air is drawn into the passenger
compartment and distributed through the
selected outlet.

Use the off position for normal heater or air
conditioner operation.

A/C (air conditioner) button

Start the engine, turn the

fan speed

control dial to the desired position and
press the

button to turn on the air

conditioner. To turn off the air conditioner,
press the

button again.

The air conditioner cooling function op-
erates only when the engine is running.

Rear window and outside mirror
(if so equipped) defroster switch

For additional information, see “Rear win-
dow and outside mirror (if so equipped)
defroster switch” (P. 2-50).

Heated seat switches (if so
equipped)

For additional information, see “Heated
seat switches” (P. 2-59).

HEATER OPERATION

Heating

This mode is used to direct heated air to
the foot outlets. Some air also flows from
the defrost outlets and the side vent
outlets.

1. Press the

button to the off position

for normal heating.

2. Press the

air flow control button.

3. Turn the

fan speed control dial to

the desired position.

4-32

Monitor, climate, audio, phone and voice recognition systems

4. Turn the temperature control dial to the

desired position between the middle
and the hot position.

Ventilation

This mode directs outside air to the side
and center vents.

1. Press the

button to the off position.

2. Press the

air flow control button.

3. Turn the

fan speed control dial to

the desired position.

4. Turn the temperature control dial to the

desired position.

Defrosting or defogging

This mode directs the air to the defrost
outlets to defrost/defog the windows.

1. Press the defrost/defog button

.

2. Turn the

fan speed control dial to

the desired position.

3. Turn the temperature control dial to the

desired position between the middle
and the hot position.

• To quickly remove ice or fog from the win-

dows, turn the

fan speed control dial

to the highest setting and the tempera-
ture control to the full HOT position.

• When the

position is selected, the air

conditioner automatically turns on if the
outside temperature is more than 36°F
(2°C). This dehumidifies the air which
helps defog the windshield. The
mode automatically turns off, allowing
outside air to be drawn into the passen-
ger compartment to further improve the
defogging performance. The recircula-
tion mode cannot be activated in the

position.

Bi-level heating

The bi-level mode directs warmed air to
the side and center vents and to the front
and rear floor outlets.

1. Press the

button to the off position.

2. Press the

air flow control button.

3. Turn the

fan speed control dial to

the desired position.

4. Turn the temperature control dial to the

desired position.

Heating and defogging

This mode heats the interior and defogs
the windshield.

1. Press the

air flow control button.

2. Turn the

fan speed control dial to

the desired position.

3. Turn the temperature control dial to the

desired position between the middle
and the hot position.

• When the

position is selected, the

air conditioner automatically turns on if
the outside temperature is more than
36°F (2°C). This dehumidifies the air which
helps defog the windshield. The
mode automatically turns off, allowing
outside air to be drawn into the passen-
ger compartment to further improve the
defogging performance.

Operating tips

Clear snow and ice from the wiper blades
and air inlet in front of the windshield.
This improves heater operation.

Monitor, climate, audio, phone and voice recognition systems

4-33

AIR CONDITIONER OPERATION

Start the engine, turn the

fan speed

control dial to the desired position, and
press the

button to activate the air

conditioner. When the air conditioner is on,
cooling and dehumidifying functions are
added to the heater operation.

The air conditioner cooling function op-
erates only when the engine is running.

Cooling

This mode is used to cool and dehumidify
the air.

1. Press the

button to the off position.

2. Press the

air flow control button.

3. Turn the

fan speed control dial to

the desired position.

4. Press the A/C button. The indicator light

comes on.

5. Turn the temperature control dial to the

desired position.

• For quick cooling when the outside tem-

perature is high, press the

button to

the ON position. Be sure to return the

to the off position for normal cooling.

MAX A/C may be used for quick cooling.

Dehumidified heating

This mode is used to heat and dehumidify
the air.

1. Press the

button to the off position.

2. Press the

air flow control button.

3. Turn the

fan speed control dial to

the desired position.

4. Press the A/C (air conditioner) button.

The indicator light comes on.

5. Turn the temperature control dial to the

desired position.

Dehumidified defogging

This mode is used to defog the windows
and dehumidify the air.

1. Press the

air flow control button.

2. Turn the

fan speed control dial to

the desired position.

• When the

or

are selected, the

air conditioner automatically turns on if
the outside temperature is more than
36°F (2°C). This dehumidifies the air which
helps defog the windshield. The
mode automatically turns off, allowing
outside air to be drawn into the passen-
ger compartment to further improve the
defogging performance.

3. Turn the temperature control dial to the

desired position.

Operating tips

• Keep the windows closed while the air

conditioner is in operation.

• After parking in the sun, drive for 2 or 3

minutes with the windows open to vent
hot air from the passenger compart-
ment. Then, close the windows. This al-
lows the air conditioner to cool the inte-
rior more quickly.

• The air conditioning system should be

operated for approximately 10 minutes at
least once a month. This helps prevent
damage to the system due to lack of
lubrication.

• A visible mist may be seen coming from

the ventilators in hot, humid conditions
as the air is cooled rapidly. This does not
indicate a malfunction.

4-34

Monitor, climate, audio, phone and voice recognition systems

• If the engine coolant temperature gauge

indicates engine coolant temperature
over the normal range, turn the air condi-
tioner off. For additional information, see
“If your vehicle overheats” (P. 6-11).

• When

Remote

Engine

Start

(if

so

equipped) is activated, the manual cli-
mate control system will default to the
last used heating or cooling mode.

AIR FLOW CHARTS

The following charts show the button and
dial positions for

MAXIMUM AND QUICK

heating, cooling or defrosting.

The

air

recirculation button should always be
in the off position for heating and
defrosting.

LHA5330

Monitor, climate, audio, phone and voice recognition systems

4-35


Content      ..     12      13      14      15     ..