Nissan Sentra (2022 year). Manual in english - page 10


  Index      Manuals     Nissan Sentra (2022 year). Manual in english


Search            copyright infringement  


Content      ..     8      9      10      11     ..


Nissan Sentra (2022 year). Manual in english - page 10


The power outlet is for powering electrical
accessories such as cellular telephones. It
is rated at 12 volt, 120W (10A) maximum.

The power outlet is powered only when the
ignition switch is in the ON position.

CAUTION

The outlet and plug may be hot dur-
ing or immediately after use.

Only certain power outlets are de-
signed for use with a cigarette lighter
unit. Do not use any other power out-
let for an accessory lighter. It is rec-
ommended that you visit a NISSAN
dealer for additional information.

Do not use with accessories that ex-
ceed a 12 volt, 120W (10A) power draw.

Do not use double adapters or more
than one electrical accessory.

Use power outlets with the engine
running to avoid discharging the ve-
hicle battery.

Avoid using power outlets when the
air conditioner, headlights or rear
window defroster is on.

Before inserting or disconnecting a
plug, be sure the electrical accessory
being used is turned off.

Push the plug in as far as it will go. If
good contact is not made, the plug
may overheat or the internal tem-
perature fuse may open.

When not in use, be sure to close the
cap. Do not allow water or any other
liquid to contact the outlet.

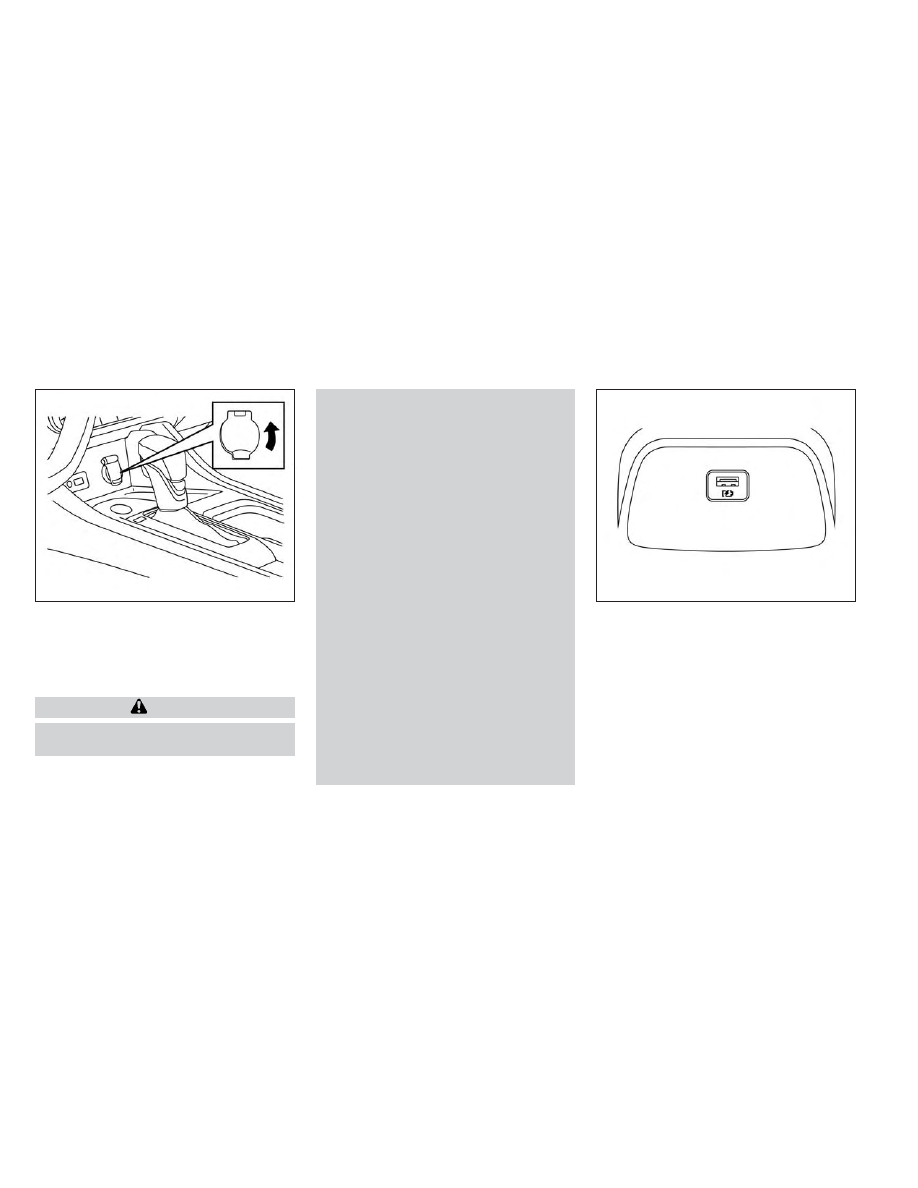
There is a USB/iPod® charging port located
on the rear center console. This port will
charge compatible devices.

NOTE:

Only the USB connection port located
below the instrument panel will allow
operation of the USB/iPod® devices
through the audio system.

LIC4337

LHA5413

POWER OUTLET

USB/iPod® CHARGING PORT (if so
equipped)

Instruments and controls

2-63

The extended storage switch is used when
the vehicle is in transit from the factory. It is
located in the fuse panel to the left of the
steering wheel on the instrument panel. If
any electrical equipment does not operate,
ensure the extended storage switch is
pushed fully in place, as shown.

LIC4391

LIC4392

Pulled position

LIC4393

Pushed position

EXTENDED STORAGE SWITCH

2-64

Instruments and controls

FRONT-DOOR POCKETS

SEATBACK POCKETS (if so
equipped)

The seatback pockets are located on the
back of the passenger's seat. The pockets
can be used to store maps.

WARNING

To ensure proper operation of the driv-
er’s and/or front passenger’s NISSAN
Advanced

Air

Bag

System

(if

so

equipped), please observe the follow-
ing items:

Do not allow a passenger in the rear
seat to push or pull on the seatback
pocket or head restraint/headrest.

Do not place heavy loads heavier
than 9.1 lbs. (4 kg) on the seatback,
head restraint/headrest, or in the
seatback pocket.

LIC4088

Front door pockets

LIC1328

STORAGE

Instruments and controls

2-65

STORAGE TRAYS

WARNING

Do not place sharp objects in the trays
to help prevent injury in an accident or
sudden stop.

GLOVE BOX

Open the glove box by pulling the handle.

WARNING

Keep glove box lid closed while driving
to help prevent injury in an accident or
a sudden stop.

CONSOLE BOX

To open the console box, press in on the
lever

O

1

and raise the lid

O

2

.

To close, push the lid down until the lock
latches.

LIC4338

Storage Trays (if so equipped)

LIC4551

LIC1026

2-66

Instruments and controls

OVERHEAD SUNGLASSES
STORAGE

To open the sunglasses holder, push and
release.

Only store one pair of sunglasses in the
holder.

WARNING

Keep the sunglasses holder closed
while driving to avoid obstructing the
driver’s view and to help prevent an
accident.

CAUTION

Do not use for anything other than
sunglasses.

Do not leave sunglasses in the sun-
glasses holder while parking in direct
sunlight. The heat may damage the
sunglasses.

CUP HOLDERS

CAUTION

Avoid abrupt starting and braking
when the cup holder is being used to
prevent spilling the drink. If the liquid
is hot, it can scald you or your
passenger.

Use only soft cups in the cup holder.
Hard objects can injure you in an
accident.

LIC4905

LIC4339

Front cup holders

Instruments and controls

2-67

Soft bottle holder

CAUTION

Do not use bottle holder for any other
objects that could be thrown about in
the

vehicle

and

possibly

injure

people during sudden braking or an
accident.

Do not use bottle holder for open liq-
uid containers.

LIC2656

Rear cup holders (if so equipped)

LIC4089

Front bottle holder

LIC4090

Rear bottle holder

2-68

Instruments and controls

POWER WINDOWS

WARNING

Make sure that all passengers have
their hands, etc., inside the vehicle
while it is in motion and before clos-
ing the windows. Use the window
lock switch to prevent unexpected
use of the power windows.

To help avoid risk of injury or death
through unintended operation of the
vehicle and/or its systems, including
entrapment in windows or inadver-
tent door lock activation, do not
leave children, people who require
the assistance of others or pets unat-
tended in your vehicle. Additionally,
the temperature inside a closed ve-
hicle on a warm day can quickly be-
come high enough to cause a signifi-
cant risk of injury or death to people
and pets.

The power windows operate when the ig-
nition switch is placed in the ON position or
for a period of time after the ignition switch
is placed in the OFF position. If the driver's
door is opened during this period of time,
the power to the windows is canceled.

Driver's side power window
switch

The driver's side control panel is equipped
with switches to open or close all of the
windows.

To open a window, push the switch and
continue to hold it down until the desired
window position is reached. To close a win-
dow, pull the switch and continue to hold it
up until the desired window position is
reached.

Locking passengers' windows

When the window lock switch is depressed,
only the driver's side window can be
opened or closed. Push it again to cancel
the window lock function.

LIC3208

1. Window lock button

2. Power door lock switch

3. Front passenger side switch

4. Right rear passenger side

5. Left rear passenger side

6. Driver side automatic switch

WINDOWS

Instruments and controls

2-69

Front passenger's power window
switch

The passenger's window switch operates
only the corresponding passenger's win-
dow. To open the window, push the switch
and continue to hold it down until the de-
sired window position is reached

O

1

. To

close the window, pull the switch and con-
tinue to hold it up until the desired window
position is reached

O

2

.

Rear power window switch

The rear power window switches open or
close only the corresponding windows. To
open the window, push the switch and hold
it down

O

1

. To close the window, pull the

switch up

O

2

.

Automatic operation

To fully open a window equipped with au-
tomatic

operation,

push

the

window

switch down to the second detent and re-
lease it; it need not be held. The window
automatically opens all the way. To stop
the window, lift the switch up while the win-
dow is opening.

To fully close a window equipped with au-
tomatic operation, pull the switch up to the
second detent and release it; it need not be
held. The window automatically closes all
the way. To stop the window, push the
switch down while the window is closing.

LIC2309

LIC2663

LIC4340

2-70

Instruments and controls

Auto-reverse function

The auto-reverse function can be acti-
vated when a window is closed by auto-
matic operation.

Depending on the environment or driv-
ing conditions, the auto-reverse func-
tion may be activated if an impact or
load similar to something being caught
in the window occurs.

WARNING

There are some small distances imme-
diately

before

the

closed

position

which cannot be detected. Make sure
that all passengers have their hands,
etc., inside the vehicle before closing
the window.

If the vehicle's battery is disconnected, re-
placed, or jump started, the power window
auto-reverse function may not operate
properly. Have the power window auto-
reverse system re-initialized. It is recom-
mended that you visit a NISSAN dealer for
this service.

If the control unit detects something
caught in a window equipped with auto-
matic operation as it is closing, the window
will be immediately lowered.

When power window switch does
not operate

If the power window automatic function
(closing only) does not operate properly,
perform the following procedure to initial-
ize the power window system:

1. Place the ignition switch in the ON

position.

2. Open the window more than halfway by

operating the power window switch.

3. Pull the power window switch and hold it

to close the window, and then hold the
switch more than 3 seconds after the
window is closed.

4. Release the power window switch. Op-

erate the window by the automatic
function to confirm the initialization is
complete. The power window automati-
cally opens or closes depending on if the
automatic down or up function is
selected.

5. Perform steps 2 through 4 above for

other windows.

If the power window function does not op-
erate properly after performing the above
procedure have the system checked and
repaired. It is recommended that you visit a
NISSAN dealer for this service.

Instruments and controls

2-71

POWER MOONROOF

The moonroof will only operate when the
ignition switch is placed in the ON position.
The power moonroof is operational for a
period of time, even if the ignition switch is
placed in the AUTO ACC or OFF position. If
the driver's door is opened during this pe-
riod of time, the power to the moonroof is
canceled.

Sliding the moonroof

To fully open or close the moonroof, push
the switch to the open

O

1

or closed

O

2

position and release it; it need not be held.

The roof will automatically open or close all
the way. To stop the roof, push the switch
once more while it is opening or closing.

Tilting the moonroof

To tilt up, first close the moonroof, then
push the switch

O

3

and release it; it need

not be held. To tilt down the moonroof,
push the switch to the tilt down position

O

2

.

Resetting the moonroof switch

If the moonroof does not operate properly,
perform the following procedure to initial-
ize the moonroof operation system.

1. If the moonroof is open, close it fully

by repeatedly pushing the moonroof
switch to the closed position

O

2

.

2. Push and hold the switch to the closed

position

O

2

for approximately 15 seconds.

3. Release the switch after the moonroof

moves up, down, then back to the full tilt
up position.

4. Push and hold the switch to the closed

position

O

2

.

5. Release the switch after the moonroof

completes one full cycle from the tilt up
position to the closed position, then to
the open position, and again to the fully
closed position.

6. Check if the moonroof switch operates

normally.

If the moonroof does not operate properly
after performing the procedure above,
have your vehicle serviced. It is recom-
mended that you visit a NISSAN dealer for
this service.

Auto-reverse function (when
closing or tilting down the
moonroof)

The auto-reverse function can be acti-
vated when the moonroof is closed or
tilted down by automatic operation when
the ignition switch is placed in the ON po-
sition or for a period of time after the igni-
tion switch is placed in the OFF position.

Depending on the environment or driv-
ing conditions, the auto-reverse func-
tion may be activated if an impact or
load similar to something being caught
in the moonroof occurs.

LIC4249

MOONROOF (if so equipped)

2-72

Instruments and controls

WARNING

There are some small distances imme-
diately

before

the

closed

position

which cannot be detected. Make sure
that all passengers have their hands,
etc., inside the vehicle before closing
the moonroof.

When closing

If the control unit detects something
caught in the moonroof as it moves to the
front, the moonroof will immediately open
backward.

When tilting down

If the control unit detects something
caught in the moonroof as it tilts down, the
moonroof will immediately tilt up.

If the auto-reverse function malfunctions
and repeats opening or tilting up the
moonroof, keep pushing the tilt down
switch within 5 seconds after it happens;
the moonroof will fully close gradually.
Make sure nothing is caught in the
moonroof.

WARNING

In an accident you could be thrown
from the vehicle through an open
moonroof. Always use seat belts and
child restraints.

Do not allow anyone to stand up or
extend any portion of their body out
of the moonroof opening while the
vehicle is in motion or while the
moonroof is closing.

CAUTION

Remove water drops, snow, ice or
sand from the moonroof before
opening.

Do not place heavy objects on the
moonroof or surrounding area.

Sunshade

Open and close the sunshade by sliding it
forward or backward.

If the moonroof does not close

Have your moonroof checked and re-
paired. It is recommended that you visit a
NISSAN dealer for this service.

1

The interior light can be turned on re-
gardless of door position. The light will
go off after a period of time unless the
ignition switch is placed in the ON posi-
tion when any door is opened.

2

The interior lights can be set to operate
when the doors are opened. To turn off
the interior lights when a door is open,
push the switch; the interior lights will
not illuminate, regardless of door posi-
tion.
The lights will go off when the ignition
switch is placed in the ON position, or
the driver's door is closed and locked.

LIC4906

INTERIOR LIGHTS

Instruments and controls

2-73

NOTE:

The step lights (if so equipped) illumi-
nate when the driver and passenger
doors are opened regardless of the inte-
rior light switch position. These lights
will turn off automatically after a period
of time while doors are open to prevent
the battery from becoming discharged.

CAUTION

Do not use for extended periods of time
with the engine stopped. This could re-
sult in a discharged battery.

MAP LIGHTS

To turn the map lights on, push the
switches. To turn them off, push the
switches again.

CAUTION

Do not use for extended periods of time
with the engine stopped. This could re-
sult in a discharged battery.

PERSONAL LIGHTS

To turn the rear personal lights on, push the
switch. To turn them off, push the switch
again.

CAUTION

Do not use for extended periods of time
with the engine stopped. This could re-
sult in a discharged battery.

LIC4907

LIC4041

2-74

Instruments and controls

TRUNK LIGHT

The light illuminates when the trunk lid is
opened. When the trunk lid is closed, the
light goes off.

The light will go off after a period of time if
the trunk lid is left open, unless the ignition
switch is placed in the ON position.

For additional information, see “Exterior
and interior lights” (P. 8-26).

Instruments and controls

2-75

3 Pre-driving checks and adjustments

Keys . . . . . . . . . . . . . . . . . . . . . . . . . . . . . . . . . . . . . . . . . . . . . 3-2

NISSAN Intelligent Key® . . . . . . . . . . . . . . . . . . . . . . . 3-2
NISSAN Vehicle Immobilizer System
keys . . . . . . . . . . . . . . . . . . . . . . . . . . . . . . . . . . . . . . . . . . 3-3

Doors . . . . . . . . . . . . . . . . . . . . . . . . . . . . . . . . . . . . . . . . . . . 3-4

Locking with key . . . . . . . . . . . . . . . . . . . . . . . . . . . . . 3-5
Locking with inside lock knob . . . . . . . . . . . . . . . . 3-5
Locking with power door lock switch . . . . . . . . . 3-6
Automatic door locks . . . . . . . . . . . . . . . . . . . . . . . . 3-6
Child safety rear door lock . . . . . . . . . . . . . . . . . . . . 3-7

NISSAN Intelligent Key® . . . . . . . . . . . . . . . . . . . . . . . . . . 3-7

Operating range . . . . . . . . . . . . . . . . . . . . . . . . . . . . . 3-9
Door locks/unlocks precaution . . . . . . . . . . . . . . . 3-9
NISSAN Intelligent Key® Operation . . . . . . . . . . . 3-10
How to use the remote keyless entry
function . . . . . . . . . . . . . . . . . . . . . . . . . . . . . . . . . . . . . 3-13
Warning signals . . . . . . . . . . . . . . . . . . . . . . . . . . . . . 3-15
Troubleshooting guide (Continuously
Variable Transmission only) . . . . . . . . . . . . . . . . . 3-16
Troubleshooting guide (Manual
Transmission only) . . . . . . . . . . . . . . . . . . . . . . . . . . 3-18

Remote Engine Start (if so equipped) . . . . . . . . . . . 3-19

Remote Engine Start operating range . . . . . . . 3-19
Remote starting the vehicle . . . . . . . . . . . . . . . . . 3-20
Extending engine run time . . . . . . . . . . . . . . . . . . 3-20

Canceling a Remote Engine Start . . . . . . . . . . . 3-20
Conditions the Remote Engine Start will
not work . . . . . . . . . . . . . . . . . . . . . . . . . . . . . . . . . . . . 3-21

Hood . . . . . . . . . . . . . . . . . . . . . . . . . . . . . . . . . . . . . . . . . . . 3-22
Trunk lid . . . . . . . . . . . . . . . . . . . . . . . . . . . . . . . . . . . . . . . . 3-23

Trunk lid release switch . . . . . . . . . . . . . . . . . . . . . 3-23
Interior trunk lid release . . . . . . . . . . . . . . . . . . . . . 3-23
Interior trunk access . . . . . . . . . . . . . . . . . . . . . . . . 3-24

Fuel-filler door . . . . . . . . . . . . . . . . . . . . . . . . . . . . . . . . . . 3-24

Opener operation . . . . . . . . . . . . . . . . . . . . . . . . . . . 3-24
Fuel-filler cap . . . . . . . . . . . . . . . . . . . . . . . . . . . . . . . . 3-25

Steering wheel . . . . . . . . . . . . . . . . . . . . . . . . . . . . . . . . . 3-27

Tilt operation . . . . . . . . . . . . . . . . . . . . . . . . . . . . . . . . 3-27
Telescopic operation . . . . . . . . . . . . . . . . . . . . . . . . 3-27

Sun visors . . . . . . . . . . . . . . . . . . . . . . . . . . . . . . . . . . . . . . 3-27

Vanity mirrors . . . . . . . . . . . . . . . . . . . . . . . . . . . . . . . 3-28
Card holder . . . . . . . . . . . . . . . . . . . . . . . . . . . . . . . . . 3-28

Mirrors . . . . . . . . . . . . . . . . . . . . . . . . . . . . . . . . . . . . . . . . . 3-29

Manual anti-glare rearview mirror
(if so equipped) . . . . . . . . . . . . . . . . . . . . . . . . . . . . . . 3-29
Automatic anti-glare rearview mirror
(if so equipped) . . . . . . . . . . . . . . . . . . . . . . . . . . . . . . 3-29
Outside mirrors . . . . . . . . . . . . . . . . . . . . . . . . . . . . . 3-30

NISSAN INTELLIGENT KEY®

Your vehicle can only be driven with the
Intelligent Keys which are registered to
your vehicle’s Intelligent Key components
and NISSAN Vehicle Immobilizer System
components.

Never leave the keys in the vehicle.

As many as four Intelligent Keys can be
registered and used with one vehicle. The
new keys must be registered prior to use
with the Intelligent Key and NISSAN Vehicle
Immobilizer System of your vehicle. It is rec-
ommended that you visit a NISSAN dealer
for this service. Since the registration pro-
cess requires erasing all memory in the
Intelligent Key components, when register-
ing new keys, be sure to take all Intelligent
Keys that you have to a NISSAN dealer.

A key number plate is supplied with your
keys. Record the key number and keep it in
a safe place (such as your wallet), not in the
vehicle. If you lose your keys, it is recom-
mended that you visit a NISSAN dealer for
duplicates by using the key number.
NISSAN does not record key numbers so it
is very important to keep track of your key
number plate.

A key number is only necessary when you
have lost all keys and do not have one to
duplicate from. If you still have a key, it can
be duplicated without knowing the key
number.

CAUTION

Listed below are conditions or occur-
rences which will damage the Intelli-
gent Key:

Do not allow the Intelligent Key,
which contains electrical compo-
nents, to come into contact with wa-
ter or salt water. This could affect the
system function.

Do not drop the Intelligent Key.

Do not strike the Intelligent Key
sharply against another object.

Do not change or modify the Intelli-
gent Key.

LPD2874

Type A (if so equipped)

1. Intelligent Keys (two sets)

2. Mechanical key

3. Key number plate (one plate)

LPD2875

Type B (if so equipped)

KEYS

3-2

Pre-driving checks and adjustments

Wetting may damage the Intelligent
Key. If the Intelligent Key gets wet,
immediately wipe until it is com-
pletely dry.

Do not place the Intelligent Key for an
extended period in an area where
temperatures exceed 140°F (60°C).

Do not attach the Intelligent Key with
a key holder that contains a magnet.

Do not place the Intelligent Key near
equipment that produces a magnetic
field, such as a TV, audio equipment
and personal computers.

If an Intelligent Key is lost or stolen,
NISSAN recommends erasing the ID
code of that Intelligent Key from the
vehicle. This may prevent the unau-
thorized use of the Intelligent Key to
operate the vehicle. For information re-
garding the erasing procedure, it is rec-
ommended that you visit a NISSAN
dealer.

Mechanical key

The Intelligent Key contains the mechani-
cal key.

To remove the mechanical key, release the
lock knob on the back of the Intelligent Key.

To install the mechanical key, firmly insert it
into the Intelligent Key until the lock knob
returns to the lock position.

Use the mechanical key to lock or unlock
the driver's door.

For additional information, see “Doors”
(P. 3-4).

CAUTION

Always carry the mechanical key in-
stalled in the Intelligent Key slot.

NISSAN VEHICLE IMMOBILIZER
SYSTEM KEYS

Additional or replacement keys:

If you still have a key, the key number is not
necessary when you need extra NISSAN
Vehicle Immobilizer System keys. Your ex-
isting key can be duplicated without know-
ing the key number. As many as four
NISSAN Vehicle Immobilizer System keys
can be used with one vehicle. You should
bring all NISSAN Vehicle Immobilizer Sys-
tem keys that you have to the NISSAN
dealer for registration. This is because the
registration process will erase the memory
of all key codes previously registered into
the NISSAN Vehicle Immobilizer System. Af-
ter the registration process, these compo-
nents will only recognize keys coded into
the NISSAN Vehicle Immobilizer System
during registration. Any key that is not
given to the dealer at the time of registra-
tion will no longer be able to start your
vehicle.

SPA1951

Pre-driving checks and adjustments

3-3


Content      ..     8      9      10      11     ..