Nissan Rogue Sport (2018 year). Instruction - part 3


  Index      Nissan     Nissan Rogue Sport - instruction 2018 year in english


Search            


Content   ..  1  2  3  4   ..


Nissan Rogue Sport (2018 year). Instruction - part 3


1-24

Safety — Seats, seat belts and supplemental restraint system

SSS0644

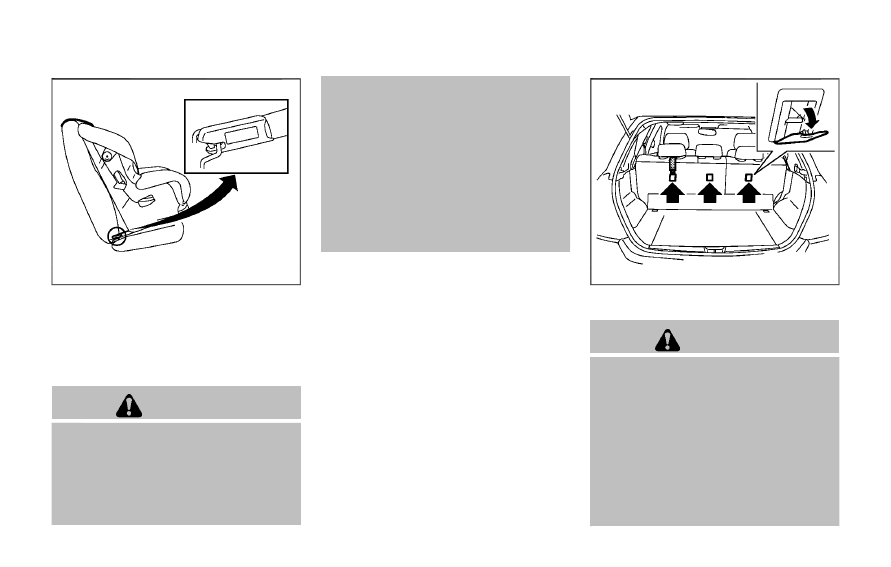
LATCH rigid attachment

When installing a child restraint, carefully
read and follow the instructions in this
manual and those supplied with the child
restraint.

Top tether anchor

WARNING

Properly secure cargo and do not
allow it to contact the top tether
strap when it is attached to the top
tether anchor. Cargo that is not
properly secured or cargo that con-
tacts the top tether strap may da-
mage the top tether strap during a

collision. If the parcel shelf contacts
the top tether strap when it is at-
tached to the top tether anchor,
remove the parcel shelf from the
vehicle or secure it on the cargo floor
below its attachment location. If the
parcel shelf is not removed, it may
damage the top tether strap during a
collision. Your child could be ser-
iously injured or killed in a collision
if the child restraint top tether strap
is damaged.

JVR0194X

Top tether anchor point locations

WARNING

Child restraint anchorages are de-
signed to withstand only those loads
imposed by correctly fitted child
restraints. Under no circumstances
are they to be used to attach adult
seat belts, or other items or equip-
ment to the vehicle. Doing so could
damage the child restraint an-
chorages. The child restraint will not
be properly installed using the da-
maged anchorage, and a child could
be seriously injured or killed in a

collision.

Anchor points are located on the back
side of the seatbacks.
If a child restraint has a top tether strap, it
must be used when installing with the
LATCH lower anchor attachments or seat
belts.
If you have any questions when instal-
ling a top tether strap child restraint on
the rear seat, it is recommended you
visit a NISSAN dealer for this service.

REAR-FACING CHILD RESTRAINT
INSTALLATION USING LATCH

Refer to all Warnings and Cautions in the
“Child safety” and “Child restraints” sec-
tions before installing a child restraint.
Do not use the lower anchors if the
combined weight of the child and the
child restraint exceeds 65 lbs (29.5 kg). If
the combined weight of the child and the
child restraint is greater than 65 lbs (29.5
kg), use the vehicle’s seat belt (not the
lower anchors) to install the child re-
straint. Be sure to follow the child re-
straint manufacturer’s instructions for
installation.
Follow these steps to install a rear-facing
child restraint using the LATCH system:
1.

Position the child restraint on the seat.
Always follow the child restraint man-
ufacturer’s instructions.

SSS0648

Rear-facing web-mounted — step 2

2. Secure the child restraint anchor at-

tachments to the LATCH lower an-
chors. Check to make sure the LATCH
attachment is properly attached to
the lower anchors.

Safety — Seats, seat belts and supplemental restraint system

1-25

1-26

Safety — Seats, seat belts and supplemental restraint system

SSS0649

Rear-facing rigid-mounted — step 2

SSS0639

Rear-facing — step 3

3. For child restraints that are equipped

with webbing-mounted attachments,
remove any additional slack from the
anchor attachments. Press downward
and rearward firmly in the center of
the child restraint with your hand to
compress the vehicle seat cushion
and seatback while tightening the
webbing of the anchor attachments.

SSS0650

Rear-facing — step 4

4. After attaching the child restraint, test

it before you place the child in it. Push
it from side to side while holding the
child restraint near the LATCH attach-
ment path. The child restraint should
not move more than 1 inch (25 mm),
from side to side. Try to tug it forward
and check to see if the LATCH attach-
ment holds the restraint in place. If the
restraint is not secure, tighten the
LATCH attachment as necessary, or
put the restraint in another seat and
test it again. You may need to try a
different child restraint or try installing
by using the vehicle seat belt (if
applicable). Not all child restraints fit

in all types of vehicles.

5. Check to make sure the child restraint

is properly secured prior to each use. If
the child restraint is loose, repeat
steps 1 through 4.

REAR-FACING CHILD RESTRAINT
INSTALLATION USING THE SEAT
BELTS

WARNING

The three-point seat belt with Auto-
matic Locking Retractor (ALR) must
be used when installing a child re-
straint. Failure to use the ALR mode
will result in the child restraint not
being properly secured. The restraint
could tip over or be loose and cause
injury to a child in a sudden stop or
collision.

SSS0100

Rear-facing — step 1

Refer to all Warnings and Cautions in the
“Child safety” (P.1-17) and “Child restraints”
(P.1-20) before installing a child restraint.
Do not use the lower anchors if the
combined weight of the child and the
child restraint exceeds 65 lbs (29.5 kg). If
the combined weight of the child and the
child restraint is greater than 65 lbs (29.5
kg), use the vehicle’s seat belt (not the
lower anchors) to install the child re-
straint. Be sure to follow the child re-
straint manufacturer’s instructions for
installation.
Follow these steps to install a rear-facing
child restraint using the vehicle seat belts
in the rear seats:

1.

Child restraints for infants must be
used in the rear-facing direction and
therefore must not be used in the
front seat. 
Position the child restraint
on the seat. Always follow the re-
straint manufacturer’s instructions.

Safety — Seats, seat belts and supplemental restraint system

1-27

1-28

Safety — Seats, seat belts and supplemental restraint system

SSS0654

Rear-facing — step 2

2. Route the seat belt tongue through

the child restraint and insert it into the
buckle until you hear and feel the
latch engage. Be sure to follow the
child restraint manufacturer’s instruc-
tions for belt routing.

SSS0655

Rear-facing — step 3

3. Pull the shoulder belt until the belt is

fully extended. At this time, the seat
belt retractor is in the Automatic
Locking Retractor (ALR) mode (child
restraint mode). It reverts to the
Emergency Locking Retractor (ELR)
mode when the seat belt is fully
retracted.

SSS0656

Rear-facing — step 4

4. Allow the seat belt to retract. Pull up

on the shoulder belt to remove any
slack in the belt.

SSS0657

Rear-facing — step 5

5. Remove any additional slack from the

seat belt; press downward and rear-
ward firmly in the center of the child
restraint to compress the vehicle seat
cushion and seatback while pulling up
on the seat belt.

SSS0658

Rear-facing — step 6

6. After attaching the child restraint, test

it before you place the child in it. Push
it from side to side while holding the
child restraint near the seat belt path.
The child restraint should not move
more than 1 inch (25 mm), from side to
side. Try to tug it forward and check to
see if the belt holds the restraint in
place. If the restraint is not secure,
tighten the seat belt as necessary, or
put the restraint in another seat and
test it again. You may need to try a
different child restraint. Not all child
restraints fit in all types of vehicles.

7. Check to make sure that the child

restraint is properly secured prior to

each use. If the seat belt is not locked,
repeat steps 1 through 6.

After the child restraint is removed and
the seat belt fully retracted, the ALR mode
(child restraint mode) is canceled.

FORWARD-FACING CHILD RE-
STRAINT INSTALLATION USING
LATCH

Refer to all Warnings and Cautions in the
“Child safety” and “Child restraints” sec-
tions before installing a child restraint.
Do not use the lower anchors if the
combined weight of the child and the
child restraint exceeds 65 lbs (29.5 kg). If
the combined weight of the child and the
child restraint is greater than 65 lbs (29.5
kg), use the vehicle’s seat belt (not the
lower anchors) to install the child re-
straint. Be sure to follow the child re-
straint manufacturer’s instructions for
installation.
Follow these steps to install a forward-
facing child restraint using the LATCH
system:
1.

Position the child restraint on the seat.
Always follow the child restraint man-
ufacturer’s instructions.

Safety — Seats, seat belts and supplemental restraint system

1-29

1-30

Safety — Seats, seat belts and supplemental restraint system

SSS0645

Forward-facing web-mounted — step 2

2. Secure the child restraint anchor at-

tachments to the LATCH lower an-
chors. Check to make sure the LATCH
attachment is properly attached to
the lower anchors.
If the child restraint is equipped with a
top tether strap, route the top tether
strap and secure the tether strap to
the tether anchor point. See “Installing
top tether strap” (P.1-32). Do not install
child restraints that require the use of
a top tether strap in seating positions
that do not have a top tether anchor.

SSS0646

Forward-facing rigid-mounted — step 2

3. The back of the child restraint should

be secured against the vehicle seat-
back.
If necessary, adjust or remove the
head restraint to obtain the correct
child restraint fit. If the head restraint
is removed, store it in a secure place.
Be sure to reinstall the head re-
straint when the child restraint is
removed. 
See “Head restraints/head-
rests” (P.1-6) for head restraint adjust-
ment information.
If the seating position does not have a
head restraint and it is interfering with
the proper child restraint fit, try an-
other seating position or a different

child restraint.

SSS0647

Forward-facing — step 4

4. For child restraints that are equipped

with webbing-mounted attachments,
remove any additional slack from the
anchor attachments. Press downward
and rearward firmly in the center of
the child restraint with your knee to
compress the vehicle seat cushion
and seatback while tightening the
webbing of the anchor attachments.

5. Tighten the tether strap according to

the manufacturer’s instructions to
remove any slack.

SSS0638

Forward-facing — step 6

6. After attaching the child restraint, test

it before you place the child in it. Push
it from side to side while holding the
child restraint near the LATCH attach-
ment path. The child restraint should
not move more than 1 inch (25 mm),
from side to side. Try to tug it forward
and check to see if the LATCH attach-
ment holds the restraint in place. If the
restraint is not secure, tighten the
LATCH attachment as necessary, or
put the restraint in another seat and
test it again. You may need to try a
different child restraint. Not all child
restraints fit in all types of vehicles.

7. Check to make sure the child restraint

is properly secured prior to each use. If
the child restraint is loose, repeat
steps 1 through 6.

Safety — Seats, seat belts and supplemental restraint system

1-31

1-32

Safety — Seats, seat belts and supplemental restraint system

JVR0194X

Installing top tether strap

WARNING

Child restraint anchorages are de-
signed to withstand only those loads
imposed by correctly fitted child
restraints. Under no circumstances
are they to be used to attach adult
seat belts, or other items or equip-
ment to the vehicle. Doing so could
damage the child restraint an-
chorages. The child restraint will not
be properly installed using the da-
maged anchorage, and a child could
be seriously injured or killed in a

collision.

The child restraint top tether strap must
be used when installing the child restraint
with the LATCH lower anchor attach-
ments.
First, secure the child restraint with the
LATCH lower anchors (rear outboard
seating positions only).
1.

Remove the head restraint and store it
in a secure place. Be sure to reinstall
the head restraint when the child
restraint is removed.
See “Head restraints/headrests” (P.1-6)
for head restraint adjustment, re-
moval and installation information.

2. Position the top tether strap as

shown.

3. Secure the top tether strap to the

tether anchor point as shown.

4. Refer to the appropriate child restraint

installation procedure steps in this
section before tightening the tether
strap.

If you have any questions when instal-
ling a top tether strap, it is recom-
mended that you visit a NISSAN dealer
for this service.

FORWARD-FACING CHILD RE-
STRAINT INSTALLATION USING THE
SEAT BELTS

WARNING

The three-point seat belt with Auto-
matic Locking Retractor (ALR) must
be used when installing a child re-
straint. Failure to use the ALR mode
will result in the child restraint not
being properly secured. The restraint
could tip over or be loose and cause
injury to a child in a sudden stop or
collision. Also, it can change the
operation of the front passenger air
bag. See “Front passenger air bag
and status light” (P.1-48).

SSS0640

Forward-facing (front passenger seat) — step 1

Refer to all Warnings and Cautions in the
“Child safety” and “Child restraints” sec-
tions before installing a child restraint.
Do not use the lower anchors if the
combined weight of the child and the
child restraint exceeds 65 lbs (29.5 kg). If
the combined weight of the child and the
child restraint is greater than 65 lbs (29.5
kg), use the vehicle’s seat belt (not the
lower anchors) to install the child re-
straint. Be sure to follow the child re-
straint manufacturer’s instructions for
installation.
Follow these steps to install a forward-
facing child restraint using the vehicle
seat belt in the rear seats or in the front

passenger seat:
1.

If you must install a child restraint in
the front seat, it should be placed in
a forward-facing direction only.
Move the seat to the rearmost posi-
tion. Child restraints for infants must
be used in the rear-facing direction
and, therefore, must not be used in
the front seat.

2. Position the child restraint on the seat.

Always follow the child restraint man-
ufacturer’s instructions.
The back of the child restraint should
be secured against the vehicle seat-
back.
If necessary, adjust or remove the
head restraint to obtain the correct
child restraint fit. If the head restraint
is removed, store it in a secure place.
Be sure to reinstall the head re-
straint when the child restraint is
removed. 
See “Head restraints/head-
rests” (P.1-6) for head restraint adjust-
ment, removal and installation
information.
If the seating position does not have
an adjustable head restraint and it is
interfering with the proper child re-
straint fit, try another seating position
or a different child restraint.

SSS0360B

Forward-facing — step 3

3. Route the seat belt tongue through

the child restraint and insert it into the
buckle until you hear and feel the
latch engage. Be sure to follow the
child restraint manufacturer’s instruc-
tions for belt routing.
If the child restraint is equipped with a
top tether strap, route the top tether
strap and secure the tether strap to
the tether anchor point (rear seat
installation only). See “Installing top
tether strap” (P.1-36). Do not install
child restraints that require the use
of a top tether strap in seating posi-
tions that do not have a top tether
anchor.

Safety — Seats, seat belts and supplemental restraint system

1-33

1-34

Safety — Seats, seat belts and supplemental restraint system

SSS0651

Forward-facing — step 4

4. Pull the shoulder belt until the belt is

fully extended. At this time, the seat
belt retractor is in the Automatic
Locking Retractor (ALR) mode (child
restraint mode). It reverts to Emer-
gency Locking Retractor (ELR) mode
when the seat belt is fully retracted.

SSS0652

Forward-facing — step 5

5. Allow the seat belt to retract. Pull up

on the shoulder belt to remove any
slack in the belt.

SSS0653

Forward-facing — step 6

6. Remove any additional slack from the

seat belt; press downward and rear-
ward firmly in the center of the child
restraint with your knee to compress
the vehicle seat cushion and seatback
while pulling up on the seat belt.

7. Tighten the tether strap according to

the manufacturer’s instructions to
remove any slack.

SSS0641

Forward-facing — step 8

8. After attaching the child restraint, test

it before you place the child in it. Push
it from side to side while holding the
child restraint near the seat belt path.
The child restraint should not move
more than 1 inch (25 mm), from side to
side. Try to tug it forward and check to
see if the belt holds the restraint in
place. If the restraint is not secure,
tighten the seat belt as necessary, or
put the restraint in another seat and
test it again. You may need to try a
different child restraint. Not all child
restraints fit in all types of vehicles.

9. Check to make sure the child restraint

is properly secured prior to each use. If

the seat belt is not locked, repeat
steps 2 through 8.

SSS0676

Forward-facing — step 10

10. If the child restraint is installed in the

front passenger seat, place the igni-
tion switch in the ON position. The
front passenger air bag status light

should illuminate. If this light is not

illuminated, see “Front passenger air
bag and status light” (P.1-48). Move
the child restraint to another seating
position. 
Have the system checked. It
is recommended you visit a NISSAN
dealer for this service.

After the child restraint is removed and
the seat belt is fully retracted, the ALR
mode (child restraint mode) is canceled.

Safety — Seats, seat belts and supplemental restraint system

1-35

1-36

Safety — Seats, seat belts and supplemental restraint system

JVR0194X

Installing top tether strap

WARNING

Child restraint anchorages are de-
signed to withstand only those loads
imposed by correctly fitted child
restraints. Under no circumstances
are they to be used to attach adult
seat belts, or other items or equip-
ment to the vehicle. Doing so could
damage the child restraint an-
chorages. The child restraint will not
be properly installed using the da-
maged anchorage, and a child could
be seriously injured or killed in a

collision.

The child restraint top tether strap must
be used when installing the child restraint
with the seat belts.
First, secure the child restraint with the
seat belt.
1.

Remove the head restraint and store it
in a secure place. Be sure to reinstall
the head restraint when the child
restraint is removed.
See “Head restraints/headrests” (P.1-6)
for head restraint adjustment, re-
moval and installation information.

2. Position the top tether strap as

shown.

3. Secure the top tether strap to the

tether anchor point as shown.

4. Refer to the appropriate child restraint

installation procedure steps in this
section before tightening the tether
strap.

If you have any questions when instal-
ling a top tether strap, it is recom-
mended you visit a NISSAN dealer for
this service.

BOOSTER SEATS

Precautions on booster seats

WARNING

If a booster seat and seat belt are not
used properly, the risk of a child
being injured or killed in a sudden
stop or collision greatly increases:
Make sure the shoulder portion of

the belt is away from the child’s
face and neck and the lap portion
of the belt does not cross the
stomach.

Make sure the shoulder belt is not

behind the child or under the
child’s arm.

A booster seat must only be

installed in a seating position that
has a lap/shoulder belt.

Booster seats of various sizes are offered
by several manufacturers. When selecting
any booster seat, keep the following
points in mind:
. Choose only a booster seat with a

label certifying that it complies with
Federal Motor Vehicle Safety Standard
213 or Canadian Motor Vehicle Safety
Standard 213.

. Check the booster seat in your vehicle

to be sure it is compatible with the
vehicle’s seat and seat belt system.

LRS0453

LRS0455

. Make sure the child’s head will be

properly supported by the booster
seat or vehicle seat. The seatback
must be at or above the center of
the child’s ears. For example, if a low
back booster seat

is chosen, the

vehicle seatback must be at or above
the center of the child’s ears. If the
seatback is lower than the center of
the child’s ears, a high back booster
seat

should be used.

. If the booster seat is compatible with

your vehicle, place your child in the
booster seat and check the various
adjustments to be sure the booster
seat is compatible with your child.
Always follow all recommended pro-
cedures.

Safety — Seats, seat belts and supplemental restraint system

1-37

1-38

Safety — Seats, seat belts and supplemental restraint system

LRS0464

All U.S. states and Canadian provinces
or territories require that infants and
small children be restrained in an ap-
proved child restraint at all times while
the vehicle is being operated.

The instructions in this section apply to
booster seat installation in the rear seats
or the front passenger seat.

Booster seat installation

WARNING

To avoid injury to child, do not use
the lap/shoulder belt Automatic
Locking Retractor (ALR) mode when
using a booster seat with the seat
belts.

Refer to all Warnings and Cautions in the
“Child safety”, “Child restraints” and “Boos-
ter seats” sections earlier in this section
before installing a child restraint.
Follow these steps to install a booster
seat in the rear seat or in the front
passenger seat:

SSS0640

1.

If you must install a booster seat in
the front seat, move the seat to the
rearmost position.

2. Position the booster seat on the seat.

Only place it in a forward-facing
direction. Always follow the booster
seat manufacturer’s instructions.

LRS0454

Front passenger position

3. The booster seat should be positioned

on the vehicle seat so that it is stable.
If necessary, adjust or remove the
head restraint to obtain the correct
booster seat fit. If the head restraint is
removed, store it in a secure place. Be
sure to reinstall the head restraint
when the booster seat is removed.
See “Head restraints/headrests” (P.1-6)
for head restraint adjustment, re-
moval and installation information.
If the seating position does not have a
head restraint and it is interfering with
the proper booster seat fit, try another
seating position or a different booster
seat.

4. Position the lap portion of the seat

belt low and snug on the child’s hips.
Be sure to follow the booster seat
manufacturer’s instructions for ad-
justing the seat belt routing.

5. Pull the shoulder belt portion of the

seat belt toward the retractor to take
up extra slack. Be sure the shoulder
belt is positioned across the top,
middle portion of the child’s shoulder.
Be sure to follow the booster seat
manufacturer’s instructions for ad-
justing the seat belt routing.

6. Follow the warnings, cautions and

instructions for properly fastening a
seat belt shown in “Seat belts” (P.1-10).

SSS0676

7. If the booster seat is installed in the

front passenger seat, place the igni-
tion switch in the ON position. The
front passenger air bag status light

may or may not illuminate de-

pending on the size of the child and
the type of booster seat used. See
“Front passenger air bag and status
light” (P.1-48).

Safety — Seats, seat belts and supplemental restraint system

1-39


Content   ..  1  2  3  4   ..