Nissan Quest (2017 year). Instruction - part 2


  Index      Nissan     Nissan Quest - instruction 2017 year in english


Search            


Content   ..   1  2  3   ..


Nissan Quest (2017 year). Instruction - part 2


0-10

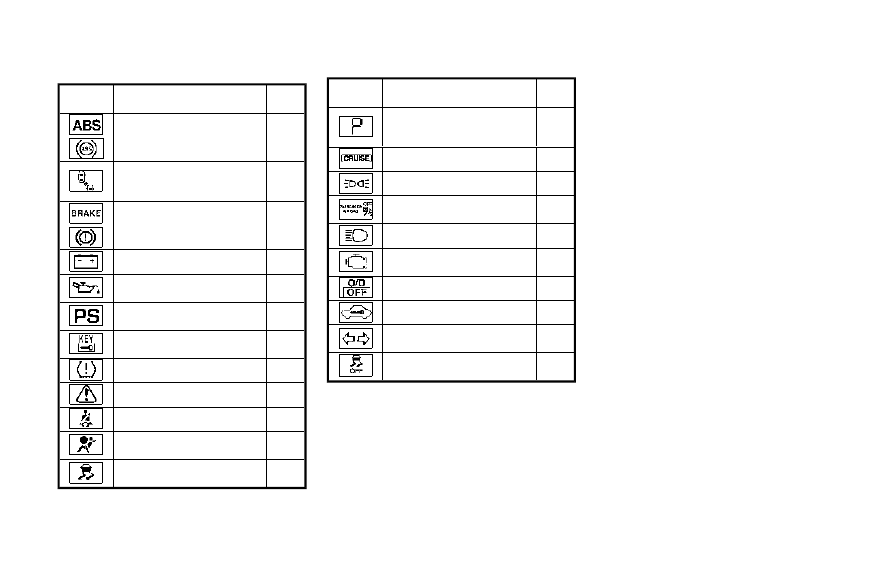
Illustrated table of contents

Warning

light

Name

Page

Anti-lock Braking System
(ABS) warning light

2-12

Blind Spot Warning (BSW)
system warning light (if so
equipped)

2-12

Brake warning light

2-12

Charge warning light

2-13

Engine oil pressure warning
light

2-13

Hydraulic pump electric power
steering warning light

2-13

Intelligent Key system warning
light

2-14

Low tire pressure warning light

2-14

Master warning light

2-15

Seat belt warning light

2-15

Supplemental air bag warning
light

2-15

Vehicle Dynamic Control (VDC)
warning light

2-16

Indicator

light

Name

Page

Continuously Variable Trans-
mission (CVT) position indicator
light

2-16

Cruise indicator light

2-16

Exterior light indicator

2-17

Front passenger air bag status
light

2-17

High beam indicator light

2-17

Malfunction Indicator Light
(MIL)

2-17

Overdrive off indicator light

2-18

Security indicator light

2-18

Turn signal/hazard indicator
lights

2-18

Vehicle Dynamic Control (VDC)
off indicator light

2-18

WARNING AND INDICATOR LIGHTS

1 Safety — Seats, seat belts and supplemental

restraint system

Seats ............................................................................................ 1-2

Front seats ............................................................................ 1-3
2nd row seats ...................................................................... 1-6
3rd row seats ....................................................................... 1-7
Armrests ................................................................................ 1-7
Flexible seating .................................................................... 1-8

Head restraints/headrests .................................................... 1-10

Adjustable head restraint/headrest components ..... 1-11
Non-adjustable head
restraint/headrest components ..................................... 1-12
Remove ............................................................................... 1-12
Install ................................................................................... 1-12
Adjust .................................................................................. 1-13
Front-seat Active Head Restraint ................................. 1-14

Seat belts ................................................................................. 1-15

Precautions on seat belt usage .................................... 1-15
Pregnant women .............................................................. 1-17
Injured persons ................................................................. 1-17
Three-point type seat belt .............................................. 1-17
Seat belt extenders .......................................................... 1-23
Seat belt maintenance .................................................... 1-24

Child safety .............................................................................. 1-24

Infants .................................................................................. 1-25
Small children .................................................................... 1-25
Larger children .................................................................. 1-26

Child restraints ....................................................................... 1-27

Precautions on child restraints ................................... 1-27
Lower Anchors and Tethers for CHildren
System (LATCH) ............................................................ 1-29
Top tether strap child restraint ................................... 1-32
Rear-facing child restraint installation
using LATCH ................................................................... 1-32
Rear-facing child restraint installation using the
seat belts .......................................................................... 1-34
Forward-facing child restraint installation
using LATCH ................................................................... 1-37
Forward-facing child restraint installation using the
seat belt ............................................................................ 1-40
Booster seats .................................................................. 1-45

Supplemental restraint system ........................................... 1-48

Precautions on supplemental restraint system ....... 1-48
NISSAN advanced air bag system (front seats) ..... 1-54
Front seat-mounted side-impact supplemental
air bag and roof-mounted curtain side-impact
supplemental air bag systems .................................... 1-61
Seat belts with pretensioners (front seats) ............. 1-62
Supplemental air bag warning labels ....................... 1-63
Supplemental air bag warning light .......................... 1-64
Repair and replacement procedure .......................... 1-64

1-2

Safety — Seats, seat belts and supplemental restraint system

SSS0133

WARNING

Do not ride in a moving vehicle

when the seatback is reclined. This
can be dangerous. The shoulder belt
will not be against your body. In an
accident, you could be thrown into it
and receive neck or other serious
injuries. You could also slide under
the lap belt and receive serious
internal injuries.

For the most effective protection

when the vehicle is in motion, the
seat should be upright. Always sit

well back and upright in the seat
with both feet on the floor and
adjust the seat belt properly. See
Precautions on seat belt usage
(P.1-15).

After adjustment, gently rock in the

seat to make sure it is securely
locked.

Do not leave children unattended

inside the vehicle. They could un-
knowingly activate switches or con-
trols. Unattended children could
become involved in serious acci-
dents.

To help avoid risk of injury or death

through unintended operation of
the vehicle and/or its systems, do
not leave children, people who re-
quire the assistance of others or
pets unattended in your vehicle.
Additionally, the temperature inside
a closed vehicle on a warm day can
quickly become high enough to
cause a significant risk of injury or
death to people and pets.

Do not adjust the drivers seat while

driving so full attention may be
given to vehicle operation. The seat
may move suddenly and could
cause loss of control of the vehicle.

The seatback should not be reclined

any more than needed for comfort.
Seat belts are most effective when
the passenger sits well back and
straight up in the seat. If the seat-
back is reclined, the risk of sliding
under the lap belt and being injured
is increased.

SEATS

SSS0792

FRONT SEATS

Front manual seat adjustment

Forward and backward:

Pull the lever

*

1

up and hold it while you slide

the seat forward or backward to the desired
position. Release the lever to lock the seat in
position.

Reclining:

To recline the seatback, pull the lever

*

2

up and

lean back. To bring the seatback forward, pull
the lever up and lean your body forward. Release
the lever to lock the seatback in position.

The reclining feature allows adjustment of the

seatback for occupants of different sizes for
added comfort and to help obtain proper seat
belt fit. (See “Precautions on seat belt usage”
(P.1-15).) Also, the seatback can be reclined to
allow occupants to rest when the vehicle is
stopped and the transmission in the P (Park)
position.

SSS0793

Seat lifter (if so equipped):

Pull up or push down the adjusting lever to
adjust the seat height until the desired position
is achieved.

Safety — Seats, seat belts and supplemental restraint system

1-3

1-4

Safety — Seats, seat belts and supplemental restraint system

Front power seat adjustment

Operating tips:
. The power seat motor has an auto-reset

overload protection circuit. If the motor
stops during operation, wait 30 seconds,
then reactivate the switch.

. Do not operate the power seat switch for a

long period of time when the engine is off.
This will discharge the battery.

See “Automatic drive positioner” (P.3-36) for the
seat position memory function (if so equipped).

CAUTION

When adjusting the seat positions, be
sure not to contact any moving parts to
avoid possible injuries and/or da-
mages.

SSS1051

Forward and backward:

Moving the switch

*

1

forward or backward will

slide the seat forward or backward to the
desired position.

Reclining:

Move the recline switch

*

2

backward until the

desired angle is obtained. To bring the seatback
forward again, move the switch

*

2

forward.

The reclining feature allows adjustment of the
seatback for occupants of different sizes for
added comfort and to help obtain proper seat
belt fit. (See “Precautions on seat belt usage”
(P.1-15).) Also, the seatback can be reclined to
allow occupants to rest when the vehicle is

stopped and the transmission is in the P (Park)
position.

SSS1052

Seat lifter (if so equipped):

1. Pull up or push down the adjusting switch to

adjust the seat height until the desired
position is achieved.

2. Tilt up or down the adjusting switch to adjust

the front angle of the seat until the desired
position is achieved (for driver’s seat).

SSS1053

Lumbar support (if so equipped):

The lumbar support feature provides lower back
support to the occupants.

Push the front or back end of the switch to
adjust the seatback lumbar area.

Safety — Seats, seat belts and supplemental restraint system

1-5

1-6

Safety — Seats, seat belts and supplemental restraint system

SSS1158

2ND ROW SEATS

Seat adjustment

WARNING

The 2nd row seats are heavy. Be

careful when folding and unfolding.

To avoid injury to yourself and

others, keep hands and body clear
when folding.

Forward and backward:

Pull the lever

*

1

up and hold it while you slide

the seat forward or backward to the desired

position. Release the lever to lock the seat in
position.

Reclining:

To recline the seatback, pull the lever

*

2

up and

lean back. To bring the seatback forward, pull
the lever up and lean your body forward. Release
the lever to lock the seatback in position.

The reclining feature allows adjustment of the
seatback for occupants of different sizes for
added comfort and to help obtain proper seat
belt fit. (See “Precautions on seat belt usage”
(P.1-15).) Also, the seatback can be reclined to
allow occupants to rest when the vehicle is
stopped and the transmission in the P (Park)
position.

SSS1159

Entry to the 3rd row seat

The 2nd row seats can tilt and slide forward for
easy entry/exit to/from the 3rd row seats.

To enter or exit the 3rd row seat, pull up the lever

*

1

or

*

2

to tilt down the seatback and slide

the seat forward.

Return and lock the 2nd row seats by sliding the
seats to the rearmost position and tilting up the
seatback after use.

SSS1149

3RD ROW SEATS

Reclining

Pull the strap on the seatback

*

A

and lean

back. Release the strap at the desired angle.

The reclining feature allows adjustment of the
seatback for occupants of different sizes to help
obtain proper seat belt fit. (See “Precautions on
seat belt usage” (P.1-15).) The seatback may
also be reclined to allow occupants to rest when
the vehicle is parked.

WARNING

After adjustment, check to be sure

the seat is securely locked.

Do not ride in a moving vehicle

when the seatback is reclined. This
can be dangerous. The shoulder belt
will not be against your body. In an
accident, you could be thrown into it
and receive neck or other serious
injuries. You could also slide under
the lap belt and receive serious
internal injuries.

For the most effective protection

when the vehicle is in motion, the
seat should be upright. Always sit
well back and upright in the seat
with both feet on the floor and
adjust the seat belt properly. See
Precautions on seat belt usage
(P.1-15).

SPA1456

Front and 2nd row seats

ARMRESTS

Front and 2nd row seats

To use the armrests on any seat, pull them down
to the resting position.

Safety — Seats, seat belts and supplemental restraint system

1-7

1-8

Safety — Seats, seat belts and supplemental restraint system

SSS1162

The armrest angle can be adjusted freely.

*

1

Pull the armrest between

*

A

and

*

B

.

*

2

Pull it down to

*

C

.

*

3

Pull up the armrest slowly, it can be secured

between

*

B

and

*

C

.

FLEXIBLE SEATING

WARNING

Never allow anyone to ride in the

cargo area or on the rear seats
when they are in the fold-down
position. In a collision, people riding
in these areas without proper re-
straints are more likely to be ser-
iously injured or killed.

Do not allow people to ride in any

area of your vehicle that is not
equipped with seats and seat belts.
Be sure everyone in your vehicle is
in a seat and using a seat belt
properly.

Do not fold down the rear seats

when occupants are in the rear seat
area or any cargo is on the rear
seats.

Head restraints and headrests

should be adjusted properly as they
may provide significant protection
against injury in an accident. Always
replace and adjust them properly if
they have been removed for any
reason.

If the head restraints/headrests are

removed for any reason, they should
be securely stored to prevent them
from causing injury to passengers
or damage to the vehicle in case of
sudden braking or an accident.

When returning the seatbacks to the

upright position, be certain they are
completely secured in the latched
position. If they are not completely
secured, passengers may be injured
in an accident or sudden stop.

Properly secure all cargo to help

prevent it from sliding or shifting.
Do not place cargo higher than the
seatbacks. In a sudden stop or
collision, unsecured cargo could
cause personal injury.

SSS1163

Folding the 2nd row seats

Before folding the rear seats:

Secure the seat belts on the seat belt hooks on
the side wall. (See “Seat belt hooks” (P.1-23).)

To fold down the seatbacks:

Pull the lever on the 2nd row seat.

To return the seatbacks:

Lift up each seatback and push it to the upright
position until it is latched.

CAUTION

When folding the 2nd row seat for
maximum cargo hauling, be sure that
cargo does not contact the center
console of the 2nd row seat to avoid
possible damage to the console.

Folding the 3rd row seats

Before folding the 3rd row seats:
. Secure the seat belts on the seat belt hooks

on the side wall. (See “Seat belt hooks”
(P.1-23).)

. Disconnect and stow the center seat belt

and tongue into the retractor base. (See
“3rd row center seat belt” (P.1-20).)

. Always reconnect the center seat belt when

the seat is returned to the upright position.

. Remove drink containers from the rear cup

holder.

SSS1149

Third row seatback

SSS1150

Back side of the third row seatback

Safety — Seats, seat belts and supplemental restraint system

1-9

1-10

Safety — Seats, seat belts and supplemental restraint system

Manual folding:

Pull the strap on the seatback

*

A

or on the

back side of the seatback

*

B

and fold the

seatback.

SSS1151

Power folding (if so equipped):

Push the front side of the switch

*

A

located on

the right side or left side of the cargo area. The
corresponding 3rd row seatback will be folded
down automatically.

Push and hold the rear side of the switch

*

B

.

The 3rd row seatback will be returned auto-
matically. A beep sounds and the rear seatback
will rise up while holding the switch. A beep
sounds when the seatback is fully returned in
position.

WARNING

Head restraints/headrests supplement
the other vehicle safety systems. They
may provide additional protection
against injury in certain rear end colli-
sions. Adjustable head restraints/head-
rests must be adjusted properly, as
specified in this section. Check the
adjustment after someone else uses
the seat. Do not attach anything to the
head restraint/headrest stalks or re-
move the head restraint/headrest. Do
not use the seat if the head restraint/
headrest has been removed. If the head
restraint/headrest was removed, rein-
stall and properly adjust the head
restraint/headrest before an occupant
uses the seating position. Failure to
follow these instructions can reduce the
effectiveness of the head restraint/
headrest. This may increase the risk of
serious injury or death in a collision.

HEAD RESTRAINTS/HEADRESTS

JVR0269X

The illustration shows the seating positions
equipped with head restraint/headrest.

Indicates the seating position is equipped

with a head restraint.

Indicates the seating position is equipped

with a headrest.

+ Indicates the seating position is not equipped
with a head restraint or headrest. (if applicable)
. Your vehicle is equipped with a head

restraint/headrest that may be integrated,
adjustable or non-adjustable.

. Adjustable head restraints/headrests have

multiple notches along the stalk to lock them
in a desired adjustment position.

. The non-adjustable head restraints/head-

rests have a single locking notch to secure
them to the seat frame.

. Proper Adjustment:

— For the adjustable type, align the head

restraint/headrest so the center of your
ear is approximately level with the center
of the head restraint/headrest.

— If your ear position is still higher than the

recommended alignment, place the head
restraint/headrest at the highest position.

. If the head restraint/headrest has been

removed, ensure that it is reinstalled and
locked in place before riding in that desig-
nated seating position.

SSS0992

ADJUSTABLE HEAD RESTRAINT/
HEADREST COMPONENTS

1. Removable head restraint/headrest

2. Multiple notches

3. Lock knob

4. Stalks

Safety — Seats, seat belts and supplemental restraint system

1-11

1-12

Safety — Seats, seat belts and supplemental restraint system

JVR0203X

NON-ADJUSTABLE HEAD RE-
STRAINT/HEADREST COMPONENTS

1. Removable head restraint/headrest

2. Single notch

3. Lock knob

4. Stalks

SSS1037

REMOVE

Use the following procedure to remove the head
restraint/headrest.

1. Pull the head restraint/headrest up to the

highest position.

2. Push and hold the lock knob.

3. Remove the head restraint/headrest from

the seat.

4. Store the head restraint/headrest properly in

a secure place so it is not loose in the
vehicle.

5. Reinstall and properly adjust the head

restraint/headrest before an occupant uses
the seating position.

SSS1038

INSTALL

1. Align the head restraint/headrest stalks with

the holes in the seat. Make sure that the
head restraint/headrest is facing the correct
direction. The stalk with the adjustment
notch

*

1

must be installed in the hole with

the lock knob

*

2

.

2. Push and hold the lock knob and push the

head restraint/headrest down.

3. Properly adjust the head restraint/headrest

before an occupant uses the seating posi-
tion.

SSS0997

ADJUST

For adjustable head restraint/headrest

Adjust the head restraint/headrest so the center
is level with the center of your ears. If your ear
position is still higher than the recommended
alignment, place the head restraint/headrest at
the highest position.

JVR0259X

For non-adjustable head restraint/head-
rest

Make sure the head restraint/headrest is posi-
tioned so the lock knob is engaged in the notch
before riding in that designated seating position.

SSS1035

Raise

To raise the head restraint/headrest, pull it up.

Make sure the head restraint/headrest is posi-
tioned so the lock knob is engaged in the notch
before riding in that designated seating position.

Safety — Seats, seat belts and supplemental restraint system

1-13

1-14

Safety — Seats, seat belts and supplemental restraint system

SSS1036

Lower

To lower, push and hold the lock knob and push
the head restraint/headrest down.

Make sure the head restraint/headrest is posi-
tioned so the lock knob is engaged in the notch
before riding in that designated seating position.

SSS0508

FRONT-SEAT ACTIVE HEAD RE-
STRAINT

The Active Head Restraint moves forward
utilizing the force that the seatback receives
from the occupant in a rear-end collision. The
movement of the head restraint helps support
the occupant’s head by reducing its backward
movement and helping absorb some of the
forces that may lead to whiplash-type injuries.

Active Head Restraints are effective for colli-
sions at low to medium speeds in which it is said
that whiplash injury occurs most.

Active Head Restraints operate only in certain
rear-end collisions. After the collision, the head
restraints return to their original position.

Adjust the Active Head Restraints properly as
described earlier in this section.

PRECAUTIONS ON SEAT BELT
USAGE

If you are wearing your seat belt properly
adjusted, and you are sitting upright and well
back in your seat with both feet on the floor, your
chances of being injured or killed in an accident
and/or the severity of injury may be greatly
reduced. NISSAN strongly encourages you and
all of your passengers to buckle up every time
you drive, even if your seating position includes a
supplemental air bag.

Most U.S. states and Canadian provinces
or territories specify that seat belts be
worn at all times when a vehicle is being
driven.

SSS0136A

SSS0134A

Safety — Seats, seat belts and supplemental restraint system

1-15

SEAT BELTS


Content   ..   1  2  3   ..