Nissan Maxima (2018 year). Instruction - part 2
 

  Index      Nissan     Nissan Maxima - instruction 2018 year in english


Search            


Content   ..   1  2  3   ..


Nissan Maxima (2018 year). Instruction - part 2


FRONT POWER SEAT ADJUSTMENT

Operating tips

∙ The power seat motor has an auto-

reset overload protection circuit. If the
motor stops during operation, wait
30 seconds then reactivate the switch.

∙ Do not operate the power seat switch for

a long period of time when the engine is
off. This will discharge the battery.

For additional information, refer to “Auto-
matic drive positioner” in the “Pre-driving
checks and adjustments” section of this
manual.

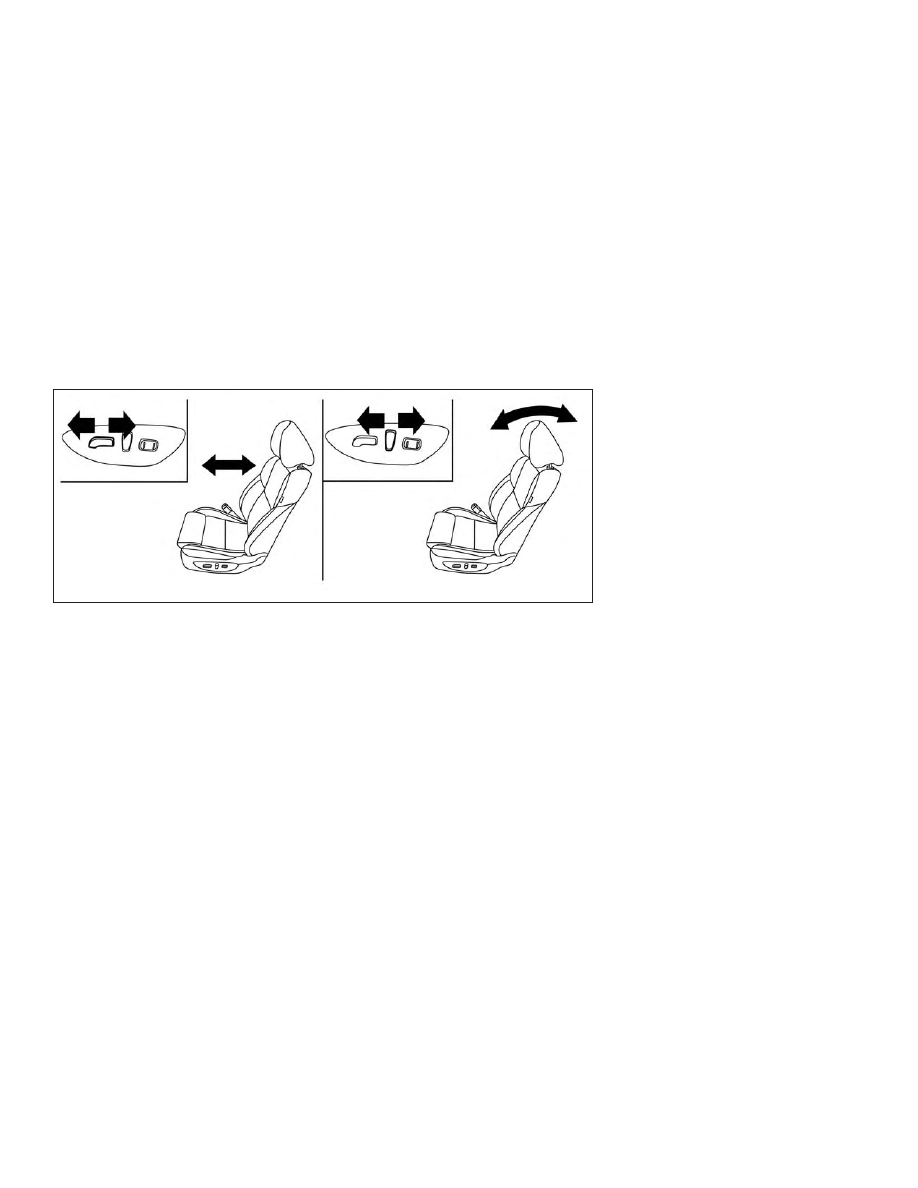
Forward and backward

Moving the switch as shown will slide the
seat forward or backward to the desired
position.

Reclining

Move the recline switch as shown until the
desired angle is obtained.

The reclining feature allows adjustment of
the seatback for occupants of different
sizes for added comfort and to help obtain
proper seat belt fit. For additional informa-
tion, refer to “Precautions on seat belt us-
age” in this section. Also, the seatback can
be reclined to allow occupants to rest
when the vehicle is stopped and the shift
lever is in P (Park).

LRS2692

Safety—Seats, seat belts and supplemental restraint system

1-3

Seat lifter (for driver’s seat and if
so equipped for passenger’s seat)

Move the switch as shown to adjust the
angle (if so equipped) and height of the
seat cushion.

Lumbar support (if so equipped
for driver’s seat)

The lumbar support feature provides ad-
justable lower back support to the driver.
Push the switch as shown to adjust the
seat lumbar area.

Driver’s seat

LRS2693

Passenger’s seat

LRS2938

LRS2669

1-4

Safety—Seats, seat belts and supplemental restraint system

Thigh extension (if so equipped
for driver’s seat)

Pull up and hold the lever to extend the
front portion to the desired position.

FOLDING REAR SEAT

Interior trunk access

The trunk can be accessed from the pas-
senger side of the rear seat for loading and
unloading, as shown.

1. Move the front passenger seat to the

most forward position.

2. Open the access cover on the rear par-

cel shelf.

3. Push down on the button

1

on the

rear parcel shelf.

4. Fold down the passenger’s side seat-

back

2

.

WARNING

∙ Never allow anyone to ride in the

cargo area or on the rear seat when it
is in the fold-down position. Use of
these areas by passengers without
proper restraints could result in seri-
ous injury or death in an accident or
sudden stop.

∙ Properly secure all cargo with ropes or

straps to help prevent it from sliding
or shifting. Do not place cargo higher
than the seatbacks. In a sudden stop
or collision, unsecured cargo could
cause personal injury.

LRS2666

LRS2691

Safety—Seats, seat belts and supplemental restraint system

1-5

∙ When returning the seatbacks to the

upright position, be certain they are
completely secured in the latched po-
sition. If they are not completely se-
cured, passengers may be injured in
an accident or sudden stop.

∙ Closely supervise children when they

are around cars to prevent them from
playing and becoming locked in the
trunk where they could be seriously
injured. Keep the car locked, with the
rear seatback and trunk lid securely
latched when not in use, and prevent
children’s access to car keys.

To fold down either side of the rear seat,
open the trunk and pull on the strap

1

.

For additional information, refer to “Interior
trunk access” in the “Pre-driving checks
and adjustments” section of this manual.

CENTER ARMREST

To use the center armrest on the rear seat,
pull on the tab in the center of the seat and
fold it down as shown.

LRS2168

LRS2978

1-6

Safety—Seats, seat belts and supplemental restraint system

WARNING

Head restraints/headrests supplement
the other vehicle safety systems. They
may

provide

additional

protection

against injury in certain rear end colli-
sions.

Adjustable

head

restraints/headrests must be adjusted
properly, as specified in this section.
Check the adjustment after someone
else uses the seat. Do not attach any-
thing to the head restraint/headrest
stalks

or

remove

the

head

restraint/headrest. Do not use the seat
if the head restraint/headrest has been
removed. If the head restraint/headrest
was removed, reinstall and properly ad-
just the head restraint/headrest before
an occupant uses the seating position.
Failure to follow these instructions can
reduce the effectiveness of the head
restraints/headrests.

This

may

in-

crease the risk of serious injury or death
in a collision.

The illustration shows the seating posi-
tions

equipped

with

head

restraints/headrests.

䉱 Indicates the seating position is
equipped with a head restraint.

䡲 Indicates the seating position is equipped
with a headrest.

+ Indicates the seating position is not
equipped with a head restraint or headrest
(if applicable).

∙ Your vehicle is equipped with a head

restraint/headrest that may be inte-
grated, adjustable or non-adjustable.

∙ Adjustable head restraints/headrests

have multiple notches along the stalk(s)
to lock them in a desired adjustment
position.

∙ The

non-adjustable

head

restraints/headrests have a single lock-
ing notch to secure them to the seat
frame.

∙ Proper Adjustment:

– For the adjustable type, align the

head restraint/headrest so the cen-
ter of your ear is approximately level
with

the

center

of

the

head

restraint/headrest.

– If your ear position is still higher than

the recommended alignment, place
the head restraint/headrest at the
highest position.

∙ If the head restraint/headrest has been

removed, ensure that it is reinstalled
and locked in place before riding in that
designated seating position.

LRS2695

HEAD RESTRAINTS/HEADRESTS

Safety—Seats, seat belts and supplemental restraint system

1-7

ADJUSTABLE HEAD RESTRAINT/
HEADREST COMPONENTS

1. Removable head restraint/headrest

2. Multiple notches

3. Lock knob

4. Stalks

NON-ADJUSTABLE HEAD
RESTRAINT/HEADREST
COMPONENTS

1. Removable head restraint/headrest

2. Single notch

3. Lock knob

4. Stalks

REMOVE

Use the following procedure to remove the
head restraint/headrest:

1. Pull the head restraint/headrest up to

the highest position.

2. Push and hold the lock knob.

3. Remove the head restraint/headrest

from the seat.

4. Store

the

head

restraint/headrest

properly in a secure place so it is not
loose in the vehicle.

LRS2300

LRS2299

LRS2302

1-8

Safety—Seats, seat belts and supplemental restraint system

5. Reinstall and properly adjust the head

restraint/headrest before an occupant
uses the seating position.

INSTALL

1. Align the head restraint/headrest stalks

with the holes in the seat. Make sure that
the head restraint/headrest is facing the
correct direction. The stalk with the
notch (notches)

1

must be installed in

the hole with the lock knob

2

.

2. Push and hold the lock knob and push

the head restraint/headrest down.

3. Properly adjust the head restraint/

headrest before an occupant uses the
seating position.

ADJUST

For adjustable head restraint/headrest

Adjust the head restraint/headrest so the
center is level with the center of your ears. If
your ear position is still higher than the
recommended alignment, place the head
restraint/headrest at the highest position.

LRS2303

WRS0134

Safety—Seats, seat belts and supplemental restraint system

1-9

For non-adjustable head restraint/headrest

Make sure the head restraint/headrest is
positioned so the lock knob is engaged in
the notch before riding in that designated
seating position.

Raise

To raise the head restraint/headrest, pull it
up.

Make sure the head restraint/headrest is
positioned so the lock knob is engaged in
the notch before riding in that designated
seating position.

Lower

To lower, push and hold the lock knob and
push the head restraint/headrest down.

Make sure the head restraint/headrest is
positioned so the lock knob is engaged in
the notch before riding in that designated
seating position.

LRS2351

LRS2305

LRS2306

1-10

Safety—Seats, seat belts and supplemental restraint system

PRECAUTIONS ON SEAT BELT
USAGE

If you are wearing your seat belt properly
adjusted and you are sitting upright and
well back in your seat with both feet on the
floor, your chances of being injured or killed
in a collision and/or the severity of injury
may be greatly reduced. NISSAN strongly
encourages you and all of your passengers
to buckle up every time you drive, even if
your seating position includes a supple-
mental air bag.

Most U.S. states and Canadian provinces
or territories specify that seat belts be
worn at all times when a vehicle is being
driven.

SSS0136

SEAT BELTS

Safety—Seats, seat belts and supplemental restraint system

1-11

WARNING

∙ Every person who drives or rides in

this vehicle should use a seat belt at
all times. Children should be in the
rear seats and in an appropriate
restraint.

WARNING

∙ The seat belt should be properly ad-

justed to a snug fit. Failure to do so
may reduce the effectiveness of the
entire restraint system and increase
the chance or severity of injury in an
accident. Serious injury or death can
occur if the seat belt is not worn
properly.

SSS0134

SSS0016

1-12

Safety—Seats, seat belts and supplemental restraint system

WARNING

∙ Always route the shoulder belt over

your shoulder and across your chest.
Never put the belt behind your back,
under your arm or across your neck.
The belt should be away from your
face and neck, but not falling off your
shoulder.

∙ Position the lap belt as low and snug

as possible AROUND THE HIPS, NOT
THE WAIST. A lap belt worn too high
could increase the risk of internal inju-
ries in an accident.

∙ Be sure the seat belt tongue is se-

curely fastened to the proper buckle.

∙ Do not wear the seat belt inside out or

twisted. Doing so may reduce its
effectiveness.

∙ Do not allow more than one person to

use the same seat belt.

∙ Never carry more people in the vehicle

than there are seat belts.

∙ If the seat belt warning light glows

continuously while the ignition is
placed in the ON position with all
doors closed and all seat belts fas-
tened, it may indicate a malfunction in
the system. Have the system checked.
It is recommended that you visit a
NISSAN dealer for this service.

∙ No changes should be made to the

seat belt system. For example, do not
modify the seat belt, add material, or
install devices that may change the
seat belt routing or tension. Doing so
may affect the operation of the seat
belt system. Modifying or tampering
with the seat belt system may result
in serious personal injury.

∙ Once seat belt pretensioner(s) have

activated, they cannot be reused and
must be replaced together with the
retractor. It is recommended that you
visit a NISSAN dealer for this service.

∙ All seat belt assemblies, including re-

tractors

and

attaching

hardware,

should be inspected after any colli-
sion. It is recommended that you visit
a NISSAN dealer for this service.
NISSAN recommends that all seat belt
assemblies in use during a collision be
replaced unless the collision was mi-
nor and the belts show no damage
and continue to operate properly.
Seat belt assemblies not in use during
a collision should also be inspected
and replaced if either damage or im-
proper operation is noted.

∙ All child restraints and attaching

hardware should be inspected after
any collision. Always follow the re-
straint manufacturer’s inspection in-
structions and replacement recom-
mendations.

The

child

restraints

should

be

replaced

if

they

are

damaged.

SSS0014

Safety—Seats, seat belts and supplemental restraint system

1-13

SEAT BELT WARNING LIGHT

Both the driver’s and passenger’s front
seats are equipped with a seat belt warn-
ing light. The warning light, located on the
instrument panel, will show the status of
the driver and passenger seat belt.

NOTE:

The front passenger seat belt warning
light will not light up if the seat is not
occupied.

For additional information, refer to “Warn-
ing lights, indicator lights and audible re-

minders” in the “Instruments and controls”
section of this manual.

PREGNANT WOMEN

NISSAN

recommends

that

pregnant

women use seat belts. The seat belt should
be worn snug and always position the lap
belt as low as possible around the hips, not
the waist. Place the shoulder belt over your
shoulder and across your chest. Never run
the lap/shoulder belt over your abdominal
area. Contact your doctor for specific rec-
ommendations.

INJURED PERSONS

NISSAN recommends that injured persons
use seat belts. Check with your doctor for
specific recommendations.

THREE-POINT TYPE SEAT BELT
WITH RETRACTOR

WARNING

∙ Every person who drives or rides in

this vehicle should use a seat belt at
all times. Children should be in the
rear seats and in an appropriate
restraint.

∙ Do not ride in a moving vehicle when

the seatback is reclined. This can be
dangerous. The shoulder belt will not
be against your body. In an accident,
you could be thrown into it and re-
ceive neck or other serious injuries.
You could also slide under the lap belt
and receive serious internal injuries.

∙ For the most effective protection

when the vehicle is in motion, the seat
should be upright. Always sit well
back and upright in the seat with both
feet on the floor and adjust the seat
belt properly.

∙ Do not allow children to play with the

seat belts. Most seating positions are
equipped with Automatic Locking Re-
tractor (ALR) mode seat belts. If the
seat belt becomes wrapped around a
child’s neck with the ALR mode acti-
vated, the child can be seriously in-
jured or killed if the seat belt retracts
and becomes tight. This can occur
even if the vehicle is parked. Unbuckle
the seat belt to release the child. If the
seat belt cannot be unbuckled or is
already unbuckled, release the child
by cutting the seat belt with a suitable
tool (such as a knife or scissors) to
release the seat belt.

LRS0786

1-14

Safety—Seats, seat belts and supplemental restraint system

Fastening the seat belts

1. Adjust the seat. For additional informa-

tion, refer to “Seats” in this section.

2. Slowly pull the seat belt out of the re-

tractor and insert the tongue into the
buckle

A

until you hear and feel the

latch engage.

∙ The retractor is designed to lock

during a sudden stop or on impact.
A slow pulling motion permits the
seat belt to move, and allows you
some freedom of movement in the
seat.

∙ If the seat belt cannot be pulled

from its fully retracted position,
firmly pull the belt and release it.
Then smoothly pull the belt out of
the retractor.

Front seat shown

LRS2692

LRS2674

Safety—Seats, seat belts and supplemental restraint system

1-15

3. Position the lap belt portion low and

snug on the hips

B

as shown.

4. Pull the shoulder belt portion toward

the retractor to take up extra slack

C

.

Be sure the shoulder belt is routed over
your shoulder and across your chest.

The front passenger seat and the rear
seating positions three-point seat belts
have two modes of operation:

∙ Emergency Locking Retractor (ELR)

∙ Automatic Locking Retractor (ALR)

The ELR mode allows the seat belt to ex-
tend and retract to allow the driver and
passengers some freedom of movement
in the seat. The ELR locks the seat belt
when the vehicle slows down rapidly or
during certain impacts.

The ALR mode (child restraint mode) locks
the seat belt for child restraint installation.

When the ALR mode is activated, the seat
belt cannot be extended again until the
seat belt tongue is detached from the
buckle and fully retracted. The seat belt re-
turns to the ELR mode after the seat belt
fully retracts. For additional information, re-
fer to “Child restraints” in this section.

The ALR mode should be used only for
child restraint installation. During nor-
mal seat belt use by an occupant, the ALR
mode should not be activated. If it is ac-
tivated, it may cause uncomfortable seat
belt tension. It can also change the op-
eration of the front passenger air bag.
For

additional

information,

refer

to

“Front passenger air bag and status
light” in this section.

WARNING

When fastening the seat belts, be cer-
tain that the seatbacks are completely
secured in the latched position. If they
are not completely secured, passengers
may be injured in an accident or sudden
stop.

LRS2675

1-16

Safety—Seats, seat belts and supplemental restraint system

Unfastening the seat belts

To unfasten the seat belt, press the button
on the buckle

1

. The seat belt automati-

cally retracts.

Checking seat belt operation

Seat belt retractors are designed to lock
seat belt movement by two separate
methods:

∙ When the seat belt is pulled quickly from

the retractor

∙ When the vehicle slows down rapidly

To increase your confidence in the seat
belts, check the operation as follows:

∙ Grasp the shoulder belt and pull for-

ward quickly. The retractor should lock
and restrict further belt movement.

If the retractor does not lock during this
check, get the system checked. It is recom-
mended that you visit a NISSAN dealer for
this service or to learn more about seat belt
operation.

Shoulder belt height adjustment
(front seats)

The shoulder belt anchor height should be
adjusted to the position best for you. For
additional information, refer to “Precau-
tions on seat belt usage” in this section. To
adjust, pull out the adjustment button

1

and move the shoulder belt anchor to the
desired position

2

, so the belt passes over

the center of the shoulder. The belt should
be away from your face and neck, but not
falling off your shoulder. Release the ad-
justment button to lock the shoulder belt
anchor into position.

WRS0139

LRS0242

Safety—Seats, seat belts and supplemental restraint system

1-17

WARNING

∙ After adjustment, release the adjust-

ment button and try to move the
shoulder belt anchor up and down to
make sure it is securely fixed in
position.

∙ The

shoulder

belt

anchor

height

should be adjusted to the position
best for you. Failure to do so may re-
duce the effectiveness of the entire
restraint system and increase the
chance or severity of injury in an
accident.

SEAT BELT EXTENDERS

If, because of body size or driving position, it
is

not

possible

to

properly

fit

the

lap/shoulder belt and fasten it, an extender
that is compatible with the installed seat
belts is available for purchase. The ex-
tender adds approximately 8 in (200 mm)
of length and may be used for either the
driver or front passenger seating position.
It is recommended that you visit a NISSAN
dealer for assistance with purchasing an
extender if an extender is required.

WARNING

∙ Only NISSAN seat belt extenders,

made by the same company which
made the original equipment seat
belts, should be used with NISSAN
seat belts.

∙ Adults and children who can use the

standard seat belt should not use an
extender.

Such

unnecessary

use

could result in serious personal injury
in the event of an accident.

∙ Never use seat belt extenders to in-

stall child restraints. If the child re-
straint is not secured properly, the
child could be seriously injured or
killed in a collision or a sudden stop.

SEAT BELT MAINTENANCE

∙ To clean the seat belt webbing, apply

a mild soap solution or any solution rec-
ommended for cleaning upholstery or
carpet. Then wipe with a cloth and allow
the seat belts to dry in the shade. Do not
allow the seat belts to retract until they
are completely dry.

∙ If dirt builds up in the shoulder belt

guide of the seat belt anchors, the
seat belts may retract slowly. Wipe the
shoulder belt guide with a clean, dry
cloth.

∙ Periodically check to see that the seat

belt and the metal components, such
as buckles, tongues, retractors, flexible
wires and anchors, work properly. If
loose parts, deterioration, cuts or other
damage on the webbing is found, the
entire seat belt assembly should be re-
placed.

1-18

Safety—Seats, seat belts and supplemental restraint system


Content   ..   1  2  3   ..