Nissan Altima Coupe (2013 year). Instruction - part 10


  Index      Nissan     Nissan Altima Coupe - instruction 2013 year in english


Search            


Content   ..  8  9  10  11   ..


Nissan Altima Coupe (2013 year). Instruction - part 10


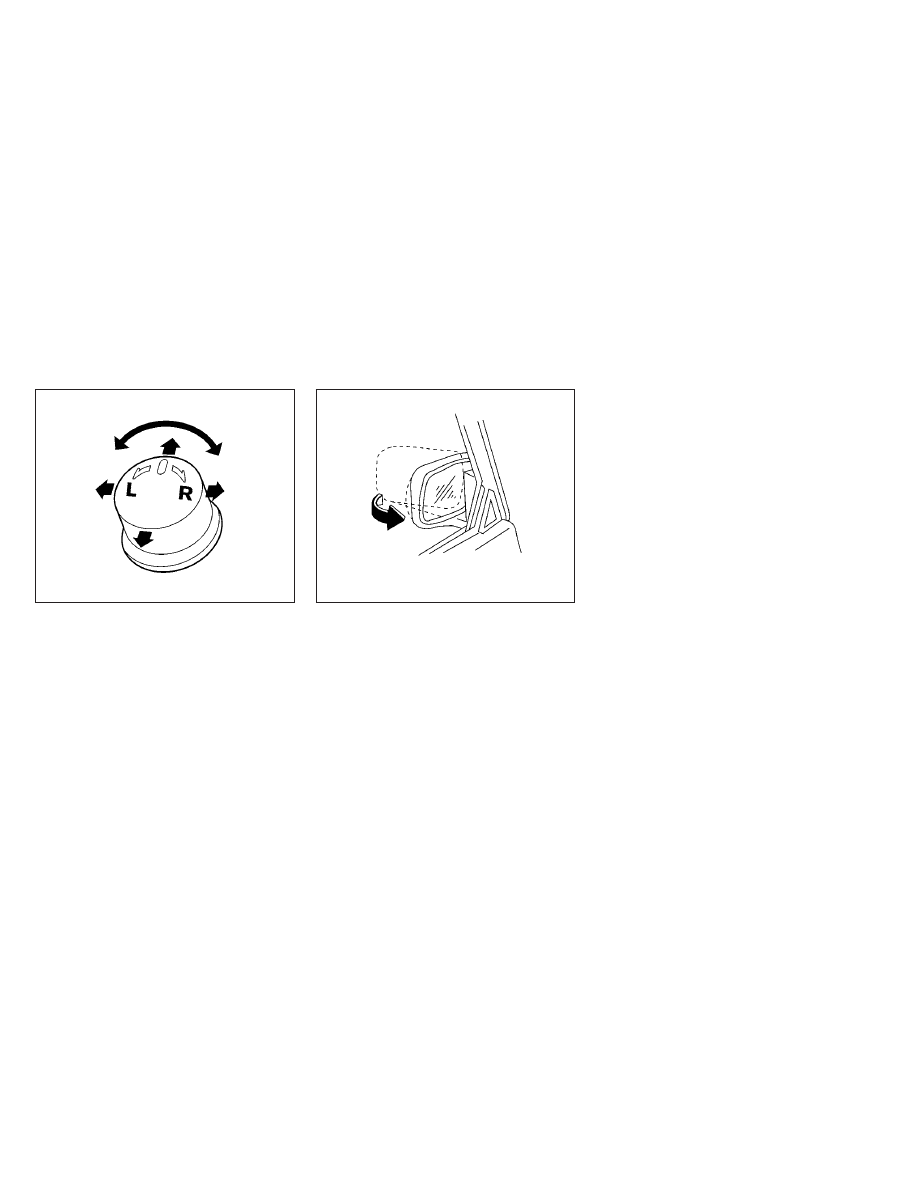
Electric control type

The outside mirror remote control only operates
when the ignition switch is in the ACC or ON
position.

Rotate the control lever to select the right or left
mirror. Adjust the mirror to the desired position by
moving the control lever.

Heated mirrors (if so equipped)

Some outside mirrors can be heated to defrost,
defog, or de-ice for improved visibility. For addi-
tional information, see “Rear window and outside
mirror defroster switch” in the “Instruments and
controls” section of this manual.

Manual folding outside mirrors (if so
equipped)

Pull the outside mirror toward the door to fold it.

LPD0346

WPD0056

Pre-driving checks and adjustments

3-25

4 Monitor, climate, audio, phone and voice
recognition systems

Control panel buttons — color screen with
Navigation System (if so equipped) . . . . . . . . . . . . . . . . . . 4-2

How to use the touch screen . . . . . . . . . . . . . . . . . . . . 4-3
How to select menus on the screen . . . . . . . . . . . . . . 4-5
How to use the INFO button . . . . . . . . . . . . . . . . . . . . . 4-5
How to use the SETTING button . . . . . . . . . . . . . . . . . 4-6

button. . . . . . . . . . . . . . . . . . . . . . . . . . . . . . . . . . 4-12

RearView Monitor (if so equipped). . . . . . . . . . . . . . . . . . 4-13

How to read the displayed lines . . . . . . . . . . . . . . . . . 4-13
Difference between predicted and actual
distances . . . . . . . . . . . . . . . . . . . . . . . . . . . . . . . . . . . . . 4-14
Adjusting the screen . . . . . . . . . . . . . . . . . . . . . . . . . . . 4-16
Operating tips. . . . . . . . . . . . . . . . . . . . . . . . . . . . . . . . . 4-17

Vents . . . . . . . . . . . . . . . . . . . . . . . . . . . . . . . . . . . . . . . . . . . 4-18
Heater and air conditioner (manual)
(if so equipped) . . . . . . . . . . . . . . . . . . . . . . . . . . . . . . . . . . 4-18

Controls . . . . . . . . . . . . . . . . . . . . . . . . . . . . . . . . . . . . . . 4-19
Heater operation . . . . . . . . . . . . . . . . . . . . . . . . . . . . . . 4-20
Air conditioner operation . . . . . . . . . . . . . . . . . . . . . . . 4-21
Air flow charts. . . . . . . . . . . . . . . . . . . . . . . . . . . . . . . . . 4-22

Heater and air conditioner (automatic)
(if so equipped) . . . . . . . . . . . . . . . . . . . . . . . . . . . . . . . . . . 4-26

Automatic operation . . . . . . . . . . . . . . . . . . . . . . . . . . . 4-26
Manual operation . . . . . . . . . . . . . . . . . . . . . . . . . . . . . . 4-27

Operating tips. . . . . . . . . . . . . . . . . . . . . . . . . . . . . . . . . 4-28

Servicing air conditioner. . . . . . . . . . . . . . . . . . . . . . . . . . . 4-28
Audio system . . . . . . . . . . . . . . . . . . . . . . . . . . . . . . . . . . . . 4-29

Radio . . . . . . . . . . . . . . . . . . . . . . . . . . . . . . . . . . . . . . . . 4-29
FM radio reception . . . . . . . . . . . . . . . . . . . . . . . . . . . . 4-29
AM radio reception . . . . . . . . . . . . . . . . . . . . . . . . . . . . 4-29
Satellite radio reception (if so equipped) . . . . . . . . . 4-30
Audio operation precautions . . . . . . . . . . . . . . . . . . . . 4-30
FM/AM radio with compact disc (CD) player
(if so equipped) . . . . . . . . . . . . . . . . . . . . . . . . . . . . . . . 4-44
FM/AM/SAT radio with compact disc (CD)
player (if so equipped) . . . . . . . . . . . . . . . . . . . . . . . . . 4-48
FM/AM/SAT radio with CD/DVD player
(if so equipped) . . . . . . . . . . . . . . . . . . . . . . . . . . . . . . . 4-54
Digital Versatile Disc (DVD) Player
Operation (models with Navigation System) . . . . . . 4-63
USB interface (models without Navigation
System) (if so equipped) . . . . . . . . . . . . . . . . . . . . . . . 4-66
USB interface
(models with Navigation System) . . . . . . . . . . . . . . . . 4-68
iPod

姞* player operation without Navigation

System (if so equipped) . . . . . . . . . . . . . . . . . . . . . . . . 4-71
iPod

姞* player operation with Navigation

System (if so equipped) . . . . . . . . . . . . . . . . . . . . . . . . 4-73

Bluetooth

姞 streaming audio (if so equipped) . . . . . .4-76

CD care and cleaning . . . . . . . . . . . . . . . . . . . . . . . . . . 4-79
Steering wheel switch for audio control
(if so equipped) . . . . . . . . . . . . . . . . . . . . . . . . . . . . . . . 4-81
Antenna . . . . . . . . . . . . . . . . . . . . . . . . . . . . . . . . . . . . . . 4-83

Car phone or CB radio . . . . . . . . . . . . . . . . . . . . . . . . . . . . 4-83
Bluetooth

姞 Hands-Free Phone System without

Navigation System (if so equipped) . . . . . . . . . . . . . . . . . 4-84

Regulatory Information . . . . . . . . . . . . . . . . . . . . . . . . . 4-85
Using the system . . . . . . . . . . . . . . . . . . . . . . . . . . . . . . 4-86
Control buttons . . . . . . . . . . . . . . . . . . . . . . . . . . . . . . . 4-88
Getting started . . . . . . . . . . . . . . . . . . . . . . . . . . . . . . . . 4-88
List of voice commands . . . . . . . . . . . . . . . . . . . . . . . . 4-90
Voice Adaptation (VA) mode . . . . . . . . . . . . . . . . . . . . 4-94
Manual control . . . . . . . . . . . . . . . . . . . . . . . . . . . . . . . . 4-95
Troubleshooting guide . . . . . . . . . . . . . . . . . . . . . . . . . 4-97

Bluetooth

姞 Hands-Free Phone System with

Navigation System (if so equipped) . . . . . . . . . . . . . . . . . 4-98

Regulatory Information . . . . . . . . . . . . . . . . . . . . . . . .4-100
Voice commands . . . . . . . . . . . . . . . . . . . . . . . . . . . . .4-100
Connecting procedure . . . . . . . . . . . . . . . . . . . . . . . .4-100

Vehicle phonebook . . . . . . . . . . . . . . . . . . . . . . . . . . .4-102
Handset phonebook . . . . . . . . . . . . . . . . . . . . . . . . . .4-104
Making a call . . . . . . . . . . . . . . . . . . . . . . . . . . . . . . . . .4-105
Receiving a call . . . . . . . . . . . . . . . . . . . . . . . . . . . . . .4-105
During a call . . . . . . . . . . . . . . . . . . . . . . . . . . . . . . . . .4-106
Ending a call . . . . . . . . . . . . . . . . . . . . . . . . . . . . . . . . .4-107
Phone settings . . . . . . . . . . . . . . . . . . . . . . . . . . . . . . .4-107
Bluetooth settings . . . . . . . . . . . . . . . . . . . . . . . . . . . .4-108
Call volume . . . . . . . . . . . . . . . . . . . . . . . . . . . . . . . . . .4-109

NISSAN Voice Recognition System
(if so equipped) . . . . . . . . . . . . . . . . . . . . . . . . . . . . . . . . .4-109

NISSAN Voice Recognition Standard Mode . . . . .4-110
Using the system . . . . . . . . . . . . . . . . . . . . . . . . . . . . .4-113
Before starting . . . . . . . . . . . . . . . . . . . . . . . . . . . . . . .4-113
Giving voice commands . . . . . . . . . . . . . . . . . . . . . . .4-113
NISSAN Voice Recognition Alternate
Command Mode . . . . . . . . . . . . . . . . . . . . . . . . . . . . .4-121
Using the system . . . . . . . . . . . . . . . . . . . . . . . . . . . . .4-126
Speaker Adaptation function . . . . . . . . . . . . . . . . . . .4-129
Troubleshooting guide . . . . . . . . . . . . . . . . . . . . . . . .4-131

WARNING

● Positioning of the heating or air condi-

tioning controls and display controls
should not be done while driving in or-
der that full attention may be given to
the driving operation.

● Do not disassemble or modify this sys-

tem. If you do, it may result in accidents,
fire, or electrical shock.

● Do not use this system if you notice any

abnormality, such as a frozen screen or
lack of sound. Continued use of the
system may result in accident, fire or
electric shock.

● In case you notice any foreign object in

the system hardware, spill liquid on it,
or notice smoke or smell coming from
it, stop using the system immediately
and

contact

your

nearest

NISSAN

dealer. Ignoring such conditions may
lead to accidents, fire or electrical
shock.

1. Display screen

2. MAP button*

3. DEST button*

4. ROUTE/VOICE button*

5. INFO button (P. 4-5)

6. SETTING button (P. 4-6)

7. Volume control knob

8.

(brightness control) button

LHA2081

CONTROL PANEL BUTTONS —
COLOR SCREEN WITH NAVIGATION
SYSTEM (if so equipped)

4-2

Monitor, climate, audio, phone and voice recognition systems

*For Navigation system control buttons, refer to
the

separate

Navigation

System

Owner’s

Manual.

When you use this system, make sure the engine
is running.

If you use the system with the engine not
running (ignition ON or ACC) for a long
time, it will discharge the battery, and the
engine will not start.

Reference symbols:

“Example” — Words marked in quotes refer to a
key shown only on the display. These keys can be
selected by touching the screen.

HOW TO USE THE TOUCH
SCREEN

CAUTION

● The glass display screen may break if it

is hit with a hard or sharp object. If the
glass screen breaks, do not touch it.
Doing so could result in an injury.

● To clean the display, never use a rough

cloth, alcohol, benzine, thinner or any
kind of solvent or paper towel with a
chemical cleaning agent. They will
scratch or deteriorate the panel.

● Do not splash any liquid such as water

or car fragrance on the display. Contact
with liquid will cause the system to
malfunction.

To help ensure safe driving, some functions can-
not be operated while driving.

The on-screen functions that are not available
while driving will be “grayed out” or muted.

Park the vehicle in a safe location and then oper-
ate the navigation system.

WARNING

● ALWAYS give your full attention to

driving.

● Avoid using vehicle features that could

distract you. If distracted, you could
lose control of your vehicle and cause
an accident.

Touch screen operation

Selecting the item:

Touch an item to select. To select the “Naviga-
tion” key, touch the “Navigation” key

1

on the

screen. Touch the “BACK” key

2

to return to the

previous screen.

LHA1227

Monitor, climate, audio, phone and voice recognition systems

4-3

Adjusting the item:

Touch the “+” key

1

or the “

⫺” key

2

to adjust

the settings of an item.

Touch the up arrow

3

to scroll up the page one

item at a time, or touch the double up arrow

4

to

scroll up an entire page.

Touch the down arrow

5

to scroll down the

page one item at a time, or touch the double
down arrow

6

to scroll down an entire page.

Inputting characters:

Touch the letter or number key

1

.

There are some options available when inputting
characters.

● Uppercase:

Shows uppercase characters.

● Lowercase:

Shows lowercase characters.

● Space:

Inserts a space.

● Delete:

Deletes the last inputted character with one
touch. Touch and hold the “Delete” key to
delete all of the characters.

● OK:

Completes the character input.

Touch screen maintenance

If you clean the display screen, use a dry, soft
cloth. If additional cleaning is necessary, use a
small amount of neutral detergent with a soft
cloth. Never spray the screen with water or de-
tergent. Dampen the cloth first, and then wipe the
screen.

LHA1228

LHA1230

4-4

Monitor, climate, audio, phone and voice recognition systems

HOW TO SELECT MENUS ON THE
SCREEN

Vehicle functions are viewed on the center dis-
play screen in menus. Whenever a menu selec-
tion is made or menu item is highlighted, different
areas on the screen provide you with important
information. See the following for details.

1. Header:

Shows the path used to get to the current
screen (for example, press the SETTING
button > then select the “Comfort” key).

2. Menu Selections:

Shows the options to choose within that
menu screen (for example, Auto Interior Illu-
mination, etc.).

3. Up/Down Movement Indicator:

Shows that the arrows on the touch screen
may be used to move up or down on the
screen and select more options.

4. Screen Count:

Shows the number of menu selections avail-
able for the current menu, even if they are on
multiple pages (for example, 1/7).

5. Footer/Information Line:

Provides more information (if available)
about the menu selection currently high-
lighted (for example, Cabin lighting when
unlocking doors).

HOW TO USE THE INFO BUTTON

Press the INFO button; the display screen shows
vehicle and navigation information for your con-
venience.

Where am I?

Refer to the separate Navigation System Own-
er’s Manual for information regarding this item.

Traffic Info

Refer to the separate Navigation System Own-
er’s Manual for information regarding this item.

WHA1401

LHA1402

Monitor, climate, audio, phone and voice recognition systems

4-5

Weather Info

Refer to the separate Navigation System Own-
er’s Manual for information regarding this item.

Map Update

Refer to the separate Navigation System Own-
er’s Manual for information regarding this item.

Navigation Version

Refer to the separate Navigation System Own-
er’s Manual for information regarding this item.

GPS Position

For GPS Position, refer to the separate Naviga-
tion System Owner’s Manual.

Voice Recognition settings

For Voice Recognition settings, refer to “NISSAN
Voice Recognition system” in this section.

HOW TO USE THE SETTING
BUTTON

When the SETTING button is pressed, the Set-
tings screen will appear on the display. You can
select and/or adjust several functions, features
and modes that are available for your vehicle.

LHA1236

LHA1237

4-6

Monitor, climate, audio, phone and voice recognition systems

Display settings

Select the “Display” key. On the screen above,
select the “Display Adjustment” key. The Display
Adjustment screen will appear.

Brightness/contrast:

Select the “Brightness” key or the “Contrast” key
to adjust the brightness or contrast of the display
background. Touch the “+” or “-” key to adjust the
brightness to darker or brighter and the contrast
to lower or higher.

The new settings are automatically saved when
you exit the setting screen by selecting the
“Back” key or any other mode button.

Display off:

Select the “Display ON” key. The indicator of the
“Display ON” turns off and the message above
will be displayed briefly. When the audio, HVAC
(Heater and air conditioner), or any mode button
on the control panel is operated, the display turns
on for that operation. If one of the control panel
buttons is pressed, the display will not automati-
cally turn off until that operation is finished. Oth-
erwise, the screen turns off automatically after 5
seconds.

WHA1502

WHA1503

LHA1242

Monitor, climate, audio, phone and voice recognition systems

4-7

To turn the screen on:

● Press the SETTING button and select the

“Display” key and then select the “Display
ON” key, or

● Press the

button and the message

“resuming display” will appear and the “Dis-
play ON” key will be automatically turned on
(no amber indicator).

Background color:

Select the “Background Color” key; the display
color changes between day and night.

The new settings are automatically saved when
you exit the setting screen by selecting the
“Back” key or any other mode button.

Color theme:

Select the “Display” key, then select the “Color
Theme” key. The Color Theme select screen will
appear.

Select the key for the desired color. The appear-
ance of the background, arrows and bars will
change for all screens accordingly. You can
choose a black, blue or red color theme.

Clock

The following display will appear after pressing
the SETTING button, then selecting the “Clock”
key.

On-screen Clock:

When this item is enabled (indicator light illumi-
nated), a clock is always displayed in the upper
right corner of the screen.

This clock will indicate the time almost exactly
because it is always adjusted by the GPS system.

LHA1240

LHA1241

4-8

Monitor, climate, audio, phone and voice recognition systems

Clock Format (24h):

When this item is enabled (indicator light illumi-
nated), the clock format will change from the
default 12-hour display to a 24-hour display.

Offset (hour):

Adjust the time by increasing or decreasing the
hours.

Offset (minute):

Adjust the time by increasing or decreasing the
minutes.

Daylight Savings Time:

When this item is enabled (indicator light illumi-
nated), daylight savings time is on. To turn off the
daylight savings time, touch the “ON” key; the
amber indicator light will go out.

Time Zone:

Select the “Time Zone” key; the Time Zone
screen will appear.

Select one of the following zones, depending on
the current location, by selecting the correct time
zone key to enable that time zone (indicator light
will illuminate for that location).

● Pacific
● Mountain
● Central
● Eastern
● Atlantic

● Newfoundland
● Hawaii
● Alaska

After selection/settings, select the “Back” key or
any other mode button to accept the changes.

LHA1243

Monitor, climate, audio, phone and voice recognition systems

4-9

Others settings

Select the “Others” key. Comfort settings, lan-
guage and units and Voice Recognition settings
will be displayed.

Comfort settings

Select the “Others” key, then select the “Com-
fort” key. The Comfort settings screen will be
displayed.

You can set the following operating conditions by
selecting the key for the desired item. The indica-
tor light (box at the right of the selected item)
alternately turns on and off each time the item is
touched.

Indicator light is illuminated — ON

Indicator light is not illuminated — OFF

Auto Interior Illumination: Select to turn on or
turn off the illumination of the interior lights when
any door is unlocked.

Light Sensitivity: Select to adjust the sensitivity
of the automatic headlights higher (right) or lower
(left). After selecting the item, touch the “+” or “-”
key to change the setting.

Light Off Delay: Select to change the duration
of the automatic headlight off timer. After select-
ing the item, touch the “+” or “-” key to change
the setting. The available delays are 0, 30, 45, 60,
90, 120, 150 and 180 seconds.

LHA1403

WHA1404

LHA1405

4-10

Monitor, climate, audio, phone and voice recognition systems

Speed Sensing Wiper Interval: Select to turn
on or turn off the wiper interval adjusted automati-
cally according to the vehicle speed.

Selective Door Unlock: When this item is
turned on, only the driver’s door is unlocked first
after the door unlock operation. When the door
handle request switch on the driver’s or front
passenger’s side door is pushed to be unlocked,
only the corresponding door is unlocked first. All
the doors can be unlocked if the door unlock
operation is performed again within one minute.

When this item is turned to off, all the doors will
be unlocked after the door unlock operation is
performed once.

Intelligent Key Lock / Unlock: Select to turn
on or turn off the door lock/unlock function by
pushing the door handle request switch.

Return All Settings to Default: Select to
change all the comfort and convenience systems
to their default settings.

Language & Units:

Select the “Language & Units” key. Select the key
of the setting you wish to change.

Select Language:

Select the “English” key or the “Français” key to
change the language shown on the display.

If you select the “Français” key, French language
will be displayed, so please use the French Own-
er’s Manual. To obtain a French Owner’s Manual,
please see “Owner’s Manual/Service Manual Or-
der Information” in the “Technical and consumer
information” section.

LHA1250

LHA1251

Monitor, climate, audio, phone and voice recognition systems

4-11

Select Units:

Select the “US” (mi, °F, MPG) key or the “Metric”
(km, °C, L/100 km) key to change the units
shown on the display.

Voice Recognition:

For Voice Recognition settings, refer to “NISSAN
Voice Recognition system” in this section.

Navigation settings

Refer to the separate Navigation System Own-
er’s Manual for information regarding these set-
tings.

Audio settings

For audio settings, refer to “Audio System” in this
section.

Phone settings

For phone settings refer to “Bluetooth

姞 Hands-

Free Phone System with Navigation System” in
this section.

Bluetooth

姞 settings

For

Bluetooth

姞 phone settings, refer to

“Bluetooth

姞 Hands-Free Phone System with

Navigation System” in this section.

For

Bluetooth

姞 audio settings, refer to

“Bluetooth

姞 streaming audio” in this section.

Volume & beeps settings

Navigation volume

For navigation volume settings, refer to the sepa-
rate Navigation System Owner’s Manual for infor-
mation regarding these settings.

Phone volume

For phone volume settings refer to “Bluetooth

Hands-Free Phone System with Navigation Sys-
tem” in this section.

Switch beeps

With this option on (indicator light illuminated), a
beep will sound if any control panel button is
pressed.

BUTTON

To

change

the

display

brightness,

press

the

button. Pressing the button again will

change the display to the day

or the

night

display.

If no operation is performed within 5 seconds, the
display will return to the previous display.

LHA1252

LHA1253

4-12

Monitor, climate, audio, phone and voice recognition systems

Press and hold the

button for more than

two seconds to turn the display off. Press the
button again to turn the display on.

When the shift selector is shifted into the R
(Reverse) position, the monitor display shows a
rearward view from the vehicle.

WARNING

● The system is designed as an aid to the

driver in detecting large stationary ob-
jects to help avoid damaging the ve-
hicle. The system will not detect small
objects below the bumper, and may not
detect objects close to the bumper or
on the ground.

● The RearView Monitor is a convenience

but it is not a substitute for proper back-
ing. Always turn and check that it is safe
to do so before backing up. Always
back up slowly.

● Objects viewed in the RearView Moni-

tor differ from actual distance because
a wide-angle lens is used.

● Make sure that the trunk is securely

closed when backing up.

● Do not put anything on the rearview

camera. The rearview camera is in-
stalled beside the license plate light.

● When washing the vehicle with high-

pressure water, be sure not to spray it
around the camera. Otherwise, water
may enter the camera unit causing wa-
ter condensation on the lens, a mal-
function, fire or an electric shock.

● Do not strike the camera. It is a preci-

sion instrument. Otherwise, it may mal-
function or cause damage resulting in a
fire or an electric shock.

CAUTION

There is a plastic cover over the camera.
Do not scratch the cover when cleaning
dirt or snow from the cover.

HOW TO READ THE DISPLAYED
LINES

Lines which indicate the vehicle clearance and
distances to objects with reference to the bum-
per line

A

are displayed on the monitor.

LHA1254

REARVIEW MONITOR (if so
equipped)

Monitor, climate, audio, phone and voice recognition systems

4-13

They are indicated as reference distances to
objects. The lines and colors in the display indi-
cate distances from the back bumper line

A

in

the illustration.

1

1.5 ft (0.5 m) red

2

3 ft (1 m) yellow

3

7 ft (2 m) green

4

10 ft (3 m) green

The vehicle clearance lines are wider than
the actual clearance.

DIFFERENCE BETWEEN
PREDICTED AND ACTUAL
DISTANCES

The distance guide line and the vehicle width
guide line should be used as a reference only
when the vehicle is on a level, paved surface. The
distance viewed on the monitor is for reference
only and may be different than the actual distance
between the vehicle and displayed objects.

LHA0437

WHA1504

4-14

Monitor, climate, audio, phone and voice recognition systems


Content   ..  8  9  10  11   ..