Nissan Frontier D40. Manual - part 942


  Index      Nissan     Nissan Frontier D40 (2010 year) - Service and Repair Manual


Search            


Content   ..  940  941  942  943   ..


Nissan Frontier D40. Manual - part 942


RF-52

< ON-VEHICLE REPAIR >

SUNROOF SYSTEM

Removal and Installation

INFOID:0000000005272957
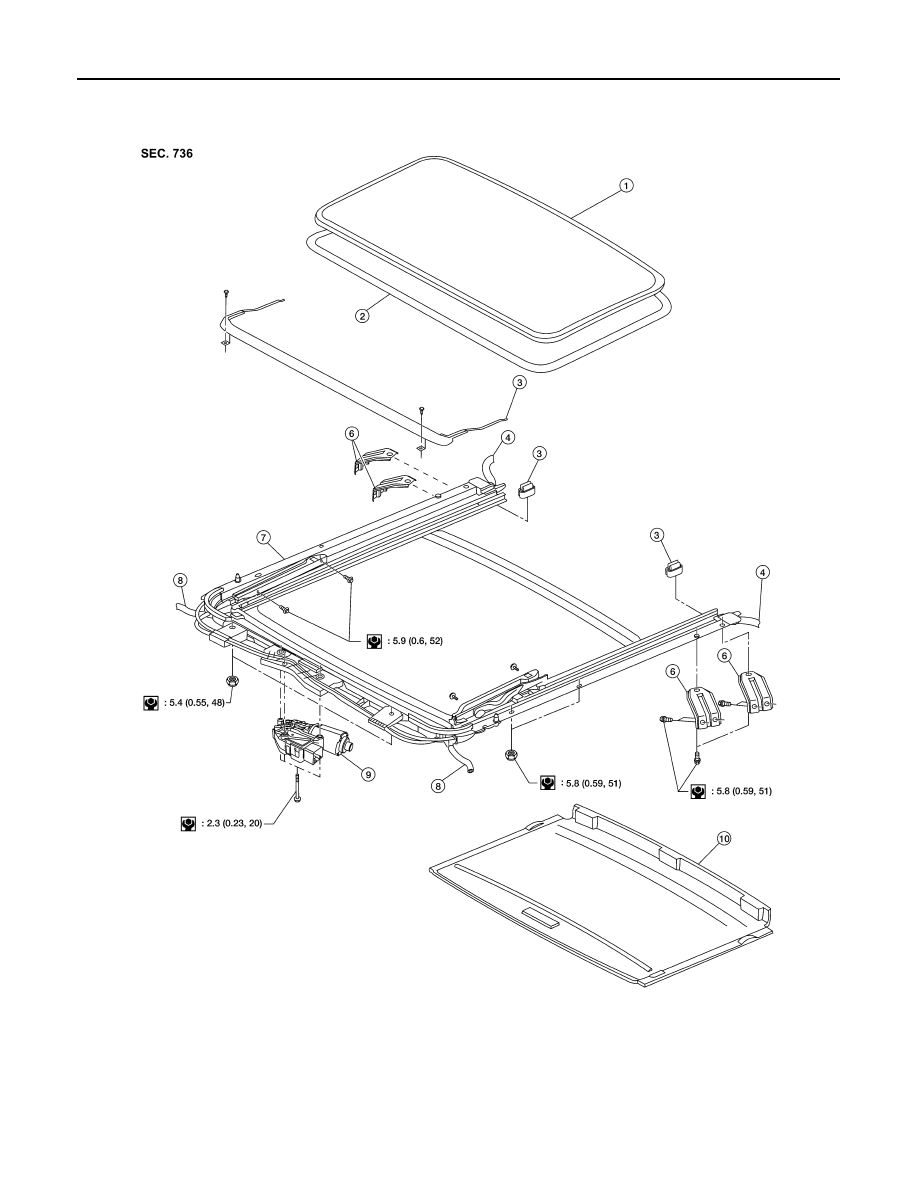
1.

Glass lid assembly

2.

Sunroof lid seal

3.

Wind deflector

4.

Rear drain hoses

5.

Shade stoppers

6.

Sunroof bracket

7.

Sunroof frame assembly

8.

 Front drain hoses

9.

Sunroof motor assembly

10. Sunshade assembly

ALKIA1850GB

SUNROOF SYSTEM

RF-53

< ON-VEHICLE REPAIR >

C

D

E

F

G

H

I

J

L

M

A

B

RF

N

O

P

• After any adjustment, check sunroof operation and glass lid alignment.
• Handle glass lid with care so not to cause damage.
• For easier installation, mark each point before removal.

CAUTION:

• Always work with a helper.
• Before removal, fully close the glass lid assembly. Then, after removal, do not move the motor

assembly.

• After installing the sunroof and glass lid, check gap adjustment to ensure there is no malfunction.

SUNROOF UNIT

Removal

CAUTION:

• Always work with a helper.
• When taking sunroof unit out, use shop cloths to protect the seats and trim from damage.
• After installing the sunroof unit and glass lid, be sure to check gap adjustment to ensure there is no

malfunction.

1.

Remove headlining. Refer to 

INT-24, "Removal and Installation"

2.

Remove the sunroof glass lid.

3.

Disconnect sunroof motor, and if equipped, remove overhead console bracket.

4.

Remove the sunshade stoppers and sunshade.

5.

Disconnect the drain hoses.

6.

Remove front sunroof frame assembly nuts.

7.

Remove the rear sunroof bracket bolts. 

8.

Remove the side bolts and the sunroof unit.

Installation

1.

Position the sunroof frame assembly and install the side bolts.

2.

Install the rear sunroof bracket bolts.

3.

Install front sunroof frame assembly nuts.

4.

Connect the drain hoses.

5.

Install the sunshade and sunshade stoppers.

6.

Install the overhead console bracket (if equipped), and connect the sunroof motor.

7.

Install the sunroof glass lid.

8.

Install headlining. Refer to 

INT-24, "Removal and Installation"

.

GLASS LID

Removal

1.

Open sunshade.

2.

Ensure glass lid is closed.

3.

Remove the screws securing glass lid to the sunroof frame assembly.

4.

Remove the glass lid assembly.

Installation

1.

Position glass lid to sunroof assembly.

2.

Install the glass lid assembly screws. (First tighten left front bolt,
then tighten right rear bolt on glass lid to prevent lid from moving
while tightening other bolts.) 

3.

Adjust the sunroof glass. Refer to 

RF-51, "Adjustment"

.

WIIA0252E

RF-54

< ON-VEHICLE REPAIR >

SUNROOF SYSTEM

SUNROOF LID SEAL

Removal

1.

Remove glass lid, refer to GLASS LID in this section

2.

Inspect rubber edge of glass lid. 
NOTE:
If rubber edge is deformed or damaged, entire glass lid must be replaced.

3.

Remove sunroof lid seal from the rubber edge of glass lid by pulling it outward.

Installation

1.

Inspect and clean the ditch groove of the rubber edge for dirt or debris.

2.

Stretch sunroof lid seal around glass lid and push the tounge edge into the ditch groove.  
NOTE:
If needed, very light taps with a rubber hammer can be used to press the seal into place.

3.

Place glass lid into sunroof assembly and install, refer to GLASS LID in this section.

WIND DEFLECTOR

Removal

1.

Open the sunroof.

2.

Remove screws from the left, center, and right side wind deflec-
tor holders.

3.

Remove the wind deflector from the sunroof frame assembly.

Installation

Installation is in the reverse order of removal.

SUNSHADE

Removal

1.

Remove the sunroof frame assembly. Refer to 

RF-52, "Removal and Installation"

.

2.

Remove the sunshade stoppers (2 points) from the rear end of
the sunroof frame assembly.

3.

Remove the sunshade assembly from the rear end of the sun-
roof frame assembly.

Installation

Installation is in the reverse order of removal.

SUNROOF MOTOR

Removal

CAUTION:

• When removing the sunroof motor, be sure that the sunroof is in the fully closed position.
• Never run the removed motor as a single unit.

1.

Position the sunroof assembly in the fully closed position.

WIIA0424E

LIIA1672E

SUNROOF SYSTEM

RF-55

< ON-VEHICLE REPAIR >

C

D

E

F

G

H

I

J

L

M

A

B

RF

N

O

P

2.

Remove the front roof console assembly. Refer to 

INT-24, "Removal and Installation"

.

3.

Disconnect the harness connector from the sunroof motor
assembly.

4.

Remove the mounting screws and the sunroof motor assembly.

Installation

CAUTION:

Before installing the sunroof motor assembly, be sure to place the link and wire assembly in the sym-
metrical and fully closed position.

1.

Move the sunroof motor assembly laterally little by little so that
the gear is completely engaged into the wire on the sunroof unit
and the mounting surface becomes parallel. Then secure the
motor with bolts.

2.

Connect the harness connector to the sunroof motor assembly.

3.

Install the front roof console assembly. Refer to 

INT-24, "Removal and Installation"

.

4.

Reset the sunroof motor memory. Refer to 

BRC-189, "ADJUSTMENT OF STEERING ANGLE SENSOR

NEUTRAL POSITION : Special Repair Requirement"

.

DRAIN HOSES

Removal

LIIA1673E

LIIA1674E

1.

Drain hose

WIIA1074E


Content   ..  940  941  942  943   ..