Nissan Frontier D40. Manual - part 322


  Index      Nissan     Nissan Frontier D40 (2010 year) - Service and Repair Manual


Search            


Content   ..  320  321  322  323   ..


Nissan Frontier D40. Manual - part 322


DIFFERENTIAL GEAR OIL

DLN-309

< ON-VEHICLE MAINTENANCE >

[REAR FINAL DRIVE: M226 (ELD) ]

C

E

F

G

H

I

J

K

L

M

A

B

DLN

N

O

P

ON-VEHICLE MAINTENANCE

DIFFERENTIAL GEAR OIL

Changing Differential Gear Oil

INFOID:0000000005275638

DRAINING

1.

Stop engine.

2.

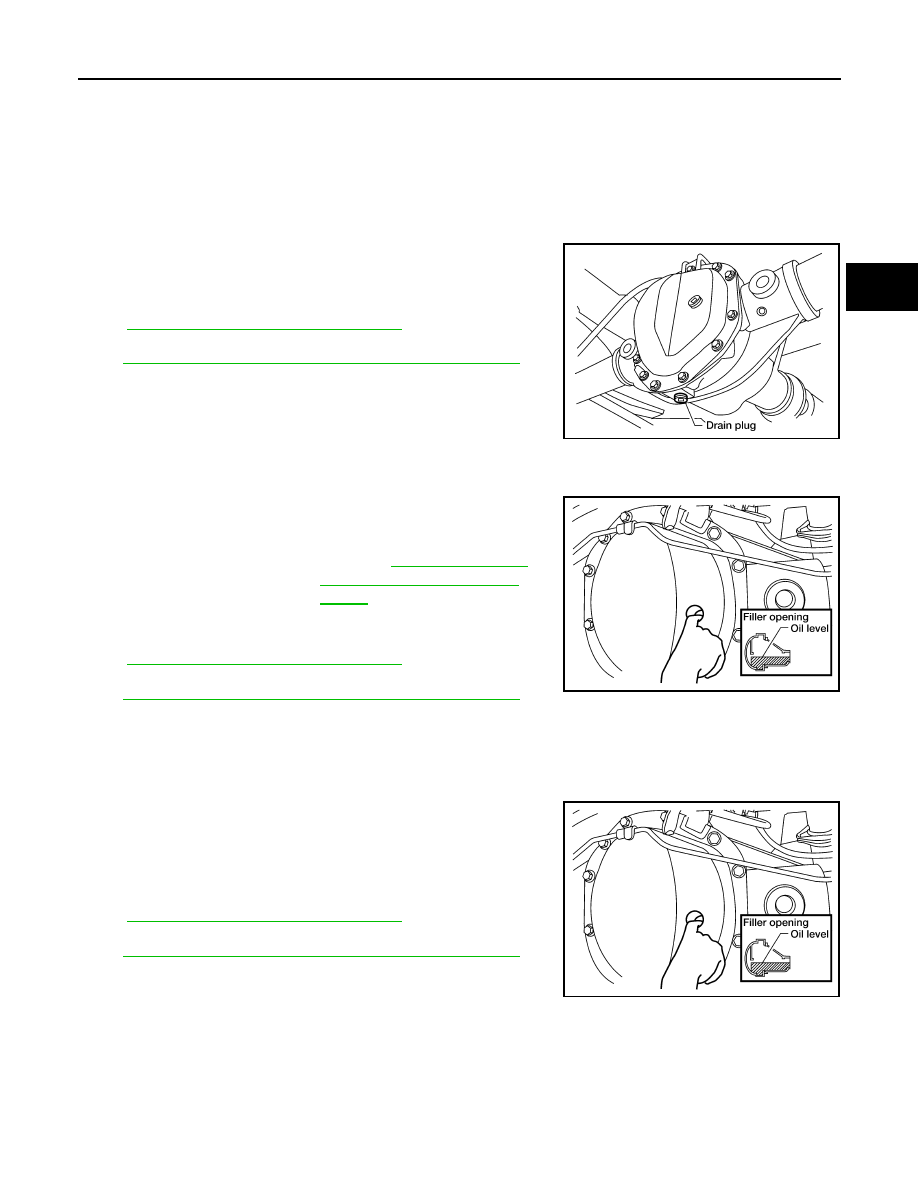
Remove the drain plug from the rear final drive assembly to
drain the differential gear oil.

3.

Install the drain plug with sealant applied on the threads to the
rear final drive assembly. Tighten to the specified torque. Refer
to 

DLN-320, "Disassembly and Assembly"

.

• Use High Performance Thread Sealant or equivalent. Refer to

GI-22, "Recommended Chemical Products and Sealants"

FILLING

1.

Remove the filler plug from the rear final drive assembly.

2.

Fill the rear final drive assembly with new differential gear oil
until the level reaches the specified level near the filler plug hole.

3.

Install the filler plug with sealant applied on the threads to the
rear final drive assembly. Tighten to the specified torque. Refer
to 

DLN-320, "Disassembly and Assembly"

.

• Use High Performance Thread Sealant or equivalent. Refer to

GI-22, "Recommended Chemical Products and Sealants"

.

Checking Differential Gear Oil

INFOID:0000000005275639

DIFFERENTIAL GEAR OIL LEAKAGE AND LEVEL

1.

Make sure that differential gear oil is not leaking from the rear final drive assembly or around it.

2.

Check the differential gear oil level from the filler plug hole as
shown.

CAUTION:

Do not start engine while checking differential gear oil level.

3.

Install the filler plug with sealant applied on the threads to the
rear final drive assembly. Tighten to the specified torque. Refer
to 

DLN-320, "Disassembly and Assembly"

.

• Use High Performance Thread Sealant or equivalent. Refer to

GI-22, "Recommended Chemical Products and Sealants"

.

LDIA0183E

Differential gear oil 
grade and capacity

: Refer to 

MA-16, "For North 

America: Fluids and Lubri-
cants"

.

LDIA0127E

LDIA0127E

DLN-310

< ON-VEHICLE REPAIR >

[REAR FINAL DRIVE: M226 (ELD) ]

DIFFERENTIAL LOCK CONTROL UNIT

ON-VEHICLE REPAIR

DIFFERENTIAL LOCK CONTROL UNIT

Removal and Installation

INFOID:0000000005275640

REMOVAL

1.

Disconnect the battery cable from the negative terminal.

2.

Remove jack and tools.

3.

Remove upper bracket of center seat belt retractor and belt assembly. Refer to 

SB-11, "Removal and

Installation"

.

4.

Remove the necessary push pins and reposition rear panel out of the way. Refer to 

INT-18, "Removal and

Installation"

.

5.

Reposition the carpet to access differential lock control unit to
disconnect connector.

6.

Remove the two nuts and remove differential lock control unit.

INSTALLATION

Note the following, and installation is in the reverse order of removal.
• When installing differential lock control unit, tighten nuts to the specified torque.

LDIA0156E

Differential lock control unit nuts

: 5.1 N·m (0.52 kg-m, 45 in-lb)

DIFFERENTIAL LOCK POSITION SWITCH

DLN-311

< ON-VEHICLE REPAIR >

[REAR FINAL DRIVE: M226 (ELD) ]

C

E

F

G

H

I

J

K

L

M

A

B

DLN

N

O

P

DIFFERENTIAL LOCK POSITION SWITCH

Removal and Installation

INFOID:0000000005275641

REMOVAL

Differential Lock Position Switch

CAUTION:

• Be careful not to damage spline, companion flange and front oil seal when removing propeller shaft.
• Before removing rear final drive assembly or rear axle assembly, disconnect ABS sensor harness

connector from the assembly and move it away from rear final drive assembly/rear axle assembly
area. Failure to do so may result in sensor wires being damaged and sensor becoming inoperative.

1.

Drain rear final drive gear oil. Refer to 

DLN-309, "Changing Differential Gear Oil"

.

2.

Remove rear propeller shaft. Refer to 

DLN-173, "Removal and Installation"

.

3.

Remove both RH and LH axle shafts. Refer to 

RAX-19, "Removal and Installation"

.

4.

Remove the carrier cover. Refer to 

DLN-317, "Removal and Installation"

.

5.

Remove differential lock solenoid connector (B) bolt and discon-
nect differential lock position connector (A).

: Front

6.

For installation, apply a paint matching mark on one side of side
bearing cap.

CAUTION:

• Side bearing caps are line-board for initial assembly. The

matching marks are used to install them in their original
positions.

• For matching mark, use paint. Do not damage side bear-

ing cap.

7.

Remove adjuster lock plates.

8.

Remove side bearing caps.

WDIA0331E

SDIA2583E

SDIA2587E

DLN-312

< ON-VEHICLE REPAIR >

[REAR FINAL DRIVE: M226 (ELD) ]

DIFFERENTIAL LOCK POSITION SWITCH

9.

Loosen the side bearing adjusters using Tool.

10. Remove the differential case assembly, keep side bearing outer

races together with inner races. Do not mix them up. Also, keep
side bearing adjusters together with bearing.

11. Remove side bearing adjusters from gear carrier.

12. Remove bracket for the differential lock position switch connector and bolts.
13. Remove differential lock position switch.

INSTALLATION

1.

Apply sealant to threads of differential lock position switch. 
• Use Genuine Silicone RTV or equivalent. Refer to 

GI-22, "Recommended Chemical Products and Seal-

ants"

.

CAUTION:

Remove old sealant adhering to gear carrier and differential lock position switch. Also remove any
moisture, oil, or foreign material adhering to application and gear carrier and differential lock posi-
tion switch.

2.

Install differential lock position switch on gear carrier and tighten
differential lock position switch bolts with the specified torque.
Refer to 

DLN-320, "Disassembly and Assembly"

.

Tool number

 (C - 4164)

PDIA0337E

SDIA2588E

PDIA0381E

SDIA2633E


Content   ..  320  321  322  323   ..