NOISE, VIBRATION, AND HARSHNESS (NVH) TROUBLESHOOTING
DLN-133
< FUNCTION DIAGNOSIS >
[PROPELLER SHAFT: 2F1310]
C
E
F
G
H
I
J
K
L
M
A
B
DLN
N
O
P
FUNCTION DIAGNOSIS
NOISE, VIBRATION, AND HARSHNESS (NVH) TROUBLESHOOTING
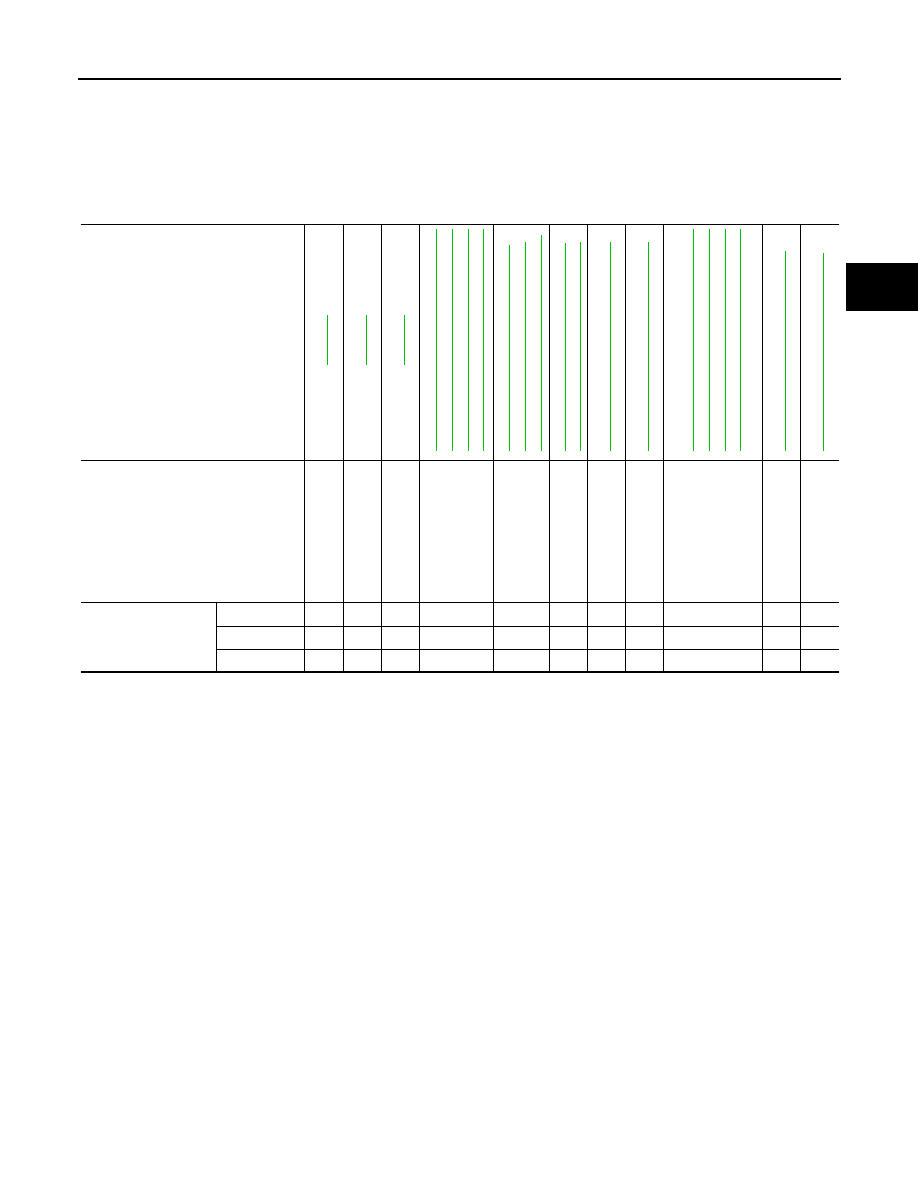
NVH Troubleshooting Chart
INFOID:0000000005275498
Use the chart below to help you find the cause of the symptom. If necessary, repair or replace these parts.
×
: Applicable
Reference page
DLN-134
DLN-134
DLN-134
DL
N-18
3,
"NVH T
ro
u
b
les
ho
ot
ing
Cha
rt"
DL
N-21
7,
"NVH T
ro
u
b
les
ho
ot
ing
Cha
rt"
DL
N-24
9,
"NVH T
ro
u
b
les
ho
ot
ing
Cha
rt"
DL
N-27
3,
"NVH T
ro
u
b
les
ho
ot
ing
Cha
rt"
F
AX-4
,
"NVH T
rou
ble
s
h
o
o
tin
g Chart
"
RA
X-5,
"NVH T
rou
bl
es
ho
ot
ing
Cha
rt"
R
A
X-1
7
, "NVH T
rou
bl
es
ho
ot
in
g
C
h
a
rt"
FSU-4,
"NVH T
ro
u
b
les
ho
ot
ing
Ch
art"
RS
U-4
, "
N
V
H
T
rou
bl
es
ho
oti
ng
Cha
rt"
WT
-4
1,
"NVH T
rou
bl
es
ho
ot
ing
Cha
rt"
WT
-4
1,
"NVH T
rou
bl
es
ho
ot
ing
Cha
rt"
DL
N-13
3,
"NVH T
ro
u
b
les
ho
ot
ing
Cha
rt"
DL
N-14
2,
"NVH T
ro
u
b
les
ho
ot
ing
Cha
rt"
DL
N-15
1,
"NVH T
ro
u
b
les
ho
ot
ing
Cha
rt"
DL
N-17
1,
"NVH T
ro
u
b
les
ho
ot
ing
Cha
rt"
BR-6,
"NVH T
rou
bl
es
ho
oti
n
g
Cha
rt"
ST
-5,
"NVH T
rou
bl
es
ho
ot
in
g
Cha
rt"
Possible cause and suspected parts
Une
v
en
rot
a
ti
on
torq
ue
Rot
a
ti
on
im
ba
la
nc
e
Ex
ce
ss
iv
e run
ou
t
Di
ff
ere
n
ti
al
Axle
Su
sp
en
si
on
Ti
re
s
Road wheel
Driv
e sh
af
t
Brak
es
S
tee
ring
Symptom
Noise
×
×
×
×
×
×
×
×
×
×
×
Shake
×
×
×
×
×
×
×
Vibration
×
×
×
×
×
×
×
×