Nissan Titan. Manual - part 506


  Index      Nissan     Nissan Titan (2014 year) - Service and Repair Manual


Search            


Content   ..  504  505  506  507   ..


Nissan Titan. Manual - part 506


SB-4

< REMOVAL AND INSTALLATION >

SEAT BELTS

REMOVAL AND INSTALLATION

SEAT BELTS

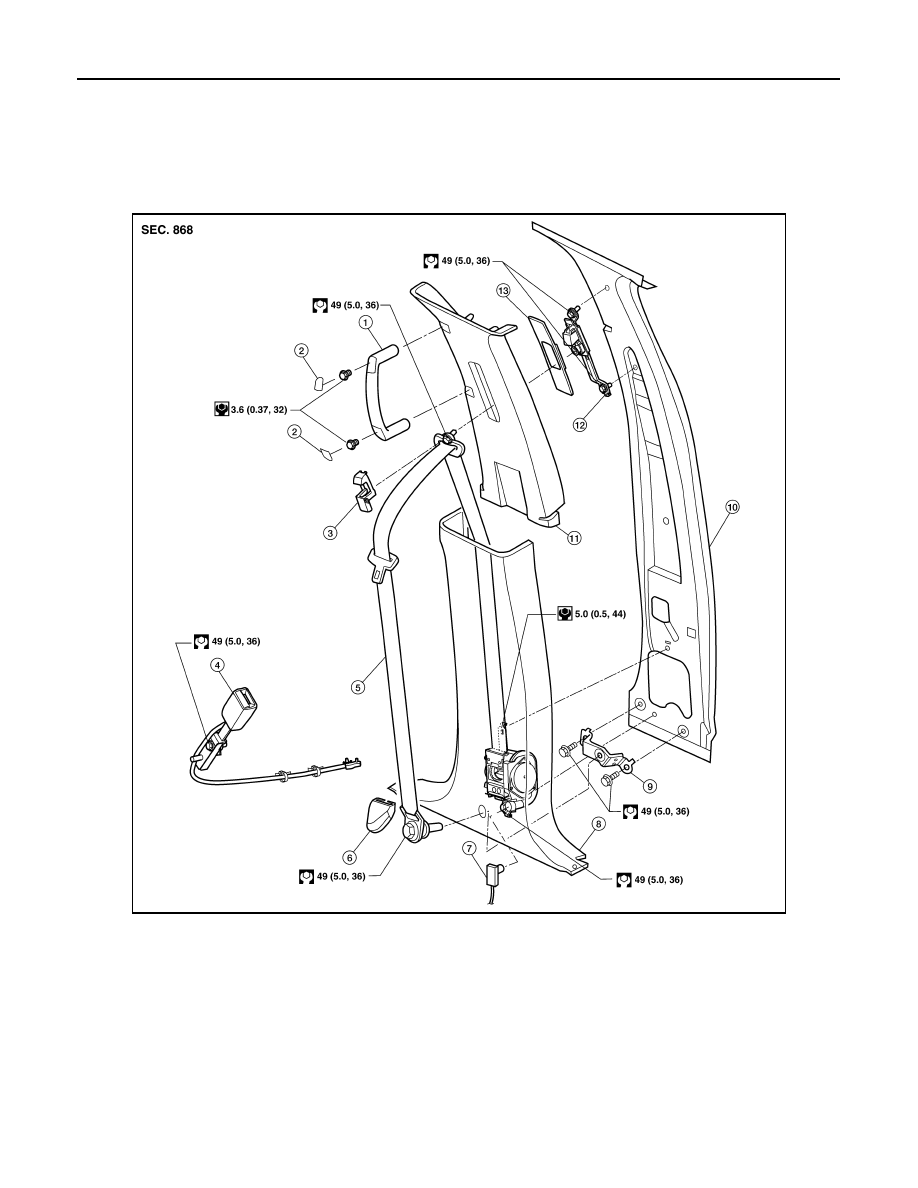
Removal and Installation of Front Seat Belt

INFOID:0000000009882835

CREW CAB

AWHIA0225GB

1.

Assist handle

2.

Assist handle screw covers

3.

 D-ring anchor bolt cover 

4.

Seat belt buckle

5.

Seat belt retractor and belt assembly 
(LH)

6.

Anchor cover

7.

Seat belt pre-tensioner connector

8.

Center pillar lower finisher

9.

Seat belt anchor bracket

10. Center pillar

11. Center pillar upper finisher

12. Seat belt height adjuster

13. Seat belt height adjuster finisher

SEAT BELTS

SB-5

< REMOVAL AND INSTALLATION >

C

D

E

F

G

I

J

K

L

M

A

B

SB

N

O

P

KING CAB

REMOVAL AND INSTALLATION OF SEAT BELT RETRACTOR 

CAUTION:

• Before servicing SRS, turn the ignition switch off, disconnect both battery terminals and wait at least

three minutes.

WIIA0991E

1.

Seat belt height adjuster

2.

Seat belt height adjuster finisher

3.

Door finisher

4.

Armrest

5.

D-ring anchor bolt cover

6.

Seat belt buckle

7.

Seat belt retractor and belt assembly 
(LH)

8.

Anchor cover

9.

Seat belt pre-tensioner connector

10. Lower door finisher

11. Rear door (LH)

SB-6

< REMOVAL AND INSTALLATION >

SEAT BELTS

• For installing/removing seat belt pre-tensioner connector,

insert a thin screwdriver wrapped in tape into the notch, lift

the lock and remove the connector.

• Install the connector with the lock raised, and push the lock

into the connector.

Removal - Crew Cab

CAUTION:

Before servicing the SRS, turn the ignition switch off, disconnect the battery terminals and wait at

least three minutes.

1. Disconnect both the negative and positive battery terminals, then wait at least three minutes. Refer to 

PG-

80, "Removal and Installation"

.

2. Remove the D-ring anchor bolt cover and anchor bolt.
3. Remove the anchor cover and lower seat belt assembly anchor bolt.

• On RH side, disconnect the seat belt tension sensor.

4. Remove the center pillar lower finisher. Refer to 

INT-14, "Removal and Installation"

.

5. Remove the seat belt retractor and belt assembly lower anchor bolt and upper bolt. 
6. Disconnect the harness connector from the seat belt pre-tensioner.
7. Remove the front seat belt retractor and belt assembly.

PHIA0341E

1.

Seat belt retractor and belt assembly 
RH

2.

Seat belt lower anchor RH (seat belt 
tension sensor)

3.

Anchor cover RH (LH similar)

4.

Seat belt lower anchor LH

5.

Seat belt anchor bracket

6.

Seat belt retractor and belt assembly 
LH

7.

Center pillar

A.

Lower anchor bolt

B.

Anchor bracket bolt

C.

Retractor anchor bolt

D.

Retractor bolt upper

Front

WHIA0346E

SEAT BELTS

SB-7

< REMOVAL AND INSTALLATION >

C

D

E

F

G

I

J

K

L

M

A

B

SB

N

O

P

Installation - Crew Cab

 Installation is in the reverse order of removal. 

• Install the seat belt retractor upper bolt first.

• Make sure seat belt height adjuster is locked in the lowest position during installation.

Removal - King Cab

CAUTION:

Before servicing the SRS, turn the ignition switch off, disconnect the battery terminals and wait at

least three minutes.
1. Disconnect both the negative and positive battery terminals, then wait at least three minutes. Refer to 

PG-

80, "Removal and Installation"

.

2. Remove D-ring anchor bolt cover and bolt.
3. Remove anchor cover and bolt.
4. Remove lower door finisher.
5. Disconnect the harness connector from the seat belt pre-tensioner.
6. Remove seat belt retractor and belt assembly.

Installation - King Cab

Installation is in the reverse order of removal.

REMOVAL AND INSTALLATION OF SEAT BELT BUCKLE

Removal - Bucket Seat

1. Remove the front seat. Refer to 

SE-34, "Removal and Installation - Front Seat Assembly"

.

2. Remove screw and seat cushion inner finisher.
3. Remove the anchor bolt and buckle.
4. Disconnect the buckle switch connector from the seat connector.

Installation - Bucket Seat

CAUTION:

• Passenger seat is equipped with Occupant Classification System sensor and control module. Do not

disassemble front passenger seat cushion assembly or remove trim as this will affect the Occupant

Classification System calibration.

• On passenger seat during installation, the wire harness clips must be installed in the holes they were

originally in.

 Installation is in the reverse order of removal.

REMOVAL AND INSTALLATION OF CENTER BENCH SEAT BELT AND SEAT BELT BUCKLE

WHIA0128E


Content   ..  504  505  506  507   ..