Nissan Quest E52. Manual - part 1042


  Index      Nissan     Nissan Quest E52 (2011-2014 year) - Service and Repair Manual


Search            


Content   ..  1040  1041  1042  1043   ..


Nissan Quest E52. Manual - part 1042


THIRD SEAT BELT

SB-17

< REMOVAL AND INSTALLATION >

C

D

E

F

G

I

J

K

L

M

A

B

SB

N

O

P

b.

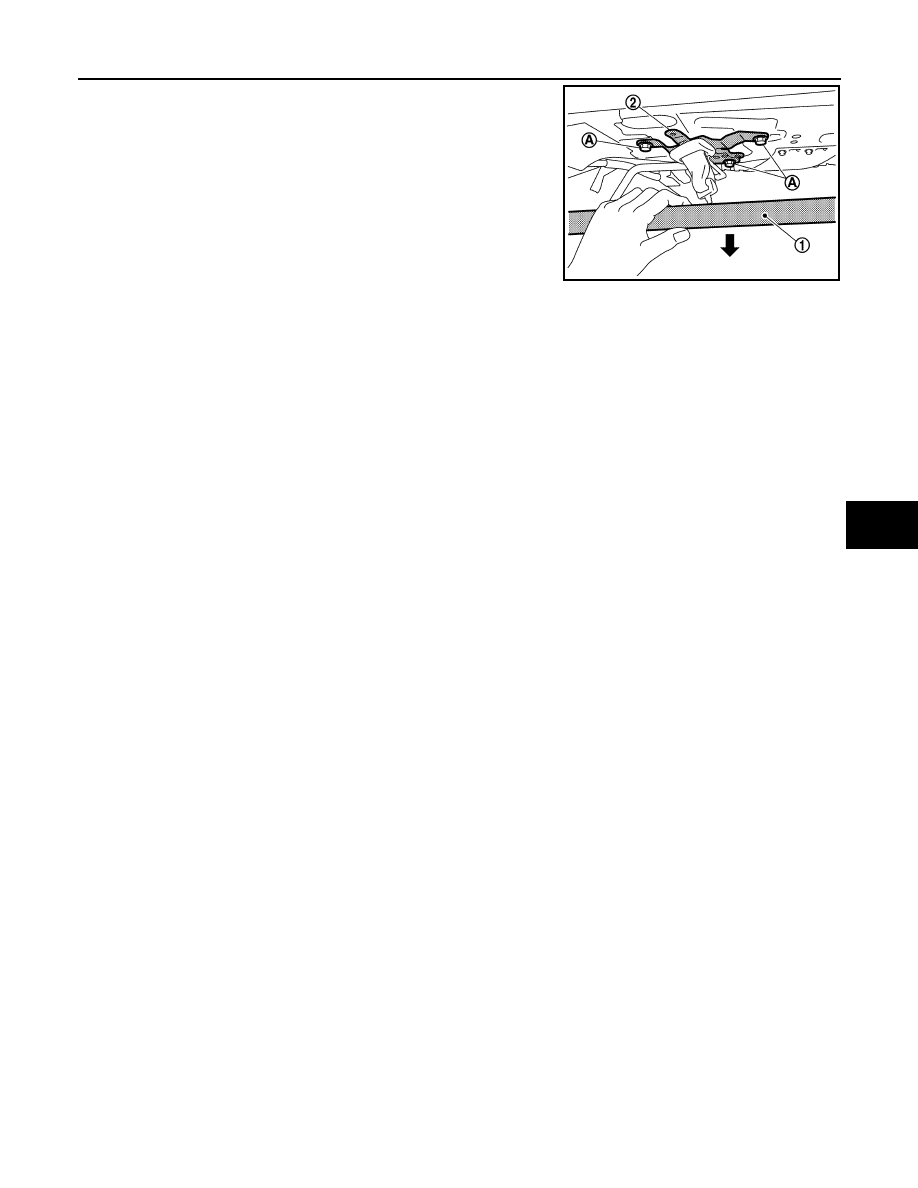
Slightly lower the headlining assembly (1) rear and secure work
space.

c.

Remove outer seat belt retractor mounting anchor bolts (A), and
then remove outer seat belt retractor (2).

INATALLATION

Install in the reverse order of removal.

SEAT BELT RETRACTOR : Inspection

INFOID:0000000009650628

AFTER A COLLISION

WARNING:

Inspect all seat belt assemblies including retractors and attached hardware after any collision.
NISSAN/INFINITI recommends that all seat belt assemblies in use during a collision be replaced
unless the collision was minor and the belts show no damage and continue to operate properly. Fail-
ure to do so could result in serious personal injury in an accident. Seat belt assemblies not in use dur-
ing a collision should also be replaced if either damage or improper operation was noted. Seat belt
pre-tensioners should be replaced even if the seat belts were not in use during a frontal collision in
which the air bags were deployed.
Replace any seat belt assembly (including anchor bolts) if:
• The seat belt is in use at the time of a collision (except for minor collisions and the belts, retractors and buck-

les show no damage and continue to operate properly).

• The seat belt is damaged in an accident (i.e. torn webbing, bent retractor or guide, etc.).
• The seat belt attaching point is damaged in an accident. Inspect the seat belt attaching area for damage or

distortion and repair if necessary before installing a new seat belt assembly.

• Anchor bolts are deformed or worn out.
• The seat belt pre-tensioners must be replaced even if the seat belts were not in use during the collision in

which the air bags were deployed.

PRELIMINARY CHECKS

1.

Check that the seat belt retractor, seat belt anchor and buckle bolts are tightened firmly.

2.

Check retractor operation:

a.

Fully extend the seat belt webbing and check for twists, tears or other damage.

b.

Allow the seat belt to retract. Check that webbing returns smoothly and completely into the retractor. If the
seat belt does not return smoothly, wipe the inside of the loops with a clean paper cloth. Dirt build-up in the
loops of that upper anchors can cause the seat belts to retract slowly.

c.

Fasten the seat belt. Check that seat belt returns smoothly and completely to the retractor. If the webbing
does not return smoothly, the cause may be an accumulation of dust or dirt. Use the “SEAT BELT TAPE
SET” and perform the following steps. 

3.

Repeat steps above if necessary to check the other seat belts.

SEAT BELT RETRACTOR ON-VEHICLE CHECK

Emergency Locking Retractors (ELR) and Automatic Locking Retractors (ALR)

NOTE:
All seat belt retractors are Emergency Locking Retractors (ELR) type. In an emergency (sudden stop) the
retractor will lock and prevent the webbing from extending any further. All 3-point type seat belt retractors
except the driver seat belt also have an Automatic Locking Retractors (ALR) mode. The ALR mode (also
called child restraint mode) is used when installing child seats. The ALR mode is activated when the seat belt
is fully extended. When the webbing is then retracted partially, the ALR mode automatically locks the seat belt
in a specific position so the webbing cannot be extended any further. To cancel the ALR mode, allow the seat
belt to fully wind back into the retractor. 

JMHIA1727ZZ

SB-18

< REMOVAL AND INSTALLATION >

THIRD SEAT BELT

Check the seat belt retractors with the following test(s) to determine if a retractor assembly is operating prop-
erly.

ELR Function Stationary Check

Grasp the shoulder webbing and pull forward quickly. The retractor should lock and prevent the belt from
extending further.

ALR Function Stationary Check

1.

Pull out the entire length of seat belt from retractor until a click is heard.

2.

Retract the webbing partially. A clicking noise should be heard as the webbing retracts indicating that the
retractor is in the Automatic Locking Retractors (ALR) mode.

3.

Grasp the seat belt and try to pull out the retractor. The webbing must lock and not extend any further. If it
does not operate normally, replace the retractor assembly.

4.

Allow the entire length of the webbing to retract to cancel the automatic locking mode.

ELR Function Moving Check

WARNING:

Perform the following test in a safe, open area clear of other vehicles and obstructions (for example, a
large, empty parking lot). Road surface must be paved and dry. Never perform the following test on
wet or gravel roads or on public streets and highways. This could result in an accident and serious
personal injury. The driver and passenger must be prepared to brace themselves in the event that the
retractor does not lock.

1.

Fasten driver seat belt. Buckle a passenger into the seat for the belt that is to be tested.

2.

Proceed to the designated safe area.

3.

Drive the vehicle at approximately 16 km/h (10 MPH). Notify any passengers of a pending sudden stop
and the driver and passenger must be prepared to brace themselves in the event that the retractor does
not lock. Apply brakes firmly and make a very hard stop.

During stopping, seat belts should lock and not be extended. If the seat belt retractor assembly does not lock,
perform the retractor off-vehicle check.

SEAT BELT RETRACTOR OFF-VEHICLE CHECK

1.

Remove the third seat belt retractor. Refer to 

SB-16, "SEAT BELT RETRACTOR : Removal and Installa-

tion"

.

2.

Slowly pull out webbing while tilting the retractor assembly forward from the mounted position without
twisting the retractor assembly as shown in the figure.

a.

Outer seat belt retractor
• The webbing can be pulled out when the angle (A) is 15

degrees or less.

• The webbing cannot be pulled out when the angle (B) is 35

degrees or more.

b.

Center seat belt retractor

A and B

: Tilting angles

: Vehicle front

JMHIA1064ZZ

THIRD SEAT BELT

SB-19

< REMOVAL AND INSTALLATION >

C

D

E

F

G

I

J

K

L

M

A

B

SB

N

O

P

• The webbing can be pulled out when the angle (A) is 15

degrees or less.

• The webbing cannot be pulled out when the angle (B) is 35

degrees or more.

3.

Replace the seat belt assembly if it does not operate normally.

SEAT BELT BUCKLE

SEAT BELT BUCKLE : Removal and Installation

INFOID:0000000009650629

REMOVAL

OURTER SETA BELT BUCKLE RH & CENTER SETA BELT BUCKLE

1.

Remove luggage floor rear board. Refer to 

INT-40, "LUGGAGE FLOOR REAR BOARD : Removal and

Installation"

.

2.

Remove cable cover. Refer to 

INT-41, "CABLE COVER : Removal and Installation"

.

3.

Remove outer seat belt buckle RH.

a.

Remove outer seat belt buckle RH mounting anchor bolt.

4.

Pull up seat belt buckle from the seat back and remove it.

CONNECTOR BUCKLE

1.

Remove third seat RH from the vehicle. Refer to 

SE-125, "Removal and Installation"

.

CAUTION:

When removing and installing, use shop cloths to protect parts from damage.

2.

Remove connector buckle mounting anchor bolt, and then remove connector buckle.

OURTER SETA BELT BUCKLE LH

1.

Remove third seat LH from the vehicle. Refer to 

SE-125, "Removal and Installation"

.

CAUTION:

When removing and installing, use shop cloths to protect parts from damage.

2.

Remove outer seat belt buckle LH mounting anchor bolt, and then remove outer seat belt buckle LH.

INSTALLATION

Install in the reverse order of removal.

SEAT BELT BUCKLE : Inspection

INFOID:0000000009650630

AFTER A COLLISION

WARNING:

Inspect all seat belt assemblies including retractors and attached hardware after any collision.
NISSAN/INFINITI recommends that all seat belt assemblies in use during a collision be replaced
unless the collision was minor and the belts show no damage and continue to operate properly. Fail-
ure to do so could result in serious personal injury in an accident. Seat belt assemblies not in use dur-
ing a collision should also be replaced if either damage or improper operation was noted. Seat belt
pre-tensioners should be replaced even if the seat belts were not in use during a frontal collision in
which the air bags were deployed.
Replace any seat belt assembly (including anchor bolts) if:
• The seat belt is in use at the time of a collision (except for minor collisions and the belts, retractors and buck-

les show no damage and continue to operate properly).

• The seat belt is damaged in an accident. (i.e. torn webbing, bent retractor or guide, etc.)
• The seat belt attaching point is damaged in an accident. Inspect the seat belt attaching area for damage or

distortion and repair if necessary before installing a new seat belt assembly.

A and B

: Tilting angles

: Vehicle front

JMHIA0522ZZ

SB-20

< REMOVAL AND INSTALLATION >

THIRD SEAT BELT

• Anchor bolts are deformed or worn out.
• The seat belt pre-tensioner must be replaced even if the seat belts were not in use during the collision in

which the air bags are deployed.

PRELIMINARY CHECKS

1.

Check that the seat belt retractor, seat belt anchor and buckle bolts are tightened firmly.

2.

Repeat step above if necessary to check the other seat belts.

SEAT BELT HOOK

SEAT BELT HOOK : Removal and Installation

INFOID:0000000009650631

REMOVAL

1.

Slide second seat to the frontmost position.

2.

Remove third seat from the vehicle. Refer to 

SE-125, "Removal and Installation"

.

3.

Remove luggage side lower finisher. Refer to 

INT-43, "LUGGAGE SIDE LOWER FINISHER : Removal

and Installation"

.

4.

From back of luggage side lower finisher, press pawls indicated
by arrows as shown in the figure and remove seat belt hook
from luggage side lower finisher.

INSTALLATION

Install in the reverse order of removal.

JMHIA1638ZZ


Content   ..  1040  1041  1042  1043   ..