Nissan Altima HL32 Hybrid. Manual - part 753


  Index      Nissan     Nissan Altima HL32 Hybrid (2009 year) - Service and Repair Manual


Search            


Content   ..  751  752  753  754   ..


Nissan Altima HL32 Hybrid. Manual - part 753


PRECAUTIONS

INT-11

< PRECAUTION >

C

D

E

F

G

H

I

K

L

M

A

B

INT

N

O

P

Precautions

INFOID:0000000004215420

• After removing and installing any opening/closing parts, make sure to perform all adjustments for proper

operation.

• Check the lubrication level, damage, and wear of each part. If necessary, grease or replace it.

• When removing or disassembling any part, be careful not to damage or deform it. Protect parts which may

get in the way with cloth.

• When removing parts with a screw driver or other tool, protect parts by wrapping them with vinyl or tape.

• Keep removed parts protected with cloth.

• If a clip is deformed or damaged, replace it.

• If a non reuseable part is removed, replace it with a new one.

• Tighten bolts and nuts firmly to the specified torque.

• After re-assembly has been completed, make sure each part functions correctly.

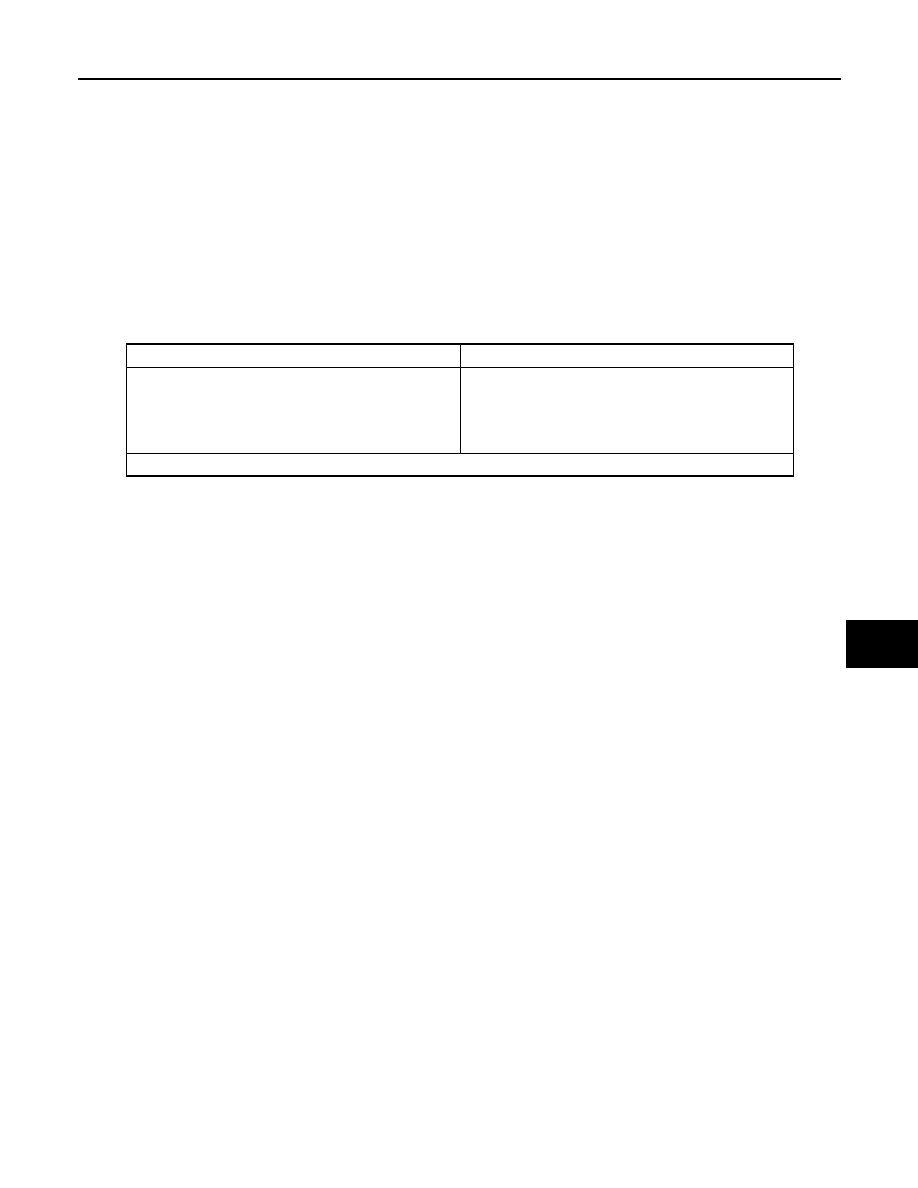
• Remove stains in the following manner:

Water-Soluble stains

Oil stains

Dip a cloth in warm water, and squeeze tightly. After wip-
ing the stain, wipe with a soft dry cloth.

Dissolve a synthetic detergent in warm water (density of 2 
to 3% or less), dip the cloth, then clean off the stain with 
the cloth. Next, dip the cloth in fresh water, then squeeze 
tightly. Clean off detergent completely, then wipe entire 
area with a soft dry cloth.

Do not use any organic solvent, such as a thinner or benzine to remove stains

INT-12

< PREPARATION >

PREPARATION

PREPARATION

PREPARATION

Special Service Tools

INFOID:0000000004215421

The actual shapes of Kent-Moore tools may differ from those of special service tools illustrated here.

Commercial Service Tools

INFOID:0000000004215422

Tool number
(Kent-Moore No.)
Tool name

Description

(J-39570)
Chassis ear

Locating the noise

(J-43980)
NISSAN Squeak and Rattle 
Kit

Repairing the cause of noise

SIIA0993E

SIIA0994E

Tool name

Description

Engine ear

Locating the noise

Power tools

Loosening bolts, nuts and screws

SIIA0995E

PIIB1407E

DOOR FINISHER

INT-13

< ON-VEHICLE REPAIR >

C

D

E

F

G

H

I

K

L

M

A

B

INT

N

O

P

ON-VEHICLE REPAIR

DOOR FINISHER

Exploded View

INFOID:0000000004215423

ALJIA0001ZZ

INT-14

< ON-VEHICLE REPAIR >

DOOR FINISHER

Removal and Installation

INFOID:0000000004215424

FRONT DOOR FINISHER

Removal

1. Release the pawls and remove step lamp lens, then disconnect the connector.
2. Release the pawls at the rear edge and remove inside release handle escutcheon, then remove the

screw.

3. Release the clip at the front edge, then lift upward to release pawls and remove arm rest finisher.
4. Lift power window and door lock/unlock switch finisher upward to remove, then disconnect the connec-

tors.

• Remove the front door finisher screws beneath power window and door lock/unlock switch finisher.

5. Release the clips around outer edge, then remove front door finisher.
6. Disconnect inside release handle and lock knob cables from back of front door finisher.
7. Release the pawls and remove mirror cover.

Installation

Installation is in the reverse order of removal.

REAR DOOR FINISHER

Removal

1. Release the pawls and remove the step lamp/reflector lens, then disconnect the connector (if equipped).
2. Release the pawls at the rear edge and remove inside release handle escutcheon, then remove the

screw.

3. Release the pawls and lift upward to remove arm rest finisher.
4. Lift power window switch finisher upward to remove, then disconnect the connector.

• Remove the rear door finisher screws beneath power window switch finisher.

5. Release the clips around outer edge, then remove rear door finisher.
6. Disconnect inside release handle and lock knob cables from the back of rear door finisher.

Installation

Installation is in the reverse order of removal.

1.

Mirror cover

2.

Front door finisher

3.

Step lamp lens

4.

Rear door finisher

5.

Step lamp lens (if equipped)

6.

Arm rest finisher

7.

Rear door power window switch fin-
isher 

8.

Inside release handle

9.

Inside release handle escutcheon

10. Front door power window and door 

lock/unlock switch finisher

A.

Screw

Clip C101

Pawl

Vehicle front


Content   ..  751  752  753  754   ..