Nissan Frontier. Manual - part 987


  Index      Nissan     Nissan Frontier (2014 year) - Service and Repair Manual


Search            


Content   ..  985  986  987  988   ..


Nissan Frontier. Manual - part 987


ENGINE OIL

LU-9

< PERIODIC MAINTENANCE >

[QR25DE]

C

D

E

F

G

H

I

J

K

L

M

A

LU

N

P

O

PERIODIC MAINTENANCE

ENGINE OIL

Inspection

INFOID:0000000009479889
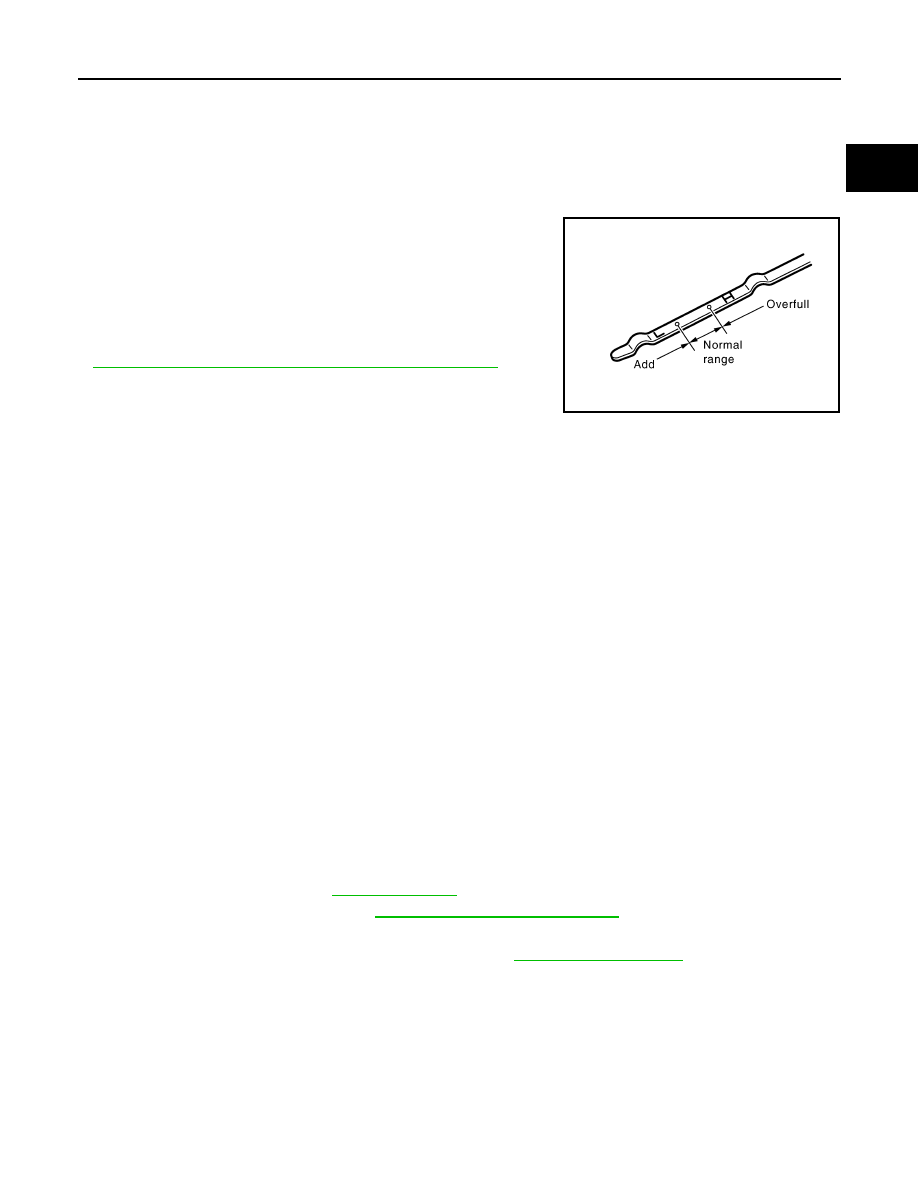
OIL LEVEL

• Before starting the engine make sure the vehicle is parked on a flat

and level surface, then check the oil level. If the engine is already

running, turn it off and allow 10 minutes before checking. 

• Pull out oil level gauge and wipe clean.

• Insert oil level gauge.

• Check that the oil level is within the low (L) and high (H) range as

indicated on the dipstick.

• If the engine oil level is out of range, add oil as necessary. Refer to

MA-16, "FOR USA AND CANADA : Fluids and Lubricants"

.

CAUTION:

Do not overfill the engine with oil.

NOTE:

It is normal to add some oil between oil maintenance intervals or during the break-in period, depending on

the severity of the operating conditions.

OIL APPEARANCE

• Check the engine oil for a white milky appearance or excessive contamination.

• If the engine oil is milky, it is highly probable that it is contaminated with engine coolant. Repair or replace

damaged parts.

OIL LEAKAGE 

Check for engine oil leakage around the following area.

• Oil  pan

• Oil pan drain plug

• Oil pressure switch

• Oil filter

• Oil cooler

• Intake valve timing control cover and intake valve timing control solenoid valve

• Front cover

• Mating surface between cylinder block and lower cylinder block

• Mating surface between cylinder block and cylinder head

• Mating surface between cylinder head and rocker cover

• Crankshaft oil seals (front and rear)

OIL PRESSURE CHECK

WARNING:

• Be careful not to burn yourself, as the engine and engine oil may be hot.

• Put the A/T shift selector in the Park (P) position (A/T models) or Neutral position (M/T models), and

apply parking brake securely.

1. Check engine oil level. Refer to 

LU-9, "Inspection"

.

2. Remove engine under cover. Refer to 

EXT-15, "Removal and Installation"

.

3. Disconnect the oil pressure switch harness connector.
4. Remove oil pressure switch using a suitable tool. Refer to 

EM-80, "Exploded View"

.

CAUTION:

Do not drop or shock oil pressure switch.

PBIC2823E

LU-10

< PERIODIC MAINTENANCE >

[QR25DE]

ENGINE OIL

5. Install Tools.

6. Start the engine and warm it up to normal operating temperature.
7. Check the engine oil pressure with engine running under no-load. Refer to 

LU-16, "Standard and Limit"

.

CAUTION:

• If the difference between the test results and the specification is extreme, check the oil passages

and oil pump for leaks and blockages.

• The oil pump and balancer must be replaced as a unit. 

8. After the inspections, install oil pressure switch as follows:
a. Remove old liquid gasket adhering to oil pressure switch and the engine.
b. Apply liquid gasket and tighten oil pressure switch to the specification.

Use Genuine RTV Silicone Sealant or equivalent. Refer to 

GI-21, "Recommended Chemical Prod-

ucts and Sealants"

.

c.

After warming up engine, make sure there are no engine oil leaks.

9. Install engine under cover. Refer to 

EXT-15, "Removal and Installation"

.

Changing Engine Oil

INFOID:0000000009479890

WARNING:

• Be careful not to burn yourself, as the engine and engine oil may be hot.

• Prolonged and repeated contact with used engine oil may cause skin cancer; try to avoid direct skin

contact with used oil. If skin contact is made, wash thoroughly with soap or hand cleaner as soon as

possible. 

1. Warm up the engine and check for oil leaks
2. Stop the engine and wait for at least 10 minutes.
3. Remove the oil drain plug and oil filler cap to drain the old oil.
4. Install a new washer on the oil drain plug, then install the oil

drain plug in the oil pan.

CAUTION:

• Clean the drain plug and install with new washer.

• Do not reuse copper sealing washers.

5. Refill the engine with new specified engine oil.

CAUTION:

The refill capacity depends on the oil temperature and drain time. Use the "Refill oil capacity" val-

ues as a reference and check the oil level using the dipstick when filling the engine with oil.

Tool numbers : ST25051001 (J-25695-1)

: ST25052000 (J-25695-2)

WBIA0571E

Oil pressure switch torque

: 14.7 N·m (1.5 kg-m, 11 ft-lb)

Oil drain plug:

: Refer to 

EM-33, "Exploded 

View"

.

PBIC3006E

Oil grade and viscosity

: Refer to 

MA-16, "FOR USA AND CANADA : Flu-

ids and Lubricants"

.

Oil capacity

: Refer to 

LU-16, "Standard and Limit"

.

ENGINE OIL

LU-11

< PERIODIC MAINTENANCE >

[QR25DE]

C

D

E

F

G

H

I

J

K

L

M

A

LU

N

P

O

6. Warm up the engine and check the area around the drain plug and oil filter for oil leaks. Repair as neces-

sary.

7. Stop the engine and wait for more than 10 minutes.
8. Check the oil level using the dipstick as shown. Add oil as nec-

essary and install the oil filler cap. Refer to 

LU-9, "Inspection"

.

CAUTION:

Do not overfill the engine with oil.

PBIC2823E

LU-12

< PERIODIC MAINTENANCE >

[QR25DE]

OIL FILTER

OIL FILTER

Removal and Installation

INFOID:0000000009479891

REMOVAL

1. Remove the engine under cover. Refer to 

EXT-15, "Removal and Installation"

.

2. Drain the engine oil. Refer to 

LU-10, "Changing Engine Oil"

.

3. Remove the oil filter using Tool as shown.

WARNING:

Be careful not to burn yourself, as the engine and engine oil

may be hot.

CAUTION:

• Oil filter is equipped with a pressure relief valve.

• Use Genuine NISSAN Oil Filter or equivalent.

• When removing, position a shop cloth to absorb engine

oil leaks or spills.

• Do not allow engine oil to adhere to drive belts.

• Completely wipe off any engine oil that adheres to the engine and the vehicle.

INSTALLATION

1. Remove foreign materials adhering to the oil filter seal mating surface.
2. Apply clean engine oil to the oil filter seal circumference of the

new oil filter as shown.

3. Screw on the oil filter manually until it touches the installation

surface, then tighten it by 2/3 turn as shown. Or tighten to speci-

fication.

4. Refill the engine with new engine oil. Refer to 

LU-10, "Changing Engine Oil"

.

5. Inspect the engine for oil leaks. Refer to 

LU-9, "Inspection"

.

6. Install the engine under cover. Refer to 

EXT-15, "Removal and Installation"

.

INSPECTION AFTER INSTALLATION

• Before starting engine, check oil/fluid levels including engine coolant and engine oil. If less than required

quantity, fill to the specified level. Refer to 

MA-16, "FOR USA AND CANADA : Fluids and Lubricants"

.

• Use procedure below to check for fuel leakage.

• Turn ignition switch ON (with engine stopped). With fuel pressure applied to fuel piping, check for fuel leak-

age at connection points.

Tool number

: KV10115801 (J-38956)

KBIA0303E

SMA010

Oil filter

: 17.7 N·m (1.8 kg-m, 13 ft-lb)

SMA702C


Content   ..  985  986  987  988   ..