Nissan Leaf. Manual - part 707


  Index      Nissan     Nissan Leaf (2011-2014 year) - Service and Repair Manual


Search            


Content   ..  705  706  707  708   ..


Nissan Leaf. Manual - part 707


GI-40

< PRECAUTION >

CAUTIONS AS TO HIGH VOLTAGE

bag maintains voltage for 3 minutes. There is a possibility of sudden SRS air bag inflation due to har-

ness short circuit or damage and it may cause serious injuries.

Indications the high voltage system is ON

1. If the READY indicator is ON, the high voltage system is active.

2. If the charge indicator is ON, the high voltage system is active.

3. If the air conditioning remote timer indicator (located on the HVAC controller) is ON, the high voltage sys-

tem is active.

4. If the remote controlled air conditioning system is active, push the power switch to the ON position. This

will turn OFF the remote controlled air conditioning system.

NOTE:

Remote controlled air conditioning system is a feature that allows the vehicle owner to activate the air

conditioning system via telematics communication (cell phone, personal computer, etc.). When this sys-

tem is active, the air conditioning remote timer indicator (located on the HVAC controller) is illuminated.

Before disconnecting the 12V battery terminal, if necessary, set the parking brake, lower the windows, unlock

the doors, and open the rear hatch as required. Once 12V battery is disconnected, power controls will not

operate.

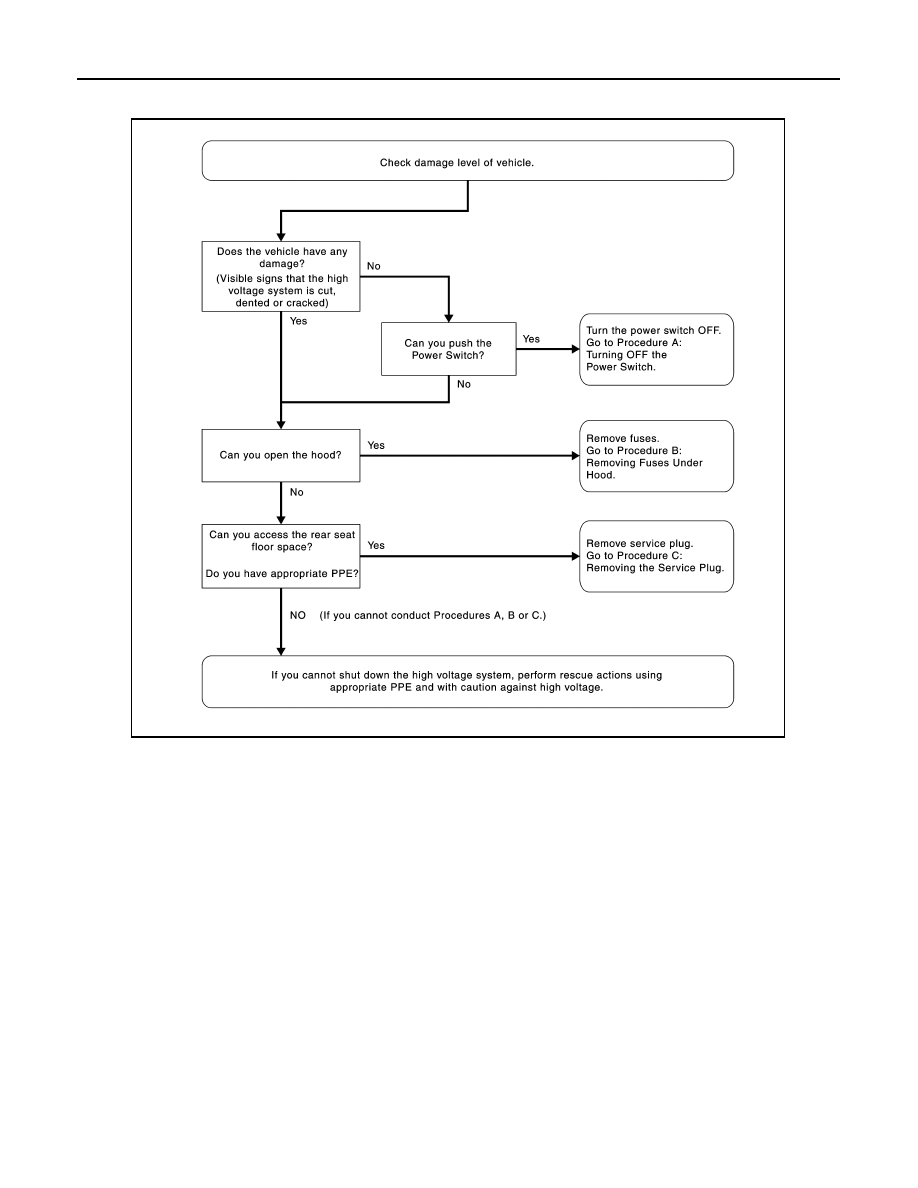
Procedure 1: Turning OFF the Power Switch.

1. Check the READY indicator status. If it is ON, the high voltage system is active.

2. Press the power switch once to turn OFF the high voltage system. Then verify whether the READY indica-

tor is OFF.

3. If possible, keep the intelligent key at least 5 meters (16 feet) away from the vehicle.

4. Open the hood.

5. Disconnect the negative 12V battery cable. Insulate the negative 12V battery cable terminal with insulated

tape.

JSAIA1828GB

CAUTIONS AS TO HIGH VOLTAGE

GI-41

< PRECAUTION >

C

D

E

F

G

H

I

J

K

L

M

B

GI

N

O

P

6. Wait 10 minutes for complete discharge of the high voltage condenser after the power switch has been

turned OFF and the battery cable has been disconnected.

7. Perform the first response action.

Procedure B: Removing Fuses Under Hood

1. Open the hood.

2. Press and expand the pawls on the sides of the fuse box and remove the fuse box from its housing.

3. Remove the following fuses:

-

VCM IG fuse (F15 VCM IGN 10A)

-

PBW Fuse (F21 PBW IGN 15A)

-

VCM Fuse (F3 VCM 20A)

4. If you cannot identify the above fuses, remove all fuse in the fuse box.

5. Disconnect the negative 12V battery cable. Insulate the negative 12V battery cable terminal with insulated

tape.

6. Wait 10 minutes for complete discharge of the high voltage condenser after the fuses and pulled and bat-

tery cable has been disconnected.

7. Perform the first response action.

WARNING:

To avoid unintended installation and risk of electrical shock, the rescuer should carry the fuses

on his/her person and cover the fuse box with insulated tape.

Procedure C: Removing the Service Plug

DANGER:

Do not remove the service plug without wearing appropriate PPE to help protect the responder

from any serious injury or death by electrical shock.

Immediately cover the service plug socket with insulated tape. To avoid electric shock, DO NOT

touch the terminals inside the socket.

WARNING:

To avoid unintended installation and risk of electrical shock, the rescuer should carry the service

plug on his/her person while work is in progress.

1. Insert a suitable tool under the RH rear corner of the access trim

cover (1) and pry up (2) to remove.

2. Remove the access cover bolts (1) and remove the cover (2).

: Vehicle front

ALAIA0106ZZ

: Vehicle front

ALAIA0107ZZ

GI-42

< PRECAUTION >

CAUTIONS AS TO HIGH VOLTAGE

3. Remove the service plug by pulling the green tab (1) upward, then pushing the locking tab (2) and lifting

the handle (3) to the straight-up position. Using the handle, pull the service plug completely out of its

socket.

4. Wait 10 minutes for complete discharge of the high voltage condenser after the service plug has been

removed.

5. Open the hood.

6. Disconnect the negative 12 V battery cable. Insulate the negative 12V battery cable terminal with insu-

lated tape.

7. Wait 3 minutes for complete discharge of the air bag condenser after the battery cable has been discon-

nected.

8. Perform the first response action.

VEHICLE FIRE

WARNING:

In the case of extinguishing a fire with water, large amounts of water from a fire hydrant (if possible)

must be used. DO NOT extinguish fire with a small amount of water. Small amounts of water will make

toxic gas produced by a chemical reaction between the Li-ion battery electrolyte and water.

CAUTION:

In the event of a small fire, a Type ABC fire extinguisher may be used for an electrical fire caused by

wiring harnesses, electrical components, etc. or oil fire.

In case of vehicle fire, contact fire department immediately and extinguish the fire if possible. If you must walk

away from the vehicle, notify an appropriate responder or a rescue person of the fact that the vehicle is an

electric car and contains a high voltage system and warm all others.

LI-ION BATTERY DAMAGE AND FLUID LEAKS

Li-ion Battery Electrolyte Solution Characteristics:

• Clear in color

• Sweet odor

• Similar viscosity to water

• Skin irritant

• Eye irritant - If contact with plenty of water and see a doctor immediately.

• Highly flammable

• Electrolyte liquid or fumes that have come into contact with water vapors in the air will create an oxidized

substance. This substance may irritate skin and eyes. In these cases, rinse with plenty of water and see a

doctor immediately.

• Since the Li-ion battery is made up of many small sealed battery modules, electrolyte solution should not

leak in large quantity.

NOTE:

Other fluids in the vehicle (such as washer fluid, brake fluid, coolant, etc.) are the same as those in a conven-

tional internal combustion vehicle.

Cautions for Scrapping Vehicles

INFOID:0000000010122921

The Li-ion battery must be removed from the vehicle before the vehicle is scrapped.

CAUTION:

Insulate the terminals of the removed Li-ion battery with insulating tape.

Handling of a Vehicle with a Dead Battery

INFOID:0000000010122922

For the handling of a vehicle when the battery is dead, refer to 

GI-45, "Tow Truck Towing"

ALAIA0088ZZ

LIFTING POINT

GI-43

< PRECAUTION >

C

D

E

F

G

H

I

J

K

L

M

B

GI

N

O

P

LIFTING POINT

Commercial Service Tools

INFOID:0000000010122923

CAUTION:

• Every time the vehicle is lifted up, maintain the complete vehicle curb condition.

• Since the vehicle's center of gravity changes when removing main parts on the front side (engine,

transmission, suspension etc.), support a jack up point on the rear side garage jack with a mission

jack or equivalent. 

• Since the vehicle's center of gravity changes when removing main parts on the rear side (rear axle,

suspension, etc.), support a jack up point on the front side garage jack with a mission jack or equiv-

alent. 

• Be careful not to smash or never do anything that would affect piping parts.

Garage Jack and Safety Stand and 2-Pole Lift

INFOID:0000000010122924

WARNING:

• Park the vehicle on a level surface when using the jack. Check to avoid damaging pipes, tubes, etc.

under the vehicle.

• Never get under the vehicle while it is supported only by the jack. Always use safety stands when

you have to get under the vehicle.

• Place wheel chocks at both front and back of the wheels on the ground.

• When lifting the vehicle, open the lift arms as wide as possible and ensure that the front and rear of

the vehicle are well balanced.

• When setting the lift arm, never allow the arm to contact the brake tubes, brake cable, fuel lines and

sill spoiler.

Tool name

Description

Board on attachment

Safety stand attachment

S-NT001

S-NT002


Content   ..  705  706  707  708   ..