Nissan Leaf. Manual - part 484


  Index      Nissan     Nissan Leaf (2011-2014 year) - Service and Repair Manual


Search            


Content   ..  482  483  484  485   ..


Nissan Leaf. Manual - part 484


LI-ION BATTERY

EVB-219

< UNIT DISASSEMBLY AND ASSEMBLY >

D

E

F

G

H

I

J

K

L

M

A

B

EVB

N

O

P

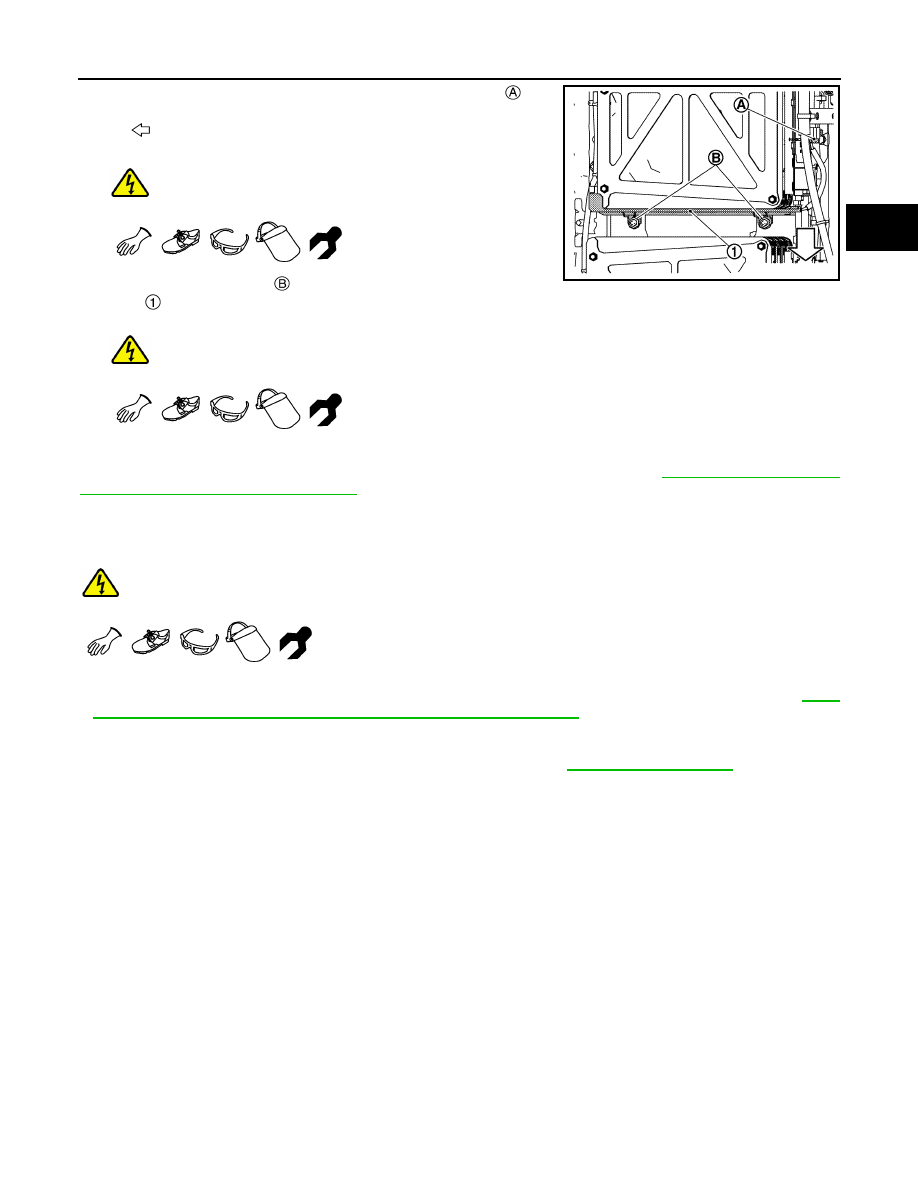
5. Disconnect Li-ion battery heater RH2 harness connector  .

WARNING:

 To prevent electric shock hazards, be sure to put on

insulated protective gear and use insulated tools.

6. Remove mounting nuts   and then remove Li-ion battery heater

RH2 .

WARNING:

 To prevent electric shock hazards, be sure to put on insulated protective gear and use insu-

lated tools.

Li-ion battery heater harness

Remove Li-ion battery heater harness after front module stack is removed. Refer to 

EVB-226, "FRONT MOD-

ULE STACK : Removal and Installation"

.

INSTALLATION

Note the following, and install in the reverse order of removal.

WARNING:

 To prevent electric shock hazards, be sure to put on insulated protective gear and use insulated

tools.

CAUTION:

• Install Li-ion battery controller immediately before installing battery pack upper case. Refer to 

EVB-

201, "LI-ION BATTERY CONTROLLER : Removal and Installation"

.

• Be sure to reinstall the high voltage harness clips in their original positions. If a clip is damaged,

replace it with a new clip before installing.

• Check the following items after installing battery pack: Refer to 

EVB-256, "Inspection"

.

„

AIR LEAK INSPECTION

„

ELECTRIC EQUIPOTENTIAL TEST

LI-ION BATTERY HEATER RELAY UNIT

: Battery front

JSCIA0756ZZ

EVB-220

< UNIT DISASSEMBLY AND ASSEMBLY >

LI-ION BATTERY

LI-ION BATTERY HEATER RELAY UNIT : Exploded view

INFOID:0000000010121182

Li-ion battery heater RR2

Li-ion battery heater RH2

Li-ion battery heater RH1

Li-ion battery heater LH1

Li-ion battery heater LH2

Li-ion battery heater relay unit

JSCIA0750GB

LI-ION BATTERY

EVB-221

< UNIT DISASSEMBLY AND ASSEMBLY >

D

E

F

G

H

I

J

K

L

M

A

B

EVB

N

O

P

LI-ION BATTERY HEATER RELAY UNIT : Disassembly and Assembly

INFOID:0000000010121183

DANGER:

Since hybrid vehicles and electric vehicles contain a high voltage battery, there is the risk of

electric shock, electric leakage, or similar accidents if the high voltage component and vehicle are

handled incorrectly. Be sure to follow the correct work procedures when performing inspection and

maintenance.

WARNING:

• Be sure to remove the service plug in order to disconnect the high voltage circuits before perform-

ing inspection or maintenance of high voltage system harnesses and parts.

• To prevent the removed service plug from being connected by mistake during the procedure, always

carry it in your pocket or put it in the tool box.

• Be sure to wear insulating protective equipment consisting of glove, shoes, face shield and glasses

before beginning work on the high voltage system.

• Refer to 

EVB-7, "High Voltage Precautions"

.

• To prevent electric shock hazards, ignition, and damage to parts, always remove Li-ion battery con-

troller before disassembling battery pack.

CAUTION:

There is the possibility of a malfunction occurring if the vehicle is changed to READY status while the

service plug is removed. Therefore do not change the vehicle to READY status unless instructed to do

so in the Service Manual.

WORK ENVIRONMENT FOR DISASSEMBLY OF LI-ION BATTERY

1. Must be an indoor environment.

• The work environment must be able to be isolated from the outside by shutters or other means to pre-

vent the intrusion of rain, snow, sand, and other substances.

• The environment must prevent the entry of sweat during work, and also prevent condensation from

occurring as a result of high temperature and humidity.

2. No entry of foreign materials.

• In addition to being indoors, the environment must not permit the entry during disassembly work of

metal powders, oil, or foreign substances resulting from causes such as servicing of other vehicles.

• If there is any risk of the above, use a plastic curtain or other means to block off the work area, or take

other necessary steps.

3. The floor must be dry.

• The floor must not become wet as a result of causes such as vehicles entering when it is raining or

snowing.

4. Work space

• Space approximately the size of one vehicle must be secured as the disassembly space.

• A sign indicating that disassembly is in progress or other measures must be taken so that persons other

than the workers do not enter the work space.

5. Standard fire fighting equipment

• Always place a standard fire fighting equipment in the disassembly work area.

• Depending on type of fire (vehicle or battery) use standard fire fighting equipment (water or extin-

guisher).

DISASSEMBLY

1. Remove battery pack upper case. Refer to 

EVB-191, "BATTERY PACK UPPER CASE : Removal and

Installation"

.

2. Remove Li-ion battery controller. Refer to 

EVB-201, "LI-ION BATTERY CONTROLLER : Removal and

Installation"

.

3. Remove the following; Refer to 

EVB-206, "BATTERY JUNCTION BOX AND BATTERY HARNESS : Dis-

assembly and Assembly"

.

• Battery current sensor (integrated with bus bar)

• Service plug switch bracket

Li-ion battery heater harness

Li-ion battery heater RR1

: N·m (kg-m, in-lb)

EVB-222

< UNIT DISASSEMBLY AND ASSEMBLY >

LI-ION BATTERY

4. Disconnect harness connector   and heater harness connector

.

WARNING:

 To prevent electric shock hazards, be sure to put on

insulated protective gear and use insulated tools.

5. Remove mounting nuts   and then remove the Li-ion battery

heater relay unit  .

ASSEMBLY

Assemble in the reverse order of disassembly.

WARNING:

 To prevent electric shock hazards, be sure to put on insulated protective gear and use insulated

tools.

CAUTION:

• Check the following items after installing battery pack: Refer to 

EVB-256, "Inspection"

.

„

AIR LEAK INSPECTION

„

ELECTRIC EQUIPOTENTIAL TEST

• Install Li-ion battery controller immediately before installing battery pack upper case.

FRONT MODULE STACK
FRONT MODULE STACK : Exploded View

INFOID:0000000010121184

REMOVAL AND INSTALLATION

JSCIA0757ZZ


Content   ..  482  483  484  485   ..