Nissan Frontier D22. Manual - part 452


  Index      Nissan     Nissan Frontier D22 Pickup (1998-2004 year) - Service and Repair Manual


Search            


Content   ..  450  451  452  453   ..


Nissan Frontier D22. Manual - part 452


DTC P0442 EVAP CONTROL SYSTEM

EC-911

[VG33E]

C

D

E

F

G

H

I

J

K

L

M

A

EC

3.

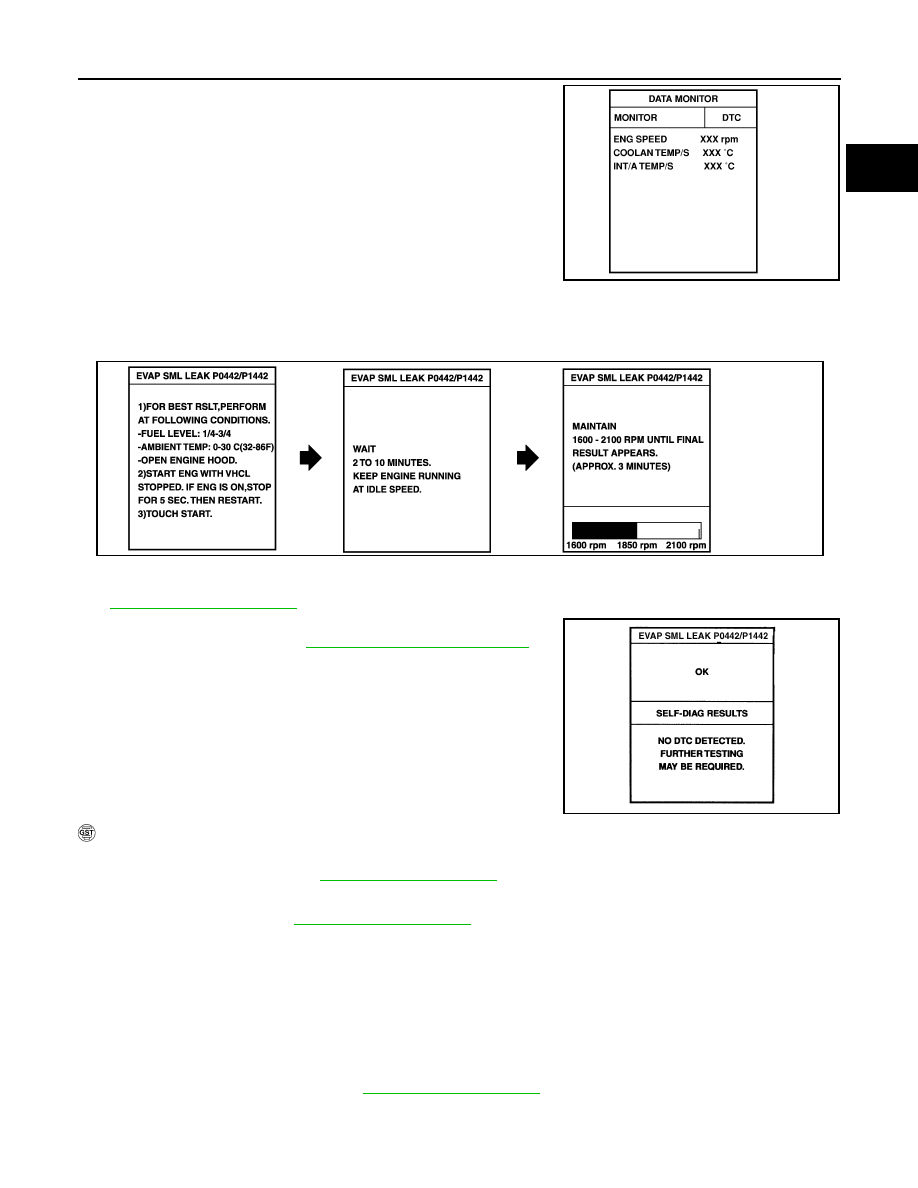
Turn ignition switch ON and select “DATA MONITOR” mode with
CONSULT-II.

4.

Make sure that the following conditions are met.
COOLAN TEMP/S: 0 - 32

°C (32 - 90°F)

INT/A TEMP SE: More than 0

°C (32°F)

5.

Select “EVAP SML LEAK P0442/P1442” of “EVAPORATIVE SYSTEM” in “DTC WORK SUPPORT” mode
with CONSULT-II.
Follow the instruction displayed.

NOTE:
If the engine speed cannot be maintained within the range displayed on the CONSULT-II screen, go to

EC-646, "Basic Inspection"

 .

6.

Make sure that “OK” is displayed.
If “NG” is displayed, refer to 

EC-912, "Diagnostic Procedure"

 .

NOTE:
Make sure that EVAP hoses are connected to EVAP canister
purge volume control solenoid valve properly.

 WITH GST

NOTE:
Be sure to read the explanation of 

EC-629, "Driving Pattern"

  before driving vehicle.

1.

Start engine.

2.

Drive vehicle according to 

EC-629, "Driving Pattern"

 .

3.

Stop vehicle.

4.

Select MODE 1 with GST.

If SRT of EVAP system is not set yet, go to the following step.

If SRT of EVAP system is set, the result will be OK.

5.

Turn ignition switch OFF and wait at least 5 seconds.

6.

Start engine.
It is not necessary to cool engine down before driving.

7.

Drive vehicle again according to the 

EC-629, "Driving Pattern"

 .

8.

Stop vehicle.

9.

Select MODE 3 with GST.

SEF475Y

PBIB0829E

LEC048A

EC-912

[VG33E]

DTC P0442 EVAP CONTROL SYSTEM

If P0442 is displayed on the screen, go to 

EC-912, "Diagnostic Procedure"

 .

If P0441 is displayed on the screen, go to Diagnostic Procedure for DTC P0441, 

EC-903, "Diagnostic Pro-

cedure"

 .

If P0442 and P0441 are not displayed on the screen, go to the following step.

10. Select MODE 1 with GST.

If SRT of EVAP system is set, the result will be OK.

If SRT of EVAP system is not set, go to step 6.

Diagnostic Procedure

UBS00DKV

1. 

CHECK FUEL FILLER CAP DESIGN

1.

Turn ignition switch OFF.

2.

Check for genuine NISSAN fuel filler cap design.

OK or NG

OK

>> GO TO 2.

NG

>> Replace with genuine NISSAN fuel filler cap.

2. 

CHECK FUEL FILLER CAP INSTALLATION

Check that the cap is tightened properly by rotating the cap clockwise.

OK or NG

OK

>> GO TO 3.

NG

>>

Open fuel filler cap, then clean cap and fuel filler neck threads using air blower.

Retighten until ratcheting sound is heard.

3. 

CHECK FUEL FILLER CAP FUNCTION

Check for air releasing sound while opening the fuel filler cap.

OK or NG

OK

>> GO TO 5.

NG

>> GO TO 4.

4. 

CHECK FUEL TANK VACUUM RELIEF VALVE

Refer to 

EC-1167, "Component Inspection"

 .

OK or NG

OK

>> GO TO 5.

NG

>> Replace fuel filler cap with a genuine one.

SEF915U

DTC P0442 EVAP CONTROL SYSTEM

EC-913

[VG33E]

C

D

E

F

G

H

I

J

K

L

M

A

EC

5. 

INSTALL THE PRESSURE PUMP

To locate the EVAP leak, install EVAP service port adapter and pres-
sure pump to EVAP service port securely.

NOTE:
Improper installation of the EVAP service port adapter to the EVAP service port may cause leaking.

Models with CONSULT-II>>GO TO 6.
Models without CONSULT-II>>GO TO 7.

AEC649A

SEF916U

EC-914

[VG33E]

DTC P0442 EVAP CONTROL SYSTEM

6. 

CHECK FOR EVAP LEAK

 With CONSULT-II

1.

Turn ignition switch ON.

2.

Select “EVAP SYSTEM CLOSE” of “WORK SUPPORT” mode with CONSULT-II.

3.

Touch “START” and apply pressure into the EVAP line until the
pressure indicator reaches the middle of the bar graph.

NOTE:

Never use compressed air or a high pressure pump.

Do not exceed 4.12 kPa (0.042 kg/cm

2

 , 0.6 psi) of pres-

sure in the system.

4.

Using EVAP leak detector, locate the EVAP leak. For the leak
detector, refer to the instruction manual for more details.
Refer to 

EC-1165, "EVAPORATIVE EMISSION LINE DRAW-

ING"

 .

OK or NG

OK

>> GO TO 8.

NG

>> Repair or replace.

PEF917U

SEF200U


Content   ..  450  451  452  453   ..