Nissan Xterra. Manual - part 303


  Index      Nissan     Nissan Xterra (2014 year) - Service and Repair Manual


Search            


Content   ..  301  302  303  304   ..


Nissan Xterra. Manual - part 303


EC-338

< DTC/CIRCUIT DIAGNOSIS >

[VQ40DE]

P0456 EVAP CONTROL SYSTEM

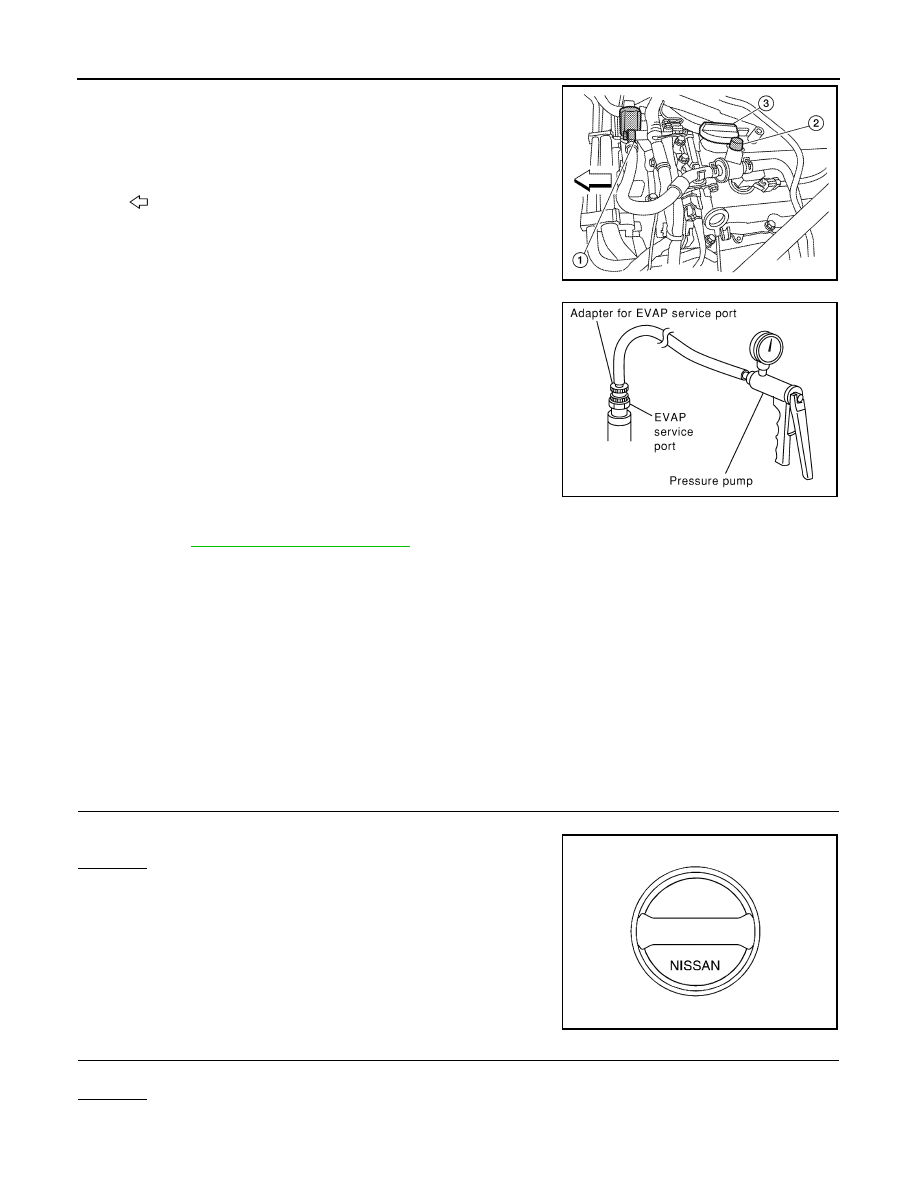
1. Attach the EVAP service port adapter securely to the EVAP ser-

vice port (2).

2. Set the pressure pump and a hose.

3. Also set a vacuum gauge via 3-way connector and a hose.

4. Turn ignition switch ON.

5. Connect GST and select Service $08.

6. Using Service $08 control the EVAP canister vent control valve

(close).

7. Apply pressure and make sure the following conditions are sat-

isfied.
Pressure to be applied: 2.7 kPa (0.028 kg/cm

2

, 0.39 psi)

Time to be waited after the pressure drawn in to the EVAP

system and the pressure to be dropped: 60 seconds and

the pressure should not be dropped more than 0.4 kPa
(0.004 kg/cm

2

, 0.06 psi).

If NG, go to 

EC-338, "Diagnosis Procedure"

.

If OK, go to next step.

8. Disconnect GST.

9. Start engine and warm it up to normal operating temperature.

10. Turn ignition switch OFF and wait at least 10 seconds.

11. Turn ignition switch ON.

12. Turn ignition switch OFF and wait at least 10 seconds.

13. Restart engine and let it idle for 90 seconds.

14. Keep engine speed at 2,000 rpm for 30 seconds.

15. Turn ignition switch OFF.

NOTE:

For more information, refer to GST instruction manual.

Diagnosis Procedure

INFOID:0000000009484042

1.

CHECK FUEL FILLER CAP DESIGN

1. Turn ignition switch OFF.

2. Check for genuine NISSAN fuel filler cap design.
OK or NG

OK

>> GO TO 2.

NG

>> Replace with genuine NISSAN fuel filler cap.

2.

CHECK FUEL FILLER CAP INSTALLATION

Check that the cap is tightened properly by rotating the cap clockwise.
OK or NG

OK

>> GO TO 3.

NG

>> 1. Open fuel filler cap, then clean cap and fuel filler neck threads using air blower.

1.

EVAP canister purge volume control solenoid valve 
(view with intake air duct removed)

3.

Oil filler cap

:Front

AWBIA0687ZZ

SEF462UI

SEF915U

P0456 EVAP CONTROL SYSTEM

EC-339

< DTC/CIRCUIT DIAGNOSIS >

[VQ40DE]

C

D

E

F

G

H

I

J

K

L

M

A

EC

N

P

O

2. Retighten until ratcheting sound is heard.

3.

CHECK FUEL FILLER CAP FUNCTION

Check for air releasing sound while opening the fuel filler cap.
OK or NG

OK

>> GO TO 5.

NG

>> GO TO 4.

4.

CHECK FUEL TANK VACUUM RELIEF VALVE

Refer to 

EC-297, "Component Inspection"

.

OK or NG

OK

>> GO TO 5.

NG

>> Replace fuel filler cap with a genuine one.

5.

INSTALL THE PRESSURE PUMP

To locate the EVAP leak, install EVAP service port adapter and pres-

sure pump to EVAP service port (2) securely. For the location of

EVAP service port, refer to 

EC-32, "Description"

.

NOTE:

Improper installation of the EVAP service port adapter to the

EVAP service port may cause leaking.

With CONSULT>>GO TO 6.

Without CONSULT>>GO TO 7.

6.

CHECK FOR EVAP LEAK

With CONSULT

1. Turn ignition switch ON.

2. Select “EVAP SYSTEM CLOSE” of “WORK SUPPORT” mode with CONSULT.

3. Touch “START” and apply pressure into the EVAP line until the pressure indicator reaches the middle of

the bar graph.

CAUTION:

• Never use compressed air or a high pressure pump.
• Never exceed 4.12 kPa (0.042 kg/cm

2

, 0.6 psi) of pressure in the system.

1

: EVAP canister purge volume control solenoid valve 
(view with intake air duct removed)

3

: Oil filler cap

: Front

AWBIA0687ZZ

SEF916U

EC-340

< DTC/CIRCUIT DIAGNOSIS >

[VQ40DE]

P0456 EVAP CONTROL SYSTEM

4. Using EVAP leak detector, locate the EVAP leak. For the leak

detector, refer to the instruction manual for more details.

Refer to 

EC-32, "Description"

.

OK or NG

OK

>> GO TO 8.

NG

>> Repair or replace.

7.

CHECK FOR EVAP LEAK

Without CONSULT

1. Turn ignition switch OFF.

2. Apply 12 volts DC to EVAP canister vent control valve (3). The

valve will close. (Continue to apply 12 volts until the end of test.)

-

Fuel filler pipe (1)

-

EVAP control system pressure sensor (2)

-

EVAP canister (4)

-

Drain filter (5)

-

: Vehicle front

3. Pressurize the EVAP line using pressure pump with 1.38 to 2.76

kPa (0.014 to 0.028 kg/cm

2

, 0.2 to 0.4 psi), then remove pump

and EVAP service port adapter.

CAUTION:

• Never use compressed air or a high pressure pump.
• Do not exceed 4.12 kPa (0.042 kg/cm

2

, 0.6 psi) of pressure in the system.

4. Using EVAP leak detector, locate the EVAP leak. For the leak

detector, refer to the instruction manual for more details. Refer

to 

EC-32, "Description"

.

OK or NG

OK

>> GO TO 8.

NG

>> Repair or replace.

8.

CHECK EVAP CANISTER VENT CONTROL VALVE

Check the following.

• EVAP canister vent control valve is installed properly.

Refer to 

FL-16, "Removal and Installation"

.

• EVAP canister vent control valve.

Refer to 

EC-309, "Component Inspection"

.

OK or NG

OK

>> GO TO 9.

NG

>> Repair or replace EVAP canister vent control valve and O-ring.

9.

CHECK IF EVAP CANISTER IS SATURATED WITH WATER

1. Remove EVAP canister with EVAP canister vent control valve and EVAP control system pressure sensor

attached.

SEF200U

AWBIA0223ZZ

SEF200U

P0456 EVAP CONTROL SYSTEM

EC-341

< DTC/CIRCUIT DIAGNOSIS >

[VQ40DE]

C

D

E

F

G

H

I

J

K

L

M

A

EC

N

P

O

2. Does water drain from the EVAP canister?
Yes or No

Yes

>> GO TO 10.

No (With CONSULT)>>GO TO 12.

No (Without CONSULT)>>GO TO 13.

10.

CHECK EVAP CANISTER

Weigh the EVAP canister with the EVAP canister vent control valve and EVAP control system pressure sensor

attached.

The weight should be less than 2.0 kg (4.4 lb).
OK or NG

OK (With CONSULT)>>GO TO 12.

OK (Without CONSULT)>>GO TO 13.

NG

>> GO TO 11.

11.

DETECT MALFUNCTIONING PART

Check the following.

• EVAP canister for damage

• EVAP hose between EVAP canister and vehicle frame for clogging or poor connection

>> Repair hose or replace EVAP canister.

12.

CHECK EVAP CANISTER PURGE VOLUME CONTROL SOLENOID VALVE OPERATION

With CONSULT

1. Disconnect vacuum hose connected to EVAP service port and EVAP canister purge volume control sole-

noid valve from EVAP canister purge control solenoid valve.

2. Start engine.

3. Perform “PURG VOL CONT/V” in “ACTIVE TEST” mode.

4. Touch “Qu” on CONSULT screen to increase “PURG VOL CONT/V” opening to 100%.

5. Check vacuum hose for vacuum when revving engine up to 2,000 rpm.
OK or NG

OK

>> GO TO 16.

NG

>> GO TO 14.

13.

CHECK EVAP CANISTER PURGE VOLUME CONTROL SOLENOID VALVE OPERATION

Without CONSULT

1. Start engine and warm it up to normal operating temperature.

2. Stop engine.

3. Disconnect vacuum hose connected to EVAP service port and EVAP canister purge volume control sole-

noid valve from EVAP canister purge control solenoid valve.

4. Start engine and let it idle for at least 80 seconds.

5. Check vacuum hose for vacuum when revving engine up to 2,000 rpm.

OK or NG

OK

>> GO TO 15.

NG

>> GO TO 14.

14.

CHECK VACUUM HOSE

Check vacuum hoses for clogging or disconnection. Refer to 

EC-32, "Description"

.

OK or NG

OK

>> GO TO 15.

BBIA0558E

Vacuum should exist.


Content   ..  301  302  303  304   ..